


EMBROIDERY PROCESS –
43
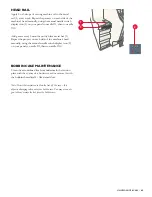
COMPLETING A CAP DESIGN
(START TO FINISH)
PREPARE
1. Install the cap driver. See the Cap driver installation section.
2. Set the cap and the backing on the cap embroidery hoop, on the cap station. See
the Cap embroidery hoop section.
3. Grab the extra fabric near the back of the cap and secure it with the supplied
binder clips, making sure the binder clips are facing inward. See the Framing
fabric section.
4. Insert the cap embroidery hoop onto the cap driver. See the Cap installation
section.
5. Insert the USB into the USB port on the right side of the panel. See the
Importing/uploading a design section.
6. Make sure the embroidery status setting is set to unlocked. See the Embroidery
status section.
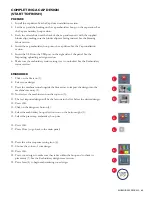
EMBROIDER
7. Click on the file icon (1).
8. Select your design.
9. Press the machine icon alongside the blue arrow to import the design into the
machine’s memory (2).
10. Now select the machine icon on the top row (3).
11. The last imported design will be the last one in the list. Select the desired design.
12. Press OK.
13. Click on the design set button (4).
14. Select the embroidery hoop selection icon on the bottom right (5).
15. Select the preset cap embroidery hoop size.
16. Press OK.
17. Press Close (to go back to the main panel).
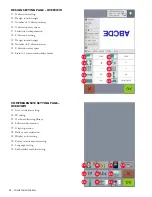
18. Press the color sequence setting icon (6).
19. Choose the colors of your design.
20. Press OK.
21. Trace your design to make sure that it fits within the hoop and to check its
placement (7). See the Embroidery design trace section.
22. Press Start (8) to begin embroidering your design.
1
2
3
4
5
6
7
8


