16
– PREPARATIONS
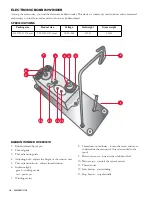
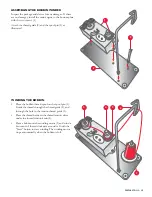
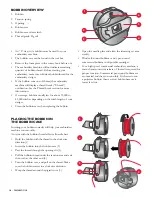
BOBBIN OVERVIEW
1. Bobbin
2. Tension spring
3. Opening
4. Bobbin case
5. Bobbin case release latch
6. Thread guide/Pig tail
• An “L” size/style bobbin must be used for your
embroidery machine.
• The bobbin case can be found in the tool box.
• Remove the foam piece in the rotary hook before use.
• The embroidery machine will not indicate remaining
quantity of bobbin thread. Before starting your
embroidery, make sure sufficient bobbin thread for the
embroidery design.
• If the bobbin runs out of thread, the embroidery
machine will display a thread break (“T-break”)
notification. See the Thread break section for more
information.
• On average, bobbins usually last for about 35,000 to
42,000 stitches depending on the stitch length of your
design.
• Clean the bobbin case when replacing the bobbin.
• Open the needle plate and clean the trimming set area
weekly.
• Wind self-wound bobbins or buy pre-wound
commercial bobbins in disposable cartridges.
• For a high speed, commercial embroidery machine, a
smooth and consistent release of thread is required for
proper function. Commercial pre-wound bobbins are
economical and they run smoothly. It is better to run
a polyester bobbin, than a cotton bobbin because it
leaves less lint.
PLACING THE BOBBIN IN
THE BOBBIN CASE
Inserting your bobbin correctly will help your embroidery
machine run smoothly.
An issue with the bobbin thread affects all needle bars.
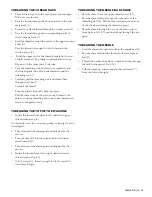
• Hold the bobbin with the thread in the clockwise
direction (1).
• Insert the bobbin into the bobbin case (2).
• Pass the thread through the opening slit (3).
• Pull the bobbin thread under the tension arm and exit
the notch at the other end (4).
• Turn the bobbin over, and pull on the thread. Make
sure the bobbin rotates in a clockwise direction.
• Wrap the thread around the pigtail twice (5).
1
4
3
2
6
1
4
2
5
3
5

