1–7
Company confidential. Pelican User’s Guide, Ed 1, Final. Freeze Status: frozen
This is the cyan on page 1–7 (seq: 21)
This is the black on page 1–7 (seq: 21)
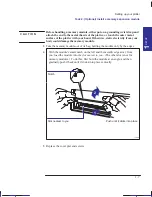
Before handling a memory module, either put on a grounding wrist strap and
attach the end to the metal chassis of the plotter, or touch the outer metal
surface of the plotter with your hand. Otherwise, static electricity from your
body could damage the memory module.
3
Take the memory module out of its bag, holding the module only by the edges.
4
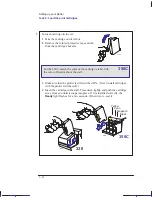
With the module’s small notch on the left and the metallic edge away from
you, load the module into the slot nearest to you. (The other slot is not for
memory modules.) To do this, first hold the module at an angle, and then
gradually push it back until it clicks into place vertically.
Notch
Push until it clicks into place
Slot nearest to you
1
2
1738a
5
Replace the cover plat and screws.
Localization Note JKCT: Similar to Parrot UG p1–7.
SETUP
1
C A U T I O N
Setting up your plotter
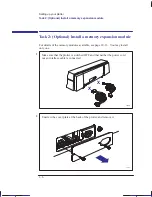
Task 2: (Optional) Install a memory expansion module
Содержание Designjet 330
Страница 1: ...C4699 90031 English HP DesignJet 330 and 350C Plotters User s Guide ...
Страница 4: ...iv ...
Страница 14: ...xiv ...
Страница 89: ...4 1 To cancel a plot 4 2 To copy a plot 4 2 To advance the media 4 3 PLOT 4 MANAGEMENT Managing your plots 4 ...
Страница 92: ...4 4 ...
Страница 114: ...6 12 ...
Страница 124: ...7 10 ...
Страница 125: ...8 1 FRONT PANEL 8 LIGHTS Front panel lights 8 ...
Страница 150: ...9 20 ...
Страница 170: ...10 20 ...
Страница 171: ...11 1 GLOSSARY 11 Glossary 11 ...
Страница 180: ......

