Hardware Description
p. 148
2. After the system has completely shut-down, carefully grasp the head of the power cord and
gently pull it out of the back of the power supply. Remove the cords from both power supply
modules.
3. Disconnect the cord from the power strip or wall outlet.
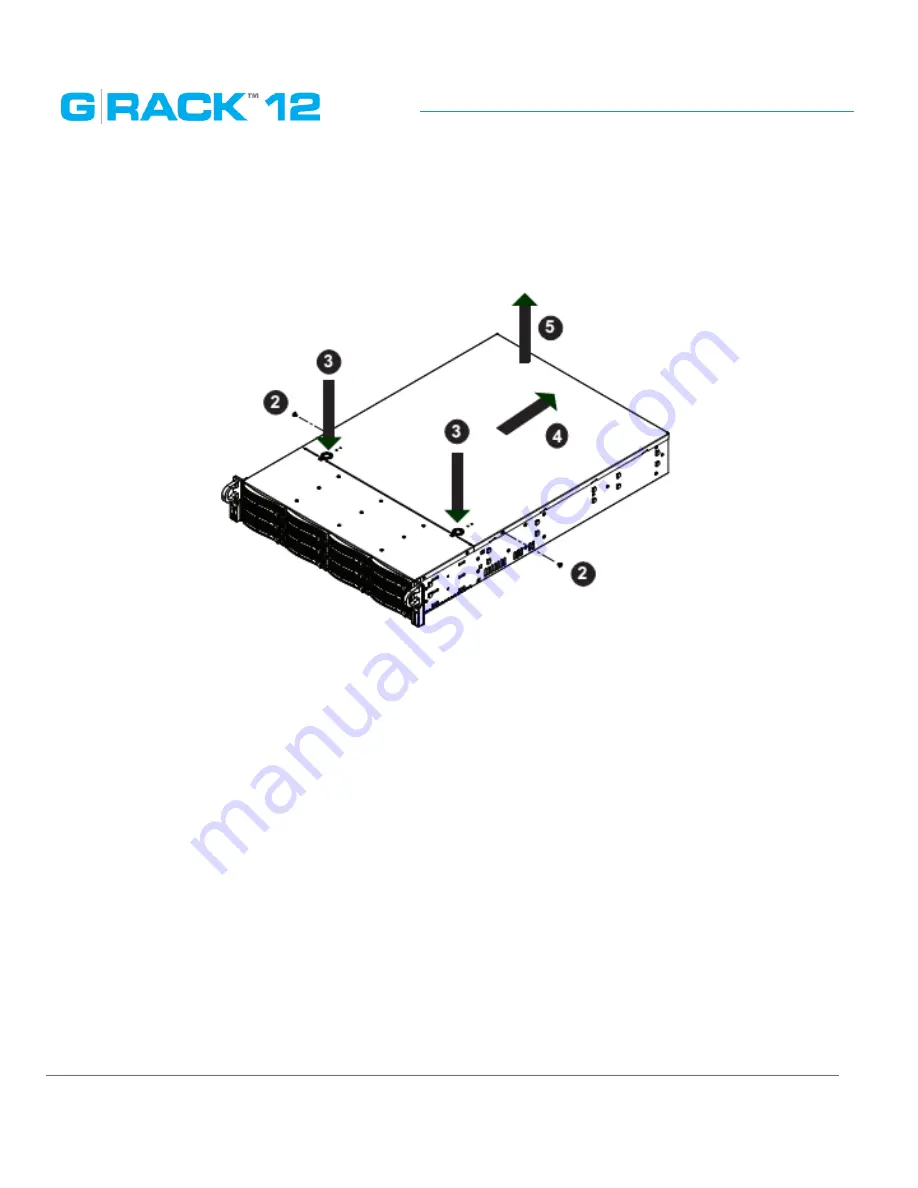
Removing the Chassis Cover
Removing the Chassis Cover
1. Power down the server as described in section 4-1, lay the chassis on a flat stable surface and
remove the chassis cover.
2. Remove the two screws from the sides of the chassis cover.
3. Press the release tabs to remove the cover from the locked position. Press both tabs at the same
time.
4. Once the top cover is released from the locked position, slide the cover toward the rear of the
chassis.
5. Lift the cover off the chassis.
Caution:
Except for short periods of time, do not operate the system without the cover in place. The
chassis cover must be in place to allow proper airflow and prevent overheating.
Содержание G-RACK 12
Страница 1: ......
Страница 2: ...Copyrights...
Страница 4: ...Introduction...
Страница 9: ...Getting Started...
Страница 12: ...Getting Started p 12 Front View Rear View...
Страница 31: ...Getting Started p 31 All settings can be changed manually in the G RACK 12 Administrative Tool at any time...
Страница 32: ...Administrative Tool...
Страница 41: ...Administrative Tool p 41 Delete Workspace To delete a workspace highlight the workspace and click Delete button...
Страница 48: ...Administrative Tool p 48 Extended information from smartctl utility...
Страница 77: ...Administrative Tool p 77 SMB CIFS Workspaces Add a workspace that will connect via SMB CIFS service...
Страница 92: ...Administrative Tool p 92 Comment Optional comment text box...
Страница 109: ...Administrative Tool p 109 Example error message...
Страница 124: ...Administrative Tool p 124 Memory usage Network interfaces...
Страница 130: ...Hardware Description...
Страница 159: ...Use Cases Tutorials...
Страница 180: ...Use Cases Tutorials p 180...
Страница 184: ...Use Cases Tutorials p 184 You need to click the enable slider to activate this option...
Страница 191: ...Use Cases Tutorials p 191 Lastly a review is presented before the shares are created...
Страница 192: ...Use Cases Tutorials p 192 Once you confirm the process starts...
Страница 215: ...Use Cases Tutorials p 215 6 The RAID is ready...
Страница 221: ...iSCSI Essentials...
Страница 228: ...iSCSI Essentials p 228 Links and references https en wikipedia org wiki ISCSI...
Страница 234: ...Troubleshooting...
Страница 247: ...F A Q...
Страница 272: ...Technical Support Warranty...
Страница 283: ...Glossary...
Страница 289: ...Appendices...


