Chapter 8 System Operation
PAGE 8- 26
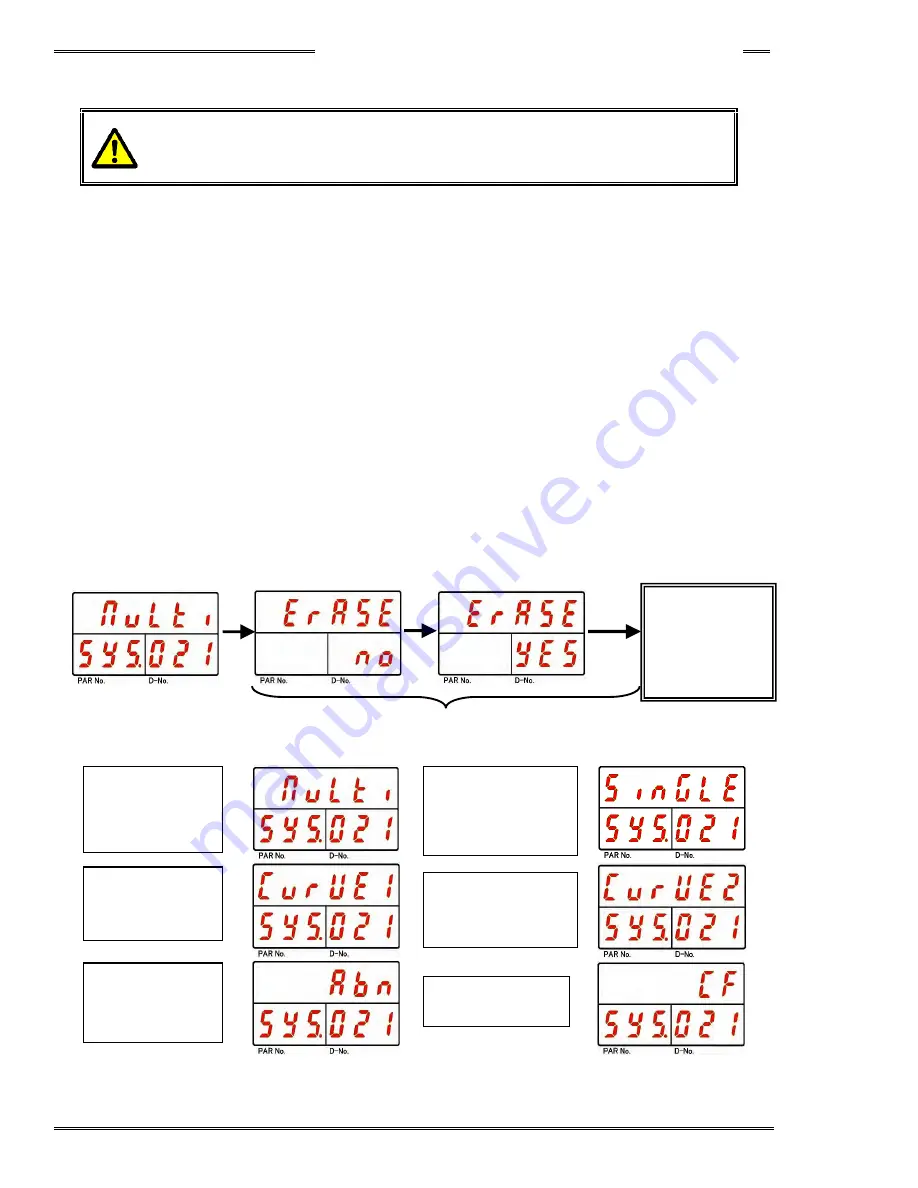
<Procedure for erasing the Fastening Results History>
All of the fastening results history saved in the controller can be erased with similar procedures.
・
・
・
・
Once the fastening results history is erased, the data cannot be retrieved.
Be careful when erasing the data.
Example: To erase a multi type fastening history (sequence operation)
1. Operate the arrow pushbuttons to make “Erase” with “SYS” indicated in the PAR No. display and
“021” indicated in the D-No. display.
2. Change the RUN/BYPASS switch on front panel to the BYPASS position or turn the I/O input
signal BYPASS to “ON” to put the Controller in BYPASS mode and then press the [SET]
pushbutton.
3. Press the [
▲
] or [
▼
] pushbutton to select “Multi” as the type of result history to be erased and then
press the [SET] pushbutton.
4. Press the [
▲
] or [
▼
] pushbutton to change the indication from “Erase NO” to “Erase YES” within 2
seconds, and then press the [SET] pushbutton within 2 seconds.
5. When the erasing of the fastening results history is started, “Erase” in the upper stage of the
display flashes, the MULTI LED and the COM. LED become lit in orange, the STATUS LED and
the JUDGE LED begin to flash in orange and all information in the fastening results history of the
type selected in procedure 2 are erased.
Example of other data types that can be erased:
Erasing of
Fastening
Results
History
Memory Card
Formatting
Erasing of
Single Fastening
Data History
Erasing of
Curve History
Erasing of
Reject Curve
History
Erasing of
Abnormal
History
Canceled if operation is not performed within 2 seconds.
Erasing of Multi
Fastening
History
[
◎
SET]
[
▲
] or [
▼
]
[
◎
SET]
Содержание AFC3000
Страница 1: ...AFC3000E HW 1 ...
Страница 17: ......
Страница 18: ...Chapter 1 Outline PAGE 1 1 Chapter 1 Outline 1 ...
Страница 25: ......
Страница 26: ...Chapter 2 Specifications PAGE 2 1 Chapter 2 Specifications 2 ...
Страница 34: ...Chapter 3 System Description PAGE 3 1 Chapter 3 System Description 3 ...
Страница 64: ...Chapter 4 Installation and Wiring PAGE 4 1 Chapter 4 Installation and Wiring 4 ...
Страница 131: ...Chapter 4 Installation and Wiring PAGE 4 68 Blank Page ...
Страница 132: ...Chapter 5 I O Expansion Unit Page 5 1 Chapter 5 I O Expansion Unit 5 ...
Страница 164: ...Chapter 6 Power up and Initial Checks PAGE 6 1 Chapter 6 Power Up and Initial Checks 6 ...
Страница 168: ...Chapter 7 Fastening Instructions PAGE 7 1 Chapter 7 Fastening Instructions 7 ...
Страница 207: ... Blank Page ...
Страница 208: ...Chapter 8 System Operation PAGE 8 1 Chapter 8 System Operation 8 ...
Страница 259: ...Chapter 8 System Operation PAGE 8 52 ...
Страница 260: ...Chapter 9 Maintenance Inspection PAGE 9 1 Chapter 9 Maintenance Inspection 9 ...
Страница 268: ...Chapter 10 Troubleshooting PAGE 10 1 Chapter 10 Troubleshooting 10 ...
Страница 294: ......


