Removing an Aspen 8810 PSU/Fan Controller
Extreme Networks Consolidated XOS Hardware Installation Guide
141
5
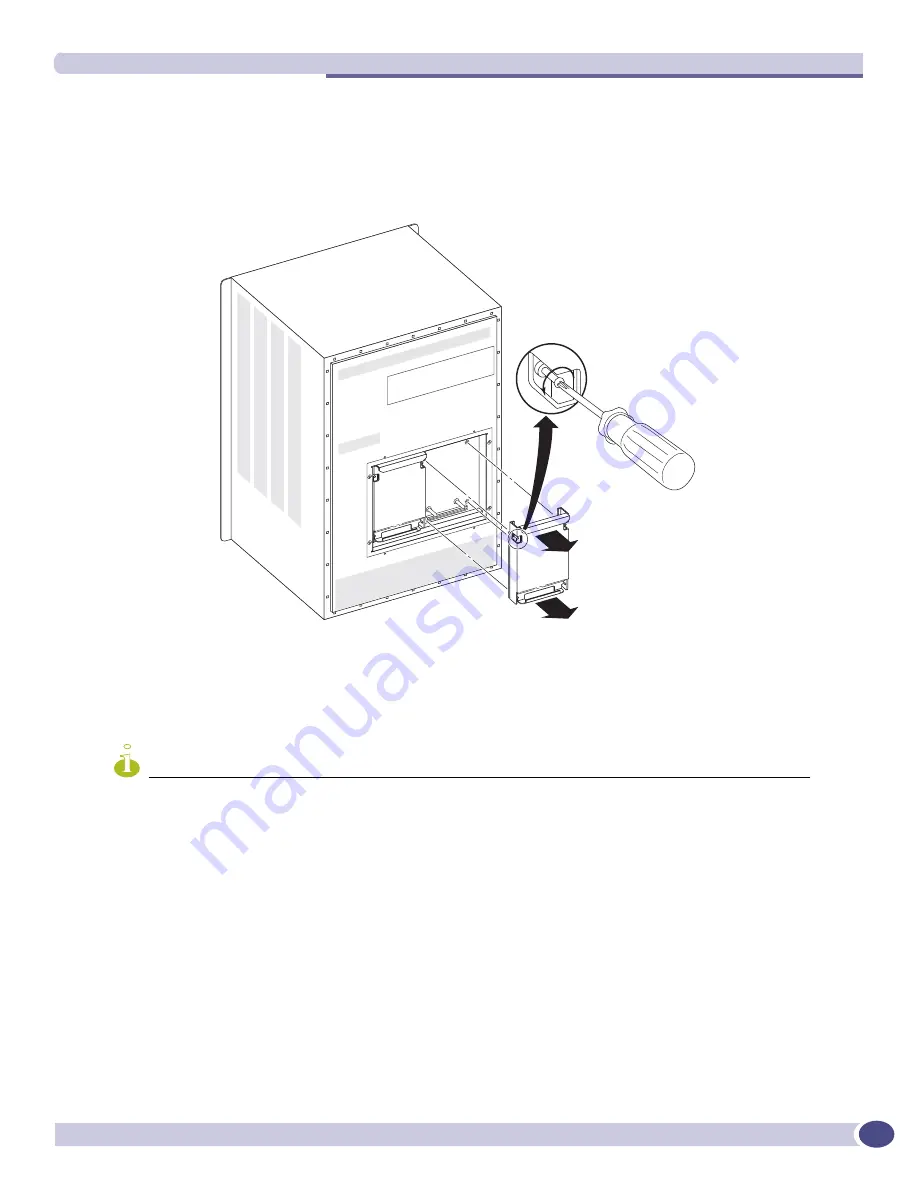
Locate the four captive screws on the PSU/fan controller located within the access panel as shown in
Figure 82
.
Figure 82: Four captive screws on the Aspen PSU/fan controller
6
Turn each captive screw counter-clockwise, using a #1 Phillips screwdriver, to loosen all four captive
screws on the PSU/fan controller also shown in
Figure 82
.
7
Gently pull the PSU/fan controller out from the access panel on the chassis.
NOTE
Leave the ESD-preventive wrist strap permanently connected to the chassis so that it is always available when you
need to handle ESD-sensitive components.
ASP033B
Loosen Captive
Screws (x4)
Remove
PSU/Fan
Controller
Содержание BlackDiamond 8810
Страница 8: ...Table of Contents Extreme Networks Consolidated XOS Hardware Installation Guide 8...
Страница 12: ...Preface Extreme Networks Consolidated XOS Hardware Installation Guide 12...
Страница 13: ...1 Site Preparation...
Страница 14: ......
Страница 36: ...Initial Management Access Extreme Networks Consolidated XOS Hardware Installation Guide 36...
Страница 37: ...2 Common Characteristics...
Страница 38: ......
Страница 57: ...3 BlackDiamond 10K Series Switch...
Страница 58: ......
Страница 76: ...BlackDiamond 10K System Chassis Extreme Networks Consolidated XOS Hardware Installation Guide 76...
Страница 100: ...BlackDiamond 10K Series I O Modules Extreme Networks Consolidated XOS Hardware Installation Guide 100...
Страница 105: ...4 Aspen Switch...
Страница 106: ......
Страница 136: ...Aspen 8810 MSM and I O Modules Extreme Networks Consolidated XOS Hardware Installation Guide 136...
Страница 147: ...5 Appendixes...
Страница 148: ......
Страница 157: ...Extreme Networks Consolidated XOS Hardware Installation Guide 157...
Страница 158: ...Technical Specifications Extreme Networks Consolidated XOS Hardware Installation Guide 158...


