


XTLplus International Series Installation and Programming Guide
Digital Monitoring Products
9
Entering Characters Using the Number Pad
1. Choose a character from the table.
2. Identify the
Number
the character correlates with and press it on the number pad.
3. Identify the
Select Key or Area
for that character and press that select key or area on the keypad. Press that
select key or area again to access the uppercase letter.
4. When the desired character displays on the keypad, return to Step 1 to enter another character or press
CMD
if finished.
Entering Characters Using the Standard Keyboard (Graphic Touchscreen Keypads)
• Press
ABC
to access uppercase letters.
• Press
abc
to access lowercase letters.
• Press
!@#
to access symbols.
• Press
123
to access the number pad.
Not all keypad prompts accept letters and/or symbols. For
example, pressing
P
on the
ENTER CODE
prompt could
display a
6
on the keypad.
Keypad Displays Current Programming
Each programming option displayed at the keypad shows the currently
selected option in the panel memory. These options are either shown as a number, a blank, or a NO or YES. To change
a number or blank to a new number, press any select key. The current option is replaced with a dash. Press the
number(s) on the keypad you want to enter as the new number for that option. It is not necessary to enter numbers
with leading zeros. The panel automatically right justifies the number when you press
CMD
.
To change a programming option that requires a NO or YES response, press the select key for the response not
selected. See Figure 13.
For example, if the current option is selected as YES and you want to change it to NO, press the third select key. The
display changes to NO. Press
CMD
to display the next option.
Programming Menu
Accessing the Programmer
To access the programmer function of the XTLplusINT:
1. Use a standard LCD keypad, connect to the PROG header, and set the keypad to Address 1.
2. Press the RESET button for two seconds.
3. Enter the code 665 (PRO). The keypad displays: PROGRAMMER.
You are now ready to start programming the XTLplusINT panel. Pressing
CMD
scrolls you through the programming
menu items listed below.
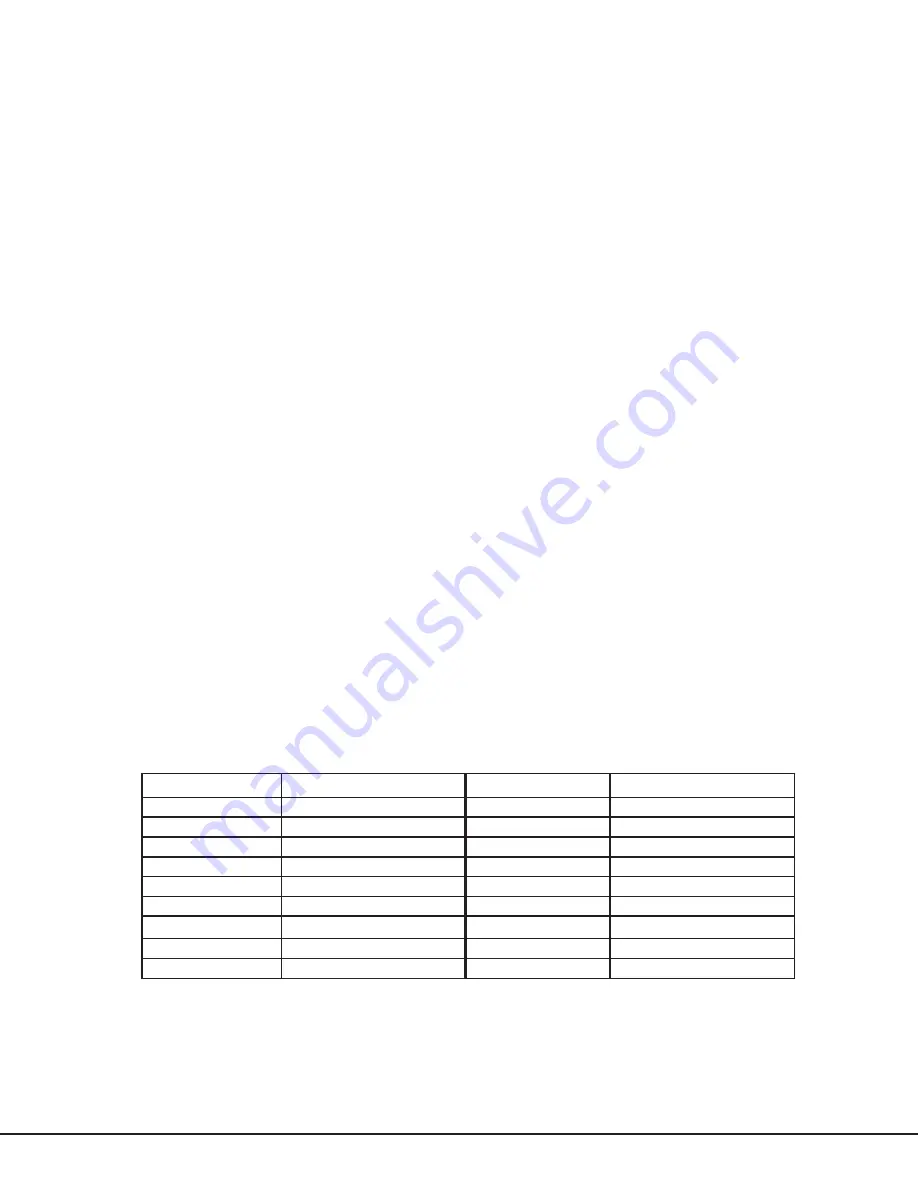
Menu Item
Section in This Manual
Menu Item
Section in This Manual
Initialization
20
Bell Options
29
Fast Program
21
Output Options
30
Communication
22
Output Setup
31
Network Options
23
Area Information
32
Messaging Setup
24
Zone Information
33
Device Setup
25
Stop
34
Remote Options
26
Set Lockout Code
35
System Reports
27
Appendix
36
System Options
28
To select a section for programming, press any select key when the name of that section displays on the keypad. The
detailed instructions for each programming step are found in sections 20 to 35 of this manual. Remove the hardwired
keypad when programming is completed.
Programmer Lockout Codes
Although the XTLplusINT panel allows you to access the Programming menu without a lockout code, it is available to
program one to restrict programming access to authorized individuals only. You can do this by using SET LOCKOUT
CODE at the end of the programming menu.


