Diagnostic Instruments SPOT Скачать руководство пользователя страница 88

Ch. 5 - Viewing, Editing, and Annotating Images

Edit - Image Quality

User's Guide to the SPOT Cooled Color Digital Camera, 6/9/98

88

c)


The program automatically multiplies all red, green, and blue values between the
new Bottom and Top values by the factor necessary to make the new full scale
setting equal to actual full scale after the new Bottom value (if you have defined
one) has been subtracted.  The thumbnail sample image updates automatically so
you can gauge the effect of your adjustments.

d)


Click on OK to save the image with the new Bottom (zero point) and Top (full
scale) values.

Adjust Histogram (HSL)

histogram

 is a graphical representation of the number of pixels at each brightness level

in an image.  Our HSL histogram displays the number of pixels at each luminance level.
The SPOT program's HSL histogram serves two main purposes:

§


It is a point of reference for examining the distribution of luminance levels in an
image.

§


It can be used to reset the zero and 100 % luminance points in an image.  This is
known as 

stretching

.  Like the aforementioned Stretch Bright and Dark Level

function, the Adjust Histogram (HSL) option enables you to stretch the darker areas
of your image to pure black and lighten the brighter areas to pure white (100 %
luminance).

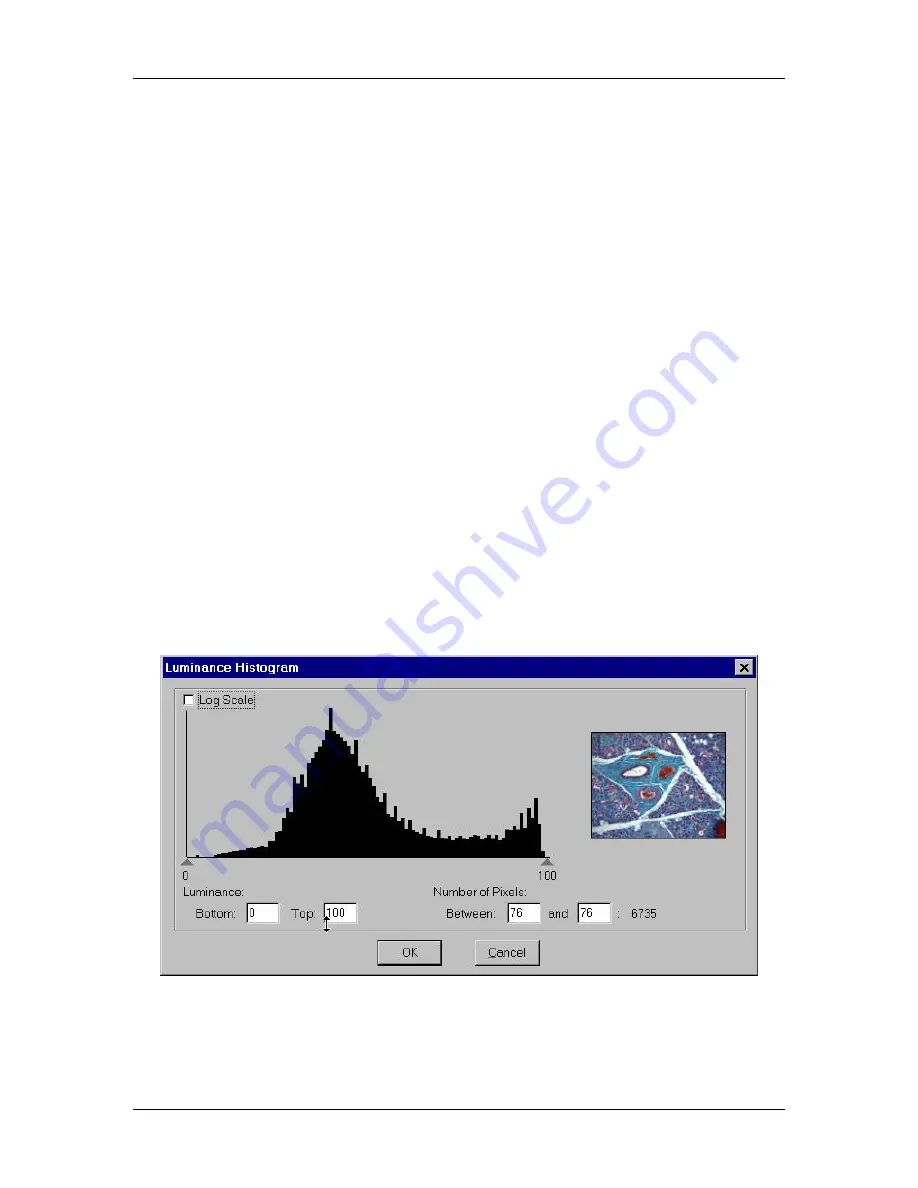
To use the Adjust Histogram (HSL) option, follow these steps:

1.


From the Edit menu, select Adjust HSL, Adjust Histogram.  The Luminance
Histogram window appears:

Содержание SPOT

Страница 1: ...avigating the SPOT Software 9 Ch 3 Preparing to Take a Picture 19 Ch 4 Taking a Picture 48 Ch 5 Viewing Editing and Annotating Images 65 Ch 6 Calibration and Measurement 103 Ch 7 Using SPOT Databases 107 Ch 8 Printing Options 124 Appendix A Specifications 132 Appendix B Changing the Dessicant 133 Appendix C Using SPOT s TWAIN Features 136 Appendix D Using the SPOT Image Pro Plus Driver 141 ...

Страница 2: ...of the software for each computer 2 TITLE Diagnostic Instruments retains title to the Software subject to your right to possess and use the software while the License is in effect You will agree to use your best efforts to protect the software from unauthorized use illegal reproduction or illicit distribution 3 COPYRIGHTS and TRADE SECRETS Diagnostic Instruments owns all rights regarding the Softw...

Страница 3: ...at are used throughout the manual Notes Note This is an example of a note Notes appear within the text to indicate information for further consideration or reference Cautions CAUTION This is an example of a cautionary note Cautionary notes appear to indicate that you should carefully consider the implications of an action Warnings MWARNINGM THIS IS AN EXAMPLE OF A WARNING WARNINGS INDICATE THAT TH...

Страница 4: ... the SPOT Cooled Color Digital Camera 6 9 98 4 Ch 1 Electronic Imaging Theory and the SPOT Camera Introduction 5 Digital Photography 5 Color Images 6 The SPOT Cooled Color Digital Camera 7 Three Pictures 7 Pixel Digitization 7 A Cooled CCD Chip 7 Gain 7 An Automated Exposure Process 8 ...

Страница 5: ...eckerboard is known as a picture element or more commonly a pixel The following is a simplified description of what happens when you take a picture with a digital camera 1 The camera s optical system forms images on the checkerboard of pixels 2 The CCD is exposed to the image for a period of time During this period each photo sensitive cell receives photons of light converts the photons to electro...

Страница 6: ...ter This design uses three CCD chips The incoming image first goes through a color beam splitter which directs the red light to one chip the green light to a second chip and the blue light to a third chip The chips are very accurately aligned so as to achieve near perfect registration between the three chips The red green and blue values for each point on an image are measured by the corresponding...

Страница 7: ...led CCD Chip The CCD chip in the SPOT camera is cooled in order to reduce thermal noise The effect of thermal noise on a digital image is similar to the snow that you see on your TV when tuned in to a station with a weak signal If you could reduce the snow i e the thermal noise the weak station or the dim image would be much clearer Cooling the CCD chip cuts the amount of thermal noise in half for...

Страница 8: ...ll Well Exposure Time sample 1 1 80 seconds 2 1 2 40 seconds 4 1 4 20 seconds 8 1 8 10 seconds 16 1 16 5 seconds An 80 second exposure at a gain of one turns into a 5 second exposure at gain 16 This is good in terms of the exposure time Unfortunately background noise is directly proportional to gain It is 16 times higher at a gain of 16 is than at a gain of one An Automated Exposure Process Normal...

Страница 9: ...lbar 11 File Save and Print Options 11 Image Capture and View Options 12 Image Annotation Options 12 The View Status Bar 13 Opening and Saving Files 14 Standard Windows Options 14 Open File 15 Save 15 Save As 15 Close 15 Delete 15 Print Print Setup 15 Exit 15 SPOT Specific Options 15 Open Database Image 15 Show File Thumbnails 16 Save to Database 17 Save All 17 Preliminary Settings 18 Preferences ...

Страница 10: ...Bar Each of these areas is discussed in the three sections that follow Menus The menus that appear at the top of the window vary according to whether an image is open and whether you are editing or annotating an image When you first open the software the only functions that are available are the file opening image setup and image capture options File opening The file open and save options are for ...

Страница 11: ...left hand side of the view status bar The Toolbar buttons can be classified into three categories File save and print options Image capture and view options Image annotation options As a default the Toolbar displays the file save print options and the image capture view options Note To use the image annotation options you must select the Annotate option from the Edit menu The annotation buttons th...

Страница 12: ...alues Zoom Show Pan Window Note Refer to Chapter 4 Taking a Picture and Chapter 5 Viewing Editing and Annotating Images for more details on these options Image Annotation Options In addition to editing an image for resolution clarity and color the SPOT software allows you to annotate images by adding explanatory text and illustrations Note Image annotation is described in detail in Chapter 5 Viewi...

Страница 13: ...ote For a detailed discussion of pixel bit depth refer to Chapter 3 Preparing to Take a Picture X Y pixel coordinates As you move your cursor over an image the view status bar displays the x y coordinates in pixels Thus for an image that uses the entire CCD chip the values for the upper left corner of the image would be 0 0 while the lower right values would read 1315 1035 Brightness values As you...

Страница 14: ...image setup to the list Note Refer to Chapter 3 Preparing to Take a Picture for more information on image setups Opening and Saving Files All of the file open and save options in the SPOT program can be accessed from the File menu and the Toolbar The file open and save options in the SPOT software can be classified into two categories Standard Windows options SPOT specific options These options ar...

Страница 15: ...ile location Close Use the Close option to close an image The program prompts you to specify a location to save the file Delete Use the Delete option to delete an open image The program prompts you to verify the deletion Print Print Setup Refer to Chapter 8 Printing Options for information on standard Windows and SPOT custom printing features Exit Exit the SPOT program SPOT Specific Options The fo...

Страница 16: ...e Image ID appears in its own column If the search results are displayed as thumbnails right click on the thumbnail to display associated information including the Image ID Show File Thumbnails Use the Show File Thumbnails option to display thumbnail previews of specified files You can open the image from the preview screen To use the Show File Thumbnails options follow these steps 1 From the File...

Страница 17: ... follow these steps 1 Ensure that the database that you want to save the image to is open 2 From the File menu select the Save to Database option or click on the Save to Database Toolbar button 3 The Save Image to Database window appears Enter the appropriate information for the database Note For details on saving images to a SPOT database refer to Chapter 7 Using SPOT Databases Save All Use the S...

Страница 18: ... and 100 to set the JPEG quality for images JPEG quality refers to the level of compression for JPEG images A value of one is the most compressed and lowest image quality while a value of 100 is the least compressed and highest image quality The default setting is 100 4 Determine whether images should open in Fit to Window mode This box is checked as a default If this option is selected the progra...

Страница 19: ...8 and 12 bit mono 26 Use Red Green Blue 24 and 36 bit RGB 27 Color Order 24 and 36 bit RGB 27 Binning 28 Image Type Auto Exposure 29 Auto Gain Limit Auto Exposure 8 bit and 24 bit 29 Adjustment Factor Auto Exposure 31 White Balance Auto Exposure 24 and 36 bit RGB 31 Exposure Time s User Defined Exposure 33 Gain User Defined Exposure 8 bit and 24 bit 36 Image Area 37 Auto Corrections 38 Chip Defect...

Страница 20: ...cording to settings that are entered in four general categories Pixel Bit Depth Image Depth resolution Exposure Image Area Auto Corrections post exposure adjustments Note Each of these items will be discussed in more detail in the sections that follow So if your work involves samples where the specimen is typically the brightest part of an image i e fluorescence you can set the Image Type exposure...

Страница 21: ...e of the following options Add To create a new image setup click on the Add button The Image Setup dialog box appears Modify To edit an existing image setup select a setup from the list and click on the Modify button The Image Setup window appears Note The Factory Defaults setup cannot be modified Delete To delete an image setup select a setup from the list and click on the Delete button Current T...

Страница 22: ...associated settings Shortcuts The SPOT program provides quick access to the Image Setup screen via a selection tab that appears in the bottom right hand corner of your screen The tab displays the name of the current active Image Setup To change the current active Image Setup left click on the tab and select the new Image Setup To go directly to a new Image Setup or to modify an existing Image Setu...

Страница 23: ...e number of bits per pixel bpp that the camera uses to create an image The program provides four options 8 bpp monochrome 12 bpp monochrome 24 bpp color 36 bpp color The 24 bpp RGB color setting is the most common selection because it is an industry standard color format that is used by Windows and most printers In addition most monitors cannot display more than 24 bpp To select a Pixel Bit Depth ...

Страница 24: ... 94 Mb 24 bpp RGB color The 24 bit setting provides 8 bits per color per pixel i e 8 x 3 24 As noted the 24 bit setting is the most common choice for most users because it is an industry standard in terms of printing the Windows operating system and monitor display This setting meets the needs of most users A typical 24 bpp image is 3 88 Mb 36 bpp RGB color The 36 bit setting provides 12 bits per ...

Страница 25: ...the image capture and uses the values to calculate the final exposure time When you select the User Defined Exposure option you have three options You can type in values for the red green and blue exposure times You can use the Compute Exposure option to calculate and insert the exposure times and gain for you You can use the Recall Previous Exposure option to recall and insert the exposure times ...

Страница 26: ...rome picture SPOT2 SPOT2 users can slide the camera s color filter out of the light path to produce an entirely unfiltered image With the filter out of the light path it does not matter which color is selected In order to ensure a high image quality SPOT users should select the color that is closest to the color of the specimen Selection of the wrong filter color blocks the desired color For examp...

Страница 27: ...r 24 color or 36 color 2 Click on either the Auto Exposure or the User Defined Exposure option 3 Deselect one or two of the color option boxes or leave all three checked Red Green Blue Note In order to save the image setup at least one color must be selected SPOT2 If capturing an unfiltered image it does not matter which color you select Color Order 24 and 36 bit RGB In addition to allowing you to...

Страница 28: ...fore more sensitive to light Binning has three effects on image processing Light sensitivity is increased Download time is decreased Resolution is decreased Binning is particularly helpful when you want to drastically reduce exposure and download times for dim images and you don t mind a decreased resolution The SPOT camera offers four binning options each of which is illustrated in the table belo...

Страница 29: ...mera Darkfield Use the Darkfield setting for images where the specimen is the brightest part of the image The Darkfield setting instructs the camera to correctly expose the brightest parts of the picture i e the specimen The Darkfield setting is ideal for capturing fluorescent images The following two pictures illustrate a typical bright field image and a typical dark field image Figure 1 Typical ...

Страница 30: ...conds 2 1 2 40 seconds 4 1 4 20 seconds 8 1 8 10 seconds 16 1 16 5 seconds The advantage of allowing the camera to use a higher gain level for dim images is that the exposure time is reduced significantly For each doubling of gain number exposure time is halved Thus an image with an exposure time of 5 minutes at full scale a gain of 1 would take only 1 25 minutes at a gain of 4 Unfortunately backg...

Страница 31: ...hat appear when capturing images of metallic objects Over exposing the glints is necessary to correctly expose the non glinted areas To set the adjustment factor click on the scroll bar and enter a number between 25 and 32 Note The software includes two default Image Setups that you can use to handle images with glints Glints 1 and Glints 2 White Balance Auto Exposure 24 and 36 bit RGB White balan...

Страница 32: ...roscopy position the slide so that the specimen is not in the field of view but light is going through the slide near the specimen For brightfield metallurgical microscopy replace your sample with a mirror For low magnification work using an EPI illuminator shining a light on the top of your specimen from off to one side replace your sample with a white sheet of paper Note EPI illumination is usua...

Страница 33: ...e blue value is often much higher than the red and green values 8 To change the setup that the new white balance values are saved to click on Save to Setup scroll bar and select a setup from the list 9 Click on OK 10 The program returns to the main screen 11 To edit the white balance values that you saved open the image setup i e Brightfield from the previous example The values should appear in th...

Страница 34: ...n arrows or type in a value in seconds for the exposure time The minimum exposure time is 80 milliseconds 080 seconds per color The maximum exposure time is 17 minutes 1020 seconds per color 3 Click on the OK button to save the settings To have the camera calculate the exposure time follow these steps 1 Close the Image Setup window 2 Close the Image Setups dialog box 3 From the Camera menu select ...

Страница 35: ...essage changes to Computing exposure You should hear a series of clicks as the camera samples the light 7 When the camera finishes the Exposure window displays the calculated exposure times and gains as illustrated here 8 Select an image setup from the Save to Setup scroll bar The current image setup should appear as the default 9 Click on OK When you open the Image Setup window the new exposure v...

Страница 36: ...tting As with exposure you can enter a specific gain in three ways You can manually enter the gain by selecting one of the five gain options from the selection list You can let the camera compute the best gain and exposure times by using the Compute Exposure feature Note Refer to the previous section for details on using the Compute Exposure feature The gain displayed in the Exposure window is aut...

Страница 37: ...There are three image area options Full Chip Use the Full Chip option to capture the entire area of the CCD chip Center Use the Center option to capture a rectangular part of the CCD chip s area that has the same ratio of height to width as the full chip and is centered on the center of the full chip The percentage that you enter is the percentage of full chip width that the new area s width will ...

Страница 38: ...dotted border appears around the area of the image that you selected e From the Camera menu select the Set Image Region option The Image Region window displays the pixel values for the region that you selected as illustrated below f Click on OK to save the region values to the current image setup or select a different image setup The region values are now saved to the Image Setup Auto Corrections ...

Страница 39: ...ls by more than plus or minus the entered percentage it is replaced with the average value of the surrounding eight pixels To activate the Noise Filter option check the Noise Filter box and enter a value between 10 and 100 The default value is 50 The program automatically runs the noise filter each time an image is captured with that image setup Image Size Double When you select the Image Size Dou...

Страница 40: ...hen the bright areas of these types of images are correctly exposed the darker areas are sometimes so dark that they are in effect invisible Using the Gamma Adjust option can remedy this problem The screen captures on the following page illustrate the effect of a gamma adjust on a fluorescent image The image on the left is the original image prior to the gamma adjust The image on the right has bee...

Страница 41: ...l value full scale remains white at all gamma values Gamma values greater than one lift the darker areas of the original image into the brighter areas of the new image A gamma curve is smooth there are no unexpected jumps or cutoffs This means that when viewing a gamma adjusted image you will be able to see the details intensity differences in both the black and white areas of the image To use the...

Страница 42: ...that have only simple red green or blue colors The brightest areas might turn out white or pastel The RGB option is ideal for images with simple red green and blue primary colors It is not recommended for images with many subtle hues The hue of subtly colored dark areas tends to change as they are lightened while bright saturated colors remain saturated The RGB option is recommended for most fluor...

Страница 43: ...you will notice this glow while looking at the specimen under the microscope other times you will only notice it after you have already captured an image The Background Subtract option works by taking two pictures of a slide using the same exposure and gain settings a foreground image that contains the specimen and the background glow and a background image that contains only the background glow W...

Страница 44: ...sired objective and in focus 2 From the Camera menu select the Get Background Image option The following window appears 3 Click on the Begin button The following window appears 4 If the specimen is not in the objective s field of view move it into place and click on OK The Get Background Image window appears 5 You should hear a series of clicks as the camera computes the exposure time The followin...

Страница 45: ...ou might want to name the background file according to the objective s magnification i e 10x 9 Choose the file location that you will save the background image to The program automatically saves the background image file to the c SpotCam bkgdimgs directory To specify a different directory click on the square to the right of the File Name box and browse for a location Note The default file location...

Страница 46: ... option is used to correct for display problems associated with uneven intensity or coloration in your illumination or artifacts i e dust in your optical system It is used mainly with brightfield images The Flatfield Correct option is similar to the Background Subtract option in that it is a process that involves two images In the case of flat field correction the flatfield image and the final ima...

Страница 47: ...nification i e 10x 6 Specify the image setup that will be associated with this flatfield image file when using the Flatfield Correct option The current setup is the default When you open the setup the Flatfield Correct option is selected 7 Click on OK If you do not specify a directory path the program automatically saves the flat field file to the c SpotCam Fltflds directory Note The default file ...

Страница 48: ...49 Capturing Initial and Final Images 50 Get Image exposure from setup 50 Get Image last used exposure 51 Captures for Preparation and Modification 52 Set Image Region 52 Compute Exposure 53 Recall Previous Exposure 55 Compute White Balance Values 56 Get Background Image 58 Get Flatfield Image 59 Framing and Focusing 60 Frame 60 Focus 62 ...

Страница 49: ...e ND12 and ND6 filter into the light path Ensure that the specimen is in focus 2 Choose an existing image setup or define a new image setup Refer to Chapter 3 Preparing to Take a Picture for more information 3 Perform a white balance to ensure that the colors of your specimen will display accurately Refer to the Compute White Balance Values section of this chapter for more information 4 Use the Ge...

Страница 50: ...have prepared the microscope and specimen To capture an image using the current image setup follow these steps 1 Determine or define the image setup that you want to use and set it as the Current setting i e select the Current option from the Image Setups dialog box 2 From the Camera menu select the Get Image exposure from setup option Shortcuts To get an image you can also use one of the followin...

Страница 51: ...e for any one of the values i e red green or blue is more than two seconds a countdown clock displays the time 5 The newly captured image appears on screen for modification editing or annotation Following an image capture several noticeable changes take place in the appearance of the main SPOT screen The Edit and View menus become available The editing save and print related toolbar buttons are av...

Страница 52: ...nly displays the exposure times and the gain because the camera no longer needs to sample the image brightness This shortens the exposure process Captures for Preparation and Modification The following options allow you to customize the image capture process through the following pre and post exposure adjustments Set Image Region Compute Exposure Recall Previous Exposure Compute White Balance Valu...

Страница 53: ...ct a different image setup The region values are now saved to the image setup Note The image setup will automatically use the region values that you specified for subsequent image captures Refer to Chapter 3 Preparing to Take a Picture for other region capture techniques 6 Select either the Get Image exposure from setup option or the Get Image last used exposure option The new image capture displa...

Страница 54: ...ow 3 For your review the Compute Exposure window displays the image setup options for the current setup that directly affect the computation The entries for these options can be modified from this window but if you do so you also change the current image setup If you want to save the exposure times to a different image setup enter the settings for that setup Note For information on entering Image ...

Страница 55: ...sure 7 Click on OK When you open the Image Setup window the new exposure value s should display 8 Select the Get Image exposure from setup option to capture the image using the new exposure values Recall Previous Exposure Use the Recall Previous Exposure option to assign the exposure times and gain from your last image capture to an image setup This feature is helpful when you determine that a spe...

Страница 56: ... is the ratio of red green and blue exposure times necessary to achieve the proper color rendition for an image Many factors impact the coloration of an image capture including lamp voltage coloration of the slide and coloration of the micro scope s objectives In order to minimize the impact of these factors the Compute White Balance feature samples the color of your light source and calculates th...

Страница 57: ...g table Sample Type Point of Reference Transmitted light non fluorescent Clear part of the slide Reflected light non fluorescent Mirror Macroscopic White piece of paper Because fluorescent images are darkfield images i e the background is darker than the specimen white balances are not necessary 3 From the Camera menu select the Compute White Balance Values option or use the toolbar and click on t...

Страница 58: ... that the new white balance values are saved to click on Save to Setup scroll bar and select a setup from the list 9 Click on OK 10 The program returns to the main screen 11 To edit the white balance values that you saved open the image setup i e Brightfield from the previous example The values should appear in the Red Green and Blue selection bars Edit the values as needed Get Background Image Th...

Страница 59: ...ring to Take a Picture Get Flatfield Image The Get Flatfield option is the first step in the Flatfield Correct process described in Chapter 3 Preparing to Take a Picture The Flatfield Correct process corrects display problems associated with uneven lighting or artifacts i e dust in your optical system It is used mainly with brightfield images The Flatfield Correct option is similar to the Backgrou...

Страница 60: ...and desired resolution Frame The Frame option allows you to ensure that an image is correctly positioned before capturing an image In other words the Frame option enables you to ensure that everything that you want to appear in the final image will be there Consider the following image capture The image captured in the above diagram is off center Using the Frame option you can adjust the position ...

Страница 61: ... the Fast setting so that the update rate is quick and the lag time between making the adjustments and seeing the update is less noticeable However the brightness of the initial image plays an important part in selecting an update rate Dimmer images for example require slower updates in order to produce high quality images Note Refer to Table 1 in the Focus section of this chapter for a comparison...

Страница 62: ...tead of the rectangle 3 Move the rectangle to the area of the image that you want to focus on To move the rectangle use one of the following techniques Left click and drag the rectangle to the appropriate position Left click on the area of the image that you want to focus on The rectangle moves to the position that you click on 4 To open the Focus window and select the focusing options either doub...

Страница 63: ...e quality and image brightness Shutter Speed Image Quality Image Brightness Variable Slowest approx 1 frames 2 secs Slow approx 1 frames sec Medium approx 3 frames sec Fast approx 5 frames sec Highest Lowest Dimmest Brightest 8 Modify the Exposure Adjustment as needed Enter a value between 25 and 8 or move the selection bar to the desired position The contrast of the image area changes as you move...

Страница 64: ...era 6 9 98 64 11 When the image appears as you want it to click on the Stop button 12 Click on the Close button 13 From the Camera menu select the Get Image exposure from setup option Alternatively you can either click on the associated toolbar button or press F 9 14 The focused image appears ...

Страница 65: ...3 Resize 73 Flip Horizontal 74 Flip Vertical 74 Rotate Right 74 Rotate Left 75 Crop 75 Image Quality 75 Adjust RGB Adjust HSL 75 Adjust RGB or Adjust HSL Which One Should I Use 76 Adjust Brightness additive RGB 77 Adjust Brightness multiplicative RGB 78 Adjust Hue Saturation and Luminance HSL 79 Adjust Contrast RGB 80 Adjust Contrast HSL 80 Adjust Gamma RGB 81 Adjust Gamma HSL 83 Stretch Bright an...

Страница 66: ...Guide to the SPOT Cooled Color Digital Camera 6 9 98 66 Sharpen 91 Smooth 91 Filter Noise 92 Customizing Images 93 Combine Images 93 Change Pixel Bit Depth 96 Merge Images 97 Annotate 99 Annotation Toolbar Buttons Object Menu 100 The Attributes Menu 101 Edit Options 101 ...

Страница 67: ...ach option with the exception of Show Measurements is discussed in the sections that follow Note The Show Measurements option is discussed in Chapter 6 Calibration and Measurement Fit in Window The Fit in Window option allows you to view the whole image regardless of the window size Typically reducing the size of a window also cuts off part of the image The Fit in Window option solves this problem...

Страница 68: ...magnifying glass and the Zoom toolbar button becomes active The precise reference point for the zoom location is indicated by the white dot in the center of the magnifying glass The row and column numbers at the bottom of the screen indicate the exact position of the white dot as you move the magnifying glass over the image Shortcuts You can also use one of the following two methods to zoom in on ...

Страница 69: ...f the screen which then allows you to view the brightness value for the individual pixel The following is a section of a magnified image with the show grid lines option turned on All of the standard save view and edit options with three exceptions can be performed while the software is in the zoom show grid lines mode The exceptions are Show Measurements Annotate Crop To use the Show Grid Lines op...

Страница 70: ... area of interest This tedious process is replaced by the pan window When you select the Show Pan Window option a smaller version of the image appears with a color negative over the area of the image that you are zoomed in on To move to a new area of the image while zoomed in either drag the colored rectangle to the new location or left click on the location To use the pan window follow these step...

Страница 71: ...t changes from a magnifying glass to a four arrow pointer To move to a different area of the text either left click on the rectangle and drag it to the new location or left click on the new location 4 When you are finished viewing the image close the Pan Window Edit The Edit menu contains several different categories of editing options as illustrated in the following table Editing Category Menu Op...

Страница 72: ... Undo Use the Undo option to undo the last edit that you made Unlike some Windows programs you cannot undo more than one level of edits To undo an edit select the Undo option from the Edit menu Copy to Clipboard Use the Copy to Clipboard option to copy all or part of an image onto the clipboard for insertion into another program The Copy to Clipboard feature is identical to the Windows Copy comman...

Страница 73: ...intains aspect ratio so enlarged and reduced images will not be distorted When you reduce or enlarge an image keep the following in mind Reduction Resolution number of pixels and file size decrease Enlargement number of pixels and file size increase Thus the trade off for higher resolution images is increased file size The resize option lets you specify the percentage by which you want to increase...

Страница 74: ... or the Height box The SPOT program automatically calculates the dimension not entered in order to maintain the proper aspect ratio If you enter a number that is too large or too small the program displays an error message 3 Click on OK to resize the image The newly sized image replaces the original image on the screen Note If you want to create two differently sized images of an image for compari...

Страница 75: ...fter it has been captured These tools enable you to enhance the appearance of an image in ways that are not possible with conventional photography Adjust RGB Adjust HSL The SPOT software gives you precise control over the coloration brightness and contrast of your final image The Adjust RGB Red Green Blue and Adjust HSL Hue Saturation Luminance options are two different ways to make use of SPOT s ...

Страница 76: ...tasks but in different ways they are suited to different image types The following table compares the methodologies and lists some situations in which either the RGB or the HSL color space might be preferable to use in image editing RGB HSL Color Translation None Editing in the RGB color space operates directly on the red green and blue values read by the camera 1 RGB values are translated into th...

Страница 77: ...amma Adjust Gamma Stretch Bright and Dark Level Stretch Bright and Dark Level Adjust Histogram Adjust Histogram Adjust Brightness additive RGB Use the Adjust Brightness additive option to lighten or darken an entire image This function adds or subtracts the specified number s from the red green and blue values for every pixel in the image Because this is an additive function it affects bright and ...

Страница 78: ...number s that you specify Because this option is multiplicative it affects bright areas more than dark areas Like the Adjust Brightness additive option the multiplicative option enables you to either adjust the RGB values together or as individual units To use the Adjust Brightness multiplicative function follow these steps 1 From the Edit menu select Adjust RGB and Adjust Brightness multiplicativ...

Страница 79: ...ther type in the HSL values or use the slider bars to select the values Each value uses its own scale and must be entered separately The thumbnail version of the image changes as you make the adjustments Hue Enter an angle value between 180 and 180 This number represents the amount that the color wheel is rotated for each pixel in the image Saturation Enter a number between 100 and 100 This number...

Страница 80: ...t equally for red green and blue values enter a number in any one of the three boxes or use a slider bar to specify a number between 0 pure gray no contrast and 5 maximum contrast To modify an image s contrast by specifying separate red green and blue values deselect the Lock RGB box and enter a value for each color 3 Click on OK The new image appears on screen replacing the original image Adjust ...

Страница 81: ...age enter a value below one the base value 3 Click on OK The new image appears on screen replacing the original image Adjust Gamma RGB Use the Adjust Gamma option to smoothly lighten darker areas of an image without burning out bright areas or lightening black areas The Adjust Gamma option is particularly useful when capturing images with a wide dynamic range meaning the range of brightness values...

Страница 82: ...nal Image g a m m a 1 gamma 1 gamma 1 full scale full scale 0 0 The above graph demonstrates some of the basic principles of gamma adjustment Black pixel value 0 remains black at all gamma values White pixel value full scale remains white at all gamma values Gamma values greater than one lift the darker areas of the original image into the brighter areas of the new image A gamma curve is smooth th...

Страница 83: ... and enter a value for each color Note The ability to deselect the Lock RGB box and enter specific RGB values distinguishes the use of the Adjust Gamma menu option from the Gamma Adjust option on the Image Setup window see Ch 3 Preparing to Take a Picture 3 Click on OK The new image appears on screen replacing the original image Adjust Gamma HSL The Adjust Gamma HSL option works in exactly the sam...

Страница 84: ... Enter a value between 1 and 4 or use the slider bar to select a value The thumbnail preview of the image changes as you adjust the value To lighten the mid tones of an image enter a gamma value above one To darken the mid tones of an image enter a gamma value below one 3 Click on OK The new image appears on screen replacing the original image Stretch Bright and Dark Level RGB The Stretch Bright a...

Страница 85: ...h images reduces the potential for washed out images and color shifts To use the Stretch Bright and Dark Level HSL option select Adjust HSL Stretch Bright and Dark Level from the Edit menu The picture automatically adjusts itself Adjust Histogram RGB A histogram is a graphical representation of the number of pixels at each brightness level in an image Our RGB histogram displays the red green and b...

Страница 86: ... the histogram Determine the color or colors that you want to display brightness values for As a default the histogram displays all three values To display a different combination of colors deselect the Show box for the unwanted color s To display the histogram according to a logarithmic scale as opposed to a linear scale shown above check the Log Scale box Checking the Log Scale box makes the ver...

Страница 87: ...en the two brightness levels Stretch the image Follow these steps a Drag the left triangle on the X axis to the brightness level that you want to define as zero All red green and blue values that are less than or equal to this level are now reset to zero b Drag the right triangle on the X axis to the brightness level that you want to define as full scale All red green and blue values that are grea...

Страница 88: ... A histogram is a graphical representation of the number of pixels at each brightness level in an image Our HSL histogram displays the number of pixels at each luminance level The SPOT program s HSL histogram serves two main purposes It is a point of reference for examining the distribution of luminance levels in an image It can be used to reset the zero and 100 luminance points in an image This i...

Страница 89: ...l Do one of the following Move the cursor along the graph to display the number of pixels at each luminance level Type the same luminance level into both boxes under Number of Pixels The histogram readouts display the number of pixels at that luminance level Examine the number of pixels between two brightness levels Do one of the following Position the cursor over one luminance level on the graph ...

Страница 90: ...ve the image with the new black and white luminance values Or a Type the luminance value that you want to define as black 0 luminance into the Bottom box under Luminance All luminance values that are less than or equal to this level are now reset to black 0 luminance b Type the luminance value that you want to define as white 100 luminance into the Top box under Luminance All luminance values that...

Страница 91: ...sharpen the appearance of an image follow these steps 1 From the Edit menu select Sharpen The following window appears 2 Either use the slider bar to select a Strength value between one and 100 or enter the value in the box The Strength value is set as a default to 0 the value used to represent an unmodified image On the opposite end of the scale a value of 100 represents an image that has been sh...

Страница 92: ...ed image replaces the original Filter Noise Use the Filter Noise option to correct for the effects of electrical or thermal noise The Filter Noise option eliminates single isolated pixels that appear out of place due to electrical or thermal noise by checking each pixel on the CCD chip three times corresponding to the red green and blue filters If the brightness value for a pixel differs from all ...

Страница 93: ... an image from a selected open image This option allows researchers using double and triple stained fluorescence techniques to excite one dye at a time capture a color image of each excitation and then add the individual images together to create a composite image that illustrates excitation of all the dyes Change Pixel Bit Depth This option allows you to change from one bit depth to any of the ot...

Страница 94: ...age to itself An Image File Select Image File to add a file from disk to the currently open selected image Either enter the file path in the box or click on the browse button to the right of the box to search for and select a file from disk A Database Select Database to add a file from a SPOT database to the currently open selected image To add an image from a SPOT database you must enter the Imag...

Страница 95: ... the selected image Thus it is possible to subtract an image from itself An Image File Select Image File to subtract a file from disk from the currently open selected image Either enter the file path in the box or click on the browse button to the right of the box to search for and select a file from disk A Database Select Database to subtract a SPOT database image from the currently open selected...

Страница 96: ...hange the image to Consider the following situations Changing from one monochrome bit depth to another i e 8 bit to 12 bit or from one RGB bit depth to another 24 bit to 36 bit does not require the addition of any color channeling information In this case select the new pixel bit depth and click on OK CAUTION If you are changing an image to either 12 bit or 36 bit pixel bit depth you must save the...

Страница 97: ...tton The following dialog box appears Note If you changed your image to a 12 bit pixel bit depth the File Bit Depth box prompts you to save it either as 12 bpp or 16 bpp If you changed your image to a 36 bit pixel bit depth the File Bit Depth box prompts you to save it either as 36 bpp or 48 bpp The additional choices enable you to create versions of your images for use in other applications such ...

Страница 98: ...ch color channel select the source of the image that you want to merge into the new image The source can be A Currently Open Image Select Currently Open Image to merge a currently open image An Image File Select Image File to merge a file from disk or click on the browse button to the right of the box to search for and select a file from disk A Database Select Database to merge a SPOT database ima...

Страница 99: ...n to an image When you select the Annotate option on the Edit menu three changes take place in the SPOT image editing environment The image capture toolbar buttons are replaced with nine annotation toolbar buttons The Edit menu options change to reflect annotation editing as opposed to the image editing discussed earlier in this chapter The View and Camera menus disappear and three new menus appea...

Страница 100: ...annotation to the image Left click on the area in which you want to insert the line and drag until completed Arrow Add an arrow to the image Left click where you want the arrow to point and drag away from the area that the arrow will point to To change the size and or style of the arrow point select the arrow and double click on it An arrow attributes window appears Rectangle Add a rectangular ann...

Страница 101: ...ness to 1 Pattern The pattern for inserted objects such as rectangles ellipses polygons and text boxes There are seven pattern options to choose from Mode The background type for inserted objects such as rectangles ellipses polygons and text boxes There are three modes to suit varying image types transparent opaque and tinted Text Font The font style and size of the text When you select the Text F...

Страница 102: ...editing Undo feature the annotation Undo undoes an unlimited number of changes Bring to Front Bring the selected object in front of another object Send to Back Send the selected object behind another object Cut Remove the selected item Copy Duplicate the selected item Paste Place the cut or copied item into the image where it can be moved to the desired location Delete Delete the selected annotati...

Страница 103: ...Ch 6 Calibration and Measurement Table of Contents User s Guide to the SPOT Cooled Color Digital Camera 6 9 98 103 Ch 6 Calibration and Measurement Introduction 104 Calibration 104 Measurement 106 ...

Страница 104: ...images you should calibrate each of the microscope s objectives using a stage micrometer To calibrate an objective follow these steps 1 Place the stage micrometer in the objective s field of view 2 Focus on it 3 Capture an image of the stage micrometer Note For details on capturing an image refer to Chapter 4 Taking a Picture 4 From the View menu select the Show Measurements option or press Ctrl M...

Страница 105: ...rsor on the image of the stage micrometer b Left click on the mouse The drawing function is now enabled Drag the mouse across the image of the stage micrometer c Left click at the point where you want to end the line d Click on the Calibration Setup screen to re activate it The Calibrate button should now be active 8 In the lower boxes enter the length of the line in whatever units you are calibra...

Страница 106: ...ress Ctrl M The Measurement window appears as shown below 2 Select a Calibration Setup from the list Typically the Calibration Setups correspond to your microscope s objectives 3 Select from one of four measurement options Straight line Curve Angle Region Area Note Angle measurements are independent of the Calibration Setup 4 Draw the line curve angle or area that you want to measure a Position th...

Страница 107: ... Color Digital Camera 6 9 98 107 Ch 7 Using SPOT Databases Introduction 108 The Database Menu 108 Creating and Modifying Databases 109 Defining the Database 110 Setting Up Image Categories 111 Defining Lookup Lists 115 Saving Images to the Database 117 Searching Databases 119 ...

Страница 108: ...and keep track of separate passwords for each image category The Database Menu The Database menu options remain inactive gray until you open a database When a database is open you have the following options Open The Open option turns on the database engine and allows you to create modify or search the image category databases When you select the Open option the Open Database window appears From th...

Страница 109: ...tions Search and Edit Image Record options are discussed in more detail in the next two sections Creating and Modifying Databases and Searching Databases Creating and Modifying Databases The following sections outline the steps involved in creating and or modifying SPOT databases To best understand how a SPOT database works this section takes you through all of the steps involved in creating a typ...

Страница 110: ...ussed in the sections that follow Defining the Database The first step in creating a database is to define the umbrella structure that houses the image categories which contain your images To define the database follow these steps 1 From the Database menu select the Open option The Open Database window appears as shown below 2 Click on the New button The New Local Database window appears as shown ...

Страница 111: ...number the search criteria and the path to where the image is stored It does not contain the actual image 5 To set up a password for the database check the Require Password option and enter 1 10 alphanumeric characters in the Password box Re enter the password in the Enter Again box 6 Click on OK to create the database or click on Cancel to return to the Open Database window Setting Up Image Categ...

Страница 112: ...you have to define the associated data fields There are two types of data fields Text Numeric Text Numeric data fields are the fields that will be available to enter information in when you save an image to an image category When you enter information into a box the program automatically determines whether it is a textual or numeric field and checks the appropriate option There are some occasions ...

Страница 113: ...pear in the title of the image window and under any thumbnail of the image Enter the Data Fields as described in the following steps 1 Enter Patient s Name in the first Text Numeric field and check the Required and Title boxes 2 Enter Blood Oxgen Level in the second Text Numeric field Because Blood Oxygen Level represents a value on which you will want to perform searches based on a range of value...

Страница 114: ...for text numeric or lookup fields For instance if you are performing 25 tests on a blood sample for a single user whose blood color is red you could specify that red should appear in the Blood Color field and that the patient s name should appear in the Patient Name field for all of the images that you save to the image category Format The graphic format that you want to save the image to the data...

Страница 115: ...t is associated with each Lookup Field This can be done in one of two ways You can enter list items through the Lookup Lists option on the Database menu This is the primary method You can enter list items as you save an image to a database image category This method is used when you want to save an image but the criteria for that particular image has not yet been defined Note The procedure for add...

Страница 116: ...up Fields that you defined on the Image Category window should appear along with the name of the umbrella database i e shuman From the Lookup Lists window you can add new Lookup Fields as well as the associated lists In this example you will add the list items for the lookup fields that you created for the Blood image category 2 Select the Blood Color lookup The Modify and Delete buttons should no...

Страница 117: ...okup Lists window 8 Select the Research Assistant lookup list and follow the procedure in steps two through five to add the names of three research assistants Jason Karen and Bill 9 Click on Close to save your changes and close the Lookup Lists window Saving Images to the Database Once you have acquired the images that you want to store in your database the SPOT program makes it easy to save the i...

Страница 118: ...5 Select green from the Blood Color list 6 Select Karen from the Research Assistant list Note If your define a data field as required i e on the Image Category window you will not be able to close the window without entering the inforation 7 Keep the default settings that you defined on the Image Category screen Image Path folder C SPOTCAM blood Format Windows Bitmap The Save Thumbnail option is c...

Страница 119: ... Assistant list Click on Yes The program adds the new items to the Lookup Lists and closes the Save Image to Database window Note The Time Date Memo and data field entries for saved images can be edited at a later point through the Edit Image option on the Database Menu Searching Databases The SPOT database search function enables you to search an image category in an open database To perform a se...

Страница 120: ...s select lists where you can select one several all or none of the lookup list options Use the following guidelines to enter search criteria Text searches are limited to images with text strings i e specific letters or numbers in a row Two characters can be used with text field searches The asterisk wild card tells the program that any number of characters can be used with this text field For exam...

Страница 121: ...ords greater than or equal to the value entered AND Selects records that contain both of the values entered OR Selects records that contain either of the two values entered For example to search for all patients with a blood oxygen level between 3 6 and 7 7 you would enter 3 6 AND 7 7 in the Blood Oxygen Level numeric field not shown here Lookup field search criteria are specified by selecting one...

Страница 122: ...e record and click on the Edit button or double click on the record The Image Database Record window appears as shown here The Image Database Record window enables you to edit the characteristics search criteria of an image while in the database as opposed to during the save process Thus you can correct any mistakes made during the original entry process You can also use the buttons at the bottom ...

Страница 123: ...o select the order in which you want the search results to be displayed click on the Ordering button The Record Ordering window appears as shown here The Record Ordering window provides a three level sort order The Order by select lists display the search criteria To order the records for a search do the following a Select the search criteria from the Order by list i e Diameter for the first level...

Страница 124: ...ons Table of Contents User s Guide to the SPOT Cooled Color Digital Camera 6 9 98 124 Ch 8 Printing Options Introduction 125 Printer Setup 125 Print 127 Printing a Single Image 127 Printing Multiple Images on a Page 128 ...

Страница 125: ...uires you to choose and configure a printer The procedure for setting up and configuring printer in SPOT is the same as in any other Windows program Note Because the information contained in this section is standard Windows functionality the options are not discussed in detail For more information on Windows printing features refer to the Windows on line help A question mark in the upper right han...

Страница 126: ...hat you are using 3 Define the page setup that you want to use for the image s This includes the page orientation portrait or landscape paper size paper source and margins All of these items are entered from the Page Setup window shown here To save the page layout specifications that you enter click on OK Note You can also access the Page Setup screen from the Print screen i e From the File menu s...

Страница 127: ...o a page or you can print multiple images on a page for comparison or display Each of these options is discussed in the following two sections Printing a Single Image To print a single image from the SPOT software follow these steps 1 From the File menu select Print Shortcuts To access the print screen you can also Press Ctrl P a standard windows shortcut Click on the Print toolbar button The Prin...

Страница 128: ...into a two ended arrow b Using the two ended arrow cursor drag a side or corner to enlarge or reduce the image The resized image maintains the height to width ratio of the original image so as to avoid distortion 6 Adjust the position of the image a Position the cursor on the image When on the image it appears as a four pointed arrow b Left click and drag the image to the desired location 7 Click ...

Страница 129: ... want to print out a comparison sheet To add an image from a list of open images click on the Currently Open Image option and select the desired image It can be added from a file directory To add an image file from a directory check the Image File option and click on the square next to the box Browse for the desired image It can be added from an open SPOT database To add an image file from a SPOT ...

Страница 130: ...ck on the Arrange button The Arrange Images window appears as shown here b Select the number of rows and columns c Enter the Spacing between the images on the print out in inches or millimeters d Click on OK The Print screen reappears with a preview of your print arrangement The following screen capture illustrates two pictures arranged in a one row two column format ...

Страница 131: ... size distributed equally across the page Note You can reposition and resize multiple images on the preview page just as you can with a single image 5 From the print screen you have several options You can add another image as described in steps three and four You can delete the newly added image by selecting it and clicking the Remove button You can reposition and or resize the images as describe...

Страница 132: ...Interface PCI plug in card supplied Operating Systems Windows 95 and Windows NT 4 0 Mac Power PC is forthcoming Computer Hardware Requirements Pentium or Pentium II required 166 Mhz or faster recommended 64 Mb RAM required 128 Mb recommended A video card that provides 24 bit RGB millions of colors at the desired monitor resolution 8 Mb VRAM required for recommended 21 monitor operating at 1600 x 1...

Страница 133: ...Appendix B Changing the Desiccant User s Guide to the SPOT Cooled Color Digital Camera 6 9 98 133 Appendix B Changing the Desiccant Introduction 134 Do It Yourself Steps 134 ...

Страница 134: ...mputer cable and the power supply cable from the SPOT camera head c Disconnect the camera head from the microscope coupler d Attach the plastic lens cap to the front of the camera 3 Pick a non drafty non dusty non humid work environment An air conditioned office is usually good 4 Use the 3 8 Allen wrench to unscrew the large silver plug on the side of the camera Turn the screw counter clockwise 5 ...

Страница 135: ...3 8 Allen wrench to finish tightening the plug Tighten it well to ensure a good seal 9 Place the camera back on the microscope Follow these steps a Remove the plastic lens cap from the front of the camera b Attach the camera head to the microscope coupler c Ensure that both your computer and the SPOT power supply are turned off d Connect the computer cable and the power supply cable to the SPOT ca...

Страница 136: ...N Features User s Guide to the SPOT Cooled Color Digital Camera 6 9 98 136 Appendix C Using SPOT s TWAIN Features Introduction 137 Using SPOT with Photoshop 137 Image Setups 138 Pre Image Capture Operations 139 Image Captures 139 ...

Страница 137: ...SPOT s TWAIN features because it is one of the most commonly used TWAIN capable image editing programs Using SPOT with Photoshop TWAIN capability allows you to open an interface between the SPOT software and any other TWAIN capable image editing program This allows for the following You can open and edit a SPOT image in Photoshop You can use SPOT to capture an image from within Photoshop Captured ...

Страница 138: ...u can select or modify the image setup that you want to use to capture an image You can perform a variety of pre image capture operations You can capture an image in three different ways Each of these options is discussed in the sections that follow Image Setups From the Spot Camera window you can define new image setups and modify or delete existing setups To define a new image setup click on the...

Страница 139: ...as an option on the Camera menu Compute White Balance Values Set Image Region Get Background Image Get Flatfield Image Note These options are discussed in detail in Chapters 3 and 4 Image Captures From the SPOT Photoshop interface you can capture an image in two different ways You can either preview the image and then transfer it to Photoshop or you can Acquire the image which sends the captured i...

Страница 140: ... Keep Window on Top option allows you to preview and transfer or acquire multiple images without having to re open the SPOT window If the Keep Window on Top box is checked the SPOT window remains open If the box is not checked the SPOT window automatically closes after each image is transferred or acquired ...

Страница 141: ... Pro Plus Driver User s Guide to the SPOT Cooled Color Digital Camera 6 9 98 141 Appendix D Using the SPOT Image Pro Plus Driver Introduction 142 Installing the SPOT Image Pro Plus Driver 142 Using the Driver to Work in Image Pro 142 ...

Страница 142: ...Image Pro Driver disk To check the serial number click on the Help menu in the SPOT software 3 Copy the two files from the SPOT Image Pro Plus floppy disk into the Image Pro Plus 32 bit directory Note The driver will not work with the 16 bit version of Image Pro Plus Using the Driver to Work in Image Pro Follow these steps to use the SPOT Image Pro Plus driver 1 Open the Image Pro Plus program 2 F...

Страница 143: ...and post exposure measurements and adjustments focus frame compute exposure values white balance flatfield correction background subtraction region of interest selection Note Refer to Chapter 3 and Chapter 4 for more information on using these options 11 If you want to change the Image Setup that you will use to capture the image click on the Modify button The Image Setup window appears Enter any ...

Страница 144: ...o the SPOT Cooled Color Digital Camera 6 9 98 144 13 Click on Snap to take the picture The image appears in Image Pro Plus Note Refer to the Image Pro Plus manual for more information on the Acquire Video Digital window options and other image editing information ...

Отзывы: