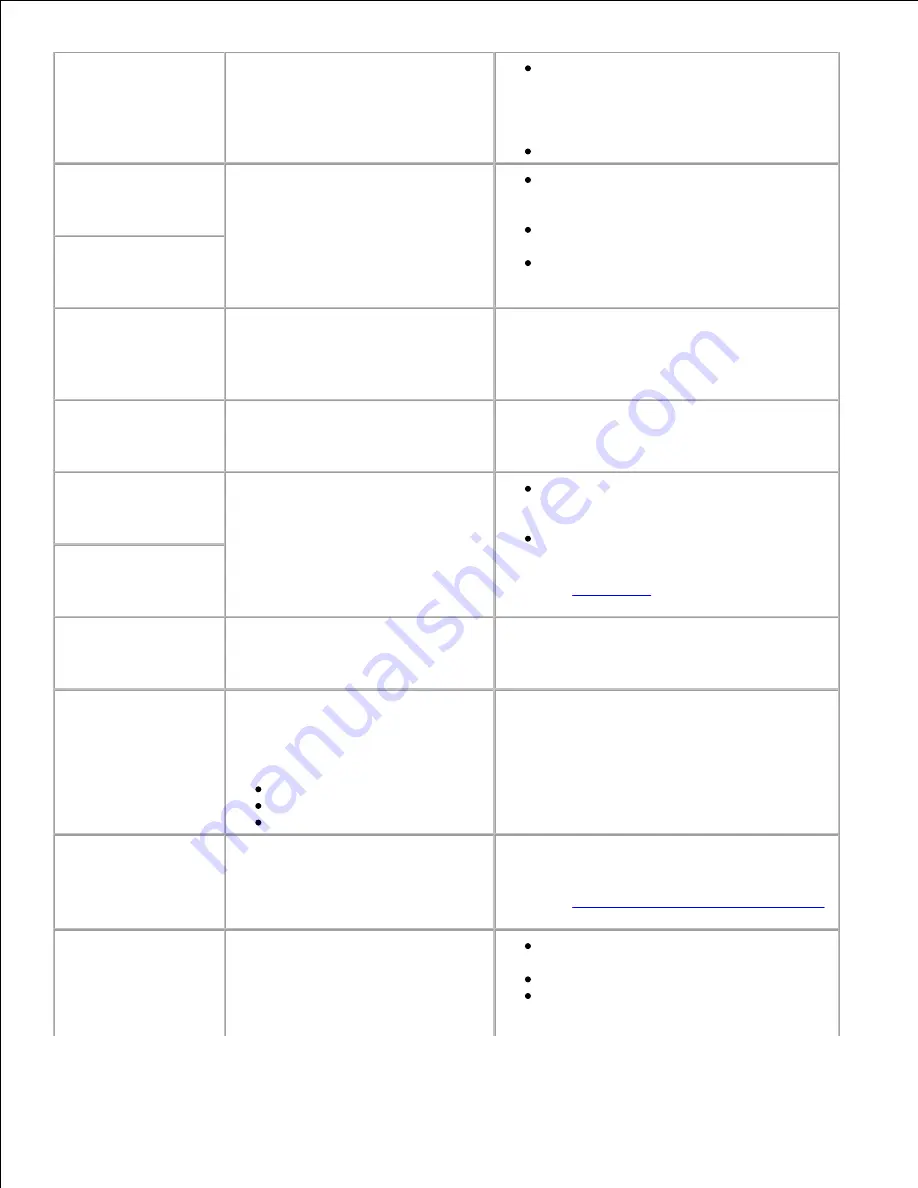
4<x>
Unsupported
Firmware Card
The printer detects an unsupported
version of firmware on the installed
firmware card during the power-on
cycle.
Turn the printer off, and then press and
hold
Go
while turning it on. The printer
reads the code on the system card and
bypasses the code on the firmware
card.
Remove the firmware card.
54 Network <x>
Software Error
The printer cannot establish
communications with an installed
network port.
Press
Go
to clear the message and
continue printing. The job may not print
correctly.
Program new firmware for the network
interface by way of the parallel port.
Press
Menu
to open the Job Menu and
reset the printer.
54 Std Network
Software Error
55 Unsupported
Flash
in Slot X
The printer detects an unsupported
flash memory card in one of the
connectors.
Turn the printer off. Remove the unsupported
option card.
55 Unsupported
Option in Slot X
The printer detects an unsupported
option card in one of the
connectors.
Turn the printer off. Remove the unsupported
option card.
56 USB Port <x>
Disabled
Data has been sent to the printer
through a USB port, but the USB
port is disabled.
Press
Go
to clear the message. The
printer discards any data received
through the USB port.
Make sure the USB Buffer menu item in
the USB Menu is not set to Disabled.
See also:
USB Buffer
56 Standard USB
Port Disabled
58 Too Many
Trays Attached
Too many drawers with matching
trays are installed on the printer.
Turn off and unplug the printer. Remove the
additional drawers. Plug in the printer and
turn it on.
59 Incompatible
<device>
You have installed an incompatible
device.
<device> is one of the following:
Env Feeder
Tray x
Duplex
Remove the device and press
Go
to clear the
message.
80 Scheduled
Maintenance
The printer requires replacement of
routine maintenance items to
maintain top performance and
avoid print quality and paper feed
problems.
Replace the maintenance items and reset the
printer maintenance counter, if necessary.
See also:
Resetting the maintenance counter
88 Toner Low
The printer has detected that the
toner supply in the toner cartridge
is low. If you do not have a toner
cartridge on hand, order one now.
Shake the toner cartridge to utilize the
remaining toner.
Replace the toner cartridge.
Press
Go
to clear the message and
continue printing. The
Supplies
message is displayed until you replace
Содержание 5200n Mono Laser Printer
Страница 3: ...Refer to the Drivers and Utilities CD for details March 2003 Rev A01 ...
Страница 16: ...1 Tab 2 Slot Guide the cartridge in until it snaps into place 6 Close the upper door and then the lower door 7 ...
Страница 67: ...1 Support 2 Support extension Gently releasing the support extension drops it to its open position 3 ...
Страница 153: ...Pull down and out if the print media is in this position Close the duplex rear door Make sure it snaps into place 6 ...
Страница 155: ...Pull down and out if the print media is in this position Close the duplex rear door Make sure it snaps into place 3 ...
Страница 157: ...Close the duplex rear door Make sure it snaps into place 3 Remove the standard tray 4 ...
Страница 188: ...support dell com ...


