


Cryo-con Model 24C
Front Panel Operation
The
Stop
and
Control
keys are used to disengage or engage the instrument’s
output control loops. Pressing
Control
will immediately turn on all enabled heater
outputs and pressing
Stop
will turn them both off. To enable or disable an
individual loop, go to the
Loop Configuration Menu
menu and select the desired
‘Type’.
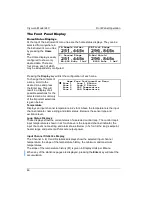
The
Home
key is used to take the display to one of the Home Status displays. These
displays show the full status of the instrument.
The
Enter
key is used to enter numeric data or selections.
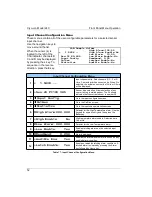
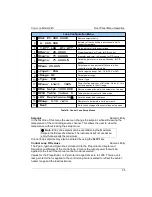
The Keypad and Setup Menu Keys
The keypad keys on the far right side of the instrument serve a
dual function. When the display is showing one of the
configuration menus, the keypad is used for navigation and data
entry. When the display is in the Home Status Display, their
function is identified by a label printed just above the key and is
as follows:
ChA
,
ChB
,
ChC
,
ChD
- Go to the Input Channel Setup
menu.
Loop 1
,
Loop 2
- Go to the Control Loop Setup menu.
Auto
Tune
- Go to the auto-tuning menu for either loop.
Config
- Go to the User Configurations menu.
Sensors
- Go to the Sensors configuration menu, including sensor calibration
curves.
PID
Table
- Go to the PID tables setup menu.
System
- Go to the System setup menu. This includes fields for Remote Input /
Output, Display filters and the Over Temperature Disconnect feature.
Display
- Go to the Display setup menu. This allows configuration of the front
panel display from a list of options
Alarm
- Go to the Alarm Status menu.
Set Pt
- Set the setpoint values for both control loops.
Options
- Go to the Options Setup Menu.
42


