Chapter XIX Application Examples
237
on the screen;
8)
Click the menu key [Bit Rate] to pop up the FlexRay bit rate setup menu on the right side of the screen and
click the menu key [10M] to set the FlexRay bit rate to 10Mbps;
9)
Click the menu key [Bus Display] to pop up the FlexRay bus display setup menu on the right side of the
screen, click the menu key [Display] to pop up the Level3 Menu of the bus display mode on the left side of
the menu, turn the Multipurpose b to select the bus and waveform display mode and then press the
Multipurpose b to confirm Select, or set by clicking the Bus and Waveforms option in the Level3 Menu.
Click the menu key [Number Format] to pop up the Level3 Menu of the number format setting on the left
side of the menu, turn the Multipurpose b to select Hex and then press the Multipurpose b to confirm Select,
or set by clicking the Hex option in the Level3 Menu. Click the menu key [Bus Offset] and turn the
Multipurpose b to change the position of the bus in the vertical direction of the display area. Click the menu
key [Waveforms Offset] and turn the Multipurpose b to change the position of the digital waveform in the
vertical direction of the display area;
10) Press the
【
Trigger
】
key in the Function Area on the front panel to pop up the trigger setup menu on the
lower screen. Click the menu key [Type] to pop up the trigger type selection menu on the right side of the
screen. Click the menu key [Bus] to select the protocol trigger type and switch to the protocol trigger setup
menu at the bottom of the screen;
11) Click the menu key [Trigger On] at the bottom of the screen to pop up the FlexRay protocol trigger type
setup menu on the right side of the screen, and click the menu key [Start of Frame] to set the FlexRay
protocol trigger type to Start of Frame.
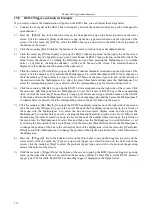
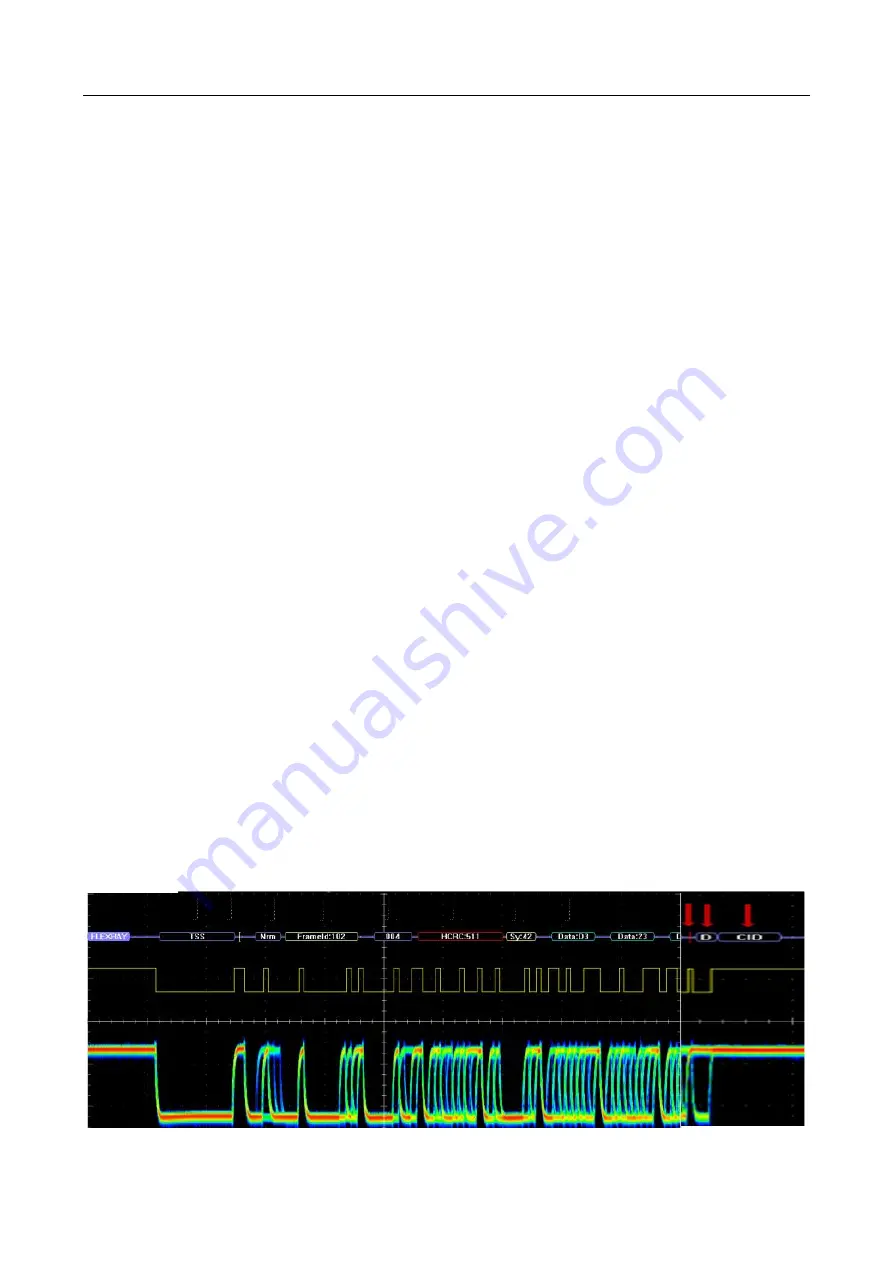
In this way, connect the Tx signal of FlexRay bus to the channel 1. The FlexRay bus decoding trigger with the bus
Start of Frame position as the trigger point is displayed in the figure below:
The FlexRay bus Start of Frame is indicated by a green left square bracket [.
The TSS is displayed in a purple box.
The Indicator Bits are displayed in a purple box.
The Id is displayed in a yellow box.
The Payload Length is displayed in a purple box.
The Header CRC is displayed in a purple box if it is correct and in a red box if it is wrong.
The Cycle Count is displayed in a yellow box.
The Data is displayed in a cyan box.
The End of Frame is indicated by a red right square bracket ].
The DTS is displayed in a purple box.
The CID is displayed in a purple box.
End of
Frame DTS
CID
TSS
Start of
Frame
Indicator
Bits
Identifier
Rayload
Length
Header
CRC
Cycle
Count
Data
Fig. 19.7 FlexRay Trigger and Analysis Example
Содержание 4456 Series
Страница 1: ...4456 Series Digital Phosphor Oscilloscope User Manual China Electronics Technology Instruments Co Ltd...
Страница 10: ...VIII...
Страница 55: ...Chapter V Trigger System 45 Fig 5 51 RF Test Signal Example...
Страница 69: ...Chapter VII Mathematical Operation 59 Fig 7 10 Advanced Math Example...
Страница 71: ...Chapter VIII Display System 61 Fig 8 3 Wfm Palette Menu Fig 8 4 Normal Palette...
Страница 72: ...Chapter VIII Display System 62 Fig 8 5 Inverted Palette Fig 8 6 Temperature Palette...
Страница 75: ...Chapter VIII Display System 65 Fig 8 12 XY Display Example...
Страница 165: ...Chapter XI Protocol Analyzer Option 155 Fig 11 242 1553 Trigger and Analysis Example...


