


2–61
Operation – 2
Reset THD Alarm and Lockout From the HMI
To reset the THD Alarm and Lockout perform the
following:
1.
Press the Down Arrow (CNFG Hot Button)
pushbutton to awaken the unit. The menu
will advance to "CONFIGURATION".
CONFIGURATION
W
SETP
COMM
V
2.
Press the Down Arrow pushbutton once.
The unit will display the following:
Cap Settings
W
V
3.
Press the Right or Left Arrow pushbutton
as necessary until "Programmable
Alarm" is displayed.
Programmable Alarm
W
V
4.
Press the Down Arrow as necessary until
the following is displayed.
Rst THD Lockout
Ready Press ENTER
5. Press the "ENT" pushbutton. If Level
2 Access is not active or has been
previously input, then the following will
be displayed. Go to Step 8.
Confirm press ENTER
Cancel press EXIT
6.
If Level 2 Access is active, then the Level
2 Access prompt will be displayed.
ENTER LEVEL 2 ACCESS
_
NOTE: When entering the Level 2 Access Code
the display will automatically advance
the cursor to the next digit when input
is momentarily paused.
7.
Enter a valid Level 2 Access Code, then
press the "ENT" pushbutton.
If a valid Level 2 Access Code was
entered, then the display will briefly flash
a confirmation screen and then display
the following:
Confirm press ENTER
Cancel press EXIT
If not, re-enter a valid code.
8.
Press ENT to reset the Neutral Current
Block Alarm, or press EXIT to cancel.
The control will momentarily display the
following when "ENT" is selected:
THD Lockout
Cleared
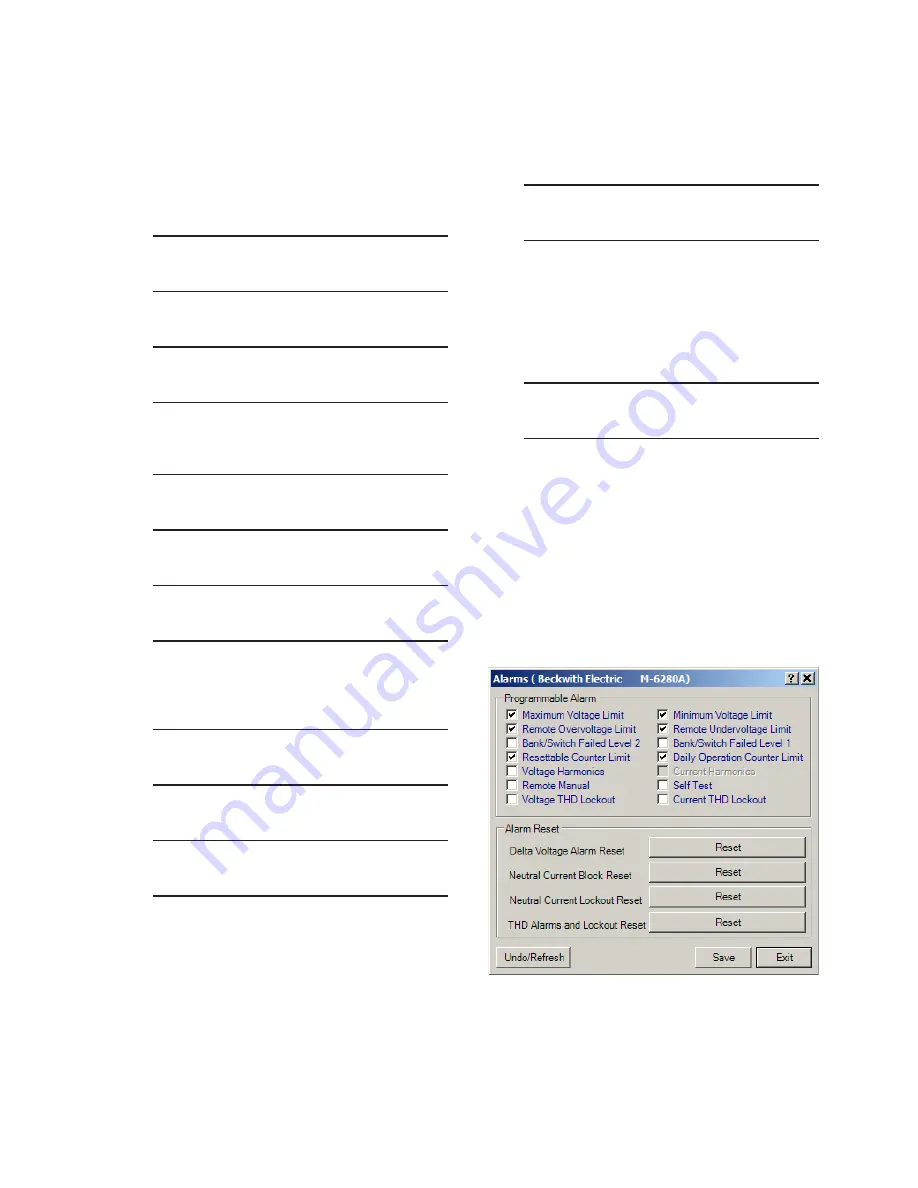
Reset THD Alarms and Lockout From CapTalk
®
To Reset THD Alarms and Lockouts from CapTalk
perform the following:
1. Select
Setup/Alarms from the CapTalk
toolbar. CapTalk will display the Alarms
dialog screen (Figure 2-51).
2.
Select the "THD Alarms and Lockout"
Reset. CapTalk will briefly display a
"Command successfully sent to the
control" confirmation screen (Figure
2-50).
Figure 2‑51 Programmable Alarms
Dialog Screen
Содержание M-6280A
Страница 1: ...Instruction Book M 6280A Digital Capacitor Bank Control ...
Страница 29: ...800 6280A SP 11MC1 03 13 2008 Beckwith Electric Co All Rights Reserved Printed in U S A 09 24 02 ...
Страница 33: ...This Page Left Intentionally Blank ...
Страница 53: ...xx M 6280A Instruction Book This Page Left Intentionally Blank ...
Страница 56: ...Introduction 1 1 3 Figure 1 1 Functional Diagram ...
Страница 59: ...1 6 M 6280A Instruction Book This Page Left Intentionally Blank ...
Страница 66: ...2 7 Operation 2 Figure 2 1 M 6280A Front Panel ...
Страница 137: ...3 14 M 6280A Instruction Book Figure 3 13 CapTalk Main Screen Connected Mode ...
Страница 152: ...3 29 CapTalk 3 Figure 3 36 Setpoints Auto Remote Control with Enabled Voltage Control Auto Adaptive Dialog Screen ...
Страница 153: ...3 30 M 6280A Instruction Book Figure 3 37 Setpoints Auto Remote Control with VAr Control Enabled Dialog Screen ...
Страница 172: ...3 49 CapTalk 3 Figure 3 67 CBEMA Settings Dialog Screen ...
Страница 179: ...3 56 M 6280A Instruction Book Figure 3 87 M 6280A DNP Configurator Dialog Screen ...
Страница 184: ...3 61 CapTalk 3 Figure 3 98 CapPlot Window with Data Logging Data Example ...
Страница 185: ...3 62 M 6280A Instruction Book Figure 3 99 CapPlot Window with Oscillograph Data Example ...
Страница 191: ...3 68 M 6280A Instruction Book This Page Left Intentionally Blank ...
Страница 311: ...M 6280A Instruction Book 4 120 Figure 4 61 Setpoints Dialog Screen Voltage Control Auto Adaptive Fixed ...
Страница 312: ...Configuration 4 4 121 Figure 4 62 Setpoints Dialog Screen Voltage Control Auto Adaptive Average ...
Страница 313: ...M 6280A Instruction Book 4 122 Figure 4 63 Setpoints Dialog Screen VAr Control ...
Страница 314: ...Configuration 4 4 123 Figure 4 64 Setpoints Dialog Screen Current Control ...
Страница 451: ...D 4 M 6280 Instruction Book This Page Left Intentionally Blank ...
Страница 461: ...This Page Left Intentionally Blank ...


