background image

Changing the Needle

 89

3

—————————————————————————————————————————————————————————————————————————————————————

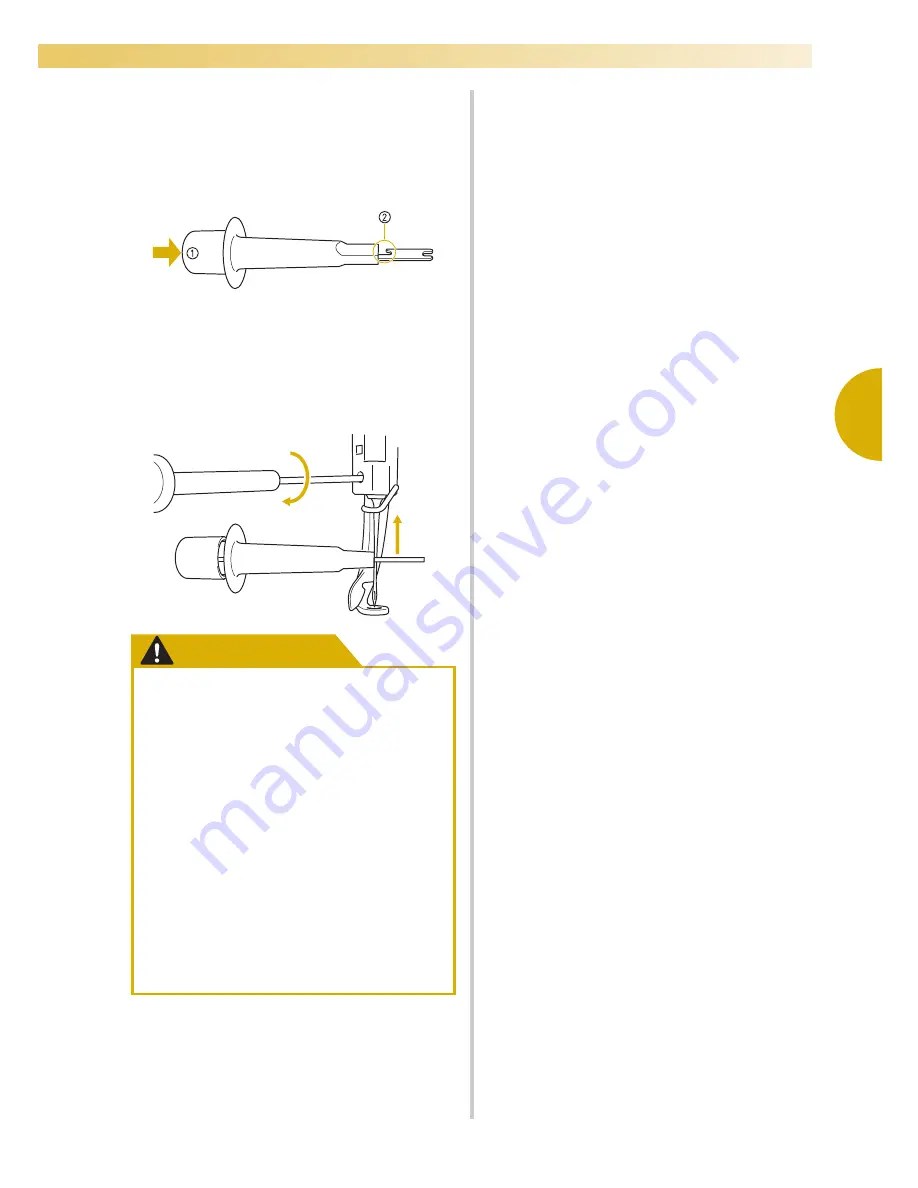
Hold the needle changing tool and press the 
end of the needle changing tool 

1

 in to 

extend the needle-mounting clamp 

2

. Attach 

the clamp to the needle, and then release the 
pressed area to clamp the needle. To 
unclamp the needle, press 

1

 again.

1

End of the needle changing tool

2

Needle mounting clamp

4

While holding the needle in place with your 
left hand, tighten the needle set screw.

Use the Allen screw driver to turn the needle 
set screw clockwise.

CAUTION

Be sure to insert the needle in the 
needle bar chamber until it reaches the 
needle bar stopper and securely tighten 
the needle set screw with the Allen 
screw driver, otherwise the needle may 
break or the machine may be damaged.

If the needle is not fully inserted, the 
hook of the automatic needle-threading 
mechanism will not pass through the 
eye of the needle during automatic 
needle threading, and the hook may 
bend or the needle cannot be threaded.

If the hook of the automatic needle-
threading mechanism is bent or 
damaged, contact your authorized 
retailer.

Содержание Enterprise BNT10L

Страница 1: ......

Страница 2: ...implied warranties of merchantability and fitness for a particular purpose are disclaimed In no event shall Intel or contributors be liable for any direct indirect incidental special exemplary or cons...

Страница 3: ...ctrical outlet Do not pull on the cord Plug the machine directly into the electrical outlet Do not use an extension cord Always unplug your machine if the power is cut 3Never operate this machine if i...

Страница 4: ...function or become damaged 5Special care is required when sewing Always pay close attention to the needle Do not use bent or damaged needles Keep fingers away from all moving parts Special care is req...

Страница 5: ...ack of the operation manual to inspect and adjust the machine yourself If the problem persists please consult your local authorized Baby Lock retailer Use this machine only for its intended use as des...

Страница 6: ...pproved by ASTA to BS 1362 i e carrying the mark rating as marked on plug Always replace the fuse cover Never use plugs with the fuse cover omitted If the available electrical outlet is not suitable f...

Страница 7: ...and can radiate radio frequency energy and if not installed and used in accordance with the instructions may cause harmful interference to radio communications However there is no guarantee that inter...

Страница 8: ...MBROIDERY created by use of the CONTENT Except as otherwise provided herein CUSTOMER may not Allow more than one copy of the CONTENT to be available for use at any one time Reproduce modify publish di...

Страница 9: ...bels 7 Warning Labels The following warning labels are on the machine Be sure to observe the precautions described in the labels 1 2 Label locations Please put a drop of oil onto the hook once a day b...

Страница 10: ...with a color that will be used in the next pattern are assigned to the same thread color based on the needle bar assignments from the previous pattern in order to reduce the number of thread spool ch...

Страница 11: ...ten or less colors If total colors are less than ten colors and if total color change is more than eleven times machine will come back to the needle that the machine is already used and sew the same...

Страница 12: ...broidery editing software provided with the Link function such as Palette 9 or later from a computer to an embroidery machine You can connect 4 machines to a computer at a same time Refer to Sending E...

Страница 13: ...available as standard equipment By connecting a computer to the machine using the included USB cable embroidery patterns can be transferred from the computer Refer to Computer USB on page 166 If the m...

Страница 14: ...e machine there are 3 optional frames quilt border and jumbo that can be used with the included embroidery frame holder B An optional cap frame is available for caps The optional cap frame driver is r...

Страница 15: ...is chapter contains descriptions on the use of the settings key the machine operations key and the help key Details on changing the basic embroidery machine settings and viewing operations on the LCD...

Страница 16: ...Remove the fixing plates 29 Adjusting the operation panel position 29 Preparing the thread guide assembly 30 Preparing the spool stand 31 Attaching the embroidery frame holder 32 EMBROIDERING TUTORIA...

Страница 17: ...Terms 81 Patterns 81 Embroidering 81 USB connectivity 82 USB mouse operation 84 OTHER BASIC PROCEDURES 87 Changing the Needle 88 Replacing the needle 88 Correctly Using the Embroidery Frames 90 Embro...

Страница 18: ...mbroidering 140 Temporary Needle Bar Setting 142 Uninterrupted embroidering monochrome 143 Reserved Needle Bar and Sewing Speed Settings 145 SELECTING EDITING SAVING PATTERNS 149 Precautions 150 Conce...

Страница 19: ...Changing the background colors of the embroidery patterns or thumbnails 222 Specifying jumpstitch trimming DST jump codes for trimming 223 Deleting short stitches 224 Specifying the remaining length...

Страница 20: ...r 273 Winding the bobbin 274 Maintenance 277 Cleaning the LCD 277 Cleaning the machine surface 277 Cleaning the hook 277 Cleaning around the needle plate 278 Cleaning the bobbin case 279 Cleaning the...

Страница 21: ...ing to sew are described in this chapter Names of Machine Parts and Their Functions 20 Front view 20 Right side rear view 21 Operation panel 21 Accessories 22 Included accessories 22 Optional accessor...

Страница 22: ...arriage Attach the embroidery frame to the carriage When the machine is turned on or when the machine is embroidering the carriage moves forward backward left and right 5 Hook cover Hook Open the hook...

Страница 23: ...er supply plug 7 Main power switch Use the main power switch to turn the machine ON I and OFF 8 Ventilation slots Operation panel 1 Start Stop button Press the start stop button to start or stop the m...

Страница 24: ...set 2 XC6469 001 3 Prewound bobbin 6 XC6368 051 4 Spool net 10 S34455 000 5 Seam ripper X54243 051 6 Scissors XC1807 121 7 Tweezers XC6542 051 8 Touch pen XA9940 051 9 Needle changing tool Threader XE...

Страница 25: ...heet extra large 200 mm H 360 mm W 7 7 8 inches H 14 inches W XE7158 001 29 Embroidery sheet large 130 mm H 180 mm W 5 1 8 inches H 7 1 8 inches W XC5721 051 30 Embroidery sheet medium 100 mm H 100 mm...

Страница 26: ...nting jig EPCFJ 7 Cylinder frame set BMP CFS 8 Cylinder frame 80 mm H 90 mm W 3 inches H 3 1 2 inches W BMP CF 9 Quilt frame 200 mm H 200 mm W 7 7 8 inches H 7 7 8 inches W ENF200 10 Border frame 100...

Страница 27: ...time of printing Please be aware that some specifications may change without notice 18 Embroidery frame extra large 200 mm H 300 mm W 7 7 8 inches H 11 3 4 inches W EPF300 19 Embroidery table ENTABLE...

Страница 28: ...lting in a fire or in damage to the machine The machine weight is approximately 42 kg 92 lb The transporting or setting up of the embroidery machine should be performed by two people When transporting...

Страница 29: ...ine CAUTION Note For your safety Since the machine weighs approximately 42kg 92 lb do not set it up on an unstable table or desk 785 mm 31 inches Minimum of 50 mm 2 inches 589 mm 23 1 4 inches More th...

Страница 30: ...ed 4 Use the included wrench to turn the adjustable foot nut on the foot Turning the nut in direction 1 lengthens the leg turning the nut in direction 2 shortens the leg 1 Adjustable foot nut Adjust a...

Страница 31: ...transporting the machine consult your authorized Baby Lock retailer Adjusting the operation panel position Adjust the orientation and angle of the operation panel so it can easily be operated 1 Loosen...

Страница 32: ...ews 1 Thumb screws Note Using the disc shaped screwdriver included loosen and firmly tighten the five thumb screws Preparing the thread guide assembly Raise the thread guide assembly CAUTION 1 Loosen...

Страница 33: ...e easy to move the thread guide assembly support Do not apply extreme force when moving the thread guide assembly support Be sure that the thumb screws are loosened well enough before moving the part...

Страница 34: ...in the embroidery frame holder 3 Corner covers Note Each embroidery frame holder has different color of corner cover Holder A White corner covers Holder B Light gray corner covers Holder C Dark gray c...

Страница 35: ...a preview image 48 7 Hooping the Fabric in the Embroidery Frame 49 Hooping the fabric in the embroidery frame 49 8 Attaching the Embroidery Frame to the Machine 51 Attaching the embroidery frame 51 9...

Страница 36: ...an electric shock may result Do not plug in or unplug the power supply cord with wet hands otherwise an electric shock may result When unplugging the power supply cord be sure to first turn off the ma...

Страница 37: ...05 H E may be used as a substitute Use of any other needles may break the needle or thread or damage the needle threading mechanism or result in injuries Never use bent needles Bent needles can easily...

Страница 38: ...o Attaching Iron On Stabilizer Backing to Fabric on page 93 for information When embroidering large pieces of fabric make sure that the fabric is not caught in the carriage Display recommendations Be...

Страница 39: ...procedures are provided on pages 34 to 36 These precautions must be strictly observed in order for the machine to function properly Make sure to read these precautions Step Operation Tutorial Referenc...

Страница 40: ...t is not already in forward position 1 Thread Picker To gain access to the bobbin case easily pull the thread picker toward the front Memo Thread picker is a device that is used to hold the thread whe...

Страница 41: ...hrough the thread slit and under the tension adjusting spring 1 Thread slit 2 Tension adjusting spring 3 Pull the thread about 50 mm 2 inches through the opening in the tension adjusting spring 1 Abou...

Страница 42: ...ears and the start stop button lights up in red 6 The carriage moves to its initial position If the number 1 needle bar is not already at the embroidering position the needle bar case moves and the nu...

Страница 43: ...viously performed and return to the initial pattern group selection screen 2 Pattern display area This area displays the selected pattern p 218 3 Embroidering area line Shows the available embroiderin...

Страница 44: ...editing screen In the pattern editing screen edit the pattern Refer to page 46 74 1 Touch this key to return to the pattern type selection screen and add another pattern 2 Touch this key to continue...

Страница 45: ...lock the machine so that the start stop button starts flashing in green The embroidery machine is now ready to begin sewing 1 Touch this key to return to the embroidering settings screen 2 Unlock key...

Страница 46: ...r information on the screen refer to page 72 1 Pattern type keys In the pattern list screen search for the desired pattern and then touch the key for the pattern Pattern list screen For details on the...

Страница 47: ...ttern 2 Horizontal width of the pattern 3 Number of thread color changes 4 These keys can be used to change the monogram frame size or change the text arrangement of a character The functions may be u...

Страница 48: ...machine the embroidering area will not display the correct frame size Refer to page 51 3 Shows the size of the currently selected embroidery pattern The top value shows the height and the bottom value...

Страница 49: ...ber of thread changes and measured position of image within the embroidery area 6 Touch to check the needle drop point on the LCD screen 7 Touch these keys to specify how the pattern will be embroider...

Страница 50: ...there is space at the top and bottom 2 Touch or to select the type of embroidery frame holder and then select the embroidery frame you are going to use If you find out the type of embroidery frame hol...

Страница 51: ...he included embroidery frame holder A For details on the uses for each frame refer to Correctly Using the Embroidery Frames on page 90 If you use the optional embroidery frames quilt border and jumbo...

Страница 52: ...o the outer frame Be sure that there are no wrinkles in the fabric after it is positioned in the embroidery frame 5 Lightly tighten the screw and then pull the edges of the fabric 6 Securely tighten t...

Страница 53: ...embroidery frame holder to the left or right to adjust it to the size of the embroidery frame 2 Clip on embroidery frame holder Insert the embroidery frame into the clips on the embroidery frame hold...

Страница 54: ...tighten the two thumb screws with included disc shaped screwdriver The machine will recognize the wrong frame size if the two screws are not tightened X The embroidery frame holder is ready for the e...

Страница 55: ...ser foot is lowered and the embroidery frame moves to show the embroidery area 2 The corners of the octagon showing the embroidery area for the pattern are indicated by changing direction Carefully wa...

Страница 56: ...d color name is displayed that needle bar has not been used If a thread color had been assigned to the needle bar on a previously sewn design the needle bar will show the previously assigned color 3 C...

Страница 57: ...r number where the thread color at the left is assigned 5 To start the machine touch this key to unlock the machine and then press the start stop button 6 Touch a key to move the selected needle bar t...

Страница 58: ...ad the machine as indicated 1 On the spool pin place a spool with the thread color specified for the corresponding needle bar Check that the spool stand has been completely opened When using small spo...

Страница 59: ...guide B only 1 Thread guide A There are 6 holes in this thread guide 2 Thread guide B There are 10 holes in this thread guide 3 Pass the thread through the hole with the corresponding needle bar numbe...

Страница 60: ...d is securely positioned in the thread tension Note All thread tension discs are threaded in clockwise direction 7 Lead the thread along the thread path and around the correct thread guide pins as ind...

Страница 61: ...n through the hole in the number 1 lower thread guide 1 Hole in lower thread guide 0 Use the included threader to pass the thread into the number 1 needle bar thread guide 1 Needle bar thread guide 2...

Страница 62: ...wing position move it there Refer to page 62 2 Pull out about 150 mm 6 inches of thread Allow thread to relax and eliminate any stress on the thread Then as shown in the illustration pass the thread u...

Страница 63: ...e If enough thread is not pulled out the thread cannot be pulled through the thread cutter 5 Press the automatic needle threading button The threader moves back away from the needle The thread is pull...

Страница 64: ...screen appears 2 Touch the key for the needle bar that you wish to move or thread X The selected needle bar moves to the position of embroidery 3 Press the automatic needle threading button while the...

Страница 65: ...on page 58 Memo When changing one of the upper thread colors it is easy to re thread by cutting the thread currently being used between the spool and the thread guide above the spool Place the new spo...

Страница 66: ...s whether or not the embroidery machine is locked If the start stop button lights up in red the machine is locked If the start stop button flashes in green the machine is unlocked Starting embroiderin...

Страница 67: ...g selected While the embroidery machine is sewing the point being sewn is indicated by the green crosshairs in the pattern display area In addition the number of stitches and the time count up 3 After...

Страница 68: ...sewn Refer to Maximum Sewing Speed Setting on page 139 Stopping embroidering The machine can be stopped during sewing Temporarily pausing 1 Press the start stop button X The machine stops and the star...

Страница 69: ...eral stitches to overlap the stitching Refer to Resume Embroidering After Turning Off the Machine on page 120 for details Memo The machine can be stopped at any time even while it is embroidering howe...

Страница 70: ...ension of the upper thread is too loose resulting in a loose upper thread loose thread locks or loops appearing on the right side of the fabric Tighten the tension dial by turning the dial clockwise R...

Страница 71: ...embroidery frame toward you Removing the fabric 1 Loosen the outer frame screw X If the screw was tightened using a disc shaped screwdriver use the included disc shaped screwdriver to loosen it 2 Rem...

Страница 72: ...m the machine Store the power supply cord in a safe place Note If a power outage occurs while the embroidery machine is being operated turn off the embroidery machine and unplug the power supply cord...

Страница 73: ...ction Page Key Name 1 This area displays the selected pattern Pattern display area 4 6 5 1 2 3 2 Shows the available embroidering area The embroidery frame indications the grid lines and other display...

Страница 74: ...3 7 8 4 6 6 Built in patterns Uppercase and lowercase letters numbers symbols and accented characters from 28 fonts can be selected in small medium and large sizes p 159 Alphabet key 7 Patterns to le...

Страница 75: ...ern that is to be embroidered so it can be previewed p 48 Preview key 6 Shows the number of thread colors for the currently selected embroidery pattern Number of thread colors 1 C 7 6 0 3 8 4 9 B A 5...

Страница 76: ...s deleted p 202 Delete key 6 Adds a pattern If touched the pattern group selection screen appears p 179 Add key 7 Displays an image of the pattern so that it can be previewed p 48 Preview key 8 Shows...

Страница 77: ...Changes the color of the pattern p 188 Change thread color key 7 Makes and edits a repeating pattern p 190 Border key 8 Duplicates the pattern p 201 Duplicate key 7 3 6 4 2 9 8 5 B 0 A 1 C 9 Flips th...

Страница 78: ...mbined the size of the entire pattern including all patterns is shown Pattern size 2 Shows the overall size vertical and horizontal of the entire combined pattern p 181 Combined edited pattern size 3...

Страница 79: ...thread is trimmed p 134 Lock stitching end key 3 7 6 2 0 B C 8 A 9 5 1 4 6 Specifies that automatic lock stitch is sewn at the beginning of the pattern and at the beginning of sewing after thread tri...

Страница 80: ...amera view key 3 Touch to zoom up the camera view twice the size of normal view This key is available when the camera view is displayed p 179 Camera zoom key 4 Touch to display the grid lines on the c...

Страница 81: ...machine stops 3 Shows the part of the pattern that will be sewn with the thread color shown first in the thread color sequence display Region display 3 4 6 2 7 8 1 5 4 Shows the order for the thread c...

Страница 82: ...return to the embroidering settings screen Return key 5 Unlocks the machine so it can start sewing within 10 seconds When this key is touched the start stop button flashes in green p 64 Unlock key 1...

Страница 83: ...is used The wiper also pulls the thread from the material when the machine trims the thread This makes trimming threads after embroidering un necessary Refer to page 61 Patterns Following patterns can...

Страница 84: ...the upper right of the screen The pattern and all information will be deleted Refer to page 71 USB connectivity You can perform many functions using the USB ports on the machine Connect the appropriat...

Страница 85: ...s USB port or plug the USB media Reader Writer into the machine s USB port You can plug the optional embroidery card Reader USB card writer module into the primary top or center port when the mouse i...

Страница 86: ...the same time that you are touching the screen with your finger or the included touch pen A USB mouse can be connected or disconnected at any time Only the left mouse button and its wheel can be used...

Страница 87: ...the mouse wheel to switch through the tabs of the pattern selection screens Memo If page numbers and a vertical scroll bar for additional pages are displayed rotate the mouse wheel or click the left...

Страница 88: ...mouse wheel toward you to enlarge the pattern in the same way as when is touched Rotating the pattern Refer to Adjusting the angle on page 100 and Rotating a pattern on page 183 1 Touch 2 Rotate the...

Страница 89: ...ging the Embroidering Position 99 Adjusting the angle 100 Aligning the Embroidering Position 103 Using the built in camera 103 Using the included embroidery positioning sticker 105 Switching the Threa...

Страница 90: ...screw counterclockwise Note Be sure to use the included Allen screw driver to replace the needle otherwise too much force may be applied to the needle causing it to break Do not apply extreme force wh...

Страница 91: ...en screw driver to turn the needle set screw clockwise CAUTION Be sure to insert the needle in the needle bar chamber until it reaches the needle bar stopper and securely tighten the needle set screw...

Страница 92: ...which embroidery frame can be installed on each embroidery frame holder refer to Types of embroidery frames frame holders and their applications on page 91 1 Embroidery frame holder A 2 White corner c...

Страница 93: ...patterns combined patterns or large embroidery patterns Flat frame optional 200 mm H 300 mm W 7 7 8 inches H 11 3 4 inches W Consult your nearest Baby Lock retailer Use when embroidering jackets and o...

Страница 94: ...nal 360 mm H 360 W mm 14 inches H 14 inches W Refer to Embroidery Patterns for the Optional Jumbo Frame on page 249 Use when embroidering combined patterns with a size less than 350 mm H 200 mm W 13 3...

Страница 95: ...idery frame be sure that the stabilizer backing is clamped on all edges in order to prevent wrinkles in the fabric 1 Area of embroidery frame 2 Iron on stabilizer backing Memo When embroidering thin f...

Страница 96: ...at corner B In the same way lightly pull the fabric in the direction indicated by arrow C and insert corner C and then lightly pull the fabric in the direction indicated by arrow D and insert corner D...

Страница 97: ...the fabric in the frame 1 With a fabric marker mark the area of the fabric you want to embroider 2 Place the embroidery sheet on the inner frame Align the guidelines on the embroidery sheet with the...

Страница 98: ...spray fabric adhesive to attach the fabric to stabilizer backing hooped in the embroidery frame With fabrics where you do not wish to use spray adhesive baste the fabric to the stabilizer backing 1 F...

Страница 99: ...extends out of the embroidering area of the frame Embroidery frames with an embroidering area smaller than the pattern Patterns that extend out of the embroidering area of the frame In either of these...

Страница 100: ...roidering settings screen is displayed The embroidery frame will not move if it is correctly positioned If the pattern extends out of the embroidering area for the frame a message appears indicating t...

Страница 101: ...ic 1 Touch and in the embroidering settings screen Move the embroidery frame so that the needle drop point is at the center of the area where you wish to embroider X The embroidery frame moves in the...

Страница 102: ...point is at the center of the area where you wish to embroider With a USB mouse your finger or the touch pen drag the pattern to move it When specifying the starting of stitching align the needle drop...

Страница 103: ...page 99 4 If necessary touch and then touch to check the embroidering area For more details refer to page 53 5 After making the desired changes touch The embroidering settings screen appears again Exa...

Страница 104: ...g hooped in the embroidery frame Example When embroidering a pillowcase Rotate the pattern 90 degrees to the left before embroidering Example When embroidering a T shirt Rotate the pattern 180 degrees...

Страница 105: ...halk pencil mark Display the grid lines or cross grid lines in the pattern display area to check the pattern orientation Refer to Centerpoint marker and grid lines on page 220 2 Hoop the fabric Note W...

Страница 106: ...can make a close adjustment for the center point of the pattern moving the embroidery frame little by little 0 Touch and adjust the orientation of the pattern until the grid lines are parallel with th...

Страница 107: ...pattern will fit within the embroidering area of the frame being used 1 Embroidering area 2 Embroidery pattern size 3 Embroidery positioning sticker Depending on the type of fabric to be used it may n...

Страница 108: ...5 When the following message appears touch X The built in camera automatically detects the embroidery positioning sticker and then the embroidery frame is moved so that the center of the embroidery p...

Страница 109: ...e embroidering area Then touch again 9 Touch 0 Touch and then press the start stop button to start embroidering Note After all of the included embroidery positioning stickers have been used new ones c...

Страница 110: ...vailable when you set Manual Color Sequence to ON in settings screen 1 Touch X The spool selection screen appears 2 Touch the number of the first needle bar that will be switched To cancel the selecti...

Страница 111: ...if the machine is in the middle of the embroidery 1 Touch X The thread color setting is canceled 2 Touch X Thread colors are assigned by the machine again regardless of the previous spool setting Not...

Страница 112: ...thread colors and ten thread color changes the thread colors are assigned as shown below For a pattern with eleven or more thread colors the thread spool information is updated when the eleventh threa...

Страница 113: ...or when the machine is set to be stopped by other settings If the spool change indicator is appears the machine will require a spool change When the time is indicated in red it is the last color embr...

Страница 114: ...lors at the point where it is displayed 2 Touch to scroll up through the thread color sequence display Each time this key is touched the previous color in the thread color sequence display is selected...

Страница 115: ...ramed in red 3 Touch this key to close the message indicating that the thread spool be changed 1 Flashing in white then lights up with the next thread color light turns off when indicates black thread...

Страница 116: ...ad spools can easily be changed when replacing a thread spool whose thread is correctly threaded through the machine 1 Cut the thread between the thread spool and the thread guide 2 Change the thread...

Страница 117: ...to page 228 Be careful when going back or forward through the stitching since the embroidery frame moves at the same time Memo When the thread breaks or the bobbin thread runs out while embroidering t...

Страница 118: ...ast two or three stitches for complete coverage 1 Stitch line 2 Cross mark If the needle bar is moved back too far through the stitching touch or to go forward through the stitching 1 Each touch of th...

Страница 119: ...69 After replacing the bobbin re attach the embroidery frame Refer to page 51 Note If the embroidery frame is removed before embroidering of the pattern is finished take caution otherwise the pattern...

Страница 120: ...by thread color or by stitch to start stitching at any position of the pattern Note Be careful when going back or forward through the stitching since the embroidery frame moves at the same time 1 Pres...

Страница 121: ...and then press the start stop button to begin embroidering X Embroidering begins from the specified point Touch this key once to return to the beginning of the stitching for the color being sewn After...

Страница 122: ...dering The remainder of the embroidery can be sewn when the machine is turned on again however some of the stitches that were already sewn may be sewn again Note Be careful when going back or forward...

Страница 123: ...Check that the needle drop point is positioned where stitches have already been sewn 8 Touch 9 Touch X The embroidering screen appears again 0 Touch and then press the start stop button to continue em...

Страница 124: ...ion of the bobbin thread and adjust the tension if necessary Be sure to adjust the tension of the bobbin thread before adjusting the tension of the upper thread Adjusting the tension of the bobbin thr...

Страница 125: ...de of the fabric 1 Turn the thread tension knobs 1 Thread tension knobs 2 Tighter 3 Looser 4 Mark Correct Thread Tension The pattern can be seen from the wrong side of the fabric If the thread tension...

Страница 126: ...be decreased any further Increase the tension of the bobbin thread For details refer to page 122 Note If you decrease the thread tension further than the red line the tension knob may be disassembled...

Страница 127: ...ying the manual color sequence 132 Using the manual color sequence 133 Precautions on the manual color sequence 133 Automatic Lock Stitch Setting 134 Starting Ending Position Settings 135 Repeatedly s...

Страница 128: ...o remove after embroidering is complete 1 Touch and then display page 2 5 of the settings screen 2 Use and to specify the distance from the pattern to the basting stitching Memo The higher the setting...

Страница 129: ...ect a frame that matches the pattern size Frame options are displayed on the LCD screen Finish combining and editing the pattern before selecting the appliqu setting If the pattern is edited after sel...

Страница 130: ...the embroidering screen Memo Three steps are added to the sewing order appliqu cutting line position of pattern placement on the garment and appliqu stitching 1 Cutting line for appliqu 2 Position of...

Страница 131: ...is used it is not necessary to remove the stabilizer material after sewing the appliqu outline To reduce shrinkage of the pattern we recommend using water soluble stabilizer Put together two layers of...

Страница 132: ...Instead of having a multi step appliqu created by following the embroidery image you can create a shape to surround the embroidery image with a frame pattern Once the multi step appliqu is created to...

Страница 133: ...h 7 Use to select the frame pattern and then touch and X The frame pattern is deleted 8 Touch to continue to the embroidering settings screen 9 Touch to continue to the embroidering screen 0 Continue...

Страница 134: ...signed to certain needle bars the thread color settings can be changed with the needle bar number assignments even when the pattern is changed The operation is simplified if the same thread colors are...

Страница 135: ...gs are to be specified X The needle bar number for the thread color selected in step 2 changes to the selected needle bar number If the needle bar number was specified with reserved needle bar setting...

Страница 136: ...gth is less than 0 8 mm the lock stitch won t be inserted If Thread Trimming is set OFF in setting screen the lock stitch won t be inserted refer to page 223 Specifying that lock stitches be sewn befo...

Страница 137: ...ears 1 Specifies the starting position 2 Specifies the ending position Touch a key to select the setting The highlighted key shows the currently selected setting Example 3 Touch this key to close this...

Страница 138: ...st embroidery pattern Touch to display the embroidering screen and then touch and press the start stop button 1 Starting position 2 Ending position 3 After embroidering is finished the machine stops a...

Страница 139: ...el the starting point setting and return the starting point to the center of the pattern touch Use to select a different starting point for embroidering 4 Touch to return to the embroidering settings...

Страница 140: ...he needle with the end of embroidering for the previous pattern Touch to check the needle drop point on the LCD screen Touch to zoom up the camera view twice the size of normal view Note You can also...

Страница 141: ...fy a maximum sewing speed to a certain needle bar in the reserved needle bar settings refer to page 146 When you set the slower sewing speed to a certain needle bar the sewing speed set with the proce...

Страница 142: ...anges to 2 After finishing sewing the area for the current color the next needle bar moves into position and the machine stops before sewing the next color X changes back to If the machine is temporar...

Страница 143: ...you will be asked if you wish to continue sewing or select a new pattern when the machine is turned on again Touch to continue embroidering Refer to Resume Embroidering After Turning Off the Machine o...

Страница 144: ...emporary use 1 While sewing the color before the one that you wish to change touch so that it changes to X After the color currently being sewn is finished the threads are trimmed and the machine stop...

Страница 145: ...is procedure even when the machine has been stopped with a specified pause or at the time of spool change If the start stop button was pressed to stop the machine while an area was being sewn a tempor...

Страница 146: ...u touch any key of the needle bar number above the temporary needle bar setting will be activated Refer to page 142 Touch again to return to the pattern s original settings 4 Touch Memo Even if uninte...

Страница 147: ...bar Note This feature is not accessible through the embroidering screen You can assign thread colors up to 9 needle bars in normal mode When you set Manual Color Sequence to ON in settings screen it i...

Страница 148: ...ecified 1 The selected color of thread and the anchor appear on the spool 5 Touch or to set the maximum sewing speed for the assigned needle bar 1 Value of maximum sewing speed setting Memo Decrease t...

Страница 149: ...the key from to for the number of the needle bar whose setting you wish to cancel 1 Indicates the number of the selected needle bar 2 Touch 1 The anchor disappears from the thread spool X This cancels...

Страница 150: ...EMBROIDERING SETTINGS 148...

Страница 151: ...idery Pattern Pattern Editing Screen 179 Enlarge the pattern image on the screen 179 Combining patterns 179 Selecting the pattern to be edited 180 Moving a pattern 181 Flipping a pattern horizontally...

Страница 152: ...lowing types of media with the USB Memory Card Reader Writer Secure Digital SD Card CompactFlash Memory Stick SmartMedia MultiMediaCard MMC xD Picture Card Note Some USB media may not be usable with t...

Страница 153: ...e pattern 90 degrees Even after being rotated 90 degrees embroidery data larger than 200 mm H 360 mm W approx 7 7 8 inches H 14 inches W cannot be used All designs must be within the 200 mm H 360 mm W...

Страница 154: ...rd reader USB card writer module is not flashing or while the embroidery machine is turned off refer to page 164 If you have purchased the Palette Ver5 or later Palette Petite or Palette PTS you can p...

Страница 155: ...een 1 Embroidery patterns 2 Frame patterns 3 Monogram and frame pattern 4 Greek alphabet patterns 5 Alphabet patterns 6 Floral alphabet patterns 7 Common design patterns 8 Embroidery patterns stored i...

Страница 156: ...ern 2 Select an embroidery pattern category Touch the desired pattern X The list of embroidery patterns appears 3 Select an embroidery pattern Touch the desired pattern X The selected pattern appears...

Страница 157: ...pattern editing screen appears Monogram and frame designs Monogram designs can be created by combining two or three letters Frame patterns are also available for these types of designs 1 Touch X The...

Страница 158: ...een X The selected characters appear in the pattern display area 1 If the wrong character was selected or you wish to select a different character touch to delete the last character selected and then...

Страница 159: ...entered characters cannot be changed after the characters are combined The size of the entire pattern can be changed from the pattern editing screen 5 Touch This confirms the character selection X Th...

Страница 160: ...size as the letters 1 Touch this key to change the size a Touch This confirms the frame selection X The pattern editing screen appears Touch to group this combined pattern Refer to Editing patterns a...

Страница 161: ...selections X The text input screen appears 3 If the key for the character that you wish to select is not displayed touch the tab for the desired set of characters 1 Uppercase letters 2 Lowercase lette...

Страница 162: ...are combined The size of the entire pattern can be changed from the pattern editing screen Note Size of the two small fonts and cannot be changed Both of these smaller fonts are shown on page 4 4 of...

Страница 163: ...lor 0 If the text is small and difficult to read on the screen touch to check the text a After checking the text touch to return to the text input screen b After entering all of the text as desired to...

Страница 164: ...h X The list of floral alphabet patterns appears 2 Select an embroidery pattern Touch the desired pattern X The selected pattern appears in the pattern display area If the wrong pattern was selected o...

Страница 165: ...elected pattern appears in the pattern display area If the wrong pattern was selected or you wish to select a different pattern touch the desired pattern 3 Touch This confirms the pattern selection X...

Страница 166: ...ine s memory can be organized by deleting unnecessary data After selecting the pattern that you wish to delete touch to display the screen shown below 1 Permanently deletes the data from the machine s...

Страница 167: ...TS you can plug the included USB card writer module into the machine as an embroidery card reader and recall patterns When connecting the USB card reader writer to the machine s USB port be sure to se...

Страница 168: ...operation when a pattern larger than 200 mm H 360 mm W 7 7 8 inches H 14 inches W is selected whether from the computer or USB media Computer USB Using the included USB cable the embroidery machine c...

Страница 169: ...e connector do not insert it with force and check the orientation of the connector For details on the position of the USB port on the computer refer to the instruction manual for the corresponding equ...

Страница 170: ...refer to Sewing Large size Split Embroidery Patterns on page 238 To add a pattern from the computer repeat step 1 X The following screen appears while data is written to the embroidery machine and the...

Страница 171: ...ace the pattern that you wish to recall into the Removable Disk folder X After writing the data to the embroidery machine the key for that pattern appears in the screen 3 If the desired pattern can st...

Страница 172: ...screwdriver remove the protective cap covering the front screw on the side of the machine Insert the end of the Allen screwdriver into the hole in the protective cap and then lightly pull out the pro...

Страница 173: ...alled Firmly insert the cord clamps into the screw holes 6 Pass the USB cable through the front USB cord clamp and then close the clamp to secure the cable Note When passing the USB cable through the...

Страница 174: ...e of the operation panel or plug the USB Card Reader Writer into the machine s port Note Do not insert anything other than USB media into the USB media port Otherwise the USB media drive may be damage...

Страница 175: ...pattern that you wish to delete touch to display the screen shown below 1 Deletes the data then returns to the screen with no pattern selected 2 Does not delete the data then returns to the screen be...

Страница 176: ...tatus of the patterns being transferred can be viewed from the computer monitor Use the included USB cable to connect the embroidery machine to a computer Operations available with the Link function S...

Страница 177: ...embroidery frame for the size of the pattern to be sent 1 Touch and then touch and to display page 5 5 of the settings screen 2 Touch to enable the Link function X When the following message appears...

Страница 178: ...details on using the embroidery editing software refer to the Instruction Manual included with it This Link dialog box is found in Palette 9 software If the following error message appears the type o...

Страница 179: ...ultiple embroidery machines are connected at the same time check the status of the machines using the 10 digit machine ID that appears in the machine s screen The following information can be viewed f...

Страница 180: ...ing screen settings specified in step 0 are saved even if was touched to continue sewing after embroidering is finished Memo If the embroidery machine is turned off while it is embroidering the resume...

Страница 181: ...view the pattern image twice the size of the normal previewed image 1 Touch X The enlarged pattern image is displayed on the screen Press and on the pattern display area to view the hidden area of th...

Страница 182: ...ether it is displayed as each pattern is selected or after all patterns that you wish to combine have been selected Selecting the pattern to be edited If multiple patterns are selected you can choose...

Страница 183: ...age 202 To return the pattern to its position before it was moved center of the embroidery frame touch The pattern can also be moved by dragging it If a USB mouse is connected move the mouse to positi...

Страница 184: ...he screen shown below appears 2 After making the desired changes touch Horizontal flip turned off Flipped horizontally Example Original angle Reduces without changing the height to width proportion Re...

Страница 185: ...ecessary touch the arrow keys to adjust the position of the pattern For more details refer to page 181 5 After making the desired changes touch X The pattern editing screen appears again CAUTION Rotat...

Страница 186: ...rge or the pattern is too close to the edge of the embroidery field all of the rotating options may not apply Changing the text arrangement of a character Characters can be arranged on a horizontal li...

Страница 187: ...all of the characters in a word selected will be spaced equally 2 Separates characters to be spaced and positioned individually 3 Increases the space between characters equally 4 Decreases the space...

Страница 188: ...g or to separately edit the patterns after all character have been entered 1 Touch 2 Touch X The key appears as 3 Use to select where the pattern is to be separated and then touch to separate it For t...

Страница 189: ...n each of the characters 1 Touch so that it changes to Each touch of the key turns the setting either on or off Changing the thread density only for selected character and frame patterns The thread de...

Страница 190: ...previewed on the screen By changing the colors of the pattern the same pattern can be viewed in various ways If your thread colors are registered in a color thread table and if you used the table for...

Страница 191: ...e pattern displayed at the top will be changed 3 Touch and to select the new color from the color palette 1 The color that appears enlarged is the color that is selected 2 Displays the name of the sel...

Страница 192: ...elect the direction in which the pattern will be repeated 1 Horizontal direction 2 Vertical direction 3 Repeating and deleting horizontal keys 4 Repeating and deleting vertical keys 5 Spacing keys X T...

Страница 193: ...me 5 Complete repeated patterns by repeating steps 2 through 4 6 After making the desired changes touch The pattern editing screen appears again Memo When there are two or more patterns all patterns w...

Страница 194: ...omplex repeated patterns 1 Choose the direction in which the repeated pattern will be cut Touch to cut horizontally Touch to cut vertically X The pattern direction indicator will change depending on t...

Страница 195: ...shed on a pattern a thread mark in the shape of an arrow will be sewn using the final thread When sewing a series of patterns use the point of this arrow for positioning the following designs to be se...

Страница 196: ...changed When a group of two or more patterns using border patterns is repeated the sewing order is changed so that the same color can be sewn continuously in each pattern To sew a repeated pattern wit...

Страница 197: ...tedly After creating the repeated pattern rehoop the embroidery frame and keep sewing for the next pattern Memo The border frame optional allows you to easily rehoop the fabric without removing the em...

Страница 198: ...embroidering area for the next pattern is within the embroidering area of the embroidery sheet 1 Pattern embroidered first 2 Position of pattern to be embroidered next 3 Embroidering area of embroide...

Страница 199: ...ion moving the embroidery frame little by little b If the pattern position cannot be aligned using the positioning keys rehoop the fabric and then try again to align the position with the positioning...

Страница 200: ...tore the Custom Thread Table to the original factory setting Visit our website at www babylock com for Custom Thread Table Clear Restore Program and instructions Before creating a custom thread table...

Страница 201: ...ll not be changed 6 Repeat the previous steps until all desired thread colors are specified To delete a specified color from the palette touch Note When setting up custom thread table touch or or touc...

Страница 202: ...to set the next color after each selection Machine will not advance to the next square automatically 6 Touch to return to the original screen Choosing a color from the custom thread table You can sele...

Страница 203: ...ead color changes 3 Selects the previous color in the thread color sequence display 4 Selects the next color in the thread color sequence display 5 Color thread table Select a color from this table 6...

Страница 204: ...tern display area are grouped Touch to ungroup the patterns If there are multiple grouped patterns the selected pattern group is ungrouped Deleting a pattern 1 Touch X The screen shown below appears 2...

Страница 205: ...embroidering settings screen Touching these keys moves the embroidery frame Rotating the entire pattern The entire pattern can be rotated 1 Touch X The screen shown below appears 1 Enables the entire...

Страница 206: ...we will combine text with floral alphabet pattern which we will then edit 1 Touch 2 Select X This pattern will be positioned at the center of the embroidery area 3 To select the pattern touch X The p...

Страница 207: ...rea To change the size of the pattern select o and then touch to select the desired size To change the text arrangement touch and then select the desired text arrangement 8 After selecting the charact...

Страница 208: ...uch the tab for lowercase letters to display the lowercase letters input screen and then touch u c then k X The selected letters appear at the center of the embroidery area c After selecting the chara...

Страница 209: ...e pointer over the desired pattern and then click the left mouse button In addition patterns can be selected by directly touching the screen with your finger or touch pen Example To reduce size f Touc...

Страница 210: ...to preview Touch again to return to the previous screen Memo Touch to group this combined pattern Refer to Editing patterns as a group on page 202 j After finishing all editing touch and then X The em...

Страница 211: ...to save a pattern in the machine s memory See page 163 for information on retrieving a saved pattern 1 With the pattern that you want to save displayed in the embroidery settings screen touch 2 Touch...

Страница 212: ...select a different pattern touch the desired pattern 3 Touch X The screen shown below appears 4 To delete the data touch X The pattern is deleted and if there is enough space the previous screen appea...

Страница 213: ...Depending on the type of USB media being used either directly plug the USB device into the machine s USB port or plug the USB media Reader Writer into the machine s USB port The USB media can be inse...

Страница 214: ...Do not unplug a USB device media from this machine immediately after it has been plugged in Be sure to wait at least 5 seconds before unplugging the USB device media Computer USB Using the included U...

Страница 215: ...ted into a connector in one direction If it is difficult to insert the connector do not insert it with force and check the orientation of the connector For details on the position of the USB port on t...

Страница 216: ...SELECTING EDITING SAVING PATTERNS 214...

Страница 217: ...lor information for PES format data 221 Specifying the thumbnail size 222 Changing the background colors of the embroidery patterns or thumbnails 222 Specifying jumpstitch trimming DST jump codes for...

Страница 218: ...r when selecting a pattern from the pattern list screen are displayed Small or Large Refer to page 222 6 Embroidery Background Color Thumbnail Background Color Depending on the color of the embroidery...

Страница 219: ...saver Refer to page 225 E Opening Screen The machine can be set so that the opening screen is either displayed ON or not displayed OFF when the machine is turned on F Spool Stand LED Specifies the set...

Страница 220: ...ck with your local authorized Baby Lock retailer or at www babylock com for details on available updates Details of each of the settings are described in the following sections After specifying the de...

Страница 221: ...m H 180 mm W 5 1 8 inches H 7 1 8 inches W Medium embroidery frame 100 mm H 100 mm W 4 inches H 4 inches W Small embroidery frame 40 mm H 60 mm W 1 1 2 inches H 2 3 8 inches W Quilt frame optional 200...

Страница 222: ...ame of the thread colors embroidery thread number or the embroidery time When the embroidery machine is purchased the thread color number 123 is selected The thread color display setting can be specif...

Страница 223: ...etting or setting from the Palette Palette petite or Palette PTS embroidery editing software Refer to Changing the thread color information on page 220 for the machine setting of thread color The PES...

Страница 224: ...nd reselect a pattern category Changing the background colors of the embroidery patterns or thumbnails The background colors of the pattern display area and pattern thumbnails Depending on the pattern...

Страница 225: ...d on the next line OFF The machine does not cut either a jumpstitch or the jump code in Tajima embroidery data dst When the machine is purchased ON is selected and the number of jumps is set to 3 The...

Страница 226: ...leting short stitches If embroidery data other than our original patterns are used the stitch length may be too short possibly resulting in the thread or the needle breaking In order to prevent this p...

Страница 227: ...gth of time A setting between OFF 0 and 60 minutes can be set in 1 minute increments When the embroidery machine is purchased 5 min is selected The screen saver settings can be specified from page 4 5...

Страница 228: ...reen Select the desired number to specify the image 5 Select the device that is connected Touch when connecting USB media to the primary top USB port Touch when connecting USB media to the center USB...

Страница 229: ...settings screen 1 Touch or to select the desired brightness X Check that the desired sewing light brightness is selected by checking the embroidering area Changing the speaker volume The volume of op...

Страница 230: ...n the machine is purchased ON is selected The thread sensor can be specified from page 4 5 of the settings screen 1 Touch or to select the desired setting Note Normally set thread sensor to ON When th...

Страница 231: ...he pointer shape from the three settings available and Memo The setting remains selected even if the machine is turned off Changing the units of measurements The units of measurements can be set to mi...

Страница 232: ...achine operations guide key and then select from the four topics that appear to display the available information Contents of Categories Principal Parts Displays and explains principal parts of the ma...

Страница 233: ...this key to display the next page 2 Balance of information on current topic 3 Previous page key Touch this key to display the previous page 4 Current page number 5 Total number of pages 6 Movie key Mo...

Страница 234: ...the movie 3 Touch this key to pause the movie 4 Touch this key to fast forward the movie 5 Touch this key to rewind the movie 6 Touch this key to display the movie from the beginning of the current p...

Страница 235: ...me 249 Using the Optional Cap Frame 253 Cap frame and its accessories 253 Types of caps 254 Fabric precautions 255 Preparing to use the cap frame 255 Attaching the cap frame 261 Installing the embroid...

Страница 236: ...material 2 Frame the fabric for the appliqu from step 1 in the embroidery frame and then sew an APPLIQUE MATERIAL pattern The line that indicates where the appliqu will be cut out is sewn and then the...

Страница 237: ...appliqu piece sew an APPLIQUE pattern The appliqu is finished Depending on the pattern an APPLIQUE pattern may not be available In this case sew the appliqu using thread in the color of a part of the...

Страница 238: ...of the satin stitched frame pattern in the same way Using a frame pattern to create appliqu s 2 There is another way of sewing appliqu s With this method there is no need to change the fabric in the e...

Страница 239: ...the embroidery frame when cutting off the excess appliqu fabric In addition do not apply extreme pressure to the framed fabric otherwise the fabric could become loose 5 Select the satin stitched fram...

Страница 240: ...read the large size embroidery pattern shown below from USB media and embroider it 1 Connect to the machine the media containing the created large size embroidery pattern and then select the large siz...

Страница 241: ...ure to select fabric of the size of combined pattern 5 Hoop the appropriate part of the fabric In this case hoop upper left part of the fabric 1 Center of fabric 6 Touch Memo The pattern can be rotate...

Страница 242: ...next design section aligning on the alignment stitching In this case align the left side of the hoop on the right side of the design section embroidered in step 6 1 Alignment stitching Note Make sure...

Страница 243: ...for the Operation of the Machine This section provides descriptions to operations useful in the operation of this machine Checking the thread tension of built in patterns We will sew this pattern to...

Страница 244: ...ing text along a line in the fabric pattern the beginning of the stitching can be set in the lower left corner so that the position can be checked and then the beginning of stitching can be reset Next...

Страница 245: ...es so that the needle drop point aligns with the beginning of stitching 5 With a fabric marker mark this point on the fabric 6 Remove the embroidery frame from the machine and then connect these two p...

Страница 246: ...ting a custom thread table on page 198 and Choosing a color from the custom thread table on page 200 for the change thread color function Normal thread color display Thread color display using a custo...

Страница 247: ...a thread is exposed to a heat source or bright lights Ensuring that thread does not become damaged requires that stock be frequently rotated and that threads are not left in the same place for an ext...

Страница 248: ...duroy velvet and faux fur are examples of materials that have a nap or pile that can actually penetrate embroidery stitches as your machine sews The result is an unfinished and often sloppy appearance...

Страница 249: ...allows sewing a flattened cap for use on a flat machine or one that allows sewing the cap in its natural curved shape for use on a tubular machine Hooping fabric The framed fabric and backing should...

Страница 250: ...highly detailed designs may require more backing If so use two pieces of lightweight backing instead of one piece of heavy backing Golf shirt 1 cut away Optional Use topping for designs containing sm...

Страница 251: ...to the Instruction Manual provided with the embroidery editing software version Palette 9 or later After the jumbo frame pattern has been created follow the procedure described below to transfer the...

Страница 252: ...1 more than 10 mm 3 8 inch 2 Location where the pattern is to be embroidered 4 Attach the jumbo frame to the machine 5 Touch Note When you change the embroidering position using the jumbo frame be su...

Страница 253: ...in camera 1 Built in camera is in this box 2 Affix the sticker in this area 9 When the machine s built in camera has finished detecting the location of the embroidery positioning sticker the following...

Страница 254: ...camera cannot detect the location of the embroidery positioning sticker the following error message appears Touch return the jumbo frame to its previous orientation and then perform the procedure aga...

Страница 255: ...this cap frame driver to the carriage of the machine 1 Insert the thumb screws into these holes and tighten the screws to secure the movable section Use these holes when storing this cap frame driver...

Страница 256: ...an be used appear as shown below Types of caps With the machine we recommend that the following types of caps be embroidered Standard Pro Style 1 Face Pro style 2 6 sections Low Profile Low fitting 1...

Страница 257: ...embroidering If caps of the following types of fabric are used they will be very difficult to frame easily wrinkled or easily shrink Polyester Foam Stretch material Melton Wool 100 Nylon Suede Prepar...

Страница 258: ...rame holder 2 Remove the two upper thumb screws of the cap frame driver and set aside Loosen the two lower thumb screws 4 turns 1 Upper thumb screws 2 Lower thumb screws 3 Pass the machine bed through...

Страница 259: ...les in the mounting plate of the cap frame driver 1 Pins on the frame mounting plate of the carriage 2 Holes in the mounting plate of the cap frame driver 6 Insert and tighten the two upper thumb scre...

Страница 260: ...Lower the L shaped bracket to make it touch the machine bed and then tighten the two hexagonal screws using the Allen screwdriver medium Firmly tighten the screws 1 L shaped bracket 4 Using the Allen...

Страница 261: ...jig Attach the mounting jig to a stable surface such as a desk 1 Loosen the thumb screw for the mounting jig to open the mounting bracket so that it is wider than the thickness of the mounting surface...

Страница 262: ...tened Do not attach the mounting jig to an unstable surface flexible bent or warped Be careful that the mounting jig does not fall when it is removed 4 Adjust the size of the mounting jig according to...

Страница 263: ...p into the cap frame attached to the mounting jig and then remove the cap frame from the mounting jig with the cap clamped Next attach the cap frame to the cap frame driver on the machine Attaching th...

Страница 264: ...cap frame snap into place 3 Release the snap lock on the cap frame by pressing down and then disengage the latch Open the clamping frame Also open brim holder 1 Snap lock released 2 Clamping frame op...

Страница 265: ...uard holder on the cap frame and then slide the sweat guard under the sweat guard holder 1 Sweat guard holder 2 Center line of sweat guard holder 3 Center line of cap 7 Align the center line of the ca...

Страница 266: ...the outside clamping frame so that it conforms to the shape of the cap and so that the teeth of the clamping frame perfectly align with the base of the brim 1 Teeth of outside clamping frame 2 Base of...

Страница 267: ...2 Screw for the inside clamping frame c Pull the brim holder up as far as possible flipping the holder over the cap brim then pushing down on the holder to secure the brim 1 Brim holder 2 Center line...

Страница 268: ...the machine s presser foot 1 Clips h While pulling the lever toward you that is located behind the handle on the right side of the mounting jig rotate the cap frame to the right After the cap frame ha...

Страница 269: ...e cap frame gently pulling toward you As shown in the illustration 1 Holder 2 Handle Attaching the cap frame to the embroidery machine The cap frame driver is required in order to attach the cap frame...

Страница 270: ...otch on cap frame 3 Holder X The cap frame is secured with holders Make sure that all of the holders on the driver are firmly secured in the frame holes This completes the installation of the cap fram...

Страница 271: ...frame driver Note Be careful that the cap frame driver does not hit any nearby parts such as the presser foot 5 With the hole on the sweat guard holder aligned with the centerline of the guiding plate...

Страница 272: ...ap frame pay attention to following points in order to avoid registration problems misalignment of gaps in the pattern 1 Sew underlay stitches 2 Start the embroidery pattern from the center and sew to...

Страница 273: ...stitching is at least 2 mm and that the stitching over laps the fabric by at least 1 mm Also make sure that there are no jumps of long stitches in the outlining on each region or letter 1 At least 1 m...

Страница 274: ...obbin winder set may differ depending on the country area where the machine was purchased Be sure to place the bobbin winder on a level stable surface Only use the bobbins supplied with this bobbin wi...

Страница 275: ...ead guide Firmly insert the thread guide as far as possible and make sure that it is secure Connecting the AC adapter 1 Insert the plug of the power supply cord into the AC adapter 2 Plug the cord on...

Страница 276: ...2 Set the thread spool on the spool pin 1 Thread spool 2 Spool pin Note When using a small spool remove the spool cushion and set the spool directly onto the spool pin Also use the included spool cap...

Страница 277: ...de slit in the bobbin winder seat and pull the thread The cutter will cut the thread 1 Guide slit 2 Bobbin winder seat Note Be sure to follow the procedure described If the bobbin is wound without the...

Страница 278: ...he bobbin correctly Check that the bobbin thread has been wound correctly otherwise the needle may break or the thread tension will be incorrect Be sure to clean the bobbin case each time that the bob...

Страница 279: ...l detergent squeeze it out firmly and then wipe the surface of the machine After cleaning it once with a wet cloth wipe it again with a dry cloth CAUTION Note Do not use chemical products such as benz...

Страница 280: ...the thread may not be cut correctly and the error message may appear or various parts of the machine may be damaged Make sure to clean around the needle plate once a month Use on offset screwdriver an...

Страница 281: ...ase Thread wax and dust easily collect around the hole in the tension adjusting spring on the bobbin case resulting in an incorrect thread tension Therefore it should be cleaned each time when the bob...

Страница 282: ...and then close the hook cover Refer to page 38 39 Cleaning the thread paths of the upper threads If dust or lint has accumulated in the thread guides or tension unit in the paths of the upper threads...

Страница 283: ...dial 2 Nylon shoulder washer 3 Tension spring 4 Tension base spring 5 Felt washer top 6 Tension disc 7 Felt washer bottom 3 Reassembling the tension unit Note When reassembling the tension unit be sur...

Страница 284: ...UTION 2 Open the hook cover and remove the bobbin case Refer to page 38 39 3 Rotate the handwheel about 50 degrees to move the race of the hook to a position where it can easily be oiled 1 Handwheel B...

Страница 285: ...y machine Do not apply too much oil Fabric or thread may get contaminated If too much oil is applied wipe off any excess with a rag If the thread breaks while sewing or the operating noise of the hook...

Страница 286: ...r problems during sewing Touch the key that shows the problem and then check for the causes that are displayed 1 Touch 2 Touch 3 Touch the key that contains a description of the problem 4 Check the it...

Страница 287: ...be difficult to remove or attach the embroidery frame Touch the Needle bar Frame move key to position the carriage so the embroidery frame can easily be removed or attached p 90 Embroidering is interr...

Страница 288: ...is catching somewhere Pull the upper thread by hand from below the presser foot and check that the thread moves smoothly If the thread does not move it is not threaded correctly Thread the upper thre...

Страница 289: ...consult your nearest Baby Lock retailer The needle is touching the needle plate 1 Needle 2 Needle plate hole 3 Needle touching hole Consult your nearest Baby Lock retailer The presser foot is set too...

Страница 290: ...correctly positioned in the needle bar thread guide p 56 59 Upper thread is not positioned in upper or middle thread guide Make sure thread passes completely under upper and middle thread guide p 56 5...

Страница 291: ...The upper thread is not threaded correctly Thread the upper thread correctly p 56 The needle is bent or blunt Replace the needle with a new one p 35 88 The needle is not installed correctly Correctly...

Страница 292: ...embroidery frame while replacing bobbin thread changing needle or working near embroidery frame If the carriage is moved turn the machine off then on again The correct frame position at the time that...

Страница 293: ...h and then thread the upper thread again p 56 The bobbin thread is not correctly threaded Correctly thread the bobbin thread p 38 The lower thread tension is incorrect Adjust the tension of the bobbin...

Страница 294: ...too heavy Too many stitches in an area pull fabric causing it to pucker Slightly decrease the design density by 5 to 10 There is no color indicated on LED light after the lights flashing when the thre...

Страница 295: ...urved text arrangement for the selected embroidery frame Change the text arrangement or the embroidery frame Machine cannot receive any data from the PC in the Link mode Turn off the machine and check...

Страница 296: ...proximately 50 mm 2 inches of thread has been pulled out and then re install the bobbin Refer to page 38 The patterns you are editing take up too much memory or you are editing too many patterns for t...

Страница 297: ...the other operation after the needle is threaded Refer to page 60 Too many patterns are being combined for the amount of memory available Delete some patterns from the combined pattern The pattern co...

Страница 298: ...ed in Resume Embroidering After Turning Off the Machine on page 120 to align the needle position and sew the remainder of the pattern was touched while thread colors were being changed A saved combine...

Страница 299: ...th the PC in the Link mode Turn off the machine and on again The thread trimming button was pressed before the machine was unlocked Touch to use the thread trimming function The machine needs maintena...

Страница 300: ...in case clean the race and then oil it Refer to page 279 and 283 The USB media is write protected Cancel the write protection The USB media is write protected Touch and cancel the write protection You...

Страница 301: ...combined The pattern has too many stitches and cannot be used Data with stitches that exceed specifications 500 000 stitches cannot be displayed Use data design software to reduce the number of stitch...

Страница 302: ...APPENDIX 300 If any of the following messages appear consult your nearest Baby Lock retailer...

Страница 303: ...Troubleshooting 301 7...

Страница 304: ...ers change with the touch of each numbered cross to show variables If the buzzer sounds when cross number 5 is touched an error occurred during setting and ERROR appears on the screen Touch the crosse...

Страница 305: ...le HA130EBBR 11 Number of needle 10 needles Thread tension Manual Cap sewing Option 60 mm H 360 mm W 2 3 8 inches H 14 inches W Tubular sewing 4 frames available 200 mm H 360 mm W 7 7 8 inches H 14 in...

Страница 306: ...data other than the upgrade file is saved on the USB media being used for this upgrade Upgrade procedure using USB media 1 While pressing the automatic threading button turn the main power to on X Th...

Страница 307: ...n turn the main power to on X The following screen will appear on the LCD 2 Touch 3 Plug the USB cable connector into the corresponding USB ports for the computer and for the machine X Removable Disk...

Страница 308: ...APPENDIX 306...

Страница 309: ...ing 254 standard pro style 254 Carriage 20 Centerpoint 220 Change thread color key 75 140 188 Changing character spacing 185 colors of the pattern 188 display guides 218 embroidering position 99 langu...

Страница 310: ...Golf Style cap 255 Greek alphabet patterns 163 H Handwheel 21 282 Headwear 248 Hook 277 Hook cover Hook 20 Hooping 49 94 247 Horizontal mirror image key 182 J Jumbo frame 249 Jump code 223 Jumpstitch...

Страница 311: ...ator 79 111 Spool stand 20 31 Spool stand LED 10 113 228 Stabilizer 93 245 248 Standard Pro Style caps 254 Standard Tail 216 225 Start stop button 21 65 Starting ending position key 77 135 136 Stitch...

Страница 312: ...English 884 T11 XF0036 001 Printed in Taiwan...

Отзывы: