


hypercharger - Operation Instructions and Installation Guide
Version 1-1C
8
Maintenance
Page 49 of 57
All rights reserved. The reproduction of this document, also partially, is allowed only with authorization by alpitronic s.r.l.
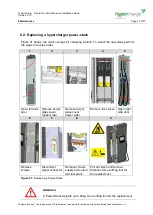
8.2. Replacing a hypercharger power-stack
Figure 41 shows the order of steps for changing a stack. To install the new stack perform
the steps in reverse order.
1
2
3
4
5
Open left side
door
Remove acrylic
glass cover
(upper side)
Remove acrylic
glass cover
(lower side)
Remove the strives Open right
side door
6
7
8
9
Remove
screws
Disconnect
signal connector
Remove screws
supply and output
terminal stack
Pull out stack and remove.
Attention! Use a lifting tool for
the replacement
Figure 41:
Replacing a Power-Stack
Attention
A Power Stack weights up to 95kg. Use a lifting tool for the replacement.


