3
Befor
e y
ou begin
Operation section
3
Spread a soft cloth over your work surface,
and place magazines or books to support
the four corners of the AW2816 so that the
faders, keys, and other controllers on the
top panel will not be damaged. Then turn
the AW2816 face down.
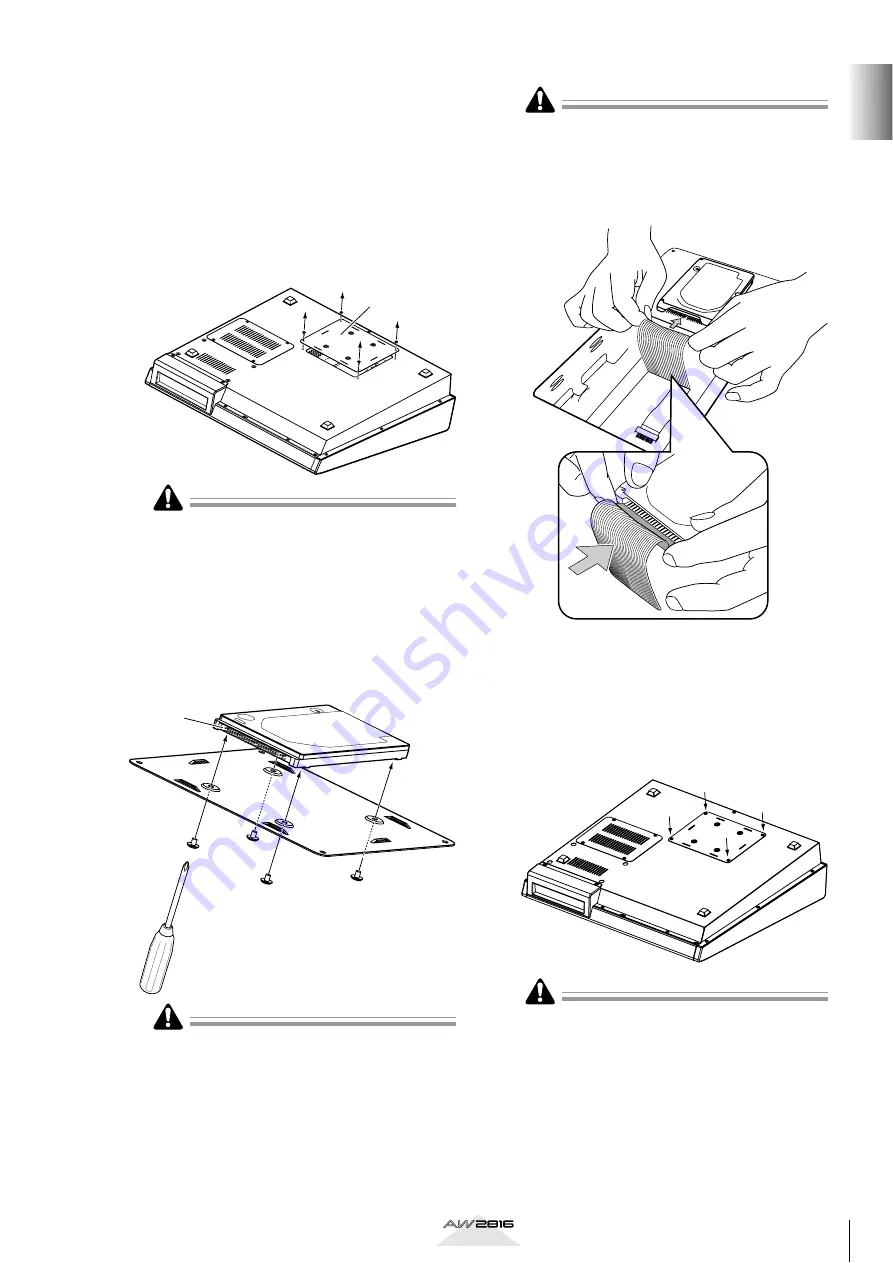
4
From the bottom, unfasten the hard disk
cover plate to which the internal 2.5 inch
IDE hard disk will be attached.
The screws you remove will be used again to fasten
the cover plate, so be careful not to lose them.
5
Turn over the hard disk cover plate. As
shown in the illustration, place the hard
disk to be installed on the cover plate,
align the screw holes of the hard disk with
the holes of the cover panel, and use a
screwdriver and the included screws to fas-
ten the hard disk at four locations.
If you fail to tighten the screws all the way, the hard
disk may vibrate and fail to operate correctly.
6
Pull out the flat cable from inside the
AW2816, and plug the flat cable into the
connector of the hard disk as shown in the
illustration. Press both ends of the flat
cable connector to ensure that it is firmly
plugged in all the way.
• Even if the connector is difficult to insert, do not
attempt to insert it by applying excessive force.
Doing so may damage the hard disk, or you may
injure yourself.
• When inserting the connector, be careful that it is
not mis-aligned up/down or left/right.
7
As shown in the illustration place the cover
plate with the attached hard disk back
onto the bottom panel of the AW2816,
and fasten the cover plate to the bottom
panel using the four screws that you
removed in step 4.
• You must use the same screws that you removed in
step 4, or identical screws. Using longer screws may
damage the interior of the unit, or may cause elec-
trical shock.
• Do not turn on the power of the AW2816 until all
options have been installed.
• When you turn on the power of the AW2816 after
installing a new hard disk, formatting of the hard
disk will begin automatically (
→
Hard disk
cover plate
Connector


