


October 2012
4-67
ColorQube 8570/8870 Service Manual
REP 4.1, REP 4.2
Repairs and Adjustments
Xerox Internal Use Only - Revised, 3rd Revision
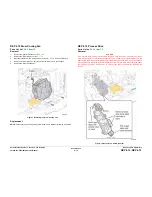
REP 4.1 Preheater Lift Solenoid
Parts List on
PL 4.1 Item 1
Removal
1.
Remove the Control Panel Cover (
REP 1.5
).
2.
Remove the Control Panel (
REP 1.6
).
3.
Remove the Left Side Cover (
REP 1.10
).
4.
Remove the Right Side Cover (
REP 1.11
).
5.
Remove the Exit Cover (
REP 1.7
).
6.
Remove the Ink Loader (
REP 1.8
).
7.
Remove the Outer Duplex Guide (
REP 3.4
).
8.
Remove the Upper Duplex Guide and Solenoid (
REP 3.5
).
9.
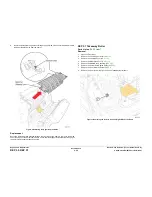
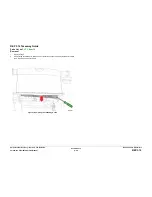
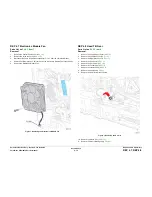
Disconnect the Preheater Lift Solenoid wiring harness connector
P/J112
.
10. Remove 1 screw that secures the Preheater Lift Solenoid to the Transfix Load Module.
11.
Remove the Preheater Lift Solenoid.
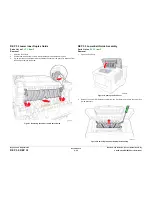
Figure 1 Removing the Preheater Lift Solenoid
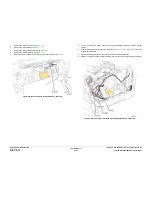
REP 4.2 Y-Axis Motor Assembly
Parts List on
PL 4.1 Item 2
Removal
1.
Remove the Control Panel Cover (
REP 1.5
).
2.
Remove the Left Side Cover (
REP 1.10
).
3.
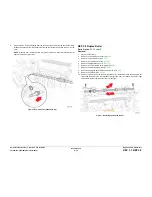
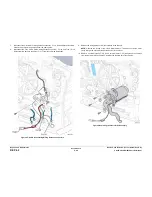
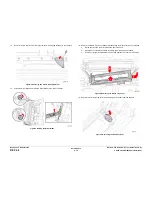
Release tension on the Y-Axis Belt by pulling the end of the Spring Arm toward the side of
the printer.
4.
Hold tension with one hand while removing the Y-Axis Belt with the other.
5.
Remove 1 screw that secures the Ground Wire to the Y-Axis Motor Assembly.
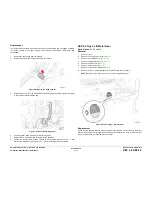
6.
Remove the Y-Axis Spring using either a spring hook or pliers, Brace the printer to pre-
vent movement while removing the spring.
Figure 1 Removing the Y-Axis Spring
Summary of Contents for COLORQUBE 8570
Page 1: ...ColorQube 8570 8870 Printer ColorQube 8570 8870 Service Manual Xerox Internal Use Only...
Page 2: ......
Page 423: ......


