background image

8.  Other informations 

105466 

– TW-31-E  -  V1.9 - 06.04.2021


Page 69 

to section 8.14:   General measures when using electronic control systems  


b.  If specific interference sources cannot be avoided they should at least be kept 

at a distance from the regulator system. 


c.  Capacitive  and  inductive  couplings  can  cause  crosstalk  between  high-voltage 

lines and  parallel low-voltage and sensor lines. This distorts measured values 
and signals and can disrupt the entire regulatory process. It is therefore recom-
mended that all sensors and signal lines be placed separately from the control 
and mains voltage lines. 


d.  If possible a separate main line should be provided to feed the regulator system. 

This helps reduce any interference penetrating the regulator via the mains sup-
ply line. Voltage surges resulting from switching substantial loads will also then 
be less of a problem. 


e.  In  the  case  of  contactors,  solenoid  valves  and  other  inductive  consumers  the 

induction voltage occurring during switching has to be reduced by appropriate 
protection methods. The choice of methods depends on whether the consumer 
runs on DC or AC voltage. 


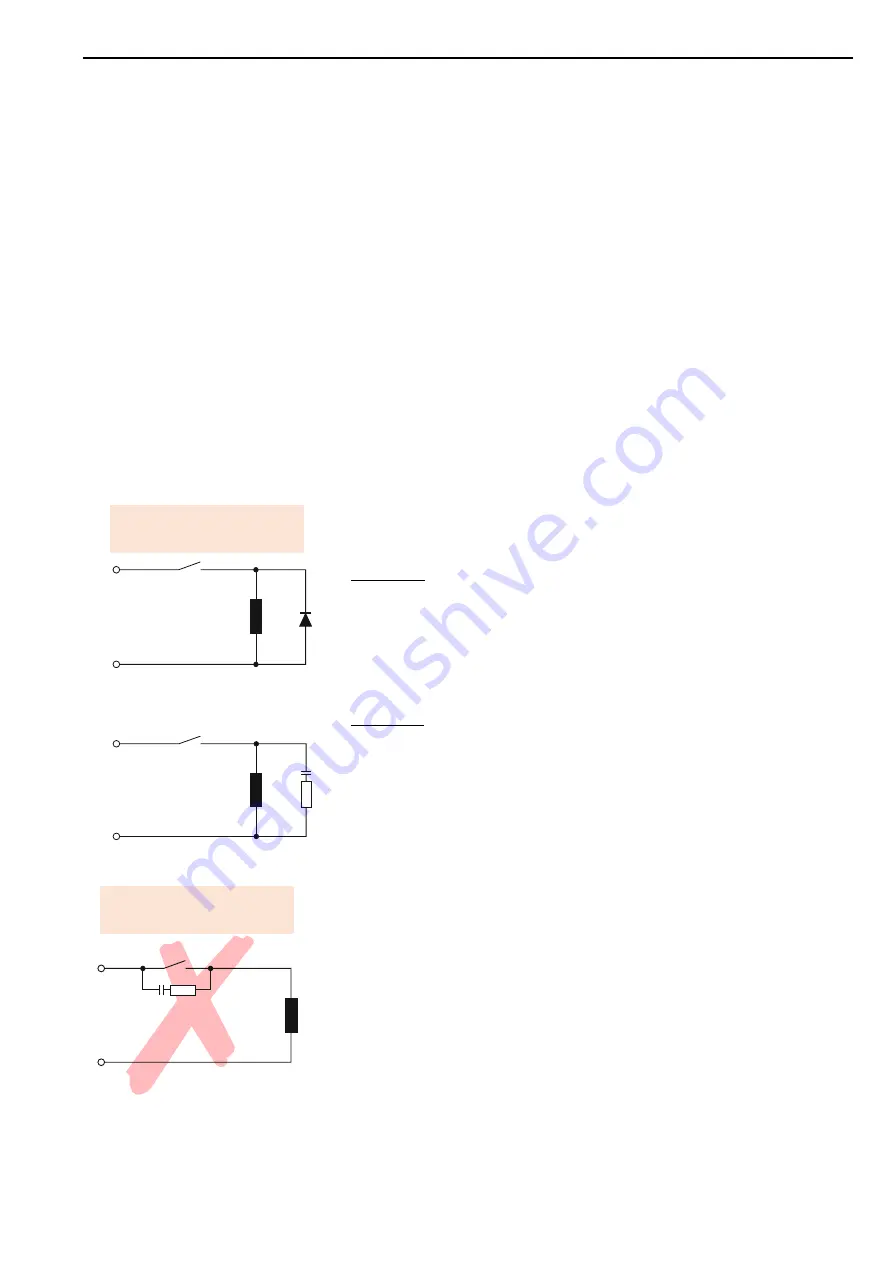
DC voltage 

In the case of d/c voltage systems the induction voltage occurring can, for 
example, be limited by using self-induction diodes, varistors or suppresser 
diodes. The diagram on the left shows one possibility using a self-induction 
diode.  


AC voltage 

In the  case  of  a/c  voltage  interference  suppression  as  described  above  is 
not possible. Instead an RC combination must be used. An RC filter must be 
connected as directly as possible to the inductance in order to ensure a short 
line.  In  addition  the  component  ratings  of  the  RC  combination  must  be 
geared to the inductance. Too low ratings lead to excessive voltage and too 
high ratings cause significant losses in the interference suppresser compo-
nent. Another point to note here is that only capacitors which meet VDE 0656 
may  be used. They must be suited to the mains voltage and designed for 
very high switching voltages. The diagram on the left shows inductance in-
terference suppression using an RC filter. 


An RC filter should not be fitted directly to the regulator's switching contact 
(as shown on the left), as an idle current will flow through the RC combination 
even  when  the  switching  contact  is  open.  This  current  may  be  enough  to 
mean that a downstream contactor is not de-energised and a closed protec-
tive contact does not reopen. 


U +

U -

AC

Right ! 

Wrong ! 

Regulator contact 

Induktor 

Diode 

RC- 

filter


Regulator contact 

Induktor 

Summary of Contents for TW-31

Page 1: ... 1 Tank monitor TW 31 Installation and operating instructions for plant engineering companies installers and service engineers Firmware V1 9 Measuring Controlling Regulating All from the same source Programmable via configuration software WELBA KONSOFT ...

Page 2: ...ical safety 14 2 6 Notes on wiring 15 3 Installation 16 3 1 Location and climatic conditions 16 3 2 Unpacking and storage 16 3 3 Fitting the sensor 17 3 4 Cleaning instructions 17 4 Electrical connection 18 4 1 GUIDELINE for the electrical connection 18 4 2 Design of the control 19 4 3 Automatic detection of the operating mode 20 4 4 Error detection Example 21 4 5 Connection of external signal tra...

Page 3: ...e parameters E parameters 57 7 9 Ebene I O test parameters o parameters 58 8 Other informations 60 8 1 Detection of mode cooling parameter h1 60 8 2 Safety function First milk in the tank h2 60 8 3 Detection of mode Cleaning parameter h4 61 8 4 Definition of term milk temperature too high for too long 62 8 5 Definition of term cooling time target temperature first milking 62 8 6 Activation delay t...

Page 4: ...allation The setting or changing of parameters may only be carried out by the system manufacturer or the service technician Basically the installer of the system is responsible for the commission ing of the tank monitor Operation instruction for the operator The plant engineers the installer or the service technician must prepare operating instructions for the operator of the tank monitor farmer W...

Page 5: ...he legal regulations valid at the time of conclusion of the con tract are applicable We reserve the right to make technical changes in the context of improving the prop erties of use and further developments 1 3 Warning notices in these operating instructions Important safety information in these assembly instructions are identified by sym bols These instructions on occupational safety must be adh...

Page 6: ...quired The critical alarm DO NOT LOAD blinking red LED addresses the driver of the milk collecting truck Together with the farmer the driver decides what to do next In addition to the two warning LEDs an external warning light an audible signal device or dialer can be connected You will find the description of the operation method in section 6 1 Function monitoring In addition to the temperatures ...

Page 7: ...elf hundreds of times in customer use Despite all care we point out that the use of the free PC Software is at your own risk WELBA does not accept any liability for damages or loss of data resulting from the installation or use of the Software 1 5 Type designation The type designation of your controller is attached to the holder frame 1 6 Item supplied Tank monitor TW 31 ready for connection Senso...

Page 8: ...e resolution 0 1 C Sensor input for KTY 81 210 optionally PT 100 Water detection via independent level monitor Digital inputs for 230 V for low voltage 6 via optocoupler 6 via optocoupler Interface 2x RS 485 1xx USB master for USB stick only Connection Plug in screw connections for cables up to 2 5 mm Housing Dimensions LxBxH Material 305 mm x 225 mm x 120 mm Housing and cover ABS UV resistant scr...

Page 9: ... than our standard type are available on request dif ferent bush form or cable length Some of the options are shown here Sensor element KTY sensor Bush material 1 4301 V2A Bush lenght 40 mm Bush diameter 6 0 mm 0 1 Cable material PVC Measurement range 10 70 C Cabel lenght standard 2 metres 40 mm 6 0 mm 6 1 mm ...

Page 10: ...l safety regulations have to be observed Access to the environment when connected must be restricted to spe cialised personnel The tank monitor may only be opened by an authorized electrician The tank monitor is not suitable for use in explosive atmospheres Dan ger of explosion Use only outside areas subject to explosive atmos pheres The tank monitor may not be exported to the USA without the manu...

Page 11: ...ide the housing IMPORTANT NOTICE ABOUT THE ACCUMULATORS See also section 8 11 Charged Batteries must be used at all times for the tank guard to function properly The life of the accumulators is limited The built in accumulators must be replaced by new ones every two years at the latest Only charged accumulators of the following specification may be used 1 2 V NiMh size AA min 2 000 mAh Since the t...

Page 12: ...d thus forbidden The controller must not be modified or converted in any way The tank monitor is ready for use only when the parameters have been set appro priately Its use before this has been done would have no benefits Responsibility for the faultless functions of the tank monitor is the responsibility of the plant engineer or the installer or the service technician who installed and com missio...

Page 13: ...g Connect all components and sensors to the terminal block according to the wiring diagram Connect mains supply Lock the switch box and switch on the mains voltage Switch on and parameterize the control as described in section Operation Possibly with the optionally available configuration Software WELBA KONSOFT 2 4 Wiring screening earthing When selecting wiring materials and installing and connec...

Page 14: ...functioning of the controller For this reason safety devices that are independent of the controller should always be used e g high and low pressure valves or temperature limiters Account should be taken of the local safety regulations in this connection The load circuit relay outputs K1 to K3 must be fused in accordance with the connected components The connection of external voltages to the digit...

Page 15: ...nd selecting the wiring materials to be used it is essential to comply with the provisions of DIN VDE 0100 Erection of power instal lations with rated voltages below 1000 or the relevant national regulations Furthermore all connections must comply with the relevant VDE regulations or cor responding national regulations Wiring of the digital inputs Only the output signal of the control at terminal ...

Page 16: ...nsation permanent and direct UV radiation dust flammable gases vapours solvents operation in an aggressive atmosphere ammonia or sulphur fumes risk of oxidation operation in the immediate vicinity of radio transmitters with high levels of spurious radiation A physical separation between the device and inductive consumers is recom mended 3 2 Unpacking and storage If the packaging is damaged or some...

Page 17: ...Parameter C91 must be adjusted so that the temper ature measured corresponds to that shown on the display A reference thermometer should be used for this purpose See the section 8 7 Pay attention to the permitted temperature range for sensor cable exposure Changing the sensor cable length lf it is necessary to shorten or lengthen the sensor cable on installation or if a sensor other than the one s...

Page 18: ...5 Installation By evaluating external signal transmitters of your existing system the tank monitor can find out the operation mode of the cooling tank monitor other functions and conditions of the tank agitator detergent tank etc External transmitters can be compressors valves level monitors or float switches but also signal transmitters of other system components such as milking robots or plate h...

Page 19: ... 10 11 12 13 14 USB Status LED 7 8 9 16 13 12 10 11 15 14 U1 The control unit includes 7 3 alarm relays 8 USB interface for data output on USB stick 9 Digital inputs to connect 230 V signal transmitters The terminals can only be wired with L1 10 Connection for power packs 11 Mains supply 12 Connection possibility for 2 level inputs 13 Connection possibility for up to two temperature sensors 14 Low...

Page 20: ...tank monitor depends on the basic design of the milk cooling system If the control of the milk cooling tank provides continuous signals for Cleaning ac tive or Cooling active these are to be used preferentially This guarantees the highest detection reliability If this is not the case external signal transmitters and sensors must be connected to determine the correct operation mode These so called ...

Page 21: ...er valve ON trigger function Cleaning mode END either by omission of the permanent signal of the external control or after end of the settable minimum period cleaning cycle h5 example 0 5 hours will be extended by 10 minutes h6 if the agitator function is detected OFF TANK EMPTY is displayed after cleaning mode has been finished The tank is empty and can be refilled 4 4 Error detection Example By ...

Page 22: ... of the cleaning mode if possible by permanent signal cleaning active of the external cooling tank control or by start signal cold water valve ON Optional To be able to monitor other milk tank components wire as follows for the agitator detection 1 by signal agitator 1 of the external cooling tank control for the agitator detection 2 by signal agitator 2 of the external cooling tank control for th...

Page 23: ...transmitters Agitator 1 Agitator 2 compressor evaporator valve cold water calve temperature sensor detergent alkaline detergent acid motor protec tion switch level detection permanent signal cooling active if available permanent signal cleaning active if available tank ice water cooling ice water pump plate head exchanger milk feed pump milk pump roboter robot signal start cooling ...

Page 24: ...tank monitor The correct parameterization of the tank monitor is described in section7 In order to be able to assign the file to the corresponding customer when the files are later evaluated by Welba KONSOFT it is important to enter the customer and tank number when installing the tank monitor See section 7 1 1 It is recommendable to record the setting values of the tank monitor after commis sioni...

Page 25: ...r settings NOTE The KONSOFT PC Software has been thoroughly tested and has proven itself hundreds of times in customer use Despite all care we point out that the use of the free PC Software is at your own risk WELBA does not accept any liability for damages or loss of data resulting from the installation or use of the Software 5 3 Reading out the tank guard LOG file Proceed as follows Insert a sta...

Page 26: ...ation Press the SET button a time is displayed If the correct time is displayed no further steps are necessary If the wrong time is displayed Hold the SET button down until the year appears flashing in between the tank temperature is shown briefly Use the arrow keys to set the correct year Press the SET button the month appears flashing Use the arrow keys to set the correct month Press the SET but...

Page 27: ...rameters Determination of the criteria whether and when critical alarms are triggered Alarm configuration F parameters An individual behavior for each error can be assigned here Hardware configuration A parameters Determination parameterization of the Hardware configuration Sensor adjustment C parameters Calibration of level and temperature sensors Service parameter E parameters Display of the tim...

Page 28: ... current time hold 3 seconds Set date and time If the red LED is flashing display of the current fault codes See section 6 4 ARROW BUTTONS for setting the time or adjusting parameters Operation by the driver of the milk truck RESET button Confirmation of the message Do not load See section 6 2 Function test Do Not Load LED and external alarm light Press reset button for 5 seconds the alarm will go...

Page 29: ...or LED green MILK COLLECTION OK permanent blinking off everything is ok milk can be loaded informative alarm a if red LED is flashing or blinking b after the confirmation of an informative alarm LED red DO NOT LOAD blinking permanent critical alarm critical alarm has already been confirmed Data transfer LED blue Data blinking permanent flashing and goes off after 5 sec off USB stick inserted Data ...

Page 30: ...es Critical tank monitor alarms red LED error code in the display During cooling mode minimum and maximum milk temperature agitator function and stirring intervals duration of power failure milk temperature too high for a long period of time During cleaning cleaning temperatures cleaning time A list of all critical alarms and their corresponding configuration can be found in section 7 5 Informativ...

Page 31: ...SET Turns off when cleaning cycle runs for at least 10 minutes active critical informative alarm critical informative alarm 1 x RESET critical informative alarm multiple RESET In case of several alarms the RESET button has to be pressed several times See section 6 3 Turns off when cleaning cycle runs for at least 10 minutes is displayed only as a blinking display code Informative alarm Critical al...

Page 32: ...rmative alarm Milk may be drawn off The driver checks the LEDs at the tank monitor The green LED is blinking alarm horn sounds error code on display Milk can be removed farmer has to be informed The farmer investigates and remedies the cause of the error and presses the button RESET the alarm horn stops The farmer presses button RESET once again the green LED flashes permanently The informative al...

Page 33: ...ay and identified by means of the error table See section 6 5 Farmer and driver determine together whether the milk can be fed into the tank despite the alarm With the RESET button the farmer confirms the alarm the alarm horn stops the red LED continuous to flash The farmer presses the RESET button again the red LED flashes permanently After emptying the tank the cleaning process has to be started...

Page 34: ...ne together whether the milk can be fed into the tank despite the alarm With the RESET button the farmer confirms the critical alarm at first the alarm horn stops The farmer presses the RESET button again the red LED flashes permanently Afterwards the farmer confirms the informative alarm the green LED turns off After emptying the tank the cleaning process has to be started Only when the cleaning ...

Page 35: ...fault example F34 blinks in the display Identify the fault using the list of faults Press RESET button The green LED continues to flash in order to indicate that there are further informative faults The next informative fault example F20 flashes in the display When the last informative fault has been reset the green LED goes out while the red LED stays on permanently It is only when the cleaning c...

Page 36: ...mum washing temperature not reached Alarm is triggered if in the main washing stages the minimum water tem perature selected in H30 is not reached F12 Minimum acting time not reached Alarm is triggered if in the main washing stages the minimum water tem perature selected in H30 has not had enough time to act Minimum acting time H31 F13 Cleaning time too short Alarm is activated if the cleaning sto...

Page 37: ...ponding time H22 F22 Forgotten to switch on the cooling At the milking time h41 h43 entered the cooling was not switched on F23 Milk temperature too high for too long Same as for faults F1 F3 Here a shorter time interval can be entered to warn the farmer ahead of time Setting in parameter h23 h24 F25 Excess temperature directly When cooling starts this alarm remains inactive until the milk tempera...

Page 38: ...3 a new cleaning start is not detected F34 Time date not set The alarm is triggered if the date and time are lost F35 Detergent empty alkaline h35 Alarm is activated only during the cleaning if the float switch detects de tergent alkaline empty F36 Detergent empty acidic h36 Alarm is activated only during the cleaning if the float switch detects de tergent acidic empty F38 Exceeding of temperature...

Page 39: ...e F57 is displayed F58 Sensor range exceeded Sensor reports upward or downward exceeding of measuring range as F56 but fault code F58 is displayed F59 Signal error mode detection If the tank monitor receives different signals for the mode detection trig ger signal for cooling and cleaning at the same time error F59 is dis played 6 5 4 System alarms external sensors F60 Erroneous communication with...

Page 40: ...6 Operation and fault handling Page 40 105466 TW 31 E V1 9 06 04 2021 ...

Page 41: ...ters Hardware Configurate H parameters extended tank monitor parameters Configurate h parameters general parameters Step 5 If necessary assign messages to the various alarms in the F param eters alarm horn LED display EMAIL or SMS messages etc 7 1 1 Enter customer and tank number When reading out the tank monitor data on a USB stick the tank monitor automati cally defines the file name of the data...

Page 42: ...igit or letter of the desired code Confirm the correct digit with SET The set digit has been accepted the second 0 flashes Use arrow keys to set the second digit Set third and fourth digits as well The first parameter of the selected level now appears If an incorrect code is entered the control switches back to the operation mode Working level CODE h General tank monitor parameter Code 4711 H Exte...

Page 43: ...arrow buttons are held the value starts to run Note In order to store the value in the memory first release the arrow button and then the SET button Return to working level possible from any parameter Standard with saving the values Press both arrow buttons simultaneously The display shows Stor for a short time changes are accepted The control switches to the operation mode the display shows the c...

Page 44: ... signal milk pump plate cooling signal etc 3 1 and 2 in combination 0 3 0 h4 Mode detection cleaning see section 8 3 0 permanent signal from the tank control cleaning active 1 Activation by signal open cold water valve end by time h5 2 same as 1 with extension of time when detecting agitator h5 h6 0 2 2 h5 Minimum period cleaning cycle after signal open cold water valve 1 999 min 30 h6 Extension o...

Page 45: ...en achieved within time h21 after the start of the cooling mode F20 0 30 C 6 0 h21 Max time to achieve target temperature Alarm is activated if this temperature has not been achieved within time h20 after the start of the cooling mode 0 deactivated 1 999 Time limit in minutes 0 999 min 180 h23 Milk temperature too high for too long Function see section 8 4 F23 0 30 0 C 10 0 h24 Time limit for h23 ...

Page 46: ... of detergent acidic by float switch 0 deactivated 1 wiring high active 2 wiring low active F36 0 2 0 Settings monitoring sensor Fault Range Def h38 Max temperature difference monitoring sensor to control sensor cooling For this function the monitoring sensor in param eter A50 has to be activated F38 1 0 5 0 2 0 Setting milk times to monitor cooling activated Range Def This function triggers an al...

Page 47: ... in minutes 1 10 min 1 h92 Recording intervals OFF and cooling in minutes 1 30 min 15 Identification of tank Range Def Tank and customer numbers are 8 digit Since the LED dis play can indicate 4 digits only enter the first and then the last digits of the number Example 1 2 3 4 5 6 7 8 gives the number 12345678 Part 1 Part 2 h93 Customer number part 1 0 9999 0 h94 Customer number part 2 0 9999 0 h9...

Page 48: ...Power pack necessary H19 Max temperature in case of power failure Alarm activation F6 only when the milk temper ature exceeds this temperature in case of a power failure F6 0 30 C 7 0 H20 Max power failure time in cooling mode 0 deactivated 1 999 time limit until alarm in minutes F6 0 999 min 300 Cooling time see section 8 5 H21 Minimum cooling temperature Enter target cooling temperature in C F21...

Page 49: ...hen agitator has run less than X seconds F16 0 500 min 60 H43 Delay monitoring of agitator 1 milking 0 120 min 30 Time of the set cooling start delay has to be en tered here to avoid a false alarm by an agitator that does not start Delay of tank monitor activation see section 8 6 Range Def H90 Delay period 0 300 min 180 Parameter level locking Range Def h98 Password protection 0 FFFF 0 h99 Passwor...

Page 50: ...monitor alarms green LED 7 8 9 10 11 Critical tank monitor alarms red LED 12 13 In this level each fault message F1 to F61 is assigned the effect of this alarm See the table below Switch to level Alarm Event assignment see section 7 2 F parameters Code FFFF Working level General tank monitor parameter Code 4711 Extended tank monitor parameter Code F94A Alarm configuration Code FFFF Hardware config...

Page 51: ...over temperature directly 7 13 7 13 7 13 11 11 11 F27 F29 milk temperature too long too low under temperature directly 7 13 7 13 11 11 F30 power failure direct 7 13 11 F31 F32 F33 F34 F35 F36 F38 F39 max time without cleaning after end cool mode max time without cooling after cleaning mode min cleaning interval time date not set Detergent dispenser empty alkaline Detergent dispenser empty acid tem...

Page 52: ...de in individual cases Assignment of the output relays In A1 to A3 the necessary functions to the output relays K1 to K3 are assigned Assignment of the digital inputs In A21 to A32 the input functions to the digital inputs DE1 to DE12 are assigned Switch to level Hardware configuration see section 7 2 A parameters Code A384 Working level General tank monitor parameter Code 4711 Extended tank monit...

Page 53: ...c 9 without function 10 without function 11 thermal protection compressor 12 without function 13 Agitator detection 1 14 Agitator detection 2 Setting Def A21 A22 A23 A24 A25 A26 assignment digital input DE1 assignment digital input DE2 assignment digital input DE3 assignment digital input DE4 assignment digital input DE5 assignment digital input DE6 0 14 0 14 0 14 0 14 0 14 0 14 1 2 3 4 5 6 A27 A2...

Page 54: ... Safety temperature sensor 0 1 0 A51 Sensor type Sensor 1 sensor 2 0 KTY81 210 1 PT100 three wire 2 PT1000 3 KTY81 110 0 3 0 Configuration of external modules Range Def A71 Activation agitator monitoring see section 8 12 0 15 0 0 deactivated 1 one agitator at ESVAW 001 A or ESVAW 004 A 2 two agitators at ESVAW 001 A or ESVAW 004 A 3 without function 4 without function 5 Deleting the range the numb...

Page 55: ...aving time 0 3 2 0 deactivated 1 Western European time zone change at 1 00 2 Central European time zone change at 2 00 3 Eastern European time zone change at 3 00 Sensitivity adjustment for agitator evaluation Range Def A80 Rating limit agitator see section 8 12 1 more sensitive 0 normal 1 less sensitive 1 1 0 A85 Phase monitor ESVAW 003 see section 8 12 0 deactivated 1 activated 0 1 1 Other setti...

Page 56: ...ghout the entire measurement range 10 10 C92 Display actual temperature sensor 2 hidden if A50 0 C93 Sensor correction sensor 2 hidden if A50 0 A correction can be applied to the value measured by the sensor 2 It is then applied cumulatively throughout the entire measurement range 10 10 Software version C98 Installed software version The software version installed is shown to help service technici...

Page 57: ... respectively set limit value E6 the last cleaning temperature reached Displays the maximum temperature during the last cleaning cycle 0 99 9 C E15 accu voltage Display the current accu voltage Only if optional accu pack is installed 0 0V 12 0V E50 SIM PIN entry for optional ESGSM for optional remote maintenance module 1 9999 1 no PIN deposited 0000 9999 SIM PIN Switch to level Service parameters ...

Page 58: ...t automatically Test of relay outputs Range Def Switched on relays remain switched on until they are reset manually o 1 Test relay 1 0 1 0 o 2 Test relay 2 0 1 0 o 3 Test relay 3 0 On 1 Off 0 1 0 Switch to level I O test parametert see section 7 2 o parameters Code 10E5 Working level General tank monitor parameter Code 4711 Extended tank monitor parameter Code F94A Alarm configuration Code FFFF Ha...

Page 59: ...igital input DE3 0 1 o 24 Test digital input DE4 0 1 o 25 Test digital input DE5 0 1 o 26 Test digital input DE6 0 1 o 27 Test digital input DE7 0 1 o 28 Test digital input DE8 0 1 o 29 Test digital input DE9 0 1 o 30 Test digital input DE10 0 1 o 31 Test digital input DE11 0 1 o 32 Test digital input DE12 0 input signal low 1 input signal high 0 1 Test and setting level inputs Range Def o 41 Leve...

Page 60: ...ank monitor finds the target value based on the switch on points and shut off points of the cooling If the temperature exceeds the found out target value without an active cooling this will be interpreted as switched off cooling change into mode OFF NOTE For an effective use of this function the signal should come from the com pressor and the target value should not be changed during a cooling cyc...

Page 61: ...19 With the detection of the milk feeding and a temperature of more than 8 C the three timers h17 h18 h19 are started 8 3 Detection of mode Cleaning parameter h4 In this parameter is determined how the tank monitor can detect the start and the end of the cleaning mode Setting parameter h4 0 Permanent signal from the tank control cleaning active Select the setting if the tank control detects an act...

Page 62: ... activated by the cool start and ends with the start of the next clean ing NOTE Even a temporary switching off of the cooling does not interrupt the temper ature monitoring Only the next cleaning stops the monitoring 8 5 Definition of term cooling time target temperature first milking Parameters Cooling time and target temperature first milking are functionally ex actly the same however different ...

Page 63: ...ensor This is then cumulatively effective over the whole measurement range An adjustment to the sensor correction is only necessary in conjunction with first installation if the sensor cable length is altered when replacing a faulty sensor In order to adjust the sensor correction a reference thermometer is needed Proceed as follows Switch off power supply Install change sensor Use the reference th...

Page 64: ...optical control of the electrode Select parameter o 41 in TW 31 in level I O test parameter see section 7 9 Setting level 1 Keep SET pressed set simultaneously the displayed value to 10 with the button ARROW DOWN Keep SET pressed increase slowly the value with button ARROW UP until the left yellow LED flashes increase additionally by 1 With the release of the SET button the last set value is store...

Page 65: ...be removed and charged or exchanged Fault message F39 If the fault message F39 appears the battery voltage is too low The batteries can be removed and recharged by a qualified electrician Are the batteries older than two years replace IMPORTANT NOTICE ABOUT THE ACCUMULATORS The life of the accumulators is limited The built in accumulators must be replaced by new ones every two years at the latest ...

Page 66: ...es are available ESVAW 001 A The ESVAW 001 A monitoring module is designed for monitoring up to 4 agitator motors In the standard version only the motors A and B are supported motors C and D are optional usable ESVAW 003 A The agitator monitoring module ESVAW 003 A is designed to monitor a three phase AC motor with 400V AC ESVAW 004 A Das ESVAW 004 A The ESVAW 004 A monitoring module is designed f...

Page 67: ... motor data 8 13 Test functions 8 13 1 Test alarm F99 The function test alarm is required to test the impacts of an error on the parame terized outputs in the F parameters relays SMS etc Method Set and store the configuration to be tested in parameter F99 Trigger test errors by pressing buttons SET and ARROW UP simultaneously for four seconds Check if the required reaction has taken place Reset th...

Page 68: ... 0 kV 0 5 kV 3 typical industrial environment 2 0 kV 1 0 kV 4 industrial environment with very high interference level 4 0 kV 2 0 kV As the values given in the table are maximum values operational values should remain well below them However in practice this is possible only with difficulty as even a normal contactor without interference suppression produces interference pulses of up to 3 0 kV For...

Page 69: ...ltage systems the induction voltage occurring can for example be limited by using self induction diodes varistors or suppresser diodes The diagram on the left shows one possibility using a self induction diode AC voltage In the case of a c voltage interference suppression as described above is not possible Instead an RC combination must be used An RC filter must be connected as directly as possibl...

Page 70: ...es These components must be protected against excessive voltages for which mainly varistors RC combinations or choke coils are used The use of zero voltage switches is also recommended The suggestions made represent only a few of the possible ways of protecting a microprocessor controlled regulator system from interference The suggested measures have the advantage that they will increase the lifet...

Reviews: