


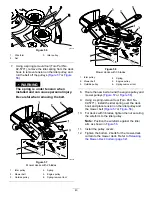
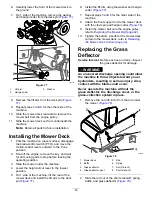


3.
Remove the damaged or worn grass deflector
and the baffle.
4.
Install the new grass deflector and the baffle
(
).
5.
Slide the rod, straight end, through the rear
grass deflector pivot and baffle.
6.
Place the spring on the rod, with end wires
down, and between the grass deflector pivots.
7.
Slide the rod through the baffle and second
grass-deflector pivot(
).
8.
Insert the rod at the front of the grass deflector
into the short standoff on the deck.
9.
Secure the rear end of the rod into the mower
with a nut (3/8 inch) as shown in
.
Important:
The grass deflector must be
spring-loaded in the down position. Lift the
deflector up to test that it snaps into the
full-down position.
Cleaning
Washing the Underside of
the Mower Deck
Service Interval:
After each use
Important:
You can wash the machine with a mild
detergent and water. Do not pressure wash the
machine. Avoid excessive use of water, especially
near the control panel, under the seat, around the
engine, hydraulic pumps, and motors.
Wash the underside of the mower deck after each use
to prevent grass buildup for improved mulch action
and clipping dispersal.
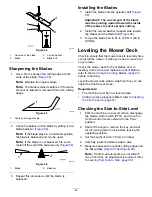
1.
Park the machine on a level surface, disengage
the blade-control switch (PTO), and move the
motion-control levers outward to the P
ARK
position.
2.
Shut off the engine, remove the key, and wait
for all moving parts to stop before leaving the
operating position.
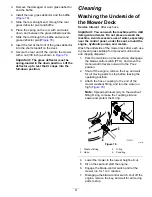
3.
Attach the hose coupling to the end of the
mower washout fitting, and turn the water on
high (
).
Note:
Spread petroleum jelly on the washout
fitting O-ring to make the coupling slide on
easier and protect the O-ring.
g020098
Figure 79
1.
Washout fitting
3.
O-ring
2.
Hose
4.
Coupling
4.
Lower the mower to the lowest height-of-cut.
5.
Sit on the seat and start the engine.
6.
Engage the blade-control switch and let the
mower run for 1 to 3 minutes.
7.
Disengage the blade-control switch, shut off the
engine, remove the key, and wait for all moving
parts to stop.
51
Summary of Contents for TimeCutter MX 4275T
Page 2: ......
Page 58: ...Schematics g307974 Electrical Diagram 139 2356 Rev A 56 ...
Page 59: ...Notes ...
Page 60: ...Notes ...
Page 62: ......
Page 71: ...decal140 2748 140 2748 decal142 5864 142 5864 9 ...
Page 121: ...Schaltbilder g307974 Elektrisches Schaltbild139 2356 Rev A 59 ...
Page 131: ...decal140 2748 140 2748 decal142 5864 142 5864 9 ...
Page 180: ...Schémas g307974 Schéma électrique139 2356 Rev A 58 ...
Page 181: ...Remarques ...
Page 238: ...Schema s g307974 Installatieschema139 2356 Rev A 56 ...
Page 240: ......


