Leveling from Side to Side
1.
Move to the left side of the machine.
2.
Set the anti-scalp rollers to the top holes or
remove them completely for this procedure; refer
to
Adjusting the Anti-Scalp Rollers (page 25)
.
3.
Set the height-of-cut lever to the 76 mm (3 inch)
position; refer to
(page 24)
.
4.
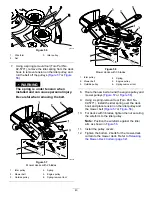
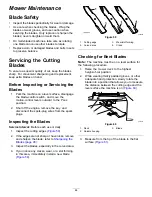
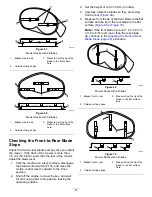
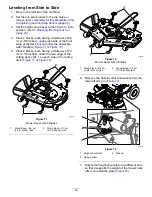
Place 2 blocks, each having a thickness of 6.6
cm (2-5/8 inches), under each side of the front
edge of the deck but not under the anti-scalp
roller brackets (
or
).
5.
Place 2 blocks, each having a thickness of 7.3
cm (2-7/8 inches), under the rear edge of the
cutting deck skirt, 1 on each side of the cutting
deck (
or
g298027
Figure 71
Mower Decks with 2 Blades
1.
Wood block—6.6 cm
(2-5/8 inches) thick
2.
Wood block—7.3 cm
(2-7/8 inches) thick
g298028
Figure 72
Mower Decks with 3 Blades
1.
Wood block—6.6 cm
(2-5/8 inches) thick
2.
Wood block—7.3 cm
(2-7/8 inches) thick
6.
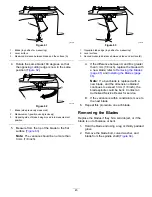
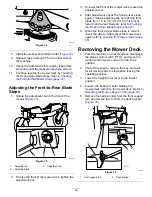
Remove the hairpin cotter and washer from the
lower lift-arm pin (
).
g294197
Figure 73
1.
Height-of-cut plate
3.
Washer
2.
Hairpin cotter
7.
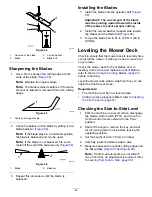
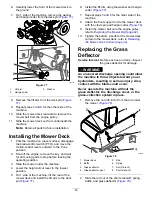
Rotate the height-of-cut plate to a different hole
so that it supports the weight of the mower deck
after you install the plate (
48
Summary of Contents for TimeCutter MX 4275T
Page 2: ......
Page 58: ...Schematics g307974 Electrical Diagram 139 2356 Rev A 56 ...
Page 59: ...Notes ...
Page 60: ...Notes ...
Page 62: ......
Page 71: ...decal140 2748 140 2748 decal142 5864 142 5864 9 ...
Page 121: ...Schaltbilder g307974 Elektrisches Schaltbild139 2356 Rev A 59 ...
Page 131: ...decal140 2748 140 2748 decal142 5864 142 5864 9 ...
Page 180: ...Schémas g307974 Schéma électrique139 2356 Rev A 58 ...
Page 181: ...Remarques ...
Page 238: ...Schema s g307974 Installatieschema139 2356 Rev A 56 ...
Page 240: ......


