


g336421
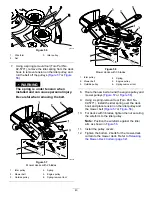
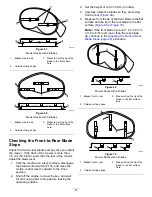
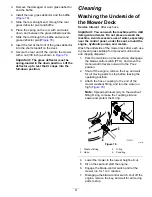
Figure 56
1.
Wire form
3.
Idler pulley
2.
Nut
7.
Using a spring-removal tool (Toro Part No.
92-5771), remove the idler spring from the deck
hook to remove tension on the idler pulley, and
roll the belt off the pulleys (
or
WARNING
The spring is under tension when
installed and can cause personal injury.
Be careful when removing the belt.
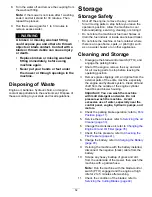
g298025
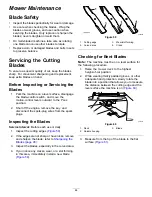
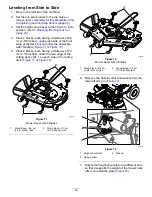
Figure 57
Mower decks with 2 blades
1.
Idler pulley
4.
Spring
2.
Mower belt
5.
Engine pulley
3.
Outside pulley
6.
Spring-removal tool
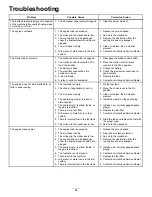
g298026
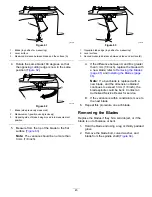
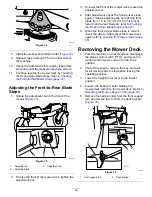
Figure 58
Mower decks with 3 blades
1.
Idler pulley
4.
Spring
2.
Mower belt
5.
Engine pulley
3.
Outside pulley
6.
Spring-removal tool
8.
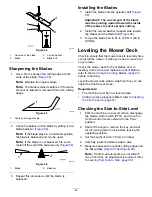
Route the new belt around the engine pulley and
mower pulleys (
or
).
9.
Using a spring-removal tool (Toro Part No.
92-5771), install the idler spring over the deck
hook and place tension on the idler pulley and
the mower belt (
or
).
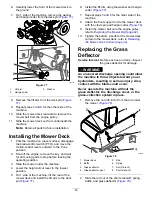
10.
For decks with 3 blades, tighten the nut securing
the wireform to the idler pulley .
Note:
Position the wireform against the idler
arm as shown in
.
11.
Install the pulley covers.
12.
Tighten the bottom 2 bolts for the mower-deck
curtain to the mower deck. Refer to
the Mower-Deck Curtain (page 32)
.
43
Summary of Contents for TimeCutter MX 4275T
Page 2: ......
Page 58: ...Schematics g307974 Electrical Diagram 139 2356 Rev A 56 ...
Page 59: ...Notes ...
Page 60: ...Notes ...
Page 62: ......
Page 71: ...decal140 2748 140 2748 decal142 5864 142 5864 9 ...
Page 121: ...Schaltbilder g307974 Elektrisches Schaltbild139 2356 Rev A 59 ...
Page 131: ...decal140 2748 140 2748 decal142 5864 142 5864 9 ...
Page 180: ...Schémas g307974 Schéma électrique139 2356 Rev A 58 ...
Page 181: ...Remarques ...
Page 238: ...Schema s g307974 Installatieschema139 2356 Rev A 56 ...
Page 240: ......


