background image

45

© Tieline Pty. Ltd. 2015

Bridge-IT XTRA Manual

 
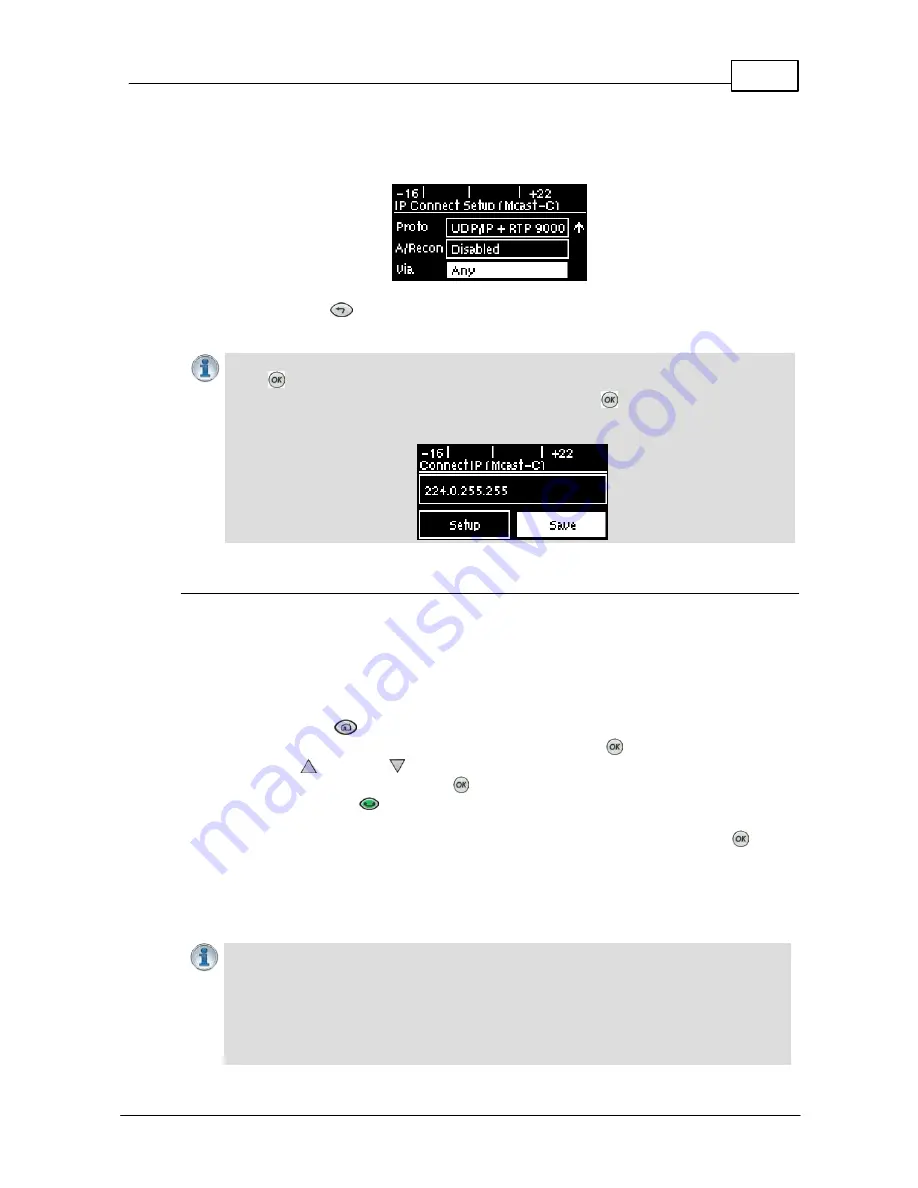
7. If required,  enable 

A/Recon

 (auto reconnect) and navigate to 

Via

 to specify  which  IP  streaming

interface is  used  to  dial  this  connection,  e.g.

 Primary

 (Ethernet  port)  or  

VLAN  

(if  configured).

Note: By default 

Any

 will select 

Primary

.

8. Press  the  

RETURN


button  when  configuration  is  complete  to  navigate  backwards  to  the

Connect IP

 screen that the multicast IP address was entered into.

Important Note:

 At this point you can navigate to 

Save

 on  the 

Connect IP

 screen and

press 

 to save the settings as a custom program for subsequent recall and dialing. Use

the  numeric 

KEYPAD

 to give the program a name and press 

 to save the program. A

confirmation message is displayed after the program is saved.

Connecting a Multicast Client Program

1. After  you  have  created  multicast  server  and  client  programs  on  your  codecs  you  can  dial

multicast  connections.  First  select  the multicast  server program  you  want  to  use  on  the  server
codec and dial to connect.

2. Select and load the multicast  client  program on each of the multicast  client  codecs  and dial the

multicast IP address to begin receiving multicast audio packets.

a. Press the 

HOME


 button to return to the 

Home

 screen.

b. Use the navigation buttons to select 

Programs 

and press the 

 button.

c. Use the up 


and  down  


navigation  buttons  to  select  the  multicast  client  program  you

want to connect with, then press the 

 button to load the program.

d. Press the 

CONNECT


button to make a connection. 

Navigate to 

Cxns

 on the 

Home

 screen to view a codec's  connection 

Status

,  then press  

 to view

connection statistics for IP packets being received over the connection.

13.11

Dialing SIP Peer-to-Peer

Important Notes:


·

The  codec  is  fully  EBU  N/ACIP  Tech  3326  compliant  when  connecting  using  SIP
(Session Initiation Protocol) to other brands of IP codecs. 

·

Both codecs connecting over SIP need to be configured 

·

SIP dialing is only supported over peer-to-peer connections, not multi-unicast
connections. 

·

Tieline G3 codecs do not support AAC and will default to MPEG Layer 2 if a Bridge-IT

Summary of Contents for Bridge-IT XTRA

Page 1: ...Bridge IT XTRA IP Codec User Manual Software Version 2 14 88 Manual Version v 2 2_20151125 November 2015...

Page 2: ...rt XII About Program Dialing 30 Part XIII Getting Connected Quickly 32 32 1 10 Quick Steps to Connect Bridge IT 35 2 Monitoring IP Connections 37 3 Load and Dial Custom Programs 37 4 Disconnecting a C...

Page 3: ...rograms 94 7 Configuring SIP Settings 96 8 Configuring SIP Programs 100 9 Dial and Disconnect a Program 101 10 Dial and Disconnect Multi unicast Connections 103 11 Lock or Unlock Programs 103 12 View...

Page 4: ...Correction 172 5 Configuring Encode Decode Direction 172 6 Bridge IT XTRA Relays and RS232 Data 174 7 Configuring TCP UDP Ports 176 8 Configuring QoS for Broadcasts 177 9 Configuring Data Packet Time...

Page 5: ...if ignored could result in death or serious personal injury caused by incorrect operation of the equipment These must be observed for safe operation Cautions Instructions warning against potential ha...

Page 6: ...ccessible disconnect device shall be incorporated in the building installation wiring Due to the risks of electrical shock and energy mechanical and fire hazards any procedures that involve opening pa...

Page 7: ...ent connected to the protective earthing of the building installation through the mains connection or through other equipment with a connection to protective earthing and to a cable distribution syste...

Page 8: ...device must only be used at altitude not exceeding 2000 metres JAPANESE SAFETY WARNINGS Translation of previous warning Provide an earthing connection Translation of previous warning Provide an earth...

Page 9: ...country national electrical codes For North America equipment must be installed in accordance with the US National Electrical Code Articles 110 16 110 17 and 110 18 and the Canadian Electrical Code S...

Page 10: ...the product contains a battery it must be disposed of separately from household waste Do not incinerate but take it to a recycling facility Disclaimer Whilst every effort has been made to ensure the a...

Page 11: ...to NAT a feature of a network device that allows IP packets to be routed to specific ports of devices communicating between public and private IP networks PSU Power Supply Unit QoS Quality of Service...

Page 12: ...formation which allows them to travel independently of previous or future packets in a data stream In general UDP is a much faster and more efficient method of sending audio over IP Unicast Broadcasti...

Page 13: ...riety of IP networks Linear audio with suite of high quality broadcast algorithms as standard The Opus algorithm and AAC LD AAC ELD LC AAC HE AAC v 1 and HE AAC v 2 as standard Tieline s loss tolerant...

Page 14: ...tems Dialing Keypad The keypad has alpha numeric buttons and operation buttons used to Launch codec functions Navigate menus Dial and hang up connections Configure contact details Operation Button Des...

Page 15: ...im mode enabled This dims the intensity of the display 30 secs after inactivity and is designed to maximise the working life of the screen Disable this mode if you want the screen to be illuminated at...

Page 16: ...tput can send both mono and stereo signals via the single XLR output Stereo Headphone Output The codec has a 6 35mm 1 4 stereo headphone jack output for monitoring audio inputs 1 and 2 and return link...

Page 17: ...4 Cxns Displays the number of current connections 5 Programs View and edit Program dialing configurations 6 Settings Select to configure codec settings Press the RETURN button to navigate backwards t...

Page 18: ...18 Bridge IT XTRA Manual Tieline Pty Ltd 2015 Codec Menu Overview...

Page 19: ...19 Tieline Pty Ltd 2015 Bridge IT XTRA Manual Connect Menu...

Page 20: ...20 Bridge IT XTRA Manual Tieline Pty Ltd 2015 IP Setup Menu Navigation...

Page 21: ...21 Tieline Pty Ltd 2015 Bridge IT XTRA Manual Settings Menu...

Page 22: ...g outputs Adjusting Audio Meter Reference Scale Settings When connected to stereo sources the top PPM meter is the left channel and the bottom PPM meter is the right channel The codec is configured by...

Page 23: ...an Tieline G3 audio codecs therefore metering needs to be adjusted when connecting to a Commander or i Mix G3 codec The G3 metering scale is between 11dBu and 18dBu and audio levels should average aro...

Page 24: ...Levels 1 Press the button and the right arrow button to open the Input Audio level adjustment screen 2 Press on the numeric keypad to toggle channel 1 on and off and press to toggle channel 2 on and o...

Page 25: ...econds to detect audio levels have returned to normal after IGC Level has been initiated and will then return the levels to the previous setting within half a second This response is linear If the set...

Page 26: ...m For example if you select the Music algorithm the sample rate will be set to 32kHz when the codec is connected The codec accepts AES3 input sample rates of 32kHz 44 1kHz or 48kHz The output sample r...

Page 27: ...Audio and press 3 Navigate to AES3 SR and press 4 Select a preferred sample rate then press Tieline normally recommends selecting STL Silence Mode for audio monitoring if using AES3 If using Auto Sele...

Page 28: ...eadphone levels can also be adjusted by navigating to SETTINGS Audio and using the down button to navigate to HP Level and press Output Headphone Monitoring Settings There are three Output HP monitori...

Page 29: ...ncer wants to monitor their own voice and not return audio when connected STL Silence Mode 1 In STL Silence mode input audio is not monitored on the PPMs or via the headphone output before the codec i...

Page 30: ...ed 1 The dialing codec sends information about how the codec receiving the call should be configured 2 Once the codec receiving session data from the dialing codec has received information successfull...

Page 31: ...g information for up to 6 connection end points They are useful for distributing audio to several studios and can be created using the Programs panel in the Toolbox web GUI See Configuring Multi Unica...

Page 32: ...your computer for configuration See the Java Toolbox Web GUI Introduction for details on configuring connections remotely via a computer Creation of programs is not currently supported in the HTML5 To...

Page 33: ...o enter the periods in the IP address Use the RETURN button to delete numbers already entered Next press the down navigation button to select Setup and press Important Note The codec remembers recent...

Page 34: ...to select FEC and press to view selection options Use the navigation buttons to choose the FEC percentage you want to use and press 9 When configuration is complete press the RETURN button to navigat...

Page 35: ...tes used and the jitter buffer latency over IP network connections Link Quality LQ Readings Send and return LQ numbers can also help to determine if a problem is occurring at either end of a connectio...

Page 36: ...odec 5 1 minute Statistics listed for the last minute of network activity 6 10 minutes Statistics for the last 10 minutes of network activity Important Note If the jitter buffer FEC or the connection...

Page 37: ...r buffer settings increase jitter buffer depth 50 100 ms reassess if only a few packets arrive late over time audio repairs will be automatic and may not require buffer changes FECd Indicates the numb...

Page 38: ...f a program configured by the Toolbox web GUI Redialing Manually from the Connect IP Screen From the Home screen select Connect IP Select an IP Session mode and the codec will assume you want to dial...

Page 39: ...Press the HOME button to return to the Home screen 2 Use the numeric KEYPAD to enter the speed dial number 3 When the Speed Dial screen appears press the button or the CONNECT button to connect 13 8...

Page 40: ...her ToolBox web GUI v 1 2 2 3 or higher A multi unicast license installed in the dialing codec Note the multi unicast license includes multicast server capability Important Notes You cannot edit a pro...

Page 41: ...both the server and client programs Next press the down navigation button to select Setup and press 4 Press the down navigation button to select Algor m algorithm and press 5 Use the navigation butto...

Page 42: ...a custom program for recall and dialing Use the numeric KEYPAD to give the program a name and press to save the program A confirmation message is displayed after the program is saved Connecting a Mul...

Page 43: ...nt program configured via the codec front panel You can lock a loaded custom program in a codec to ensure the currently loaded program cannot be unloaded by a codec dialing in with a different program...

Page 44: ...igure your preferred Jitter Buffer setting Select Auto Adapt and your preferred automatic jitter setting or Fixed Level For a fixed buffer setting enter the Jitter Buffer Depth which has a maximum set...

Page 45: ...ogram you want to use on the server codec and dial to connect 2 Select and load the multicast client program on each of the multicast client codecs and dial the multicast IP address to begin receiving...

Page 46: ...and sample rate etc Dial using SIP within the Connect menu If the remote codec has a private IP address then it should be configured for port forwarding and should dial the public IP address at the st...

Page 47: ...rogram during configuration a temporary program is created after you dial the SIP connection for the first time using the codec KEYPAD The temporary program will appear in the recent calls list if you...

Page 48: ...Press the HOME button to return to the Home screen 2 Use the navigation buttons to select Connect and press the button 3 Select IP and press the button 4 Select your preferred IP Session mode and pre...

Page 49: ...AC Stereo 32 32 6 HE AAC Stereo 32 48 7 AAC LD Mono 32 48 8 AAC LD Stereo 32 64 9 AAC ELD Mono 32 24 10 AAC ELDv2 Stereo 32 48 11 Enhanced apt X Mono 32 16 bit 128 12 Enhanced apt X Mono 48 24 bit 288...

Page 50: ...he Master panel in the web GUI click to select the file playback connection then click Disconnect The USB drive can be inserted or removed at any time as long as the codec is not already playing audio...

Page 51: ...ou may wish to lock a program in the codec include 1 Locking a dialing program to ensure the codec only dials and never answers an incoming call 2 Locking an answering program to ensure an incoming co...

Page 52: ...PIN Required to change codec connection or configuration settings accessed via the SETTINGS button Default PIN is 456789 2 User PIN Required to use the codec front panel buttons and dial hangup a con...

Page 53: ...by visiting http www java com The Web GUI will prompt you to do this if Java is not installed and you attempt to launch the Java ToolBox Web GUI 2 After updating to the latest version of Java you nee...

Page 54: ...l options Launching the Java Toolbox Web GUI 1 Click to launch the Java ToolBox Desktop Application this is recommended in preference to launching the Java Toolbox Browser Applet Note When you launch...

Page 55: ...password see Changing the Default Password This will provide better network security to maintain reliability during live broadcasts Launching the HTML5 Toolbox Quick Connect 1 Click to launch the HTM...

Page 56: ...efault port 80 is used by your PC to communicate with the codec and launch the web GUI If port 80 cannot be used across your network for some reason type the IP address of your codec into your browser...

Page 57: ...edge of the codec s public IP address Setting a strong password protects your equipment from being tampered with during live broadcasts Creating a New Password The authentication login password can be...

Page 58: ...www tieline com Support Latest Firmware 2 Unzip the file and save it to your PC 3 Connect a USB cable between your PC and the Bridge IT USB port on the rear panel of the codec 4 The PC should detect t...

Page 59: ...g in enter the default setting password and click the OK button See Changing the Default Password for instructions on changing the default password to increase your network security 15 Java Toolbox We...

Page 60: ...size 5 Close button Click to close the Master panel 6 Connect button Click Connect to connect all audio streams configured within the currently selected program in the Programs list this button also...

Page 61: ...ed program 5 Audio Stream overview Click the blue arrows to expand audio stream and connection information click the Edit symbol to adjust program settings This panel displays the program wizard when...

Page 62: ...l settings greys out when locked 4 View local Click to view local codec inputs default 5 Settings button Click to adjust input Name Type IGC and Ganging 6 Maximize Minimize Click to maximize a panel t...

Page 63: ...gs Headings for the various packet arrival statistics available 2 Connection Statistics Right click to view audio stream bit rate and jitter buffer statistics 3 Maximize Minimize Click to maximize a p...

Page 64: ...ck to program Connection and Disconnection after different relay inputs are switched ON 3 Synchronise a local relay input with a remote relay output Click to program a local relay input to Synchronise...

Page 65: ...Restore tab Click to reset codec default settings and perform backup restore of codec programs and settings 8 DNS Pane Activate to specify DNS addresses and domains to search 9 Maximize Minimize Click...

Page 66: ...can be sent to Tieline support 4 Event Logs Click to download user viewable event logs 5 Maximize Minimize Click to maximize a panel to view it in full screen mode or click to minimize back to the def...

Page 67: ...orm network address translation NAT NAT allows a single device such as a broadband router to act as an agent between the public internet and a local private LAN Usually this will be set up at the stud...

Page 68: ...static IPv4 address configuration via the drop down Configure IPv4 menu If you want to ignore IPv4 settings select Off DHCP IP addresses are automatically assigned and can change each time you connect...

Page 69: ...igned 2 Manual Select to enter static IPv6 address details 3 Off Select to ignore IPv6 address details Important Note Select Off in the drop down Configure IPv6 menu if you are not using IPv6 to conne...

Page 70: ...odecs within the specified DNS Addresses or Domains The codec can be configured to tag IP data packets sent across a network by entering a value into the Differentiated Services Code Point DSCP field...

Page 71: ...administrator before changing this setting By default the codec is programmed for Assured Forwarding and more details about DSCP are available on Wikipedia at http en wikipedia org wiki Dscp For more...

Page 72: ...els 1 Click the Input Settings symbol on the input channel you want to rename 2 Select Name and click in the text box to edit or enter a new name 3 Click Change Name to confirm the name change Selecti...

Page 73: ...hen ganged the two channel sliders move in sync with each other when dragged using a mouse pointer 4 Click the Link symbol to temporarily disable the ganging function and fine tune channel audio level...

Page 74: ...antom Power Input 1 can be configured to supply 15 volt phantom power if required this is disabled by default 1 Click the Input Settings symbol on channel 1 2 Click to select the Phantom check box Loc...

Page 75: ...rols AES3 Output Sample Rate Configuration The AES3 output sample rate can be configured using the Toolbox web GUI 1 Click the Settings symbol at the top of the screen to open the Settings panel 2 Cli...

Page 76: ...guration please note You cannot edit a program when it is currently loaded in the codec You can lock a loaded custom program in a codec to ensure the currently loaded program type cannot be unloaded b...

Page 77: ...stream connection in the wizard will allow the codec to dial Enter the name of the connection in the text box then click Next 5 Follow the instructions on the right hand side of the panel to configure...

Page 78: ...default Any will select Primary as the streaming interface Important Notes The Remote Audio Port is the codec port at the remote end of the link to which you are sending audio The Local Audio Port is...

Page 79: ...uffer and FEC settings for this audio stream recommended 8 Click the drop down arrows on the right hand side of each text box to adjust the Encoding Sample rate and Bit rate options then click Next 9...

Page 80: ...s The codec is capable of being configured to use specific settings when answering calls This useful to configure the answering codec with appropriate jitter buffer and FEC settings to suit the prevai...

Page 81: ...If you want to create another answering connection select the check box for Create another answering connection at the bottom of the panel and continue through the wizard ii Click Next and select Ena...

Page 82: ...he compatibility of the codec dialed first I e if you dial a G3 codec first then the G3 Audio Reference Level will be configured for all connections Connections are dial only for multi unicast program...

Page 83: ...program inherits all the settings of the template program and you can adjust these settings as required by continuing through the program wizard 3 Enter a name for the Audio Stream and then click Nex...

Page 84: ...o which you are sending audio The Local Audio Port is the port used by the local codec to receive audio from the remote codec When Tieline Codecs is the Session Protocol selected using Tieline sesssio...

Page 85: ...er priority or Fixed Buffer Level and enter the Jitter Depth 5000ms maximum Local and Remote FEC settings if required 8 Select the Enable Auto Reconnect check box if you want to enable this feature Th...

Page 86: ...you save the program it will be confirmed by the following message 13 Click Finish and the newly created program will be displayed in the left pane within the Programs panel and in the Master panel Se...

Page 87: ...ternet service providers ISPs block multicast traffic over wide area networks This restricts most multicast broadcasts to private local area networks Some ISPs provide quality of service QoS priority...

Page 88: ...ent programs or they will not connect successfully You cannot edit a program when it is currently loaded in the codec You can lock a loaded custom program in a codec to ensure the currently loaded pro...

Page 89: ...through the program wizard 3 Enter a name for the Audio Stream then click Next 4 This audio stream connection in the wizard will allow the codec to dial Enter the name of the connection in the text bo...

Page 90: ...programs then specify which IP streaming interface is used to dial this connection e g Primary LAN ETHERNET port and default setting or VLAN if configured Note By default Any will select Primary 7 Cl...

Page 91: ...represents the audio being downloaded from the network locally Multicast server codecs do not display LQ readings The default UDP audio port setting is 9000 and the client and server port settings mus...

Page 92: ...ode direction is configured automatically for Encode Only server program or Decode Only client program This setting is configured when you select either Multicast Server or Multicast Client when you f...

Page 93: ...fer Level and enter the Jitter Depth 5000ms maximum Important Notes Automatic or fixed jitter buffer settings can be adjusted on individual client codecs as required There is no jitter buffer setting...

Page 94: ...stage is when data transference occurs and this is left to the other protocols used by a device i e using UDP to send audio data All the mandatory EBU N ACIP 3326 algorithms are supported G 711 G 722...

Page 95: ...ork 1 Connect your codec to a LAN connection with a public IP address then login to the Toolbox web GUI and click the Settings symbol at the top of the screen to display the Settings panel 2 Click the...

Page 96: ...button to open the wizard and Click in the Program Name text box to name the new program Select Mono Stereo Peer to Peer or if you want to use an existing program as a template select this option The...

Page 97: ...EC settings in the codec Alternatively click Next to specify individual algorithm jitter buffer and FEC settings for this connection and configure backup audio for this audio stream recommended Import...

Page 98: ...Level and enter the Jitter Depth 5000ms maximum 9 Click to select Enable Auto Reconnect to enable automatic reconnection then click Next 10 Enter a name for the answering connection and click Next 11...

Page 99: ...d continue through the wizard ii Click Next and select Enable File Playback on silence detection iii Click Save Program to save the program at this point When you save the program it will be confirmed...

Page 100: ...1 Click to select the program you want to load from the Programs list in the Master panel 2 Click Connect to load the program and connect all audio streams Disconnecting a Program 1 Click to highlight...

Page 101: ...am you want to load from the Programs list 2 Click Connect to load the program and connect all connections Disconnect All Audio Stream Connections 1 Click to select the program in the Connections pane...

Page 102: ...y Ltd 2015 Disconnect a Single Audio Stream Connection 1 Click to select the audio stream connection you want to disconnect 2 Click the Disconnect button 3 Click Yes in the confirmation dialog to disc...

Page 103: ...ec 4 Click Save Settings at the bottom of the panel to save the new configuration Important Note It is only possible to lock custom programs in a codec If Lock Program is enabled and you load a new cu...

Page 104: ...facilitate editing of connection parameters Click Save Program to store settings Deleting Programs There are two ways to delete a program 1 Ensure the program you want to delete is not currently loade...

Page 105: ...105 Tieline Pty Ltd 2015 Bridge IT XTRA Manual 5 Alternatively click Delete Program next to the program name in the top right corner of the Programs panel...

Page 106: ...Reset and Restore Factory Defaults for more details on each option 1 Open the web GUI and click the Settings symbol at the top of the screen to display the Settings panel 2 Click the Reset Restore but...

Page 107: ...dio stream and connection names IP address port algorithm jitter buffer FEC and bit rate settings etc for audio stream connections Creating Backup Files 1 Open the web GUI and click the Settings symbo...

Page 108: ...inter to click and select the check boxes for restoring items For example you could select the Include programs check box and deselect the Include system check box if you are only copying programs ont...

Page 109: ...censing in the System panel 4 Select the Get license file from TieServer button 5 Click the Upload License File button 6 After the upgrade is completed click Finish and the codec screen should display...

Page 110: ...agnostics Procedure for Sending Logs to Tieline 1 Open the web GUI and click the Help symbol at the top of the screen to display the Help panel 2 Click Download Logs 3 Save the file to your computer a...

Page 111: ...ates and Flow Control 1 Open the web GUI and click the Settings symbol at the top of the screen to display the Settings panel 2 Click the Options button 3 Click the Baud rate drop down menu arrow to s...

Page 112: ...turn to the Home screen 2 Use the navigation buttons on the front panel to select Connect and press the button 3 Select IP and press the button 4 Select your preferred IP Session mode Tieline or Sessi...

Page 113: ...d 4 Check the Rule Summary and click Create Rule to save the settings Rule 2 Switch Different Control Port Inputs On to Connect and Disconnect a Program This rule is used to connect and disconnect a s...

Page 114: ...a Relay Output with each Change in Connection Status This rule is used to toggle a codec s control port relay output each time a program connects and disconnects 1 Click the fourth rule in the Rules p...

Page 115: ...nual displayed when this type of rule exists Deleting Rules 1 Click the Rules button at the top of the web GUI screen to open the Rules panel 2 Click the Delete button next to the rule you want to del...

Page 116: ...are using to perform the upgrade and click Open 5 Press the Update Firmware button to commence the upgrade Automatic Firmware Upgrades By default the web GUI application integrates with TieServer to...

Page 117: ...Bridge IT XTRA Manual Important Note Firmware upgrade files are very large and it is usually much quicker to download the file to your PC first and then upgrade the codec manually using the Manual Fi...

Page 118: ...s panel are loaded by default If you retain cookies in your browser any panels opened previously in the Web GUI are automatically populated when you log in next The default panel view is displayed on...

Page 119: ...119 Tieline Pty Ltd 2015 Bridge IT XTRA Manual Position the mouse pointer over a panel s Title bar and click and drag to move a panel and reposition it in a preferred screen position...

Page 120: ...en added into the codec Click to select a program before loading 2 Close button Click to close the panel 3 Check box symbol The Check box symbol identifies the currently loaded program in the codec 4...

Page 121: ...all connections in an audio stream 3 Connection Connect Disconnect button Click to connect disconnect an individual connection 4 Show Hide Arrow Click to show hide audio stream and connection details...

Page 122: ...122 Bridge IT XTRA Manual Tieline Pty Ltd 2015 PPMs Panel Feature Description 1 PPM Meters 4 PPM meters 2 Close button Click to close the panel...

Page 123: ...refore the image shown may not reflect the number of inputs displayed in your codec Web GUI Feature Description 1 Settings button Click to adjust input Name Type and IGC 2 Input PPM meter Input PPM me...

Page 124: ...nput is switched ON Click to configure connection and disconnection after different relay inputs are switched ON 3 Synchronise a local relay input with a remote relay output Click to configure a local...

Page 125: ...tions for each network interface 3 IPv4 details IPv4 address details and configuration 4 DNS details Select the check box and specify DNS addresses and domains to search 5 Edit Save button Click to ed...

Page 126: ...Tieline Pty Ltd 2015 settings 12 Options tab Click to open the panel configure RS232 and QoS data settings lock a loaded user Program and adjust Session Port settings and SNMP Also configure the AES...

Page 127: ...website link Click to visit the support page on the Tieline website 4 Email Support Click to email Tieline support 5 Event Logs Click to download user viewable event logs 6 Support Logs Click to downl...

Page 128: ...Ltd 2015 Language Selection The HTML5 Toolbox Web GUI offers language support for several languages 1 Click on the Language drop down menu arrow in the top right hand corner of the Web GUI page 2 Sel...

Page 129: ...es Details of the last ad hoc dial are retained in the Quick Connect panel even after a program is loaded and unloaded using the Program Loader panel Launching the HTML5 Quick Connect Web GUI 1 Type t...

Page 130: ...ame to confirm it has been loaded and the Load button changes to an Unload button To unload a program click the Unload button Dial a Loaded Program 1 Click the Connect button in the Quick Connect pane...

Page 131: ...131 Tieline Pty Ltd 2015 Bridge IT XTRA Manual Disconnect a Loaded Program 1 Click the Disconnect button in the Quick Connect panel 2 Click Yes in the confirmation dialog to disconnect the connection...

Page 132: ...ormal broadcast configurations 1 Click the drop down Transport menu arrow in the Quick Connect panel and select IP 2 Click the drop down Algorithm menu and select an algorithm 3 Click the select the a...

Page 133: ...oom from the nominal 0vu point Note the audio metering reference scale is automatically adjusted by default when a Merlin codec connects to a Commander G3 codec The G3 metering scale is between 11dBu...

Page 134: ...you simply dial the IP address to connect If you want to dial a codec with a private IP address you need to perform network address translation NAT NAT allows a single device such as a broadband rout...

Page 135: ...programs via the Programs panel IPv4 Address Configuration Click the Edit button in the Network panel to configure settings The codec is capable of automatic DHCP address assignment or manually config...

Page 136: ...ails 3 Off Select to ignore IPv6 address details Important Note Select Off in the drop down Configure IPv6 menu if you are not using IPv6 to connect to another device This ensures your codec will atte...

Page 137: ...mains 1 Click the Edit button in the Network panel to configure settings 2 Click Save to store all configuration settings The codec can be configured to tag IP data packets sent across a network by en...

Page 138: ...play the Inputs panel Important Note 15 volt phantom power can only be supplied on analog input 1 this is disabled by default Configuring Input Channel Settings Renaming Input Channels 1 Click the Inp...

Page 139: ...yellow indications on the PPM meters which represents 4dBu These levels should also be checked against the Input PPM Meters on the Master panel Other Input Controls Adjust the IGC Intelligent Gain Co...

Page 140: ...bit PCM as well as optional algorithms including LC AAC HE AAC and aptX Enhanced The default algorithm selected when connecting using SIP is G 711 Important Notes Each codec should be registered to a...

Page 141: ...ails in your codec Once these details have been entered into the codec each time it is connected to a public IP address it will contact the SIP server automatically to acknowledge its presence over a...

Page 142: ...Navigate to SETTINGS SIP Accounts to verify that the account has been registered to the SIP server The registration symbol appears when the account has been activated successfully Important Notes Som...

Page 143: ...ons panel Important Notes The HTML5 Toolbox Web GUI currently does not support the creation of new programs Use the Java Toolbox Web GUI to create a new program Loading a New Program 1 Open the HTML5...

Page 144: ...Disconnect symbol and then click Connect this connects all active audio streams and connections associated with the program 2 Click the audio stream Connect Disconnect symbol and then click Connect t...

Page 145: ...isconnect symbol and then click Disconnect to disconnect a program this includes all audio streams and connections associated with the program 2 Click the audio stream Connect Disconnect symbol and th...

Page 146: ...stereo For example if you require the codec at the studio to always connect in mono simply load and lock a mono program in the codec Generally programs will be up or down mixed by the answering codec...

Page 147: ...loaded custom program 18 7 Reset Factory Default Settings There are several options which allow you to restore factory default settings within the codec See Reset and Restore Factory Defaults for mor...

Page 148: ...s etc for audio stream connections Creating Backup Files 1 Open the HTML5 Toolbox Web GUI and click Settings at the top of the screen then click Reset to display the Reset panel 2 Click Backup 3 Click...

Page 149: ...at your new license file is ready to download from TieServer Perform an Automatic Software License Install with the HTML5 Toolbox Web GUI 1 Open the HTML5 Toolbox web GUI in a browser on your PC by ty...

Page 150: ...then click the Open button to commence license installation 5 A Success dialog in the web GUI Licensing panel confirms when installation is complete and the codec screen should display a confirmation...

Page 151: ...transport Over IP it is also possible to enable synchronized out of band data using any algorithm Algorithm Selected IP Transport Tieline Music and MusicPLUS In band RPTP data enabled automatically Sy...

Page 152: ...and some may be lost Ensure you configure the serial port baud rate to match the setting of the external device to which you are connecting Ideally the settings on both codecs should match or you coul...

Page 153: ...ct Connect and press the button 3 Select IP and press the button 4 Select your preferred IP Mode and press the button 5 Use the down navigation button to select Setup and press the button 6 Navigate t...

Page 154: ...be connected 4 Check the Rule Summary and click Create Rule to save the settings Rule 2 Switch Different Control Port Inputs On to Connect and Disconnect a Program This rule is used to connect and di...

Page 155: ...y output 3 Check the Rule summary and click Create Rule to save the settings Rule 4 Toggle a Relay Output with each Change in Connection Status This rule is used to toggle a codec s control port relay...

Page 156: ...e Pty Ltd 2015 Deleting Rules 1 Open the Toolbox HTML5 Web GUI and click Rules in the Menu Bar to display the Rules panel 2 Click to select the rule you want to delete 3 Click the Delete button 4 Clic...

Page 157: ...es with a downloaded firmware file saved to your PC 1 Open the Toolbox HTML5 Web GUI and click Settings in the Menu Bar then click Firmware to display the Firmware panel 2 Click Browse firmware to sea...

Page 158: ...nnections contact your IT Administrator Ethernet and VLAN Configuration Options The codec features a Ethernet port and up to four additional VLAN interfaces VLAN interfaces have features similar to ph...

Page 159: ...the button 6 Select Static and press the button 7 Navigate to v4 Static and enter the IP address then press the button 8 Navigate to v4 Snet and enter the Subnet Mask then press the button 9 Navigate...

Page 160: ...y The VLAN ID is encapsulated in IP packets to facilitate routing throughout your network 1 Press the SETTINGS button 2 Use the navigation buttons on the front panel to select LAN and press the button...

Page 161: ...able algorithms See Choosing Dialing Profiles for more details Overview of Tieline Algorithms 1 The Tieline Music algorithm is optimized for audio bit rates as low as 19 2kbps with only a 20 milliseco...

Page 162: ...by thousands of radio stations to deliver very low delay audio for studio to transmitter links audio distribution and remote broadcasts It delivers outstanding audio quality with exceptionally low de...

Page 163: ...live applications that integrate remote crosses into a broadcast The algorithm you choose to connect with will also depend upon The codecs you are connecting to Tieline versus non Tieline Whether you...

Page 164: ...very low delay STLs and audio distribution Remote connections able to achieve 48kbps for each audio channel Suitable w hen bidirectional communication betw een announcers is required G 711 3kHz 1ms 6...

Page 165: ...ers is required AAC ELD Up to 20kHz 15 30ms 24 kbps minimum 15 30kbps Very high quality voice and music Very low delay at low bit rates Great for live voice or music remotes Suitable w hen bidirection...

Page 166: ...t X Enhanced LC AAC HE AACv1 HE AACv2 AAC LD AAC ELD AAC ELDv2 MPEG Layer 2 G 722 G 711 Use with caution for remotes due to high delay not suitable when bidirectional communications is required Sampli...

Page 167: ...continuity of audio streaming and minimizes delay A fixed jitter buffer is preferable over satellite connections to ensure continuity of signals CAUTION If a Tieline codec connects to a device that i...

Page 168: ...PEG Layer 2 LC AAC HE AAC v 1 HE AAC v 2 AAC LD AAC ELD Opus aptX Enhanced Configuring Automatic Jitter Buffering Default Setting 1 Press the HOME button to return to the Home screen 2 Use the navigat...

Page 169: ...Correction FEC If forward error correction is configured then additional data packets are sent over a connection to replace any data packets lost There is no need to modify jitter buffer settings if y...

Page 170: ...packets are lost or corrupted then packets from the secondary stream can be substituted to replace them The amount of FEC required depends on the number of data packets lost over the IP connection Bot...

Page 171: ...than this say one in three it will be necessary to increase the FEC setting to 33 to compensate Note There is an inverse relationship between FEC settings and the jitter buffer millisecond setting tha...

Page 172: ...the down navigation button to select Setup and press 6 Navigate to Dir and press 7 Select Encode Only or Decode Only and press 19 6 Bridge IT XTRA Relays and RS232 Data The codec supports both in ban...

Page 173: ...nt to current limit the source as damage will result where the current exceeds 100mA peak to peak No more than 48 volts peak to peak should be used as a safety precaution The resistance of the CMOS el...

Page 174: ...e programmed to send RS232 data Session data sent from the dialing codec will program all other compatible codecs non G3 when you connect RS232 data can be sent from the dialing codec to all endpoints...

Page 175: ...To adjust the local Tieline session data port used by your codec to answer incoming calls 1 Press the HOME button to return to the Home screen 2 Use the navigation buttons on the front panel to select...

Page 176: ...packets being transmitted through routers across networks This is useful because in modern data networks many different IP services like email voice web pages video and streaming music coexist within...

Page 177: ...r multicast data packets In most situations the default value of 1 is used to ensure packets are sent through a single LAN router and not over multiple router hops and networks This setting is only us...

Page 178: ...1 Press the SETTINGS button 2 Navigate to Reset and press the button 3 Navigate to the preferred option from those available and press the button 4 Select Yes and press the button to confirm the menu...

Page 179: ...and all licenses that have been installed have a tick next to them Update and Install Licenses from the Codec 1 Navigate to Update from TieServer in the License Manager screen and press the button 2...

Page 180: ...ct all power cables before maintenance to avoid electric shock HIGH VOLTAGE WARNINGS Any adjustment maintenance and repair of the opened instrument under voltage must be avoided as much as possible an...

Page 181: ...rsions in the Genie and Merlin codec families All Bridge IT Basic and Pro and Bridge IT XTRA codecs with firmware release v 2 x or higher All Commander G3 and i Mix G3 codecs Getting Started at the St...

Page 182: ...ports are open 7 Configure the static IP address in your codec using the instructions in the next section To allow multiple codecs to share a single public static IP address behind a firewall and rout...

Page 183: ...s the HOME button to return to the Home screen 2 Use the navigation buttons to select Settings and press 3 Use the down navigation button to select LAN and press 4 Select Eth1 and navigate to IPv4 mod...

Page 184: ...Troubleshooting How to Determine Where Firewall Port Blocking is Occurring If you find you are unable to either send or receive audio between the studio and remote codecs you can use Tieline s Link Q...

Page 185: ...igured correctly but the codec is not using the expected port For example the firewall is set up to forward via port 9002 but codec is listening to port 10 000 Connection Refused is not normally shown...

Page 186: ...ocked on the failed connection see Troubleshooting TCP Port Blocking above Testing your Codec Visit http www tieline com Support Test lines for a list of test IP codec addresses you can use to verify...

Page 187: ...to only allow access to devices approved by a network administrator Obtaining Public IP Addresses To send audio streams over the public internet you need to use a public IP address assigned to you by...

Page 188: ...blic and private IP addresses and NAT is displayed in the following diagram and the following section explains port forwarding configuration in more detail Port Forwarding Tieline TCP and UDP Port Set...

Page 189: ...defined limit These plans are cheap but they are dangerous for streaming broadcast audio 4 Ensure that the speed of the connection for both codecs is adequate for the job The minimum upload speed reco...

Page 190: ...s connection Important Note Be careful when using cell phone connections at special events where thousands of people have mobile phones This can result in poor quality connections and audio drop outs...

Page 191: ...pinging i e ping 192 168 0 159 and press the Enter key on your keyboard v The round trip time of the packets is displayed as well as any packet loss 2 Long test sends packets continuously until stopp...

Page 192: ...f the open source software in the product is licensed under GPL version 2 A copy of the license can be obtained at http www gnu org licenses old licenses gpl 2 0 html o Some of the open source softwar...

Page 193: ...ersity Research and Technology Corporation All rights reserved o Copyright c 2004 2005 The Regents of the University of California All rights reserved o Copyright c 2007 Cisco Systems Inc All rights r...

Page 194: ...omponents under 2 clause BSD clause 3 removed Copyright holders Markus Friedl Theo de Raadt Niels Provos Dug Song Aaron Campbell Damien Miller Kevin Steves Daniel Kouril Wesley Griffin Per Allansson N...

Page 195: ...ING NEGLIGENCE OR OTHERWISE ARISING IN ANY WAY OUT OF THE USE OF THIS SOFTWARE EVEN IF ADVISED OF THE POSSIBILITY OF SUCH DAMAGE Open Source MIT style Licenses glibc DNS resolver taken from BIND 4 9 5...

Page 196: ...1997 2000 by Internet Software Consortium Inc THE SOFTWARE IS PROVIDED AS IS AND THE COPYRIGHT HOLDERS AND CONTRIBUTORS DISCLAIM ALL WARRANTIES WITH REGARD TO THIS SOFTWARE INCLUDING ALL IMPLIED WARRA...

Page 197: ...n please contact openssl core openssl org 5 Products derived from this software may not be called OpenSSL nor may OpenSSL appear in their names without prior written permission of the OpenSSL Project...

Page 198: ...ive thereof from the apps directory application code you must include an acknowledgement This product includes software written by Tim Hudson tjh cryptsoft com THIS SOFTWARE IS PROVIDED BY ERIC YOUNG...

Page 199: ...tribute it freely subject to the following restrictions 1 Redistributions of source code must retain the above copyright notice definition disclaimer and this list of conditions 2 Redistributions in b...

Page 200: ...ges or modifications to this unit not expressly approved by the party responsible for compliance could void the user s authority to operate this equipment Declaration of Conformity The Tieline Bridge...

Page 201: ...tronic products and components The IEC CB is a multilateral scheme among participating countries and certification organisations based on the use of international IEC standards This product has been t...

Page 202: ...d or other countries 4 Solaris is a trademark of Sun Microsystems Inc in the United States and or other countries 5 Linux is the registered trademark of Linus Torvalds in the U S and other countries 6...

Page 203: ...Bu unweighted Sample Frequencies IP Sample Frequencies 8kHz G 711 16kHz G 722 32kHz 44 1kHz 48kHz Algorithms IP Opus Tieline Music Tieline MusicPLUS G 711 G 722 MPEG Layer 2 AAC LD AAC ELD AAC LC AAC...

Page 204: ...22 intelligent gain control 22 metering 22 phantom power 22 quick adjustment of levels 22 Auto Reconnect operation 38 programming of 38 B Backup configuring 50 how it works 50 C Certifications 200 Co...

Page 205: ...web GUI 147 Factory defaults Java Toolbox restore via web GUI 106 Features 13 FEC how it works 170 Programming 170 Firmware upgrades HTML5 Toolbox 157 Forward error correction FEC 170 how it works 17...

Page 206: ...onfigure Ethernet ports 67 configure QoS 67 DNS settings 67 IPv4 address configuration 67 IPv6 address configuration 67 lock programs 103 unlock programs 103 Jitter buffer automatic 167 fixed 167 prog...

Page 207: ...2 dialing 82 Multi unicasts Java Toolbox configuration 82 dial disconnect 101 dialing 82 N Navigating menus how to 17 Navigation how to 17 Navigation buttons 14 O Opto isolators 172 Overview manual 5...

Page 208: ...rams 106 user settings 106 Reset defaults HTML5 Toolbox factory default settings 147 programs 147 user settings 147 Restore factory default settings via codec menus 178 RS232 HTML5 Toolbox baud rates...

Page 209: ...formation digital phone systems 6 thunderstorms and lightning 6 Web Browser Using the web GUI 59 Web GUI connecting over a LAN 54 connection pane 59 description 59 help pane 59 installing USB drivers...

Reviews: