background image

4 • System Plumbing

Doc. 065447-02 12/14

101

Installing the Eluent Generator Cartridge (Dionex EGC)

1. Open the EG door. 

2. Push down on the slide release latch and pull the tray forward until it 

reaches the stop.

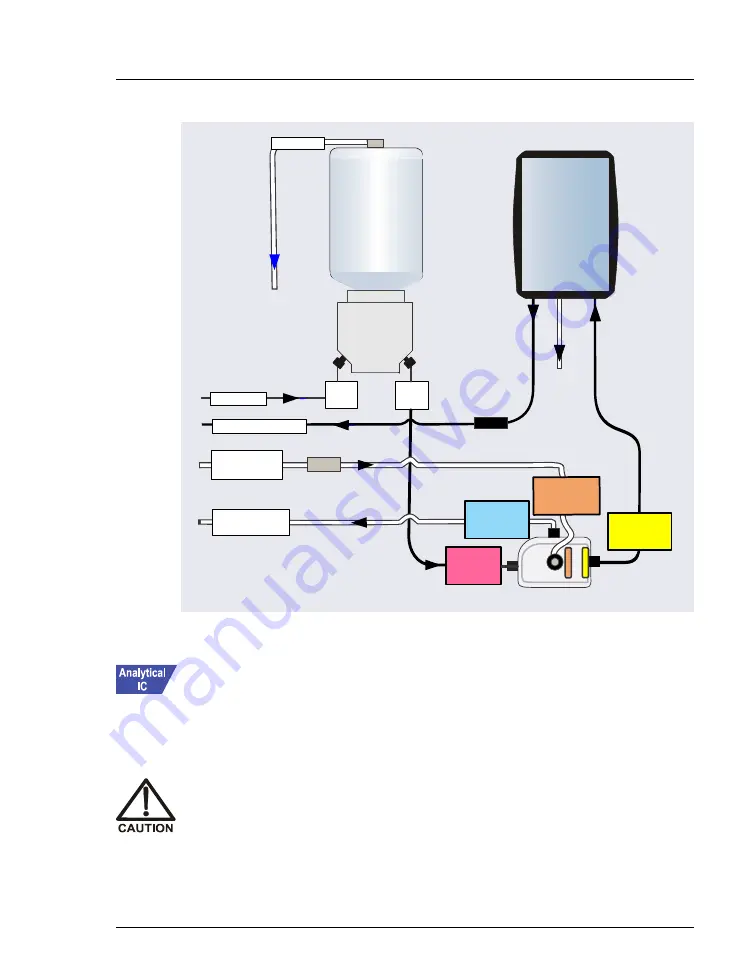
Figure 4-22.   EG Flow Schematic: Analytical (High-Pressure) Flow Version

EGC 

IN

EGC 
OUT

TO INJ VALVE  - P

Coupler

TO SRS/AES 
REGEN OUT

Coupler

TO PUMP

WASTE, GAS 
SEPARATOR

Eluent 

Out

To Waste

(via EG

rear wall)

Eluent 
In

RFIC
Eluent 

Degasser

Vent

+

EGC VENT

To Waste

(via EG

rear wall)

EGC

Inlet

Outlet

CR-TC

E

L

U

E

N

T

O

U

T

R

E

G

E

N

IN

To CR-TC 

Eluent In

(red label)

To CR-TC 

Eluent Out

(yellow label)

To CR-TC 

Regen In

(orange label)

TO CR

-

TC 

REGEN OUT 

(blue label)

The Dionex EGC contains one of the following: a corrosive base (KOH,
LiOH, or NaOH), a corrosive acid (MSA), or a concentrated K

2

CO

3

solution. Wear protective eyewear and gloves when handling the
cartridge.

Summary of Contents for Dionex ICS-5000+

Page 1: ...Dionex ICS 5000 Ion Chromatography System Installation Instructions Document No 065447 Revision 02 December 2014 ...

Page 2: ...e written authorization of Thermo Fisher Scientific Inc The contents of this document are subject to change without notice All technical information in this document is for reference purposes only System configurations and specifications in this document supersede all previous information received by the purchaser Thermo Fisher Scientific Inc makes no representations that this document is complete...

Page 3: ...ure Tube Fittings 10 1 6 2 Tightening High Pressure Fittings 11 1 6 3 Cutting Non Capillary Tubing 11 2 Unpacking Instructions 2 1 Unpacking Guidelines 13 2 2 Unpacking the Dionex AS AP 14 2 3 Unpacking the Dionex ICS 5000 Modules 19 2 4 Installing the Safety Support Bracket 21 2 5 Removing the Pump Shipping Screws Optional 23 2 6 Unpacking the Computer 24 2 7 Installing the Computer 24 2 8 Unpack...

Page 4: ...cal IC Applications 36 3 5 1 Installing the CD or ED 36 3 5 2 Installing the Suppressor in the DC 37 3 6 Setting Up the TC 38 3 6 1 Installing the Temperature Stabilizer in the TC Optional 38 3 6 2 Installing the Columns in the TC 40 3 6 3 Installing the TC Column ID Identification System 41 3 7 Connecting the Autosampler 42 3 7 1 Connecting the Autosampler Sample Transfer Line 42 3 7 2 Connecting...

Page 5: ...eal Wash System 67 3 13 1 Setting Up the System 68 3 13 2 Activating the Piston Seal Wash Function 68 3 14 Priming the Pump 69 3 15 Checking the Conductivity of the Water 70 4 System Plumbing 4 1 Plumbing a Capillary IC System 71 4 1 1 Tubing and Fittings 71 4 1 2 System Plumbing Checklists 73 4 1 3 Installing the Trap Column for KOH Based Separations 74 4 1 4 Connecting the Pump Outlet 75 4 1 5 F...

Page 6: ...Plumbing Checklists 96 4 2 3 Plumbing the Static Mixer or Trap Column 96 4 2 4 Completing the IQ Checklist 98 4 2 5 Performing the System Function Test 99 4 2 6 Completing the Operational Qualification 99 4 2 7 Plumbing the EG for Analytical IC Applications 99 4 2 8 Plumbing the DC for Analytical IC Applications 110 4 2 9 Plumbing the TC for Analytical IC Applications 114 4 3 Connecting Waste Line...

Page 7: ...lectrode in a Capillary IC System 139 B 2 Installing Low Pressure Valves in the DC 141 B 2 1 Installing a Low Pressure Valve on the DC Rear Panel 141 B 2 2 Installing a Low Pressure Valve Inside the DC 142 B 3 Installing the Injection Valve Panel in the DC 143 B 4 Installing the Automation Manager AM in the DC 146 B 4 1 Installing a High Pressure Valve on the AM 148 B 4 2 Installing a Low Pressure...

Page 8: ...1 Setting Up a Shared Datasource 158 C 1 1 Setting Up a Shared Datasource on a Workgroup 158 C 1 2 Setting Up a Shared Datasource on a Domain 159 C 2 Connecting a Client to a Remote Datasource 162 C 2 1 Connecting a Server to a Remote Datasource 163 C 3 Connecting a Client and Server Through a Network 163 ...

Page 9: ... IC and analytical IC applications are described Analytical IC applications can be configured with either standard bore or microbore plumbing Installation instructions for the following Thermo Scientific modules and components are included Dionex ICS 5000 Dual Pump DP Dionex ICS 5000 Single Pump SP Dionex ICS 5000 Eluent Generator EG Dionex ICS 5000 Detector Chromatography Module DC Dionex ICS 500...

Page 10: ... No 065259 Manuals for consumable products columns suppressors CR TC EGC CRD Chromeleon 7 Installation Guide Document No 7229 0003 Installing Chromeleon 6 8 with a Dionex Ion Chromatograph Document No 031883 1 3 Safety Messages and Notes This manual contains warnings and precautionary statements that can prevent personal injury and or damage to the system when properly followed Safety messages app...

Page 11: ...ituation de danger potentiel qui si elle n est pas évitée pourrait entraîner des blessures graves à mortelles Signale une situation de danger potentiel qui si elle n est pas évitée pourrait entraîner des blessures mineures à modérées Également utilisé pour signaler une situation ou une pratique qui pourrait gravement endommager l instrument mais qui n entraînera pas de blessures Bedeutet unmittelb...

Page 12: ...vironmental specifications for each module Refer to Appendix A of Dionex ICS 5000 Ion Chromatography System Operator s Manual Document No 065446 for specifications The manual is provided on the Thermo Scientific Reference Library DVD P N 053891 Make sure the installation site has enough power outlets for all system components Provide a sturdy vibration free lab bench of a height that ensures conve...

Page 13: ...and 0 85 MPa 80 and 120 psi Contaminant Specification Ions Resistivity 18 0 megohm cm Organics TOC 10 ppb Iron Transition Metals 1 ppb Pyrogens 0 03 Eu mL Particulates 0 2 µm 1 units mL Colloids Silica 10 ppb Bacteria 1 cfu mL Iron transition metal content not specified for ASTM Type I water Table 1 1 ASTM Filtered Type I Deionized Water Specifications for Ion Chromatography Never pressurize eluen...

Page 14: ...EG EG with one capillary Thermo Scientific Dionex EGC Dionex EGC and one capillary Thermo Scientific Dionex Continuously Regenerated Trap Column Dionex CR TC Single Analysis Capillary IC or RFIC EG System with Electrochemical Detector SP DC with one IC Cube including an injection valve and a capillary EG degasser Capillary ED Capillary column set Dionex AS AP For RFIC EG EG with one capillary Dion...

Page 15: ...e injection valve and one analytical column set One detector Thermo Scientific Dionex ICS Series Variable Wavelength Detector Dionex VWD Thermo Scientific Dionex ICS Series Photodiode Array Detector Dionex PDA or Thermo Scientific MSQ Mass Spectrometer Dionex AS AP For RFIC EG EG with one analytical Dionex EGC one analytical Dionex CR TC and one Dionex RFIC Eluent Degasser Dual Analysis Capillary ...

Page 16: ... column sets and two analytical detectors two CDs two EDs or one CD and one ED or TC with two injection valves two column sets and two detectors Dionex AS AP For RFIC EG EG with two Dionex EGCs two Dionex CR TCs and two Dionex RFIC Eluent Degassers Dual Analysis Capillary and Analytical RFIC EG Hybrid System DP with one capillary pump and one analytical pump DC with one IC Cube in the upper compar...

Page 17: ...e fitting bolt and ferrule are at least 2 mm 0 1 in from the end of the tubing before you insert the tubing into the port Do not position the ferrule and fitting bolt flush with the end of the tubing If you are installing a capillary system do not shorten or lengthen the 0 062 mm 0 0025 in ID blue PEEK polyether ether ketone tubing capillary tubing used for Dionex IC Cube connections and do not Fi...

Page 18: ...errule at least 2 mm 0 1 in from the end of the tubing see Figure 1 2 2 Insert the tubing into the port until it stops 3 While maintaining pressure on the tubing to keep it in place in the port tighten the fitting bolt fingertight and then tighten the fitting further by following the instructions in Section 1 6 2 Figure 1 2 Ferrule and Fitting Bolt Placement for Tubing Connections Figure 1 3 Ferru...

Page 19: ...ng bolt P N 074449 ferrule P N 074373 and tubing 1 6 3 Cutting Non Capillary Tubing If a connection does not require precision cut capillary tubing you can use a tubing cutter to cut tubing to the required length Make sure the cut is at a right angle to the length of the tubing and there are no nicks or burrs on the end A tubing cutter P N 049584 is included in the DC Ship Kit P N 072011 standard ...

Page 20: ...Dionex ICS 5000 Installation Instructions 12 Doc 065447 02 12 14 ...

Page 21: ...ex AS AP Autosampler Dionex ICS 5000 Detector Chromatography Module DC or Dionex ICS 5000 Thermal Compartment TC Dionex ICS 5000 Eluent Generator EG Dionex ICS 5000 Dual Pump DP or Dionex ICS 5000 Single Pump SP Unpack these system components Dionex ICS 5000 IC Cube IC Cube or Dionex ICS 5000 Automation Manager AM Dionex ICS 5000 Conductivity Detector CD Dionex ICS 5000 Electrochemical Detector ED...

Page 22: ... chaque côté du fond de l armoire Son soulèvement par la porte du panneau avant endommagera les charnières de la porte Der Dionex AS AP wiegt über 23 kg Daher sollte das Gerät nur von zwei oder mehr Personen angehoben werden Greifen Sie dazu an beiden Seiten unter das Gerät Heben Sie den Autosampler nicht an der Vordertür an da dadurch die Türangeln beschädigt werden könnten 1 Follow the instructi...

Page 23: ...iner to remove it see Figure 2 2 and then set the container aside Remove the top foam packing insert Figure 2 2 Lift up the shipping container 3 Remove the Ship Kit box from the top of the module see Figure 2 3 Figure 2 3 Ship Kit on top of the module Ship Kit Foam Packing Cage ...

Page 24: ...main power switch on the rear panel is turned off Figure 2 4 Module with packing cage removed 8 Lift up the Dionex AS AP front panel see Figure 2 5 and pull out the foam insert that secures the needle arm and carousel cover during shipment see Figure 2 6 NOTE Save the foam insert It is required to protect the needle when the autosampler is moved or shipped Figure 2 5 Dionex AS AP with foam insert ...

Page 25: ...k the Dionex AS AP Ship Kit P N 074929 see Figure 2 7 and Figure 2 8 10 Place the items in a convenient location and check them against the packing list see Figure 2 9 If there are any discrepancies contact Technical Support for Dionex products immediately Figure 2 7 Ship Kit with packing list Foam Insert ...

Page 26: ...ved from box Figure 2 9 Ship Kit items unpacked Save the shipping container and all other shipping materials for later use Should it be necessary to return the Dionex AS AP during the warranty period Thermo Fisher Scientific recommends repacking the autosampler in the original shipping container ...

Page 27: ...000 Eluent Generator EG Each module weighs more than 18 kg 40 lb Au moins deux personnes peuvent soulever l Dionex ICS 5000 Dual Pump DP Dionex ICS 5000 Single Pump SP Dionex ICS 5000 Detector Chromatography Module DC ou Dionex ICS 5000 Eluent Generator EG Chaque module pèse plus de 18 kg 40 lb Die folgenden Geräte sollten von zwei oder mehr Personen angehoben werden Dionex ICS 5000 Dual Pump DP D...

Page 28: ...ure 2 11 Ship Kit packed with module EG module shown 4 Place the module on the bench see Figure 2 12 5 Raise the front of the module about 5 cm 2 in and remove the cardboard cradle Figure 2 12 Module sitting on cardboard cradle EG module shown 6 Remove the polyethylene bag the module is shipped in Remember to save all shipping containers and packing material 7 Check that the main power switch on t...

Page 29: ...tion NOTE It is especially important to install the bracket if a monitor arm will be mounted on the side of a module see Section 1 Locate the safety support bracket Two versions of the bracket are available For a standard DC use P N 062225 provided in the standard DC Ship Kit P N 072011 For a low temperature DC use P N 22171 10001 provided in the low temperature DC Ship Kit P N 22171 62000 2 Hold ...

Page 30: ...nstallation Instructions 22 Doc 065447 02 12 14 3 Tighten the captive thumbscrews Figure 2 13 Safety Support Bracket Installed on Module Rear Panels P N 062225 for a Standard DC Shown Safety Support Bracket DC DP SP EG ...

Page 31: ...ation or when performing service procedures remove the five red shipping screws on the pump component panel The component panel can then be pulled forward to the front of the pump compartment using one of the handles NOTE The upper and lower component panels slide forward together Figure 2 14 Removing Pump Shipping Screws Red Shipping Screws 5 Handles 2 ...

Page 32: ...a computer outside of North America verify that it meets current system specifications Refer to http www thermoscientific com dionex When you purchase Chromeleon and a computer from Thermo Fisher Scientific the chromatography software and computer hardware are installed at the factory 2 Follow the instructions in the computer installation guide to hook up the computer components 3 Optional When yo...

Page 33: ... a corrosive acid MSA or a concentrated K2CO3 solution Wear protective eyewear and gloves when handling the cartridge La cartouche de Dionex EGC contient un de ce qui suit une base corrosive KOH LiOH ou NaOH un acide corrosif MSA ou une solution concentrée de K2CO3 Porter des lunettes et des gants protectives en manipulant la cartouche Die Dionex EGC Kartusche enthält eine korrosive Base KOH LiOH ...

Page 34: ...Dionex ICS 5000 Installation Instructions 26 Doc 065447 02 12 14 ...

Page 35: ...g system can detect the new modules when their power is turned on 3 1 System Setup Checklist Setup Step Page Connect the power cords page 28 Plug in the EGC and CR TC RFIC EG only page 29 Set up the DC for capillary IC applications page 29 Set up the DC for analytical IC applications page 36 Set up the TC analytical IC applications only page 38 Connect the autosampler page 40 Connect modules to th...

Page 36: ...d is used as the main disconnect device Make sure the socket outlet is located near the Dionex ICS 5000 modules and is easily accessible Operation at AC input levels outside of the specified operating voltage range may damage the Dionex ICS 5000 modules DANGER D ÉLECTROCUTION Pour éviter toute électrocution il faut utiliser une prise de courant avec prise de terre Ne l utilisez pas et ne le branch...

Page 37: ...Installing a DC for analytical IC Section 3 5 Installing a TC Section 3 6 1 Open the EG door 2 Pull the tray forward until it reaches the stop 3 If you are installing a capillary system locate the capillary IC Dionex EGC adapter P N 072133 in the EG Ship Kit P N 072047 Install the adapter on top of the Dionex EGC holder see Figure 3 1 Figure 3 1 Capillary IC Dionex EGC Adapter Installed Capillary ...

Page 38: ... EGC with the electrolyte reservoir on top and slide it down into the holder see Figure 3 3 Install the Dionex EGC on the left side for system 1 and the right side for system 2 Figure 3 2 Dionex EGC Cable Attached to Cartridge Capillary Version Shown Figure 3 3 Dionex EGC Installed in Holder Cable Cable Tie cut to release the cable EGC Standard Pressure Analytical EGC High Pressure Analytical EGC ...

Page 39: ...EGC electrical cables a Align the three pins inside the Dionex CR TC cable connector with the holes in the CR TC 1 or CR TC 2 bulkhead connector Push the cable connector firmly onto the connector see Figure 3 4 Twist the locking ring on the cable connector fingertight to secure it b Align the four pins inside the Dionex EGC cable connector with the holes in the EGC 1 or EGC 2 bulkhead connector Pu...

Page 40: ...ample of the upper compartment of a DC after the components for a capillary IC system have been installed and the plumbing is completed NOTE The 0 062 mm 0 0025 in ID blue PEEK tubing capillary tubing used for IC Cube connections is cut at the factory using a specialized precision cutter Do not cut this tubing or substitute different tubing Capillary IC Figure 3 5 Example DC Upper Compartment with...

Page 41: ...egas typically installed at the factory CES CRD an option for anion applications CRD bypass required if a CRD cartridge is not installed Column tray Electrochemicala a If you are setting up the system for electrochemical detection and the EG degas cartridge is already installed no additional cartridges are required Leave the sup pressor bypass and CRD bypass cartridges in place and go on to Instal...

Page 42: ...ridge and pull the bypass cartridge out of the Dionex IC Cube Save the bypass cartridge a Remove the caps from the regenerant ports on the rear of the CRD or CES cartridge Slide the cartridge into its slot in the Dionex IC Cube see Figure 3 6 Push the cartridge firmly into the slot and tighten the thumbscrews fingertight NOTE Install the saved regenerant port caps onto the CRD and CES cartridge po...

Page 43: ...t side 3 Push firmly to plug the electrical plug on the back of the detector into the receptacle on the rear wall of the DC compartment You should hear a click when the detector is fully seated 4 For an ED connect the cell cable and the reference electrode cable If it is necessary to remove the detector from the DC 1 Press the release lever located below the detector see Figure 3 5 2 Grasp the top...

Page 44: ...el of the DC is off 2 Pull out the DC upper compartment tray until it stops 3 Install the analytical CD P N 079829 and or the ED in the bottom half of the DC upper compartment see Figure 3 7 For a single system configuration it does not matter on which side of the compartment the detector is installed For a dual system configuration install each detector above the corresponding injection valve Fig...

Page 45: ...CELL IN and CELL OUT fittings 3 5 2 Installing the Suppressor in the DC 1 Note the two slots on the rear of the suppressor and the two mounting tabs on the CD below the cell 2 Press the suppressor onto the mounting tabs and slide it to the right to secure the suppressor onto the detector 3 Pull out slightly on the center of the suppressor to verify that it is securely fastened 4 Plug the suppresso...

Page 46: ...m each column bracket and remove the brackets from the TC see Figure 3 9 2 The TC can contain up to two temperature stabilizers microbore P N 064650 standard bore P N 064548 Determine the mounting site and orientation for each The temperature stabilizer can be mounted along either the top or bottom edge of the thermal element see Figure 3 9 The mounting holes on the temperature stabilizer are clos...

Page 47: ...led on the bottom edge 4 Repeat Step 3 for the second temperature stabilizer if needed 5 Reinstall the column brackets in the TC as follows a Check that the outside edge of the temperature stabilizer is flush with the edge of the thermal element b While holding the temperature stabilizer in place attach the brackets to positions and by loosely installing first the screw in the top of each bracket ...

Page 48: ...cientific Reference Library DVD P N 053891 2 Remove the guard column and separator column from their boxes 3 Remove the fitting plugs from the ends of each column 4 The column clip P N 064786 consists of two pieces a base and a retaining ring see Figure 3 11 5 Remove the retaining ring from the clip by pressing lightly on the ring in the direction indicated by the arrows on the ring 6 Attach the b...

Page 49: ...t P N 064789 includes two column ID chip cards P N 5710 1500 If more chip cards are needed order the optional Column ID Kit P N 6710 1505 five chip cards 1 To attach a column ID chip card to the column wrap the strap around the column insert the rivet into one of the holes on the strap and press to secure the strap to the column see Figure 3 13 Figure 3 13 Attaching the Column ID System to the Col...

Page 50: ... When you finish click Close 3 7 Connecting the Autosampler This section provides brief instructions for connecting an autosampler to a single injection valve in a DC or TC For detailed instructions refer to the operator s manual for the autosampler you are connecting The manuals are provided on the Thermo Scientific Reference Library DVD P N 053891 3 7 1 Connecting the Autosampler Sample Transfer...

Page 51: ...ing P N 044777 0 25 mm 0 010 in ID black PEEK tubing P N 042690 for analytical P N 082647 for capillary 10 32 fitting bolt P N 074449 and 10 32 double cone ferrule P N 074373 b Cut a 61 cm 24 in length of black tubing If this is not long enough to reach from the injection valve to the Dionex AS AP waste port add an additional length of green PEEK tubing 2 For an analytical system a Locate the syst...

Page 52: ...ary system port 6 is labeled SAMPLE IN In an analytical system port 6 is labeled W 4 Route the line to the Dionex AS AP waste port and insert the line into one of the round openings in the waste port see Figure 3 15 Figure 3 15 Injection Valve Waste Line Installed in Dionex AS AP Waste Port Waste line from injection valve Waste line from syringe Note The injection valve waste line is green in anal...

Page 53: ...3 8 1 USB Cables All USB connections require standard A to B cables The A connector is the flat rectangular end of the cable the B connector is the smaller hexagonal end see Figure 3 17 Figure 3 17 USB Cable These USB cables are shipped with Dionex ICS 5000 modules The DC Ship Kit standard DC P N 072011 low temperature DC P N 22171 62000 includes a 1 8 m 6 ft USB cable P N 960777 Figure 3 16 Flexi...

Page 54: ... connections shown in Figure 3 18 The USB standard limits the USB cable length to 5 m 5 5 yds Each USB module can be separated from the PC by no more than five hubs Thus each USB module can be located no more than 30 m 32 yds from the PC Type of Hub Module Notes USB 2 0 internal hub powered Dionex ICS 5000 DC Dionex ICS 5000 EG When you turn off the power using the POWER button on the front of the...

Page 55: ...n internal hub either USB 2 0 or USB 1 1 An external USB 2 0 hub The computer Connect a PDA Level 3 to A device with an internal hub either USB 2 0 or USB 1 1 An external USB 2 0 hub The computer PC Before connecting the USB cables verify that Chromeleon 7 or Chromeleon 6 8 was installed on the PC and the license code was entered If the chromatography software is not installed first Windows will b...

Page 56: ...nect the modules to the system with an external USB 2 0 hub see Figure 3 20 Figure 3 19 Example Connections Multiple Modules Connected via Internal Hubs Figure 3 20 Example Connections Multiple Modules Connected via an External Hub A A B B USB Cables B A B EG DP DC AS AP Internal USB 2 0 hub PC A B B B B A A A A USB Cables DP DC AS AP PC A USB 2 0 Hub ...

Page 57: ...rence Library DVD P N 053891 For Chromeleon 7 refer to Chromeleon 7 Installation Guide For Chromeleon 6 8 refer to Installing Chromeleon with a Dionex Ion Chromatograph Document No 031883 3 9 2 Starting the Instrument Controller Service or Server If you have not already done so turn on the computer power and log on to Windows as an administrator For a network computer log on as a user with local c...

Page 58: ... 2 Turn on the main power switch on the rear panel of each Dionex ICS 5000 module NOTE Always leave the main power switch on unless instructed to turn it off Use the POWER button on the front of each Dionex ICS 5000 module for on off control To turn off a module press and hold the POWER button for 2 seconds 3 If you are installing an autosampler turn on the autosampler power also 4 Windows automat...

Page 59: ...evice leave the wizard open and complete the Found New Hardware Wizard for the other devices After completing the driver installation for all devices go to Section 3 9 4 to configure the modules 3 9 4 Configuring the Modules in Chromeleon The Chromeleon USB Auto Configuration Wizard appears automatically when a USB device that is not assigned to a Chromeleon 7 instrument or a Chromeleon 6 8 timeba...

Page 60: ...each tab page depend on the type of device Some example tab pages are described in the following sections For details about a tab page click Help EG Configuration Properties On the Cartridges tab page see Figure 3 21 select the following settings for each Dionex EGC In the Instrument or Timebase box select the instrument or timebase to which this cartridge is assigned In the Link to Pump box selec...

Page 61: ...be name The Device Configuration dialog box appears see Figure 3 22 Verify that the IC Cube is assigned to the correct instrument or timebase If a suppressor is installed click Configure next to Suppressor Verify that the suppressor is assigned to the correct Figure 3 22 IC Cube Configuration Example Capillary IC ...

Page 62: ...Dionex ICS 5000 Installation Instructions 54 Doc 065447 02 12 14 instrument or timebase and that it is linked to the pump see Figure 3 23 Figure 3 23 IC Cube Suppressor Configuration Example ...

Page 63: ... correct instrument or timebase see Figure 3 24 For Controlled by verify that AS is selected This setting assigns control of the valve to the autosampler Use this setting for both the Dionex AS AP and Dionex AS DV If an autosampler is not installed select DC in the Controlled by list Figure 3 24 IC Cube Valve Configuration Example ...

Page 64: ...ed for InjectValve_1 and InjectValve_2 if installed This setting assigns control of the injection valve in the DC to the autosampler Use this setting for both the Dionex AS AP and Dionex AS DV If an autosampler is not installed select DC for the Controlled by setting To change the setting select the injection valve name and press F2 Figure 3 25 DC High Pressure Valves Configuration Example ...

Page 65: ...e If an autosampler is not installed clear the check box For each column that has a column ID chip card installed see Section 3 6 3 select the check box next to the column name Column A Column B etc For each installed valve and column verify that the device is assigned to the correct instrument or timebase After configuring all modules in Chromeleon start the Chromeleon client see Section 3 13 Fig...

Page 66: ...l Programs Thermo Chromeleon 7 Chromeleon 7 To start Chromeleon 6 8 click Start All Programs Chromeleon Chromeleon 2 Display the ePanel Set Chromeleon 7 or panel tabset Chromeleon 6 8 To display the Chromeleon 7 ePanel Set click the Instruments Category Bar Chromeleon 7 connects to the instrument and displays the ePanel Set Figure 3 27 Example Chromeleon 7 ePanel Set ...

Page 67: ...3 10 Connecting Drain Lines Any leaks or condensation that may occur are routed to the drain port on the rear of each module Connecting Drain Hoses to the DP SP EG standard DC and TC 1 Locate the corrugated drain hose P N 055075 in the Ship Kit for each module 2 Push the hose onto the drain port on the rear of each module Figure 3 28 Example Chromeleon 6 8 Panel Tabset ...

Page 68: ...o help prevent vapor lock and improve liquid flow to the drain is also included 1 Locate the drain line parts in the low temperature DC Ship Kit P N 22171 62000 see Table 3 3 and Figure 3 29 For correct drainage make sure drain hoses lay flat on the bench and are not bent pinched or elevated at any point Do not allow the ends of the drain hoses to be submerged in waste liquid Part Part Number Quan...

Page 69: ...ur installation site The figures below show some typical configurations You can use one of these configurations or customize the assembly as required Figure 3 29 Low Temperature DC Drain Line Parts Figure 3 30 Drain Line Routed to Rear of Bench Corrugated Drain Hose PTFE Tubing 5 pieces Union Fitting Vent Plug Fitting Tee Elbow Fitting 3 Vent Plug Elbow Fitting Corrugated Drain Hose Tee Fitting ...

Page 70: ...lbow fitting at the edge of the bench The corrugated drain hose connects to this fitting For stability make sure the horizontal leg of the elbow fitting is supported on the bench Use the tee fitting in the configuration it can be placed in any location Install the vent plug with the holes facing up in the open port on the tee NOTE If the supplied tubing lengths do not fit your installa tion site y...

Page 71: ...de the drain port ensures a leak free fit between the drain line and drain port If the drain line is pushed into the port at an angle it can force the o ring out of its groove 5 Push the corrugated drain hose into the elbow fitting at the edge of the bench Place the open end of the line into a waste container or appropriate drain For correct drainage make sure the entire rigid drain assembly from ...

Page 72: ...deionized water specifications for ion chromatography see Table 1 1 3 12 Setting Up the Reservoirs The following reservoirs are available for use with the DP SP 1 liter plastic reservoir P N 063291 2 liter plastic reservoir P N 062510 4 liter plastic reservoir P N 063292 Figure 3 33 Removal of a Drain Tube from a Fitting Press the rubber ring Pull out the tubing Do not use the plastic reservoirs f...

Page 73: ...nstalled Column manuals are provided on the Thermo Scientific Reference Library DVD P N 053891 2 Place the reservoir in the Dionex ICS 5000 Eluent Organizer EO EO with four 2 liter reservoirs P N 072058 EO with two 2 liter reservoirs P N 072057 EO without reservoirs P N 072059 If an EO is not available place the reservoir in appropriate secondary containment Verwenden Sie den Plastikbehälter zum O...

Page 74: ...nt Connect the inline filter between the pump out let and the eluent inlet port on the injection valve For details see the instructions provided with the inline filter 6 Locate the 10 mL syringe P N 079803 in the pump ship kit and a luer adapter P N 024305 in the DC Ship Kit standard DC P N 072011 low temperature DC P N 22171 62000 7 Using the syringe and luer adapter draw water through each reser...

Page 75: ...al wash system is connected to the bottom pump pump 1 at the factory To connect the seal wash system to the top pump pump 2 follow the replumbing instructions in Section A 2 To operate a piston seal wash system for both pumps order one of the following options Installation instructions are included with each kit Dual Serial External Seal Wash Kit P N 063518 After installation of this option the DP...

Page 76: ...ting the Piston Seal Wash Function 1 Open the Chromeleon 7 ePanel Set or the Chromeleon 6 8 panel tabset 2 Press the F8 key to open the Command window Chromeleon 7 or the Commands dialog box Chromeleon 6 8 3 Select the pump name 4 For Chromeleon 7 click the Properties tab in the right pane of the window For Chromeleon 6 8 scroll through the list of commands and properties under the pump name 5 Sel...

Page 77: ...riming valve see Figure 3 35 into a waste container or appropriate drain 3 Open the priming valve on the secondary pump head see Figure 3 35 by turning the knob one half turn counterclockwise NOTE If the priming valve is opened too much air is drawn through the valve and air bubbles can be seen exiting the waste line 4 On the Chromeleon 7 ePanel Set or the Chromeleon 6 8 panel tabset click the pum...

Page 78: ...ent lines select another eluent channel and repeat the priming procedure 10 Close the priming valve by turning the knob clockwise Tighten no more than fingertight 3 15 Checking the Conductivity of the Water For a CD system check the background conductivity of the water before continuing 1 Connect a short piece of tubing to the CD cell inlet port 2 Connect a luer adapter to the tubing and use a 1 m...

Page 79: ...C system begin on page 95 4 1 Plumbing a Capillary IC System This section describes how to plumb the components of a capillary IC system To plumb an analytical IC system go to Section 4 2 4 1 1 Tubing and Fittings Dionex IC Cube Tubing Kit The Dionex ICS 5000 IC Cube Ship Kit P N 072003 includes a Dionex IC Cube Tubing Kit P N 072186 for each IC Cube installed in the system The tubing kit contains...

Page 80: ... Pre Assembled Tubing Chain TO PUMP DAMPER EGC IN P N 068658 0 25 mm 0 010 in ID black PEEK 86 cm 34 in EGC OUT TO CR TC EL IN P N 072204 0 062 mm 0 0025 in ID blue PEEK 18 cm 7 in TO CR TC EL OUT EG DEGAS IN P N 072203 0 062 mm 0 0025 in ID blue PEEK 61 cm 24 in EG DEGAS OUT TO CR TC REGEN IN P N 072224 1 58 mm 0 062 in ID clear ETFE 65 cm 25 in TO CR TC REGEN OUT P N 072225 1 58 mm 0 062 in ID c...

Page 81: ...stem function test page 77 Complete the OQ optional page 78 Flush and condition the electrolytic devices page 79 Flush and install the columns page 84 Complete the plumbing page 90 Connect waste lines to the gas separator waste tube page 116 Equilibrate the system page 118 ED System Plumbing Checklist for Capillary IC Page Install the ED amperometry cell page 127 Connect the pump outlet page 75 Fi...

Page 82: ...500 tubing assembly P N 078497 to the pulse damper outlet see Figure 4 2 and connect the other end to the trap column inlet 3 Optional Connect a temporary waste line to the outlet of the trap column Use the TO CR TC REGEN OUT line which is part of the pre assembled tubing chain 4 Set the pump Purge flow rate to 2 0 mL min and the Duration to 1800 s Click Prime Do not open the purge valve you can c...

Page 83: ...n ED go on to Filling and Flushing the ED Liquid Path on page 78 If you are installing a system with a CD follow the steps below to fill and flush the suppressor and CRD regenerant pathways including the connecting path in the interior of the Dionex ICS 5000 IC Cube 1 If you have not already done so install the CES cartridge and CRD cartridge if used in the Dionex ICS 5000 IC Cube 2 In the Dionex ...

Page 84: ... that appears The regenerant path is flushed for 30 minutes NOTE The pump pressure is typically 3 to 5 MPa 400 to 700 psi at 0 100 mL min 7 Monitor the waste flow from the EG degas When no bubbles are present the path is completely filled and flushed Figure 4 3 Flow Schematic for Filling and Flushing the Regenerant path in a Capillary CD System 5 6 3 CRD CES 2 SAMPLE OUT REGEN IN ELUENT OUT ELUENT...

Page 85: ...3 mL min and the Duration to 900 s Click Prime 2 Monitor the background conductivity Verify that the conductivity is 1 S before proceeding 3 Remove the tubing assemblies between the injection valve ELUENT OUT and the CD IN 4 1 7 Completing the Installation Qualification Complete the Installation Qualification IQ and system function test to confirm that the Dionex ICS 5000 system is correctly insta...

Page 86: ...ne as shown in Figure 4 4 Use the long 10 32 fitting bolt P N AAA 057227 and split cone ferrule P N 062978 for the cell IN connection Capillary IC Before beginning the fluidic connections install the working electrode and the reference electrode in the cell For instructions see Installing the ED Amperometry Cell on page 127 Capillary IC Figure 4 4 Flow Schematic for Filling and Flushing the ED Liq...

Page 87: ... that the liquid path is ready a Note the pump pressure b Disconnect the Suppressor Bypass REGEN IN from the ED cell OUT the high pressure side and note the difference in the pump pressure c If the difference is 0 7 MPa 100 psi the low pressure flow path is ready and you can proceed to the next step NOTE If the pressure difference is greater than 0 7 MPa 100 psi refer to the ICS 5000 operator s ma...

Page 88: ...on the bottom of the Dionex EGC 3 Connect the EGC OUT line to the EGC OUT port Direct the open end of the tubing to waste The Dionex EGC will be flushed for 30 minutes Luer Fitting To ensure proper ventilation always install the luer fitting before operation If you need to remove the Dionex EGC from the system re install the vent fitting to prevent leaks Figure 4 5 Flow Schematic for Flushing the ...

Page 89: ...f and the suppressor current is off 5 Condition the Dionex EGC for 30 minutes and then turn off the Dionex EGC and the pump flow 6 Remove the backpressure tubing and reconnect the EGC OUT line Figure 4 6 Flow Schematic for Conditioning the Dionex EGC Capillary EGC capillary OUT IN EGC IN P N 068658 EGC OUT TO CR TC EL IN P N 072204 EGC Conditioning EGC concentration at 50 mM Pump flow at 0 03 mL m...

Page 90: ...e CR TC REGEN OUT line Conditioning the CR TC 1 Verify that the pump Flow rate is 0 03 mL min 2 Set the EG concentration to 50 mM Turn on the Dionex EGC current and the CR TC voltage Condition the CR TC for 15 minutes Bubbles will be present in the CR TC REGEN OUT line Figure 4 7 Flow Schematic for Flushing and Conditioning the CR TC Capillary EGC capillary OUT IN ELUENT OUT REGEN IN CR TC ELUENT ...

Page 91: ...o the CRD ELUENT IN port and direct the CRD ELUENT OUT line to waste Figure 4 8 Flow Schematic for Hydrating the Suppressor Eluent Chamber in a Capillary IC System 5 6 3 CRD CES 2 SAMPLE OUT REGEN IN ELUENT OUT ELUENT IN SAMPLE IN ELUENT OUT ELUENT IN ELUENT OUT ELUENT IN ELUENT OUT ELUENT IN EG DEGAS ELUENT IN ELUENT OUT VENT 5000 psi REGEN IN ELUENT OUT REGEN IN CR TC ELUENT OUT ELUENT IN REGEN ...

Page 92: ... the Thermo Scientific Reference Library DVD P N 053891 Flushing the Capillary Columns 1 Locate the Dionex IC Cube Tubing Kit P N 072186 in the Dionex ICS 5000 Ship Kit P N 075161 The kit contains precision cut tubing and the fittings required for installing various column configurations 2 To flush the guard column if included a Connect the 125 mm 4 92 in precision cut tubing labeled VALVE PORT 3 ...

Page 93: ...is off and the pump flow and Dionex EGC are set to the conditions specified in the QAR c Flush the separator column to waste for 20 minutes Installing the Columns in the Capillary Column Tray 1 Temporarily disconnect the column inlet tubing from the ELUENT OUT port 3 of the injection valve 2 Cut off the label from the separator column along the dotted line and slide the label into the holder on th...

Page 94: ...s and tubing guides are molded into the tray 4 Orient the separator column s outlet fitting with a flat side facing up and push the fitting into the opening at the front of the column tray until it stops Press the fitting down into the clip see Figure 4 11 Figure 4 10 Empty Capillary Column Tray Figure 4 11 Separator Column Outlet Fitting in Capillary Column Tray Fitting Clip Tubing Clip Column Gu...

Page 95: ...he fitting clips Figure 4 12 250 mm Separator Column and 50 mm Guard Column Installed in Capillary Column Tray Figure 4 13 250 mm Separator Column Installed in Capillary Column Tray Separator Column Inlet 65 mm 2 56 in Precision Cut Tubing Guard Column Inlet Guard Column Outlet 125 mm 4 92 in Precision Cut Tubing inlet line Separator Column Outlet Separator Column Inlet 210 mm 8 27 in Precision Cu...

Page 96: ...y Column Tray Figure 4 15 150 mm Separator Column Installed in Capillary Column Tray Separator Column Inlet 65 mm 2 56 in Precision Cut Tubing Guard Column Inlet Guard Column Outlet 125 mm 4 92 in Precision Cut Tubing inlet line Separator Column Outlet Separator Column Inlet 210 mm 8 27 in Precision Cut Tubing inlet line Separator Column Outlet ...

Page 97: ... hear a click NOTE The column tray lid should close easily If not do not force it Open the lid and verify that the columns and tubing are installed correctly and secured in the clips 7 Slide the column tray into the Dionex ICS 5000 IC Cube column heater and tighten the two thumbscrews 8 Reconnect the column inlet tubing to the injection valve ...

Page 98: ...t Capillary IC Figure 4 16 Flow Schematic for Equilibration and Operation of a Conductivity Detection System with a CRD Installed EGC capillary OUT IN ELUENT OUT REGEN IN CR TC ELUENT OUT ELUENT IN REGEN OUT REGEN IN 5 6 3 CRD CES 2 SAMPLE OUT REGEN IN ELUENT OUT ELUENT IN SAMPLE IN ELUENT OUT ELUENT IN ELUENT OUT ELUENT IN ELUENT OUT ELUENT IN EG DEGAS ELUENT IN ELUENT OUT VENT 5000 psi Conductiv...

Page 99: ... connect the CES ELUENT OUT line to the CD IN port 3 Connect the waste line from the CR TC REGEN OUT port to the gas separator waste tube see Section 4 3 4 Route the IC Cube tubing as described in Section 4 1 14 The flow path is ready for equilibration see Section 4 4 ...

Page 100: ...and Operation of a Electrochemical Detection System Final Flow Path EGC capillary OUT IN ELUENT OUT REGEN IN CR TC ELUENT OUT ELUENT IN REGEN OUT REGEN IN 5 6 3 CRD CES 2 SAMPLE OUT REGEN IN ELUENT OUT ELUENT IN SAMPLE IN ELUENT OUT ELUENT IN ELUENT OUT ELUENT IN ELUENT OUT ELUENT IN EG DEGAS ELUENT IN ELUENT OUT VENT 5000 psi CRD BYPASS SUPPRESSOR BYPASS REGEN IN OUT IN To waste From pump To gas ...

Page 101: ...the following settings a Pump panel Set the pump flow rate to 0 01 mL min This turns on the pump flow also b Eluent Generator panel Enter 100 mM in the Target Concentration field This turns on the power to the Dionex EGC also c Verify that eluent is exiting the cell d ED panel Set the reference electrode mode to PdH e Select DC amperometry mode set the cell voltage to 0 000 V and turn on the cell ...

Page 102: ...b If you are installing a dual system Press the sample in and sample out lines from both valves into the tubing trays and then route all four lines through the DC left side slot to the autosampler see Figure 4 19 Press the Eluent In line from the EG degas cartridge of system 1 into the tubing trays below the IC Cube of system 2 and then route the line out the DC right side slot to the EG Figure 4 ...

Page 103: ...ce of tubing remove the unions that connect the tubing in the tubing package Use tubing with white labels for system 1 left side and tubing with blue labels for system 2 right side Tubing and fittings for other connections for example the pump and Dionex EGC outlet lines are provided in the module ship kits 0 25 mm 0 010 in ID black PEEK tubing P N 052306 is provided for standard bore systems 0 12...

Page 104: ...mn is used it replaces the static mixer CD System Plumbing Checklist for Analytical IC Page Plumb the static mixer or trap column page 96 Complete the IQ checklist page 98 Perform the system function test page 99 Complete the OQ optional page 99 Plumb the EG page 99 Plumb the DC page 110 Plumb the TC page 114 Connect waste lines to the gas separator waste tube page 116 Equilibrate the system page ...

Page 105: ... manuals are provided on the Thermo Scientific Reference Library DVD P N 053891 1 Remove the static mixer from the mounting clip on the component panel see Figure 4 20 2 Remove the plugs from the trap column inlet and outlet Install the plugs in the inlet and outlet of the static mixer Set the mixer aside 3 For a Dionex MFC 500 P N 079017 Connect the tubing from the secondary pump head to the trap...

Page 106: ...for standard bore systems or 0 125 mm 0 005 in ID red PEEK tubing for microbore systems 6 Connect the tubing to the trap column outlet 7 Store the static mixer and its mounting clip if removed for future use 4 2 4 Completing the IQ Checklist Complete the Installation Qualification IQ checklist to confirm that the Dionex ICS 5000 system is correctly installed For instructions refer to Dionex ICS 50...

Page 107: ...em For an ED system complete the OQ after plumbing the EG 4 2 7 Plumbing the EG for Analytical IC Applications Refer to the Dionex EGC and CR TC manuals for the optimal operating conditions for your application The manuals are provided on the Thermo Scientific Reference Library DVD P N 053891 NOTE The Dionex EGC CO3 EGC and Thermo Scientific Dionex EPM Electrolytic pH Modifier require specialized ...

Page 108: ...d Pressure Flow Version Eluent Out EGC VENT To Waste via EG rear wall EGC IN EGC OUT EGC Inlet Outlet TO INJ VALVE P TO PUMP WASTE GAS SEPARATOR Eluent In CR TC Coupler ELUENT OUT REGEN IN TO CR TC REGEN OUT blue label To CR TC Eluent In red label To CR TC Eluent Out yellow label To CR TC Regen In orange label RFIC Eluent Degasser Vent To Waste via EG rear wall Coupler TO SRS AES REGEN OUT ...

Page 109: ...AES REGEN OUT Coupler TO PUMP WASTE GAS SEPARATOR Eluent Out To Waste via EG rear wall Eluent In RFIC Eluent Degasser Vent EGC VENT To Waste via EG rear wall EGC Inlet Outlet CR TC ELUENT OUT REGEN IN To CR TC Eluent In red label To CR TC Eluent Out yellow label To CR TC Regen In orange label TO CR TC REGEN OUT blue label The Dionex EGC contains one of the following a corrosive base KOH LiOH or Na...

Page 110: ... contient un de ce qui suit une base corrosive KOH LiOH ou NaOH un acide corrosif MSA ou une solution concentrée de K2CO3 Porter des lunettes et des gants protectives en manipulant la cartouche Die Dionex EGC Kartusche enthält eine korrosive Base KOH LiOH oder NaOH eine korrosive Säure MSA oder eine konzentrierte K2CO3 Lösung Tragen Sie daher beim Umgang mit der Kartusche eine Schutzbrille und Han...

Page 111: ... the plugs from the INLET and OUTLET fittings see Figure 4 25 Figure 4 24 Dionex EGC Service Position Figure 4 25 Dionex EGC Inlet and Outlet Fittings with Plugs Reservoir Drip Tray Electrolyte EGC Standard Pressure Analytical EGC High Pressure Analytical Generation Chamber Generation Chamber EGC Standard Pressure Analytical EGC High Pressure Analytical OUTLET INLET INLET OUTLET ...

Page 112: ...o dislodge any air bubbles trapped in the eluent generation chamber NOTE Be sure to dislodge air bubbles each time the Dionex EGC has been turned upside down 9 Slide the Dionex EGC into the cartridge holder in the EG 10 Remove the 10 32 plug from the vent opening on the side of the standard pressure Dionex EGC or remove the fitting from the top of the high pressure Dionex EGC Install a 10 32 luer ...

Page 113: ... opening in the rear wall above the bulkhead connectors and connect the line to the luer adapter in the Dionex EGC vent opening see Figure 4 27 Figure 4 26 Connecting the Dionex EGC Electrical Cable Figure 4 27 Dionex EGC Vent Opening EGC Standard Pressure Analytical EGC High Pressure Analytical EGC Standard Pressure Analytical EGC High Pressure Analytical Vent Line Vent Line The vent line must be...

Page 114: ...8 Direct the open end to a waste container This is a temporary connection NOTE The backpressure must be at least 1 4 MPa 200 psi Figure 4 28 Flow Schematic for Conditioning the Dionex EGC Analytical Flow Version EGC IN From Pump EGC OUT Eluent Out To Waste via EG rear wall Eluent In RFIC Eluent Degasser Vent EGC VENT To Waste via EG rear wall EGC Inlet Outlet To Waste Dionex EGC Flushing Pump at 1...

Page 115: ...ine 3 Temporarily remove the luer adapter and vent line and replace the 10 32 plug or fitting in the vent opening 4 Lift the Dionex EGC out of the holder turn it upside down and place it on the drip tray in the service position see Figure 4 24 5 Disconnect the RFIC Eluent Degasser inlet line from the Dionex EGC OUTLET port 6 Cut a length of 0 25 mm 0 010 in ID black PEEK tubing long enough to conn...

Page 116: ...oroethylene tubing labeled WASTE GAS SEPARATOR SRS AES REGEN OUT from the system tubing package described on page 95 6 Connect this tubing to the CR TC REGEN OUT port 7 Route the WASTE GAS SEPARATOR line through the slot on the EG and connect it to the gas separator waste tube For instructions see Section 4 3 Figure 4 29 Dionex CR TC Plumbing for Hydration Analytical Flow Version From EGC Outlet P...

Page 117: ...s on the Dionex CR TC Completing the Dionex CR TC Plumbing Refer to Figure 4 30 and the following steps to complete the Dionex CR TC plumbing To avoid damaging the suppressor always turn off the suppressor before hydrating the Dionex CR TC The pump flow is on during conditioning however no flow reaches the suppressor Figure 4 30 Dionex CR TC Plumbing Diagram Analytical Flow Version Installation Co...

Page 118: ...d then push the device firmly onto the ball studs on the mounting plate The Dionex CR TC clicks into place when properly installed 5 Connect the Dionex CR TC electrical cable 6 For a dual analysis system repeat the steps above to install the second Dionex EGC and CR TC 4 2 8 Plumbing the DC for Analytical IC Applications This section provides brief installation and plumbing instructions for the gu...

Page 119: ...he liquid flow path through the DC components for conductivity detection after all plumbing connections are complete Figure 4 31 shows the flow path for electrochemical detection Figure 4 31 Example DC Plumbing for Analytical IC with Conductivity Detection System 1 Left Side Shown 1 L L S W P C 3 2 4 5 6 Cell In Cell Out ELUENT IN Temp Stabilizer To AS AP Waste From AS AP Backpressure Device Separ...

Page 120: ...ing for Analytical IC with Electrochemical Detection System 1 Left Side Shown 1 L L S W P C 3 2 4 5 6 Temp Stabilizer GUARD OUT COL IN Backpressure Device Separator Guard COL OUT IN OUT To Waste From Eluent Degasser A backpressure device is not required for all systems To AS AP Waste From AS AP ...

Page 121: ...gh the appropriate tubing slots and secure the tubing in the tubing clips see Figure 4 33 Figure 4 33 Tubing Clips NOTE After all system plumbing is completed the valve panel should slide forward and backward relatively easily without kinking or catching any of the tubing Plumbing the Columns in the DC 1 Before connecting the columns to the suppressor pump eluent through the columns to waste for a...

Page 122: ...and the cell inlet tubing 2 Connect the tubing to the cell as shown in Figure 4 32 3 Place the waste line from the cell out port into a waste container or appropriate drain 4 Close the DC door 5 Go on to system equilibration Section 4 4 4 2 9 Plumbing the TC for Analytical IC Applications Plumbing the TC Injection Valve and Columns 1 Before connecting the columns pump eluent through the columns to...

Page 123: ...n Figure 4 34 4 Cut the remaining tubing lengths waste line column connector and cell inlet and connect them Tubing lengths should be as short as possible to minimize the void volume in the system 5 Check the arrow on each column label it should point in the direction of flow away from the injection valve 6 Route the tubing connected to port W 6 to the Dionex AS AP drip tray For details about conn...

Page 124: ...provided on the Thermo Scientific Reference Library DVD P N 053891 Go on to system equilibration Section 4 4 4 3 Connecting Waste Lines to the Gas Separator Waste Tube NOTE A gas separator waste tube is required if the Dionex ICS 5000 system includes an EG or a DC with an electrolytic suppressor The EG and electrolytic suppressor generate small amounts of electrolytic gases hydrogen or oxygen The ...

Page 125: ...ATOR line to the second length of white PTFE tubing on the assembly Figure 4 35 Gas Separator Waste Tube Installation Gas Separator Waste Tube PTFE Tubing with Unions WASTE GAS SEPARATORLines from System 1 and System 2 For correct drainage make sure waste lines are not bent pinched or elevated at any point Do not allow the ends of the lines to be submerged in waste liquid DO NOT CAP THE WASTE CONT...

Page 126: ...illent avec un proces d électrolyse qui produit des petites quantités de gaz d oxygène ou d hydrogène Afin de garantir que le gaz ne soit pas enfermé dans un conteneur fermé et puisse s y concentrer connectez un tube noir à gaz résiduel diamètre intérieur 1 3 cm n de commande 045460 à un conteneur ouvert non fermé Connectez le conteneur résiduel au tube résiduel gaz séparateur désigné Waste Gas Se...

Page 127: ...umn manual for the appropriate background for your application The column manuals are provided on the Thermo Scientific Reference Library DVD P N 053891 4 Offset the detector background and zero the reading by clicking the Autozero button 5 Verify that the detector baseline is at the expected reading for your application and is stable 6 Monitor the DP SP pressure to be sure the pressure is at the ...

Page 128: ... The EG Ship Kit P N 072047 includes four backpressure coils see Table 4 2 Capillary IC Part Number Backpressure Coil Description Flow Rate Approximate Back pressure Added AAA 053762 4 mm 0 005 in ID red 1 0 mL min 1 75 MPa 250 psi 2 0 mL min 3 5 MPa 500 psi AAA 053763 4 mm 0 005 in ID red 1 0 mL min 3 5 MPa 500 psi 2 0 mL min 7 MPa 1000 psi 053764 2 mm 0 003 in ID yellow 0 25 mL min 1 75 MPa 250 ...

Page 129: ... available for use with the DP SP can be pressurized If you plan to pressurize the eluent reservoirs a regulator kit is required The kit is available in two versions The EO Regulator Kit P N 074422 is required when the DC is installed as the topmost module in the system The kit includes a pressure regulator and gauge assembly with four outputs for connections to four eluent reservoirs as well as t...

Page 130: ...ket Orientation A 1 2 Connecting the Gas Source 1 Attach the EO regulator support bracket P N 074426 to the rear panel of the DC see Figure A 2 or to the regulator bracket on the TC VWD or PDA 2 Push the EO Gas Regulator P N 074425 onto the top of the support bracket 3 Locate the 1 4 in NPT to 1 8 in adapter P N 063505 and the orange 3 mm 1 8 in ID air line tubing P N 052297 provided in the EO Reg...

Page 131: ... blue 3 mm 1 8 in ID air line tubing with a quick disconnect fitting on one end and a one way valve fitting on the other end see Figure A 3 7 Push the one way valve fitting onto the luer fitting on the top of the reservoir cap This is the gas shutoff valve for the reservoir Figure A 2 EO Gas Regulator Connections EO Gas Regulator P N 074425 Orange Air Line Tubing P N 052297 GAS IN Fitting EO Regul...

Page 132: ...lator support bracket see Section B 2 A 1 3 Pressurizing the Eluent Reservoir NOTE Do not pressurize the system until after the reservoir is plumbed 1 Turn the gas regulator knob fully counterclockwise to ensure that there is no pressure to the reservoir when the gas source is turned on 2 Close the gas shutoff valve on each reservoir cap 3 Turn on the gas source the upper limit is 0 34 MPa 50 psi ...

Page 133: ...mp pump 1 If you want to connect the seal wash system to the top pump pump 2 follow the replumbing instructions in this section When you finish these connections follow the instructions in Section 3 13 to set up the piston seal wash system 1 To connect the seal wash system to pump 2 disconnect three piston seal wash lines from pump 1 see Figure and reconnect the lines to their respective locations...

Page 134: ...ervoir inlet line from the primary pump head Figure A 4 Piston Seal Wash Connections to Pump 1 Figure A 5 DP Piston Seal Wash Connections Pump 1 or Pump 2 2 3 1 1 2 3 Pump 1 Pump 2 Seal Wash Pump Pump 1 Pump 2 Seal Wash Pump Piston Seal Wash Connections for Pump 1 as shipped Piston Seal Wash Connections for Pump 2 Seal Wash Bottle Secondary Head Primary Head Seal Wash Bottle Secondary Head Primary...

Page 135: ... 5000 IC Cube Section B 5 B 1 Installing the ED Amperometry Cell NOTE Always wear gloves when handling the ED cell Never touch the electrode surface B 1 1 Unpacking and Disassembling the Cell 1 Remove the ED cell from the box Refer to Figure B 1 to identify the cell parts Capillary IC Figure B 1 ED Cell Components Yoke Knob and Block Spacer Block Cell Body Cell Cable Cell Inlet Cell Outlet with fi...

Page 136: ...he spacer block NOTE Handle the inside surfaces of the cell carefully to pre vent scratches which may subsequently cause leaks 4 Slide the spacer block off the alignment pins on the cell body see Figure B 2 The spacer block is for use only with disposable working electrodes If you will be installing a conventional working electrode you can remove the spacer block and save it for possible future us...

Page 137: ...urface of the cell with ASTM Type I 18 megohm cm filtered and deionized water 8 Clean the polished surface of the cell with a damp clean lint free tissue 9 Install the working electrode For a disposable working electrode see Section B 1 2 For a conventional working electrode see Section B 1 3 Figure B 3 Removing the Cell Protective Film Figure B 4 Capillary IC Only Removing the Titanium Inlet Line...

Page 138: ...ction B 1 4 To install a PdH reference electrode go on to Section B 1 5 B 1 3 Installing a Conventional Working Electrode Notes on Polishing Conventional Nondisposable Working Electrodes Do not polish new conventional working electrodes before installation After an electrode has been used for a period of time a layer of contamination may build up When this occurs the electrode must be polished For...

Page 139: ...cting the cell to the ED 1 Use tweezers to install the gasket over the alignment pins on the cell body see Figure B 5 When correctly installed one end of the gasket extends beyond the cell body to facilitate gasket installation and removal 2 Verify that the gasket is flat against the cell body and is not wrinkled Figure B 5 ED Cell Gasket for Conventional Working Electrodes Alignment Pins Cell Gas...

Page 140: ...TE It is not possible to overtighten the yoke knob After the knob clicks into place it cannot be tightened any further The yoke knob ensures that constant pressure is applied to the cell 5 Install the reference electrode If you are installing a pH Ag AgCl reference electrode go on to Section B 1 4 If you are installing a PdH reference electrode go on to Section B 1 5 Figure B 6 ED Cell Components ...

Page 141: ... cm filtered and deionized water to remove any precipitated salt 5 Calibrate the pH Ag AgCl reference electrode see the next section Calibrating the pH Ag AgCl Reference Electrode Items Needed A buffer solution with a pH of 7 A second buffer solution with a different pH typically one that matches the pH of the eluent used in your application for example pH 10 or pH 4 Always store the pH Ag AgCl re...

Page 142: ...el Set click the ED tab On the Chromeleon 6 8 panel tabset click the EC Detector tab 4 Click the Calibration button The Wellness panel opens see Figure B 8 5 Follow the instructions on the Wellness panel to calibrate the electrode 6 Disconnect the reference electrode cable and the cell cable 7 Grasp the cell body and pull straight out to remove the cell from the detector Figure B 8 Wellness Panel ...

Page 143: ...in the Cell for Capillary IC Systems 1 To avoid any hydraulic pressure buildup when inserting the reference electrode into the cell make sure that fitting plugs are not installed on the cell inlet and outlet fittings 2 Use a sharp tool for example the tip of a safety pin or a straight pin to remove the pH Ag AgCl reference electrode O ring see Figure B 9 Figure B 9 pH Ag AgCl Reference Electrode O...

Page 144: ...s centered in the bottom of the well and that it does not block the inlet or outlet of the well The inlet and outlet are small round openings in the bottom of the well see Figure B 11 Figure B 10 Reference Electrode Gasket for Capillary IC Figure B 11 Reference Electrode Well with Reference Electrode Gasket for Capillary IC Installed Reference Electrode Gasket for Capillary IC Reference Electrode ...

Page 145: ...n 4 1 13 to complete the cell plumbing Installing the pH Ag AgCl Reference Electrode in the Cell for Analytical IC Systems 1 To avoid any hydraulic pressure buildup when inserting the reference electrode into the cell make sure that fitting plugs are not installed on the cell inlet and outlet fittings 2 Verify that the pH Ag AgCl reference electrode O ring is present see Figure B 9 and then screw ...

Page 146: ...push the cell onto its mounting location on the ED see Figure B 14 4 If the detector is already installed connect the reference electrode cable and the cell cable 5 Refer to Plumbing the Electrochemical Cell in the DC on page 114 to complete the cell plumbing Figure B 14 ED Cell Installed on ED Reference Electrode Cable ED Cell Cable ...

Page 147: ...ce electrode gasket P N 072214 see Figure B 15 To avoid deforming the gasket cutout do not place the tweezer tips on the cutout 3 Orient the gasket so that the notched edge of the gasket aligns with the corresponding notch in the reference electrode well Then press the gasket into the well see Figure B 16 Capillary IC Figure B 15 Installing the PdH Reference Electrode Gasket Figure B 16 Reference ...

Page 148: ...PdH reference electrode into the reference electrode well and tighten it fingertight see Figure B 18 After fingertightening use a wrench to tighten the nut an additional 20 to 30 degrees 7 Orient the cell assembly with the yoke knob on the left and then push the cell onto its mounting location on the ED Figure B 17 Inserting the PdH Reference Electrode Fitting into the Reference Electrode Well Fig...

Page 149: ...e instructions in the next section To install low pressure valves on the AM see Section B 4 B 2 1 Installing a Low Pressure Valve on the DC Rear Panel 1 Insert the two tabs on the valve mounting plate into available slots on the DC rear panel see Figure B 19 or EO regulator stand bracket Four low pressure valves can be installed on the DC rear panel If an EO Regulator Kit P N 062582 is installed s...

Page 150: ...into available slots in the lower compartment of the DC above the columns 2 While holding the valve mounting plate firmly in place tighten the captive thumbscrew 3 Route the valve cable to the back of the DC through the slot on the side of the module Connect the cable to one of the low pressure valve connectors on the DC rear panel see Figure B 19 Figure B 19 DC Rear Panel External Low Pressure Va...

Page 151: ...2 or standard bore black tubing P N 062561 Dual valve panels include two temperature stabilizers One tubing package with precut and labeled tubing either microbore or standard bore for each valve installed on the panel Labels on the tubing for system 1 left side are white labels on the tubing for system 2 right side are blue Valves Plumbing Configuration Part Number 0 Microbore 062660 1 075948 2 0...

Page 152: ...C lower door 3 Pull the column slide forward see Figure B 21 Figure B 20 Injection Valve Panel Ship Kit Single Valve Configuration Injection Valve Panel Single valve installed Temperature Stabilizer System Tubing Package 1 2 3 1 2 3 Always turn off the DC power before installing a valve panel Figure B 21 DC Lower Compartment Column Slide and Injection Valve Cables Column Slide System 1 Injection V...

Page 153: ...in place tighten the thumbscrews to secure the panel onto the column slide Installing the Temperature Stabilizer Install the temperature stabilizer for system 1 or a single system on the left side of the injection valve panel see Figure B 23 Install the temperature stabilizer for system 2 on the right side of the panel 1 Slide the temperature stabilizer into the opening next to the valve 2 Tighten...

Page 154: ...th of the DC upper com partment an IC Cube cannot be installed in the DC when an AM is installed Connections from the AM to other components in the system pump injection valve reagent reservoirs and so on depend on the application Refer to Chapter 3 Configurations in Dionex ICS 5000 Ion Chromatography System Operator s Manual Document No 065446 for the configuration schematic for your application ...

Page 155: ... pressure 3 way valves 075950 One 10 port high pressure valve one low pressure 3 way valve 075951 One 6 port high pressure valve one low pressure 3 way valve 075952 AutoPrep configuration 10 port high pressure valve AutoPrep sample loop AutoPrep standard loops 075953 AM tray with no valves 079833 AM Component Part Number High pressure valve 6 port 075917 High pressure valve 10 port 075918 Low pres...

Page 156: ...ith the model label on top see Figure B 25 6 Hold the valve behind the AM and insert it through the valve mounting hole 7 Reinstall the two Phillips screws and washers and tighten the screws Figure B 25 High Pressure Valve Installation 8 Replace the black locking ring and tighten it fingertight 9 Two high pressure valve cables are connected to the AM prep board see Figure B 26 Uncoil the appropria...

Page 157: ...tion Left Valve Mounting Position 4 Plug the valve connector into the appropriate connector on the AM prep board see Figure B 26 NOTE For instructions on how to install low pressure valves outside the AM refer to Section B 2 B 4 3 Installing the RCH 1 Reaction Coil Heater on the AM 1 Note the two ball studs on the back of the heater Align the ball studs with the two receivers on the wall of the AM...

Page 158: ...he front of the DC for 2 seconds to turn off the power before continuing 2 Locate the high pressure valve labels shipped with the AM 3 Unscrew the black locking ring on the front of the high pressure valve Attach the appropriate label 6 port or 10 port to the front of the AM Replace the black locking ring 4 Pull the DC top component tray all the way forward see Figure B 28 5 Locate the pair of mou...

Page 159: ... Left Side 7 Place the AM on the component tray and slide it back into the mounting brackets 8 Continue sliding until the AM is connected to the electrical receptacle on the back of the DC top component tray see Figure B 28 Push firmly to seat the AM 9 Tighten the locking screws in the right and left corners of the AM with a screwdriver Do not overtighten the screws 10 Push the component tray all ...

Page 160: ...e DC upper compartment tray until it stops 4 Locate the two IC Cube installation guides P N 071264 shipped with the IC Cube 5 For reference Figure B 31 shows the completed installation of four guides for two IC Cubes installed in the upper compartment of the DC Always turn off the DC power before installing an IC Cube Capillary IC Figure B 31 IC Cube Guides Installed in DC Upper Compartment IC Cub...

Page 161: ...ing in toward the IC Cube mounting location see Figure B 31 Align the pegs with the openings on the bottom of the DC upper compartment tray The openings for the guides on the outside edges of the tray are slotted see Figure B 33 The openings for the guides in the center of the tray are round Figure B 32 IC Cube Guide Figure B 33 Openings for IC Cube Guide Alignment Pegs Right Side of DC Upper Comp...

Page 162: ...C until the connector on the rear of the IC Cube is fully seated 8 Use a slotted screwdriver to tighten the screws on each side of the IC Cube This attaches the IC Cube securely to the guides NOTE The screws on the front of the IC Cube must be tightened to ensure that the connection between the electrical connector on the rear of the IC Cube and the Dionex ICS 5000 elec tronics board is secure Fig...

Page 163: ... multiple servers can share a single datasource When Chromeleon 6 8 components are installed on the same computer they communicate automatically However when the Chromeleon 6 8 components are installed on different computers they need to be configured to allow communication This requires either a peer to peer network a workgroup or a client server network a domain The computers in a workgroup comm...

Page 164: ...located in another room The Chromeleon 6 8 client and datasource are installed on this PC The two PCs are connected to each other through a Local Area Network LAN and are assigned to the same workgroup The PC located at the system is used strictly for controlling the system at the bench Data is transferred automatically to the datasource on the desktop PC All other instrument control and data mana...

Page 165: ...are installed on the PC at each system Data from each system is transferred to the remote datasource The desktop PC in the other room is used to access data from the three systems and the remote datasource Key Points for Setting Up a Workgroup or Domain All computers must belong to the same workgroup or domain All remotely accessed datasources must share their parent folder For example if the data...

Page 166: ... the two network types C 1 1 Setting Up a Shared Datasource on a Workgroup 1 In Windows Explorer right click the parent folder of the datasource to be shared For example if the datasource is in C Chromel Data right click C Chromel 2 Click Sharing and Security on the context menu The Sharing tab page appears see Figure C 4 3 Select the Share this folder on the network check box 4 Optional Enter a n...

Page 167: ...e on a Domain 1 In Windows Explorer create the datasource folder a Create a new parent folder on the network server for example C CMDataParent b Under the new folder create a subfolder in which to save the data for example C CMDataParent Data 2 Select access rights to the datasource parent folder a Right click the parent folder name and click Properties on the context menu b Click the Security tab...

Page 168: ... additional users or groups click Add d Click Apply 3 Share the datasource parent folder a In the Properties dialog box click the Sharing tab b Click Share this folder see Figure C 6 c Click Permissions to open the Permissions for dialog box d For each user or user group that will need to access the datasource remotely select the Full Control check box e Click OK Figure C 6 Sharing a Folder on a D...

Page 169: ...tasource dialog box appears see Figure C 7 d Enter a name for the datasource and enter the path to the data folder created in Step 1 or click Browse to navigate to the folder e Select the Common Datasource Accessible by Chromeleon 6 8 Server check box and click OK f The new datasource appears in the Datasource Manager list g Click Close The new datasource appears in the Browser h Restart the Chrom...

Page 170: ... the datasource should be made accessible to the Chromeleon 6 8 server If the local client computer is also an instrument server and you want to store data from the server in the new datasource click Yes If you are connecting the local computer to the datasource only to review data or to copy an existing sequence as a template click No If you do not the local instrument server will create timebase...

Page 171: ... in the left pane and click Properties on the menu The Server Configuration dialog box appears 3 Click the Advanced tab 4 The Standard Datasource list displays the names of all datasources mounted as common datasources Select the datasource in which to store the server data 5 Click OK C 3 Connecting a Client and Server Through a Network These instructions explain how to connect a panel tabset on t...

Page 172: ...ollow these steps to connect to a Chromeleon 6 8 server on a network computer a Click the plus sign next to the Network Neighborhood icon b Navigate to the location of the computer on which the Chromeleon 6 8 server is loaded and running and click the plus sign next to the computer name Figure C 10 Connect to Chromeleon Server Dialog Box ...

Page 173: ...on from the drop down list For a local computer select My Computer For a workgroup select Windows NT Named Pipes For a domain select Internet TCP IP 4 Click OK to have Chromeleon 6 8 generate the panel tabset NOTE After a panel tabset has been created you cannot change the server to which the tabset is linked Figure C 11 Select the Chromeleon 6 8 Server ...

Page 174: ...Dionex ICS 5000 Installation Instructions 166 Doc 065447 02 12 14 ...

Reviews: