9 eSieFusi on Im aging
9 - 26
Instructions for Use
Connecting the Transmitter
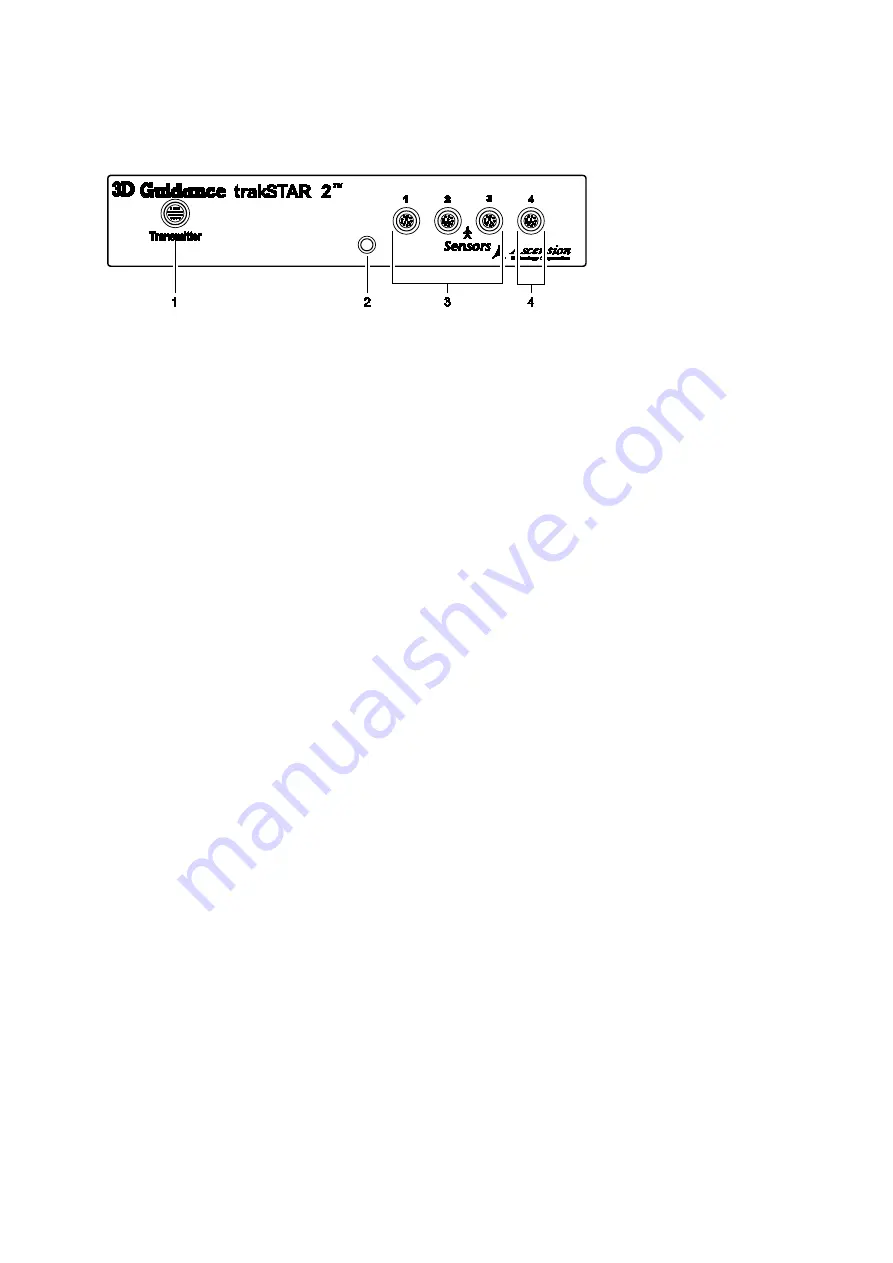
Connect the transmitter cable to the connector on the front of the electronics unit.
Example of the electronics unit for the trakSTAR2 tracking system, front view.
1 Connection for the transmitter
2 Status indicator
3 Ports for connecting transducer sensors
4 Port for connecting needle tracking sensor
Repositioning the Transmitter
Note:
If you reposition the transmitter, ensure that the transmitter is at least 24 inches (61 cm) from
the electronics unit.
When the mid-range transmitter is mounted on a rolling stand, it is designed to be mobile.
When the transmitter is in use, be sure to engage the brakes located on two of the wheels. You
can also adjust the height of the transmitter by repositioning the arm on the rolling stand.
To adjust the position of the transmitter on the transmitter stand:
1. Support the arm with one hand and rotate the knob counterclockwise.
2. Slowly move the arm up or down the pole to the required position.
3. Continue to support the arm and rotate the knob clockwise to secure the arm.
To use the brakes on the rolling stand:
To engage the brakes, push down the brake lever on each wheel.
To release the brakes, push up on the brake lever on each wheel.
Summary of Contents for Acuson S2000
Page 12: ...1 Introduction 1 2 Instructions for Use ...
Page 14: ...1 Introduction 1 4 Instructions for Use System Review Example of the ultrasound system ...
Page 84: ...2 Safety and Care 2 54 Instructions for Use ...
Page 86: ...3 System Setup 3 2 Instructions for Use ...
Page 112: ...3 System Setup 3 28 Instructions for Use ...
Page 114: ...4 Examination Fundamentals 4 2 Instructions for Use ...
Page 144: ...5 Transducer Accessories and Biopsy 5 2 Instructions for Use ...
Page 196: ...7 Specialty Transducers 7 2 Instructions for Use ...
Page 200: ...7 Specialty Transducers 7 6 Instructions for Use ...
Page 202: ...8 Physiologic Function 8 2 Instructions for Use ...
Page 208: ...9 eSieFusion Imaging 9 2 Instructions for Use ...
Page 236: ...10 Virtual Touch Applications 10 2 Instructions for Use ...
Page 258: ...10 Virtual Touch Applications 10 24 Instructions for Use ...
Page 302: ...Appendix A Technical Description A 44 Instructions for Use ...
Page 326: ...Appendix B Control Panel and Touch Screen B 24 Instructions for Use ...
Page 328: ...Appendix C Control Panel C 2 Instructions for Use ...
Page 394: ...Appendix D On screen Controls D 50 Instructions for Use ...
Page 444: ...Appendix F Acoustic Output Reference F 2 Instructions for Use ...
Page 516: ...Appendix F Acoustic Output Reference F 74 Instructions for Use ...
Page 517: ......
Page 518: ......


