background image


Reference Manual 


IVC-2D


250


©

SICK AG • Advanced Industrial Sensors • www.sick.com • All rights reserved 


Appendix 

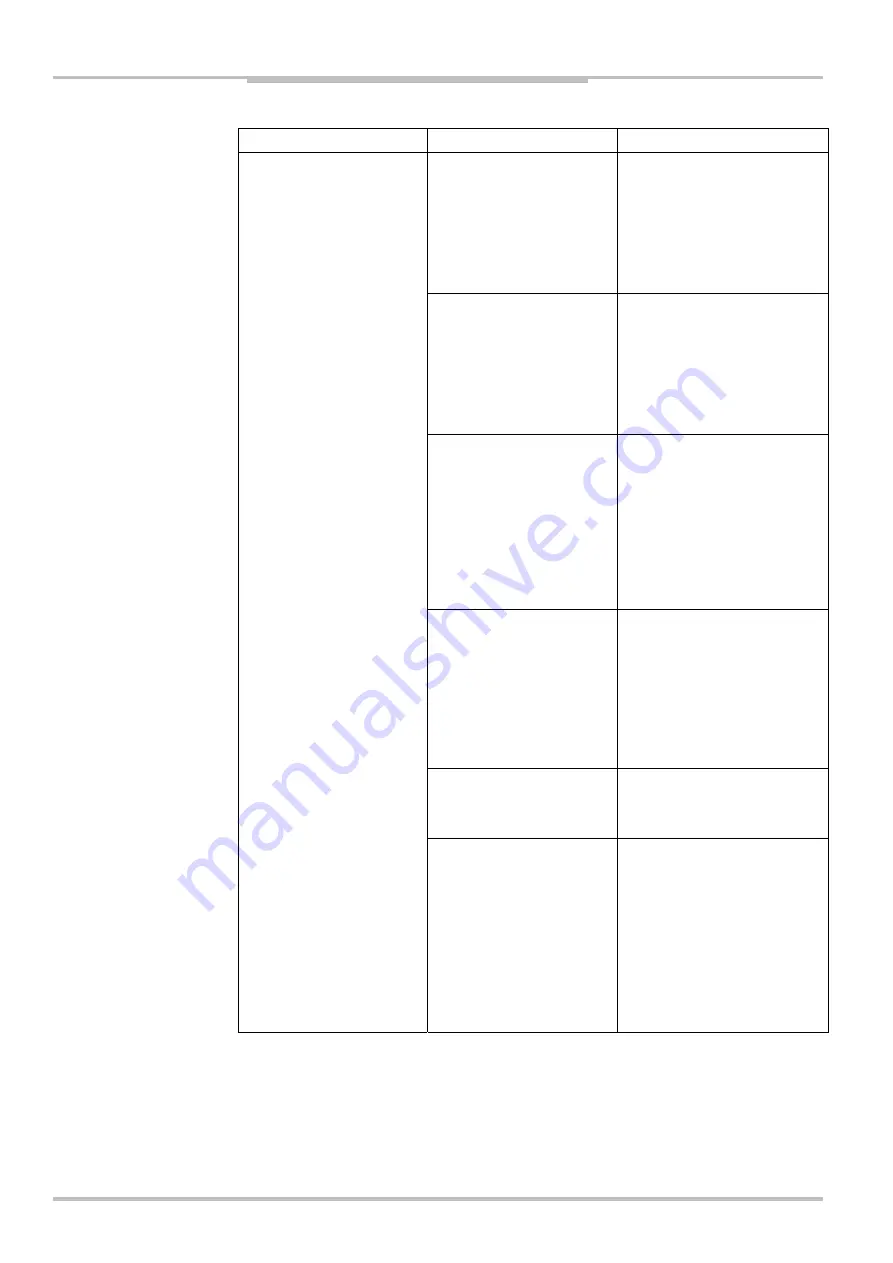
Parameter category 

Parameter name Parameter 

explanation 

DNS 

Specifies the Domain Name 
Server address. The number 
must be written in the following 
format aaa.bbb.ccc.ddd. The 
default value is 0.0.0.0. In the 
event that this parameter is 
not necessary, it should be set 
to 0.0.0.0 or an empty string. 

WINS  

Specifies the WINS server 
address. The number must be 
written in the following format 
aaa.bbb.ccc.ddd. The default 
value is 0.0.0.0. In the event 
that this parameter is not 
necessary, it should be set to 
0.0.0.0 or an empty string. 

Time Server 

Specifies the IP address of the 
Time Server, in accordance 
with the SNTP protocol (UDP 
port 123). The number must 
be written in the following 
format aaa.bbb.ccc.ddd. The 
default value is 0.0.0.0. In the 
event that this parameter is 
not necessary, it should be set 
to 0.0.0.0 or an empty string. 

DHCP  

Specifies if the DHCP is en-
abled. The default value is 1 
(enabled). The accepted 
values are 1 = enabled, 0 = 
disabled. If the DHCP client is 
enabled the following parame-
ters are set automatically: IP, 
Netmask, Gateway, DNS, 
WINS, TimeServer.  

DHCP Wait Save  

Specifies the time, in seconds, 
in which the network parame-
ters set by the DHCP are 
saved in the configuration file. 

DHCP IP Auto Configuration

Specifies what the computer 
does in the case DHCP does 
not answer the camera or 
does not assign it an IP ad-
dress. If the flag is 1 the 
camera gets the IP 0.0.0.0. 
If the flag is zero the camera 
gets the IP that was last 
assigned to it. The last as-
signed address is stored in the 
device.ini file. 

Summary of Contents for IVC-2D

Page 1: ...A p p l i c a t i o n P ro g r a m m i n g I V C 2 D R E F E R E N C E M A N U A L ...

Page 2: ...ctioning of the equipment itself Class A equipment is equipment suitable for use in all establishments other than domestic and those directly connected to a low voltage power supply network which supplies buildings used for domestic purposes Class A equipment shall meet class A limits Note Although class A limits have been derived for industrial and commercial establishments administrations may al...

Page 3: ...tudio 27 3 1 Handling Devices 27 3 2 Handling the Emulator 30 3 3 Handling Products 33 3 4 Handling Programs 35 3 5 Handling Tables 37 3 6 Handling Images 38 3 7 IVC Studio Settings 39 3 8 Programming 39 3 9 Efficient Programming 45 4 Tools 47 4 1 Image 48 Grab Setup 48 Start Snapshot 49 Grab 50 Ping Pong Grab 51 Copy Image Bank 52 Image Bank Operation 53 Add Text 55 Draw Line 56 Draw ROI 57 Reset...

Page 4: ...100 Mean Intensity 101 Line Intersection 102 Distance and Angle 103 Blob Finder 104 Blob Analyzer 106 4 6 Matching 109 Shape Locator 109 Add Shape Runtime 112 Get Shape 113 Transform Image 114 Transform ROI 116 Teach Rotation 118 Match Rotation 119 Teach Pattern 120 Inspect Pattern 122 4 7 Circular 128 External Perimeter 128 Internal Perimeter 130 Circular Perimeter ROI 132 Circular Analysis 133 C...

Page 5: ...Load Data Block from Flash 165 Save Data Block to Flash 166 Load Image from Flash 167 Save Image to Flash 168 Write Table To Flash 170 Read Table From Flash 171 Web Status Page 172 4 11 Communication 174 Setup RS485 174 Read RS485 Values 175 Write RS485 Values 176 Read RS485 String 177 Write RS485 String 178 Enable Ethernet 179 Open Ethernet Raw 180 Close Ethernet Raw 182 Read Ethernet Bytes 183 R...

Page 6: ...hape Interactive Setup 212 Locating Shapes tips and tricks 214 Find Line Edge 218 Coordinate Alignment 220 Communication Setup 223 2D Code 228 Detail Extraction Setup 232 Binarize Setup 234 Blob Finder Setup 235 Blob Analyzer Setup 238 6 Troubleshooting 240 6 1 Connecting to Devices 240 6 2 Saving to Flash 242 6 3 Running IVC Studio 243 6 4 Debugging Step Programs 243 6 5 IVC Emulator 243 6 6 Trou...

Page 7: ...table which is used for reading and storing values that are used during the analysis A number of image banks which each contains an image captured and processed by the camera Data blocks which are used by some tools for storing or reading additional data For example some pattern recognition tools Teach tools create and save data in a data block which can later be used by other tools Match tools In...

Page 8: ...gram is always executed on a device and never on the computer The computer is mainly used for building and modifying the programs on the devices and to display the results sent from the devices Product Devices Camera1 FillLevel FillTable Label LabelTable Camera2 Emulator Programs Tables uses 1 2 1 IVC Emulator The Emulator is a software behaving like an IVC camera and can be used instead of an IVC...

Page 9: ...uct in IVC Studio the included programs and tables are saved with the product on the computer Nothing is saved on the device when you save the product This is not a problem since the program associated with the device is automatically loaded into the device as soon as the program is started or edited in IVC Studio Working Memory Active Program Active Table Flash Memory Program Banks 1 2 3 4 5 Prod...

Page 10: ...e an IVC 3D camera to inspect the fill level Device 1 Device 3 Device 1 Device 2 Product Jar Dev Program Table 1 Label Jar_Label_Table 3 Jar_FillLevel Jar_FillLevel_Table Product Bottle Dev Program Table 1 Label Bottle_Label_Table 2 Bottle_FillLevel Bottle_FillLevel_Table To achieve this we create two products in IVC Studio with the following contents Product Bottle Device Program Table 1 Label Bo...

Page 11: ...ween the two locations If this angle is too large then the label is tilted and the program changes the state of an output In a real application this output could for example control a lever that pushes the faulty bottle to the side When writing a program in IVC Studio you can use either a hardware camera or if no such is available the Emulator In the following sections it is assumed that a hardwar...

Page 12: ...ults to Product Devices Camera1 FillLevel FillTable Label LabelTable Camera2 Emulator Programs Tables uses 2 1 1 Create a Product The first step is to create the product to work in 1 Start IVC Studio and log in If you just installed IVC Studio the default user and password can be found in the installation instruction 2 Choose File Æ New Product from the IVC Studio menu bar A new empty product name...

Page 13: ...he reason for associating the program with a device before building it is that the program is always run in a device and not on the computer What you see in IVC Studio when running a program are just the results which are sent from the device If you didn t associ ate the program with a device you would not be able to see any result of the program or even test the program 5 Right click Programs in ...

Page 14: ...t So when you build a program in IVC Studio you work with this list of commands Most of the tools have a number of input parameters that can be set For example when starting to take a snapshot from a camera you may specify the exposure time and which input that should trigger the capture 2 Find edge right Y coordinate of edge 340 0 Retrieve an image 3 Calculate angle Angle 45 4 Measurement OK Resu...

Page 15: ...p contains The input parameters that can be set for the tool The execution time for the tool when executed The result return values from the tool There are four columns in the program list which are used for specifying parameter values Value Table Step and Result Which column to use depends on what type of parameter value you want to use constant values values stored in the table or results from p...

Page 16: ...rogram The Grab tool is added to the program s folder in the left pane and the Image Banks Program List and Previews are displayed in the right pane 3 Double click the blue field at the top of the program step and type a description for the step for example Retrieve an image Retrieve an image 0 Grab Time of execution µs 0 01 Destination bank 0 Description Value Table Previous result Step Result Th...

Page 17: ...e ROI Rectangle step is added to the program list 10 Add a description to the step such as Set ROI to the top of the label 11 In a similar manner add a Find column edge tool from the Edge toolbar to the program and give it the description Find left edge 2 4 Setting Parameter Values The input parameters can be set in a number of different ways By manually entering a constant value By using interact...

Page 18: ... the Value column for the parameter 12 Select the Find column edge step 13 Double click the Value column for the parameter 06 ROI definition step and enter the program step in which you specified the ROI 14 Set the scan direction by double clicking the Value column for the parameter 03 Analysis direction and choose UpÆDown from the menu Interactive setup windows are also used for entering constant...

Page 19: ...f you need a larger window to work in you can double click a preview to open it in a separate window In this window you can fine tune the parameters settings for example if there are small details in the image Some parameters can be set in special interactive setup windows These windows are similar to the preview windows but contain additional controls that are used for setting the parameter value...

Page 20: ...and choose Edit Æ Copy from the main menu 22 Choose Edit Æ Paste 23 Set the line to scan along in the new Find column edge step by moving it in the preview window 24 Change the description of the program step to Find right edge 2 4 2 Using Tables and Results from Other Steps We will need the x coordinates for the lines when we calculate the angle of the top edge of the label Therefore it is useful...

Page 21: ...two Find Column Edge steps in the program 31 Add a Distance and angle tool from the Measure toolbar to the program 32 Set the parameters 01 Start point X and 03 End point X to refer to the table rows where you stored the x coordinates of the left and the right point on the label edge 33 Double click the Step column of the parameter 02 Start point Y A Previous result dialog box is displayed in whic...

Page 22: ...no jump is made Angle is not OK The test if the angle is within Out of Range re turns 1 and the program jumps To make it even more flexible we will store the highest angle that is accepted in the table and calculate the range directly in the program step 36 Add an In range tool from the Calculation toolbar 37 Set the parameter 01 Value to the angle that was calculated by the previous step by refer...

Page 23: ...et the parameters so that this step jumps to step 0 45 Add another Set output tool and set the following parameters 01 0utput number 0 02 Signal value High Name the step Angle out of range 46 Add a Goto tool and make sure that this step jumps to step 0 47 Select the If then goto step and set the parameter 02 Goto step to the step number of the Angle out of range step It is not necessary to add the...

Page 24: ... Æ Run and watch the result in the Display window 2 6 Saving the Program To save the program we have written use File Æ Save Product This will save the program on the PC along with all other programs and tables in the product but not on the device The program is present on the device as well since it is downloaded to the device as you build it But if the power to the device is cut your program wil...

Page 25: ...d or by down loading the program from the device s flash memory 2 7 What s Next In this chapter we have looked at the basics of how to handle IVC Studio such as setting up a product and writing a simple program However there are many features in IVC Studio and the camera that we have not looked at and that makes it possible to write advanced programs for inspections and automation of production So...

Page 26: ... the left pane of the main window and choosing Product Transmission This will also start the programs in the devices Using Several Programs While there can be only one program in the working memory additional programs can be stored in the flash memory of the device These programs can either be loaded manually into the working memory or they can be called from the active program To load a program m...

Page 27: ...evices are listed in the right pane Double click the device or right click the device and choose Live Device from the pop up menu A live image is displayed in a pop up window Clicking the handle of the drawer on the right of the image window displays sliders for Shutter Gain and Strobe To view a camera image for IVC 3D Select the program currently associated with the device or create a new program...

Page 28: ... Stop Program from the pop up menu To reset a device Choose Options Æ Configuration from the IVC Studio menu bar A pop up window containing a tree view appears Select Ethernet Devices in the tree view Ethernet devices appear in the right panel of the pop up window Click the Ethernet Device Configuration button The Ethernet Device Settings window appears containing available devices Right click the...

Page 29: ...s and errors that have occurred The infor mation can be refreshed on one or all devices To view device infor mation Right click the device and choose Device management Æ Device Information from the pop up menu This window contains detailed information about the device such as hardware and software versions Ethernet information and the status of the device To view the status of running program inpu...

Page 30: ... step program view cannot be used in a calculation of the expected cycle time for the application when the emulator is used From the Emulator menu in the menu bar you can enable and disable the Emulator and change its settings In the Emulator settings dialog you can choose which camera type to emulate select which folder to capture pre recorded images from and choose to enable the Emulator automat...

Page 31: ...ttings Choose Emulator Æ Settings from the IVC Studio menu bar If Type ID Number of image banks or Number of profile banks is changed the Emulator will be restarted To access the flash disk of the Emula tor The flash disk of the Emulator is found on the PC under My Documents Documents in Vista for the current user The default path to the Emulator flash is My Documents SICKIVP SmartCameras IVC Stud...

Page 32: ...rved Using IVC Studio Execute the Grab Setup step Execute the Grab step 3 2 5 Using a Non Emulated Tool in the Emulator Some tools are not emulated by the Emulator When executed in the Emulator they return the default values of all parameters Interactive setups are not available for non emulated tools ...

Page 33: ...C Studio without saving the presently active product a dialog box appears promp ting you to do so If the product has not yet been saved a dialog box is displayed Type the name of the product and click OK To make a copy of the current product Choose File Æ Save Product As from the IVC Studio menu bar Type the name of the new product and click OK To revert to the last saved version of the current pr...

Page 34: ...s from the pop up menu 3 3 3 Associating Programs and Tables with a Device Both a program and a table have to be associated with the device in order for the program to be able to run To associate a program to a device Right click the device and choose Select Program from the pop up menu Select a program from the pop up dialog and click OK to associate it with the device To associate a table Right ...

Page 35: ... Memory Program Banks 1 2 3 4 5 Product IVC Studio Device Devices Camera 1 Camera 2 Save in Flash Associated Program Copied automatically Copy values manually Associated Table 3 4 1 Handling Programs on PC Basics To create a new program Right click Programs in the tree view and choose New Program from the pop up menu To delete a program Right click the program in the tree view and choose Delete Pr...

Page 36: ...d Program in Flash from the pop up menu This deletes the program in the selected position in the flash memory It is also possible to delete multiple programs by selecting more than one position To clear unused memory on flash When a program is deleted from flash the flash blocks occupied by the program is not immediately reused but marked as unused dead The unused memory will not be reused until t...

Page 37: ...ree view and choose Show Table from the pop up menu To rename a table Right click the table in the tree view and choose Rename Table from the pop up menu To delete a table Right click the table in the tree view and choose Delete Table from the pop up menu 3 5 2 Copying Importing and Exporting Tables To make a copy of a table Right click the table in the tree view and choose Copy Table from the pop...

Page 38: ...ages are saved in image banks during program execution The image banks and their current contents are displayed in the active program window at the top of the right pane Images that are saved to disk on the PC can be loaded back into an image bank You can also save some images to disk in another file format by choosing Export but such files cannot be loaded to the device Note that when loading an ...

Page 39: ... 1 Adding Program Steps When a program is selected in the left pane a toolbar is added to the window This toolbar contains the tools that are available when writing programs The tools are organized in a logical order that groups similar tools together Switch between the groups by clicking on the tabs at the bottom of the toolbar To add program steps To add a program step click the icon for the too...

Page 40: ...click anywhere outside the changed cell The table value appears in the value column of the program step To use results from previous program steps Select the Step column in the program step Double click and choose the number of the previous step and the result you want to use and click OK To use parameter expressions Type the expression in the Value column of the program step An expression always ...

Page 41: ... programs more readable Macros are available from the Macros tab in the tab bar As they are created the macros are listed as available tools on the toolbar Default name is Macro TOOL Use the tool tip to distinguish between the macros Note The execution time of a macro includes the time it takes to run the two tools Start Macro and End Macro This means that the total execution time of the macro is ...

Page 42: ...ed Using IVC Studio from the pop up menu To show information on a macro Right click the macro in the tree view and choose Macro Infor mation from the pop up menu A pop up window displays information such as program name and dates of creation and latest change and who made the latest changes to the macro ...

Page 43: ... change a macro icon You need an icon with file extension ico consisting of two images One 16 x 16 pixels and one 32 x 32 pixels The smaller is used in the IVC Studio tree view and the larger in the IVC Studio toolbar Right click the macro in the tree view and choose Macro Properties from the pop up menu Enter the path to the icon image in the Icon field or use the browse button and click OK To sp...

Page 44: ...nored To execute a single program step Select a step and choose Debug Æ Execute Step or press F5 If Run debug or Run to cursor is chosen after executing a single step the program will continue with the selected step To execute a program step by step Select a step and choose Debug Æ Step by Step or press F8 The selected step is executed and IVC Studio selects the next step as active If Run debug or...

Page 45: ...s more specifically than the tool s original name Example Rename Scan rows to Scan rows find upper left edge or If go to If width too small go to fail Name the first step in the sequence in accordance with the purpose of the entire high level function when a sequence of steps is grouped Example If 12 steps are used to localize a blob and find its uppermost edge pixel then rename the first step to ...

Page 46: ... so on It is practical to start filling the table with the user settings as these are visible immediately in the programming environment no need to scroll the table to find them Preferably place a few empty rows in the table between each parameter block to make adjustments easier Give parameters in a table unique names that anyone familiar with IVC Studio and the application can understand 3 9 5 O...

Page 47: ...matching tools are used for teaching the camera to recognize an object and then using this for locating objects in images counting the number of objects or for calculating the rotation of objects Circular The group of circular tool contains a specific set of tools These tools make it possible to check perimeters of objects diameters the sur face and the outer shape of objects Calculation Calculati...

Page 48: ...put Parameters 01 Exposure time us This parameter defines how many micro seconds the shutter is open Common values for this setting are 4000 25000 02 Gain This parameter sets the gain for the device Common values are 300 600 for this parameter 03 External trigger This parameter defines whether the acquisition tools should be synchronized with an external trigger signal 04 Trigger slope If the Exte...

Page 49: ...following Grab starts When using Grab in combination with Start snapshot the Destination bank parameter is set in the Start snapshot tool and the pa rameter in the Grab tool is simply ignored Note that the execution time of Grab in run mode is longer than what is indicated in step mode in the case where intermediate steps have shorter execution time than the time of an image acquisition Input Para...

Page 50: ... acquisition to complete if not already completed before the step following Grab can start executing When using Grab in combination with Start Snapshot the Destination bank parameter is set in the Start Snapshot tool and the parameter in the Grab tool is simply ignored When the combination of Start Snapshot and Grab is used the execution time of Grab in run mode is longer than what is indicated in...

Page 51: ...iated in parallel with steps following the Ping pong grab step The new image should be placed in a different image bank indicated by one of the Destination bank parameters If n is a positive integer the new image is placed in Destination bank A the 2n th time Ping pong grab is executed and in Destination bank B the 2n 1 th time Note that the same Ping pong step can be executed several times by usi...

Page 52: ...ank specify which bank to duplicate and where to place the new copy Note that the contents of the destination bank are replaced by the new copy There is no undo function Replaced data in the destination bank is lost Input Parameters 01 Source bank This parameter indicates the image bank number to copy from 02 Destination bank This parameter indicates the image bank number where the new copy is pla...

Page 53: ...pair of pixels from the source and the destination images For binary images the corresponding pixels in both images must be white for the resulting pixel to be white This is equivalent to an AND operation Max or The resulting image will contain the brightest of the corresponding pair of pixels from the source and the destination images For binary images the resulting pixel is white if either the s...

Page 54: ...AG Advanced Industrial Sensors www sick com All rights reserved Image Returned Values None Error Messages Err 7704 The region of interest has parts that are outside the source bank Example Source Destination Min and Max or Diff xor Inv not Copy ...

Page 55: ...trip 03 String type This parameter specifies whether the text strip is a static text a variable value or a combination For the latter case the variable value will follow the static string with a space in between 04 Text This parameter specifies the static text 05 Variable This parameter specifies the variable value Note that the value can be given as a constant value evaluated by an expression a t...

Page 56: ...f the line can be specified as a number or chosen from an interactive menu Possible inputs are numbers between 0 and 255 where 0 through 243 are gray scale values and 244 through 255 are various colors Input Parameters 01 Start point X The x coordinate of the first end point 02 Start point Y The y coordinate of the first end point 03 End point X The x coordinate of the second end point 04 End poin...

Page 57: ...er to True Drawing a ROI in a bank is used for visualization of the current ROI and to control the selected area for next coming processing steps Input Parameters 01 ROI definition step Number of the step with the ROI to show in the selected image bank 02 Color Select a color to mark the ROI Double click on the input field to choose from a color palette 02 Filling True whole area of the ROI will b...

Page 58: ...king the value of the Color parameter the color can be specified as a number or chosen from an interactive menu Possible inputs are numbers between 0 and 255 where 0 through 243 are gray scale values and 244 through 255 are various colors Input Parameters 01 First bank to reset This parameter specifies the number of the first image bank to reset 02 Number of banks to reset This specifies how many ...

Page 59: ... or expression the column has the parameter name Variable 1 10 as header It is possible to export the values of the variables to file If the Export variable values checkbox is checked when closing the Run window a save dialog is displayed allowing the user to specify a file name and location Up to 10 000 of the rows displayed in the Run window are saved to the file If more than 10 000 rows have be...

Page 60: ... image by specifying the axis around which to mirror Input Parameters 01 Source bank Image bank containing the image to be mirrored 02 Destination bank Image bank in which to display the mirrored image 03 Mirror around axis The axis around which to mirror Vertical Mirror around the Y axis Horizontal Mirror around the X axis Returned Values None ...

Page 61: ...se between bilinear interpolation gives higher image quality or nearest neighbor gives faster execution time Input Parameters 01 Source bank Image bank containing the image to rotate 02 Destination bank Image bank in which to display the rotated image 03 ROI definition step Step number where the ROI to use was created 04 Angle The counter clockwire rotation angle in degrees 05 Rotation around cent...

Page 62: ... is possible to define the position of the ROI relative to a previously generated result This is done by setting an offset of the top left corner of the ROI using the input parameters X offset and Y offset The values of the offset must come from a previous step result or from the table The ROI is plotted in the current preview Input Parameters 01 X offset Offset value of the upper left ROI corner ...

Page 63: ...es of the rotation center could also be outside of the ROI somewhere in the FOV Note that it is necessary to execute the ROI tool keyboard key F5 to perform the rotation Input Parameters 01 Source bank Copy the selected image bank to the preview bank 02 X offset Offset value of the upper left ROI corner in x direction To set an offset the value must come from the table or as a result from a previo...

Page 64: ...al Sensors www sick com All rights reserved Region of Interest ROI Error Messages Err 107 points out of bank means that the rotation of the ROI leads out of the FOV Reduce size of ROI Check offset values If using rotation point change coordinates of rotation point ...

Page 65: ...isely It is also possible to define the position of the ROI relative to a previously generated result This is done by setting an offset to the top left corner of the bounding box of the circle using the input parameters X offset and Y offset The values of the offset must come from a previous step result or from the table Input Parameters 01 X offset Offset value of the upper left corner of the bou...

Page 66: ...o a previously generated result This is done by setting an offset of the top left corner of the bounding box of the ellipse using the input parameters X offset and Y offset The values of the offset must come from a previous step result or from the table Input Parameters 01 X offset Offset value of the upper left corner of the bounding box in X direction To set an offset the value must come from th...

Page 67: ...e ROI If a positive margin value is used make sure that the resulting ROI is not larger than the total FOV of the camera If a nega tive margin value is used make sure that the typed value will not produce negative results for the size of the ROI The parameter Filling controls if the area inside the ROI is colored red internal or if only the contour of the ROI external is colored red Input Paramete...

Page 68: ... steps to one single ROI The two ROIs to be unified are named ROI A and ROI B The resulting single ROI is the addition of ROI A and ROI B If it is necessary to display the unified ROI use the Draw ROI tool in the Image category Input Parameters 01 ROI A definition step Reference to program step to select ROI A 02 ROI B definition step Reference to program step to select ROI B Returned Values None ...

Page 69: ...ary to display the unified ROI use the Draw ROI tool in the Image category Note that if the selected ROI A and ROI B have no intersection at all this tool will not gene rate a new ROI In that case this could be the cause for error messages if input parameter ROI definition from a different tool refers to the result of this tool Input Parameters 01 ROI A definition step Reference to program step to...

Page 70: ...I B If it is necessary to display the unified ROI use the Draw ROI tool in the Image category Note that if the selected ROI A and ROI B are identical this tool will not generate a new ROI In that case this could be the cause for error messages if input parameter ROI definition from a different tool refers to the result of this tool Input Parameters 01 ROI A definition step Reference to program ste...

Page 71: ...etimes it is necessary to repeat this step several times until the desired result is achieved Figure The value of the center matrix element is changed to the highest value out of the surrounding matrix elements Input Parameters 01 Source bank Image bank containing the image to dilate 02 ROI definition step Step number where the ROI to use was created 03 Destination bank Image bank in which to disp...

Page 72: ...pixels Sometimes it is necessary to repeat this step several times until the desired result is achieved Figure The value of the center matrix element is changed to the lowest value out of the surrounding matrix elements Input Parameters 01 Source bank Image bank containing the image to erode 02 ROI definition step Step number where the ROI to use was created 03 Destination bank Image bank in which...

Page 73: ...ter is repla ced by the median value of the surrounding elements instead of the mean value The result of the median filter is an image where noise and small details single pixels are removed but edges are preserved Note that the both filter types operate only inside the selected ROI The results are displayed in a user defined image bank Input Parameters 01 Source bank Image bank containing the ima...

Page 74: ...er thresholds can be set in an interactive setup by clicking button that is displayed when double click the parameters value field This new window allows setting the upper and lower thresholds for the gray values with a slider All gray values of pixels with gray values within the two thresholds are rescaled Pixels above and below thresholds are set to 255 and 0 respectively This tool is useful for...

Page 75: ...e of 9 6 means that the brightest 9 6 and the darkest 9 6 of the pixels are set to 255 and 0 respec tively and the remaining 80 8 will be redistributed 05 Destination bank Image bank in which to store the resulting image Returned Values 01 Gray low Calculated new lower threshold depends on the parame ter Pixel percentage 02 Gray high Calculated new upper threshold depends on the parame ter Pixel p...

Page 76: ...Figure Filtering an image with the Detail Extraction tool compared with thresholding the image In the Operator Type parameter you set how the deviation search should be carried out Pixels near the edges of the ROI are affected by pixels outside the ROI Input Parameters 01 Source Bank Image bank containing the image to be filtered 02 ROI Definition Step Previous program step defining the ROI to be ...

Page 77: ... considered neighbour points should be 06 Destination Bank Image bank in which to store the filtered image 07 Deviation Type Specifies whether the details to look for are brighter Bright darker Darker or both brighter and darker Bright Dark than the background Note If the Operator Type parameter is set to Full region the Bright Dark option is not available Returned Values 01 Number of Detail Pixel...

Page 78: ...e Setupon page 234 Input Parameters 01 Source bank Image bank containing the image to binarize 02 ROI definition step Step number where the ROI to use was created 03 Gray low Lower threshold for gray value 04 Gray high Upper threshold for gray value 05 Destination bank Image bank in which to display the binarized image 06 Threshold mode Available options are Manual Set the upper and lower threshol...

Page 79: ...e sponds to the first found pixel from the left side of the ROI The gray value thresholds are set by the parameters Gray low and Gray high To set the thresholds with a slider double click the input field for the gray value threshold and click the appearing button This opens a larger image Use the left mouse button to move the slider All pixels inside the ROI with gray values within the two thresho...

Page 80: ...first found pixel beginning from the bottom of the ROI The gray value thresholds are set by the parameters Gray low and Gray high To set the thresholds with a slider double click the input field for the gray value threshold and click again on an appearing button that opens a larger image Use the left mouse button to move the slider It is also possible to adjust the column position in this window A...

Page 81: ... stop scan ning when the amount of matching pixels in the line rises above the amount set in Level pixels level or when it sinks below the amount set in Level pixels level The lower and upper limits of the range of gray levels are set by the parameters Gray low and Gray high These parameters can be set in an interactive setup window which is opened by clicking the button that is displayed when dou...

Page 82: ... Level Amount of pixels with gray values in between Gray low and Gray high Default setting 2 06 Type of transition Pixels level Stop when the amount of matching pixels in the line rises above Level Pixels level Stop when the amount of matching pixels in the line sinks below Level 07 ROI definition step Selected ROI from a previous program step Note that only ROIs created with the ROI rectangle too...

Page 83: ...ol should stop scan ning when the amount of matching pixels in the column rises above the amount set in Level pixels level or when it sinks below the amount set in Level pixels level The lower and upper limits of the range of gray level values are set by the parameters Gray low and Gray high These parameters can be set in an interactive setup window which is opened by clicking the button that is d...

Page 84: ...l Amount of pixels with gray values in between Gray low and Gray high Default setting 2 06 Type of transition Pixels level Stop when the amount of matching pixels in the column rises above Level Pixels level Stop when the amount of matching pixels in the column sinks below Level 07 ROI definition step Selected ROI from a previously program step Note that only ROIs generated by the ROI rectangle to...

Page 85: ...eshold The red circle indicates the detected point on the blue line This point corresponds to the location of the returned X and Y pixel coordinates Red circle displayed in this example only Evaluation Method 2 Detect Absolute Change of Gray Scale Beginning at the starting point of the line this method detects if the gray scale enters a user defined region of gray scale values The evaluation is ba...

Page 86: ...tance and angle anti clockwise with respect to x axes for end point of line Multiple Cartesian 2 Cartesian coordinates for start and end point of line Multiple Interval 2 Cartesian coordinates for start point and relative values delta X and delta Y for end point of line Multiple Polar 2 Cartesian coordinates for start point and distance and angle anti clockwise with respect to x axes for end point...

Page 87: ... value threshold method 2 Derivative threshold method 1 08 Gray high Upper gray value threshold method 2 Derivative threshold method 1 09 Average pixels Available with evaluation method 2 only Allows to average over up to 10 pixels in the line direction 10 Table index Works only for evaluation method 2 Start index in table to write the found pixel coordina tes of transitions in the table 11 Max st...

Page 88: ...qui red relative changes of gray values by using a slider on the left side The first found edge along the line is marked with a green dot in the image Input Parameters 01 Source bank Image bank containing the image to be processed 02 Type Always set to Cartesian 03 Start point X X coordinate for start point of line 04 Start point Y Y coordinate for start point of line 05 End point X width L X coor...

Page 89: ...ine to end point of line The tool writes the X and Y coordinates of the detected pixels into a user defined row in the table Additionally the tool returns the total number of found transitions along the line Double click the input field for the gray value thresholds and click the button to set the upper and lower thresholds for the gray values with a slider Additionally it is possible to set lengt...

Page 90: ...threshold and any transitions above or below the two thresholds will be detected 03 Start point X X coordinate for start point of line 04 Start point Y Y coordinate for start point of line 05 End point X X coordinate for end point of line 06 End point Y Y coordinate for end point of line 07 Gray low Lower gray value threshold Using any evaluation type with relative thresh old this value is the req...

Page 91: ...eshold 11 Scan interval Distance of compared pixels in pixels 12 Table index Start index in table to write the found coordi nates 13 Max stored transitions Upper limit for number of stored transition coordinates in table Note that only transitions up to this number will be marked with a cross in the image bank If Max stored transitions 0 no found transition will be marked in the image 14 Destinati...

Page 92: ...xel To ignore connected pixels it is possible to define a cluster build with a minimum number of connected pixels Clusters of this size and a distance of more than the allowed maximum distance to the next cluster are ignored for the fit Double clicking the input field for the Threshold parameter and double clicking an appea ring button opens a larger image This new window allows setting of the Thr...

Page 93: ...i e the value of m in the line equation Example The figure below shows an example to Find mean line and margin Note that red circles are ignored and are not considered for the linear fit Chosen input parameters Tolerance in pixel 5 and Filter in steps on isolated points 3 Due to the fact that all pixels with a distance of more than 5 pixels to the next found neighbor pixel are ignored indicated wi...

Page 94: ...s the X and Y coordinates of the detected pixels into a user defined row in the table Additionally the tool returns the total number of indicated pixels and sets an error flag to control the correct execution To set the thresholds with a slider double click the input field for the gray value threshold and click the appearing button that opens a larger image Use the left mouse button to move the sl...

Page 95: ... Gray high Upper gray value threshold Note that this value will be ignored when using evaluation type Relative threshold 09 Type of transition Only available with evaluation type Relative Note that this value will be ignored when using evaluation type absolute threshold Defines direction of evaluated gray value transitions 1 transitions from dark to bright 1 transitions from bright to dark 0 trans...

Page 96: ... that must have gray values between lower and upper threshold 14 Table Index Start index in table to write the found coordinates 15 Max stored transitions Upper limit for number of stored transition coordi nates in table 16 Destination bank Number of image bank to display the circle ellipse with red marked crosses to indicate found transi tions Returned Values 01 Error flag Flag 0 if the function ...

Page 97: ...er threshold with a slider and shows the image with the found pixels colored If no pixels with gray values between Gray low and Gray high are found inside the ROI the resulting coordinates of the centroid are 0 0 Input Parameters 01 Source bank Selected image bank for the processing of this tool 02 ROI definition step Select ROI from a previously program step 03 Gray low Threshold for lower gray v...

Page 98: ...k the appearing button to set the gray values with a slider All pixels inside the ROI with gray values in between the two thresholds are colored according to the parameter Color for marking pixels in range and the pixels outside the thresholds are not affected Input Parameters 01 Source bank Selected image bank for the processing of this tool 02 ROI definition step Select ROI from a previous progr...

Page 99: ...that is displayed by the field If the starting point is at a place at which the gray value is not in between Gray low and Gray high the resulting centroid is 0 0 and the number of counted pixels is of course 0 Input Parameters 01 Source bank Image bank containing the image to analyze 02 Start point X X coordinate to start evaluation of gray values 03 Start point Y Y coordinate to start evaluation ...

Page 100: ... If the input starting point is outside of the blob this tool finds white blobs best if the starting point is at the left of the blob and black blobs best if the starting point is on the right of the blob However it is strongly recommended not to use any starting point out side of the contour Input Parameters 01 Source bank Selected image bank for the processing of this tool 02 Start point X X coo...

Page 101: ...k the input field for lower and upper threshold and double click the appearing button This opens an interactive window This new window allows setting lower and upper threshold with a slider and shows the image with found pixels colored Input Parameters 01 Source bank Image bank containing the image to be proc essed 02 ROI definition step Step number where the ROI to use was created 03 Gray low Thr...

Page 102: ... with an error and the returned coordinates are set to 0 Input Parameters 01 Line A start point X X coordinate one on line A 02 Line A start point Y Y coordinate one on line A 03 Line A end point X X coordinate two on line A 04 Line A end point Y Y coordinate two on line A 05 Line B start point X X coordinate one on line B 06 Line B start point Y Y coordinate one on line B 07 Line B end point X X ...

Page 103: ...rst point 2 If both points are identical both result values are 0 This tool is useful for example for generating offset parameters in a ROI tool Input Parameters 01 Start point X X coordinate of the first point 02 Start point Y Y coordinate of the first point 03 End point X X coordinate of the second point 04 End point Y Y coordinate of the second point Returned Values 01 Distance Absolute value o...

Page 104: ...ll other pixels are black low The image can be used as input to other program steps for any kind of processing Note that the actual values of the pixels in the image have no meaning in terms of mm after blob binarization 05 Threshold Low pixels Sets the minimum height threshold limit Pixels darker than this value are ignored 06 Threshold High pixels Sets the maximum height threshold limit Pixels b...

Page 105: ...se in conjunction with Sort by to determine in which order to store the blobs 15 Sorting Point X X position of sorting point Only used when sorting by Distance to sorting point in the Sort by option 16 Sorting Point Y Y position of sorting point Only used when sorting by Distance to sorting point in the Sort by option 17 Table Index Blob centroid and blob area can be stored in the table Defines wh...

Page 106: ...tion bank If disabled the results are not visualized 05 Display Centroids Determines if the blob centroid is displayed with a sign or not 06 Orientation Method The method to compute the blob orientation none Area based or Boundary based See the Compute bounding box parameter for more information 07 Compute Bounding Box Determines if a bounding box is computed or not If Enabled the Orientation Meth...

Page 107: ... aligned The angle increases counter clock wise The valid range is 0 180 degrees 09 Blob Ovality A measure of how oval non isotropic a blob is A perfect circle or square has the value 1 whereas a straight line has a very low value Valid range is 0 1 10 Max Diameter of Blob pixels The largest diameter found in the blob where diameter is defined as the distance between the two most distant points on...

Page 108: ...ghts reserved Measure 15 Bounding Box Centre Y The vertical position of the centre of a rotated bounding box 16 Bounding Box Width pi xels The width of the bounding box along the major axis of the blob 17 Bounding Box Length pixels The length of the bounding box along the minor axis of the blob ...

Page 109: ...ference point rotation angle scale and finally score of the located shape The coordinates of the reference point are given in pixels in the destination image The rotation and scale are given relative to the reference image Reference shapes can also be created in runtime using the Add Shape Runtime tool The supplementary tools Get Shape on page 113 Transform Image on page 114 and Transform ROI on p...

Page 110: ...ization Type of result visualization in the destination bank No visualization First shape according to specified sorting order All shapes 19 Destination bank The image bank where matched shapes are visualized The value 1 indicates that no visualization is performed This will help to reduce the execution time 20 Sorting point X The x coordinate of the sorting point This value is only used when the ...

Page 111: ...rting order SEARCH STATUS 0 All OK 8823 No shape found 8824 Failure when writing results to the table 8825 The reference point of one or more shapes is located outside the image 8828 Failure when visualizing results 8833 Search aborted due to timeout The resulting shape may be less accurate ERROR CODES 7704 The ROI is partly or completely outside the image 8828 Error in visualization of the locate...

Page 112: ...rmation of the reference shape will be stored temporarily 04 Edge strength The edge strength is the image contrast needed for defining shape edges A higher value gives fewer edges in the shape Valid range 0 100 05 Robustness vs Speed This setting controls the tradeoff between execution time and robustness when running the Shape Locator tool A high value prioritizes a short execution time Valid ran...

Page 113: ...alues 01 Status code The status of the execution of the Shape Locator step 02 Ref point X coor dinate The x coordinate of the point that corresponds to the reference point in the reference shape 03 Ref point Y coor dinate The y coordinate of the point that corresponds to the reference point in the reference shape 04 Angle degrees The angle of the found shape in the coordinate system defined in the...

Page 114: ...rmation of the live image will affect the information in the image and that exact measurements cannot be performed on the transformed image The parameter Interpolation method controls how the pixel values are calculated in the destination image It is possible to choose between bilinear interpolation gives higher image quality or nearest neighbor gives faster execution time The images below show an...

Page 115: ...estination bank The image bank where the result shall be visualized Set to 1 if no visualization is used Returned Values 01 Search status The status of the execution of the Shape Locator step SEARCH STATUS The result Search status can have one of the following values 0 All OK 8825 The reference point of the shape is located outside the image ERROR CODES 8810 The referenced step is not a Shape Loca...

Page 116: ...ed ROI will be moved rotated and possibly scaled to the position of the located shape The tool refers to a previous Shape Locator step and the zero based index of a located shape The tool itself can be referred to as a ROI for all tools that can handle arbitrary shaped ROI s Reference image Position of ROI in reference image Live image ROI transformed to the position of a located shape Input Param...

Page 117: ...s can have one of the following values 0 All OK 8825 The reference point of the shape is located outside the image ERROR CODES 8810 The referenced step is not a Shape Locator step 8812 The index of the shape is not valid e g larger than the number of located shapes 8813 No results found from the Shape Locator tool This can happen if the execution of the Shape Locator tool failed for some reason 88...

Page 118: ...s used for the measurement itself unless there is a symme try problem in which case the other one is used Input Parameters 01 Source bank The image bank with the object you want to teach the device 02 X centre X coordinate of the concentric circles that hold the gray scale information about the object This should be also be the x coordinate of the center of rotation 03 Y centre Y coordinate of the...

Page 119: ...parameter Input Parameters 01 Source bank The image bank with the object you want to match with your teach object 02 Rotation definition step The step in your program which you have defined your reference object 03 X center The x coordinate of the center of rotation 04 Y center The y coordinate of the center of rotation 05 Destination bank The image bank where the result of the matching will end u...

Page 120: ...lone application Each pattern has a reference point that defines the position of the pattern The default position is the centroid of the ROI but it can be set to any position in the reference image Default centroid position of the reference point red cross The reference point can be moved for example to a key feature on the object When the Inspect Pattern step refers to a Shape Locator step the ex...

Page 121: ...rs www sick com All rights reserved 121 Matching Returned Values None ERROR CODES 7300 Memory allocation problem 8835 Error in internal ROI handling 8838 ROI type error please use ROI perimeter with filling 0 Internal 9010 General error for pattern inspection algorithm ...

Page 122: ...ern s reference point For an explanation of the reference point see the Teach Pattern tool description on page 120 The pattern is defined by its teach ROI in the reference image In run mode the pattern green is found inside the search rectangle blue Large pattern defects can either be found by setting the score threshold high so that defective patterns won t be found or by applying a pass fail cri...

Page 123: ... less sensitive to edge artifacts from the pattern 4 Normalized diff with edge suppression Like the Normalized diff mode but less sensitive to edge artifacts from the pat tern To high light small defects on a pattern visually for example in an HMI or demo the follow ing steps can be used 1 Enable the parameter Create Pattern ROI 2 Generate the difference image with option Normalized diff with edge...

Page 124: ...n a geometric pattern matching method which is the best choice for locating large patterns objects in any rotation This method is more toler ant to occlusion noise and clutter than the normalized cross correlation The following table provides a selection guide by describing several key aspects of the different algorithms Pattern Shape Locator Information used in search Intensity in all pixels Edge...

Page 125: ...urate as the fast mode Input Parameters 01 Source Bank The image bank where to search for the pattern 02 Data Block The data block number in the working memory where the reference pattern is stored 03 Shape Locator Step Reference to a Shape Locator step to enable automatic pose adjustment of the search rectangle The default value 2 means that no Shape Locator pose is used 04 Shape Index A number t...

Page 126: ...f the found pattern s reference point 04 Angle The angle of the found pattern relative to the reference image which is defined as 0 04 Delta X Not using Shape Locator The pattern s X movement relative to the reference image Using Shape Locator The pattern s X movement relative to the reference image adjusted for the Shape Locator pose 05 Delta Y Not using Shape Locator The pattern s Y movement rel...

Page 127: ... type please use a Shape Locator as reference or use 1 for no reference 8995 General visualization error please change visualization type 8997 No ROI data in the referenced step please re run the step or change the refer ence 8998 Cannot use filled ROI as input please use a ROI perimeter 8999 General error for pattern inspection datablock please re teach a pattern 9010 General error for pattern in...

Page 128: ...ght Modify the Relative threshold with the slider on the left side until a point on the contour is found This point is marked with a cross Close this window 2 Double click the input field for Gray low or Gray high threshold and double click the appearing button This opens an interactive window Modify the lower and upper threshold with the slider on the left side until the external contour of the o...

Page 129: ...eter found 02 X center X coordinate of calculated center of gravity If no external perimeter was found X center 0 03 Y center Y coordinate of calculated center of gravity If no external perimeter was found Y center 0 Example Figure Example of a successfully found external contour Displayed is the line to find a contour point yellow line the found contour yellow circle and the center of mass red cr...

Page 130: ...rawn from left to right Modify the Relative threshold with the slider on the left side until a point on the contour is found This point is marked with a cross Close the window 2 Double click the input field for Gray low or Gray high threshold and double click the appearing button This opens an interactive window Modify the lower and upper threshold with the slider on the left side until the intern...

Page 131: ...ound 02 X center X coordinate of the calculated center of gravity If no internal perimeter was found X center 0 03 Y center Y coordinate of the calculated center of gravity If no internal perimeter was found Y center 0 Example Figure Example of a successfully found internal contour Displayed is the line to find a contour point yellow line the found contour yellow circle and the center of gravi ty ...

Page 132: ...ut Parameters 01 External perimeter step Refer to step number which executes the External perimeter tool 02 Internal perimeter step A Refer to step number which executes the Internal perimeter tool to perform the first cut out 03 Internal perimeter step B Refer to step number which executes the Internal perimeter tool to perform the second cut out 04 Internal perimeter step C Refer to step number ...

Page 133: ...nterval Angular resolution of the measurements Range 1 90 in units of 0 5 Note that a high resolution increases the processing time considerably 04 Destination bank Image bank in which to show the results Returned Values 01 Error flag flag 0 tool terminated correctly flag 1 an error occurred 02 Mean external diameter Averaged external diameter 03 Max external diameter Maximum found external diamet...

Page 134: ...and double click again on the appearing button This opens an interactive window Set region of allowed gray values Control the results in the image Input Parameters 01 Source bank Image bank containing the image to be processed 02 Perimeter ROI definition step Refer to step number which executes the Circular perimeter ROI tool This ROI defines the region where the surface check is performed Note th...

Page 135: ... is defined in the tool External or Internal perimeter Beginning at this point the algorithm follows the contour counterclockwi se until the first defect is found If a defect is detected the tool terminates and returns the coordinates of the first found defect Figure Example for the two categories of defects on an external circular shape a category dent b category spike Input Parameters 01 Perimet...

Page 136: ... 03 Mathematical operation Operator Basic mathematical operations or Boolean operation Double click on input box and select one of follow ing operation writes parameter A in the specified table row basic mathematical operations OR Max Min Mean Absolute value of difference unsigned subtraction And Square root the square root of variable A Variable B can be used for setting the num ber of decimals i...

Page 137: ...ommenting the calculation in a meaningful way To maintain good readability when multiple mathematical expression steps are used after one another it is suggested to group them together by using Edit Æ Increase tabulation Input Parameters 01 Expression Mathematical expression Always starts with a for example 2 S5R1 S4R1 Returned Values 01 Result The result of the evaluated expression Example Result...

Page 138: ...ue has to be exact the value lower and upper bound values should be identical If you want to continue your step program on a certain step depending on the comparison result conditional jump you could use the If in range goto tool from the Program cate gory Input Parameters 01 Value Value to be compared if it s within the range or not 02 Min value allowed Lower bound of the range 02 Max value allow...

Page 139: ...view using the left mouse button Double clicking the preview image opens a larger image in which the circle can be set with higher accuracy This function is useful if you want to define a specific point on the circumference of a circle In particular if the center of the circle is calculated from a previously performed program step such as the Fit Circle tool or a tool from the Measurement or Edge ...

Page 140: ...during run mode Input Parameters 01 Source bank Number of the source bank In this case just to copy 02 X1 X coordinate of the first point 03 Y1 Y coordinate of the first point 04 X2 X coordinate of the second point 05 Y2 Y coordinate of the second point 06 X3 X coordinate of the third point 07 Y3 Y coordinate of the third point 08 X4 X coordinate of the fourth point 09 Y4 Y coordinate of the fourt...

Page 141: ... copy the source bank into the destination bank 02 X1 X coordinate of the first point 03 Y1 Y coordinate of the first point 04 X2 X coordinate of the second point 05 Y2 Y coordinate of the second point 06 X3 X coordinate of the third point 07 Y3 Y coordinate of the third point 08 X4 X coordinate of the fourth point 09 Y4 Y coordinate of the fourth point 10 X5 X coordinate of the fifth point 11 Y5 ...

Page 142: ...5 Sort order Select the sorting order 0 ascending order 1 descending order Returned Values None Example A blob analysis tool found three blobs and wrote the result to the table starting at row 5 For each blob the tool wrote three values x coordinate of the centroid y coordinate of the centroid and area Now we would like to sort the blobs according to their size area with the largest blob first tha...

Page 143: ...he number of rows you need from the starting index is equal to Number of monitored values 5 The result parameter Counter starts at zero at program start or after a Reset Statistics tool is executed and is increased by 1 each time this step is performed number of repetitions By the help of this parameter it is easy to update the statistic if the desired number of repetitions have been performed sim...

Page 144: ...able that the Update statistics tool refers to to default values which are not zero except for the average values Furthermore it sets the result value Counter of the Update statistics tool to zero Make sure that this tool is not performed during your statistical evaluation loop since this constantly resets your statistics Input Parameters 01 Step with statistics to reset Select the update statisti...

Page 145: ...later by the Get calibrated point tool to get aligned measurement values This tool is used through an interactive setup Therefore the program step can be re moved from or disabled in the program after creating the transform Input Parameters None This tool is used through the interactive setup which is opened by double clicking the Setup button See Coordinate Alignment on page 220 for more informat...

Page 146: ... system the tool will return X Y and Z coordinates otherwise if the transform only includes coordinate calibration the Z coordinate will always be 0 Input Parameters 01 Source bank The image bank containing an image to get calibrated coordinates from 02 X pixel The x coordinate of the pixel 03 Y pixel The y coordinate of the pixel 04 Transform data block The number of the data block in which the t...

Page 147: ... Goto This tool jumps to the selected step in the step program The program continues execution from that point Input Parameters 01 Goto step Step number where the program continues If selected step was deleted during the setup of the program this row is marked red and the previously set value changes to 1 Returned Values None ...

Page 148: ... Program If Then Goto This tool jumps to a defined program step if the condition in Control expression is true Conditional jump Input Parameters 01 Control expression Condition Definition 0 false For example v2 v5 02 Goto step Step number where the program continues if condition is true Returned Values None ...

Page 149: ...ng step or jumps to a defined program step Please select the Goto step carefully to avoid accidentally creating an infinite loop Return parameters are the step number where the last error occurred and the error code Input Parameters 01 Goto step Step number where to continue in case of an error 02 Continue to next step False The program continues at step number given by Goto step True The step wit...

Page 150: ... the value is within or outside the range Input Parameters 01 Value to be compared Value to be checked 02 Min value allowed Lower range 03 Max value allowed Upper range 04 Goto if Condition for jump In range perform jump if value in range Out of range perform jump if value out of range 05 Goto step Step number to which the program will jump and continue if value in range Returned Values 01 Compari...

Page 151: ...ge first value 03 A max value Upper range first value 04 Value B Second value to be checked 05 B min value Lower range second value 06 B max value Upper range second value 07 Value C Third value to be checked 08 C min value Lower range third value 09 C max value Upper range third value 10 Value D Fourth value to be checked 11 D min value Lower range fourth value 12 D max value Upper range fourth v...

Page 152: ...ondition in the Control expression is false the following program steps are skip ped and the program continues with the program steps following the tool referred to by the ELSE or END step parameter A construction with an If tool must always end with an End tool Input Parameters 01 Control expression Definition 0 false Boolean operations and mathematical expres sions are allowed for example v2 v5 ...

Page 153: ...e condition is false only the program steps between Else and End are executed See figure below Input Parameters 01 IF step This parameter refers to the step number with corresponding If tool 02 END step This is the step number with the corre sponding End tool Note that no other step numbers are allowed Returned Values None Example Program step Step 5 tool If 01 Control expression condition 02 END ...

Page 154: ...ion the Increment value is added to Loop index The repetition of program steps terminates if the Loop index is equal to or greater than the Stop value Input Parameters 01 Start value Initialize start value for Loop index 02 Stop value Set stop value for Loop index 03 Increment Increment for Loop index 04 END step Step number with corresponding End Returned Values 01 Loop index Current loop index E...

Page 155: ...een While and End until the condition in Control Expression is false Due to that this tool must be terminated with an End tool Input Parameters 01 Control Expression Condition Boolean operations and mathematical expressions are allowed For example v2 v5 02 END step Step number that refer to the corresponding function End Note that no other step numbers are allowed Returned Values None ...

Page 156: ... be called by the following tools Goto If then go to If in range goto If all in range goto After the subroutine is executed the program continues at the step following the step calling the subroutine Input Parameters 01 END step Step number of the End that belongs to the subroutine Returned Values 01 Calling step Step number which called the subroutine Example Step number Step tool Execution order...

Page 157: ...rial Sensors www sick com All rights reserved 157 Program End The End tool must follow the following tools If While For Subroutine Input Parameters 01 Start step Step number that refer to the corresponding If While For or Subroutine tool Returned Values None ...

Page 158: ... replace the program currently in the working memory If you want to continue running the previous program after loading a program from flash that program must also be stored in the flash memory and the loaded program must contain a Run flash program step that loads the previous program from flash Input Parameters 01 Program number Number of the program bank in which the program and table to load i...

Page 159: ...e device to another it will refuse to run on the other device If the Lock to device parameter is not set the program can be copied to other devices through FTP and run on those devices but never imported back into IVC Studio Note If you use this program step in a program make sure that you keep the original project file since there is no way to recover the program from a device if the project file...

Page 160: ... subtracting the results of two different Get timer tools or of one tool in two cycles of the step program Since it is not possible to reset the timer the return value should be stored in the table to calculate cycle times of step program sequences The maximum value for system time is 1 157 627 903 which correspond to 44FFFFFF hexadecimal When maximum value is reached the value will be wrapped Inp...

Page 161: ...l sets a time delay in the step program The program stops at this step and conti nues after the specified waiting time Note that the displayed Time of execution has no meaning in this step Please ignore this value Input Parameters 01 Wait time ms Desired time delay in milliseconds Maximum time delay 9999 ms Returned Values None ...

Page 162: ...rights reserved System Read from Table This tool reads a value from the table The return value of this tool is the selected value from the table Input Parameters 01 Table index Index number of the table in which to select a value Returned Values 01 Value Returns the read value from the table ...

Page 163: ...strial Sensors www sick com All rights reserved 163 System Write to Table This tool writes a value into the table Input Parameters 01 Value Value to be written in the table 02 Table index Index in table where the value should be written Returned Values None ...

Page 164: ... table index at which this tool stops to fill the table Either each cell in this array is filled with the value or only every nth row Input Parameters 01 Value Value to be filled in the table 02 Start table index Index number of the table to define first row of the array 03 End table index Index number of the table with the last row of the array 04 Fill interval Number of skipped rows between each...

Page 165: ...memory into a data block in the working memory The data is stored in a file on the flash memory which is referred to by the File name parameter Input Parameters 01 File name Name of the file to be loaded 02 Data block The number of the data block in working memory into which to load the data Returned Values None Error Messages Err 2 A timeout occurred Err 159 Failed to read file from flash ...

Page 166: ...r details see section on page 242 in the Troubleshooting guide Note This tool may perform an automatic defragmentation of the flash disk if the amount of dead space exceeds the specified threshold Please refer to section Setting Device Parameters in the appendix for information on how to set this threshold This will signifi cantly increase the execution time of the tool Note also that this is only...

Page 167: ...me settings for field of view FOV and length as when the image was saved Input Parameters 01 Flash bank Number of the flash bank in which the image to be loaded is stored Available numbers of flash banks 0 9999 02 Destination bank Number of the image bank into which to load the image Returned Values None Error Messages Err 361 Type of image to restore is different from image type of bank Err 7304 ...

Page 168: ...ed in the following table Format Time of execution min and max execution times in ms IVC 2DM1111 IVC 2DM1121 HiRes Raw 9 000 11 000 15 000 17 000 Compressed raw 9 000 10 000 15 000 17 000 Jpeg Quality factor 100 780 1 900 8 000 10 000 Jpeg Quality factor 50 185 500 1 000 1 500 Jpeg Quality factor 1 145 160 200 400 Note This tool may perform an automatic defragmentation of the flash disk if the amo...

Page 169: ...k on flash is too long Increase the timeout limit Options Æ Configura tion on the IVC Studio menu bar Err 8960 The amount of dead space on the flash exceeds the specified threshold Please defragment the disk by using the Clear Unused Memory option on the Flash menu in the Device list Err 8961 The automatic defragmentation failed The camera may need to be restarted to restore the flash ...

Page 170: ...n executing the tool with F5 F8 In the latter situation an error code will be returned indicating that it is time to defragment the flash Input Parameters 01 Table index Index of the first table element to be stored on flash 02 Number of elements The number of table elements to be stored on flash 03 File name Name of the file on flash where the data will be stored 04 Warning Wears down flash The t...

Page 171: ... flash To be able to do this the file should previ ously be written by the Write Table To Flash tool Input Parameters 01 Table Index The elements read from the flash will be stored in the current table starting from this index 02 File Name Name of the file on flash Returned Values 01 Result 0 Everything is ok 1 The file does not exist 2 The file could not be read and interpreted ...

Page 172: ...uffer takes some time and so the execution time will increase Colors in the image bank will be displayed in white on the web page Also note that the description that can be added in the parameters Description A E allows only strings no numerical values If no description or numerical values is used the variable will not be included in the web page To update the status page just click on the refresh...

Page 173: ... included on the web page with Description E Returned Values None Errors If you are unable to connect to the device with a web browser try the following Check that the HTTP server is enabled Go to Options Æ ConfigurationÆ Ethernet Devices Click on button Ethernet Device Configuration and check Device Parameters on the right table HTTP Server Enabled must set to 1 Make a Proxy Server exception in t...

Page 174: ...p program before using following tools Write RS485 Values Read RS485 Values Write RS 485 String Read RS 485 String Input Parameters 01 Baud rate Select desired Baud rate 1200 115200 02 Parity Select parity None Even Odd 03 Data bit Select how many data bits 7 8 04 Stop bit Select number of stop bits 1 2 Returned Values None The Emulator does not emulate this tool See section Handling the Emulator ...

Page 175: ...ne byte before an error message occurs due to time out 02 Expected values Total number of expected values Since the number of rows in the table are limited to 2000 the Table index Expected values 2001 03 Table index Start row in table to write received values in a succes sive manner Returned Values 01 Received bytes Total number received values Error Messages Err 407 Serial protocol Check if a Set...

Page 176: ...2 Number of values Total number of values that will be sent in a suc cessive manner Since the number of rows in the table are limited to 2000 the Table index Number of values 2001 Returned Values None Error Messages Err 407 Serial protocol Check if a Setup RS485 tool was executed before using this tool Example Figure Example for sending values from table via RS485 Input Parameters Table index 21 a...

Page 177: ...ad the next time the tool is executed To ensure that the tool reads the first 4095 characters each time it is executed the tool Setup RS485 should be inserted before Read RS485 string to clear the queue before a new string is transmitted The read string is found in the result value Received string Input Parameters4 01 Timeout Time limit about how long the tool waits to read string via the RS485 po...

Page 178: ...t RS485 Input Parameters 01 String String to write Note that only up to 4095 characters can be sent Returned Values None Error Messages Err 407 Serial protocol Check if a Setup RS485 tool was executed in the step program before using this tool Err 8006 The string to send is too long more than 4095 charac ters The Emulator does not emulate this tool See section Handling the Emulator for more inform...

Page 179: ...his case the Display tool will not be updated with current result values and no image will be shown If Status true transmission will be enabled again After enable the transmission again it is recommended to include a Wait tool with a delay of at least 1 ms in the step program before using tools that need result values or images This ensures that the values will be available for the following tool ...

Page 180: ... the devices initiates the connection by sending a connection request to the other device If the other device replies to the request the connection can be established If the device should initiate the connection the connection type should be set to Outgo ing TCP in the Open Ethernet Raw step If the device should wait for other devices to connect the connection type should be set to Incoming TCP in...

Page 181: ... until it is closed by using the Close Ethernet raw tool and reopened again Input Parameters 01 Timeout The time in milliseconds during which the camera will try to establish the connection 02 Transport Protocol Type of connection to be established and protocol TCP or UDP for the connection Outgoing TCP Incoming TCP UDP 03 IVC Device Port The port number on which the camera will send or receive da...

Page 182: ...P any data that is queued will be received or sent before the connection is actually closed which may take an unspecified amount of time Input Parameters 01 Open step The program step in which the connection was opened Returned Values None Error Messages Err 1 The program step referred to by the parameter Open step does not contain an Open Ethernet raw tool The Emulator does not emulate this tool ...

Page 183: ...h the connection was opened is used as the parameter Open step Input Parameters 01 Open step The program step in which the connection was opened 02 Timeout The time in milliseconds during which the camera will try to receive data This includes the time it takes to establish the connection if necessary 03 Expected bytes The number of values that are expected to be received 04 Table index Table row ...

Page 184: ...ding to the IEEE 754 standard The following formats are available Format Description Ix Integer with x bytes 1 2 or 4 bytes Fy Float with y bytes 4 or 8 bytes Uz Unsigned integer with z bytes 1 2 or 4 bytes Pn Pad with n bytes 0 999 bytes The padded bytes will be set to 0 For padding bytes no table cell is accessed Example If the telegram holds two integers with 2 bytes one integer with 4 bytes an...

Page 185: ...vice Err 8004 The specified connection is for sending data only Err 8970 Parsing error The format string may be empty Err 8971 Syntax error The format string does not have the correct format e g the string contains an invalid character Err 8972 Precision error The number of bytes is not valid for the speci fied data type Err 8974 Buffer too long The total number of bytes exceeds the size of the Et...

Page 186: ... was opened is used as the parameter Open Step As the length of the string is not known in advance this tool will always wait the time specified in the parameter Timeout before returning the received string Input Parameters 01 Open step The program step in which the connection was opened 02 Timeout The time in milliseconds during which the camera will try to receive the string This includes the ti...

Page 187: ...ut Parameters 01 Open step The program step in which the connection was opened 02 Timeout The time in milliseconds during which the camera will try to send data This includes the time it takes to establish the connection if necessary 03 Table index Table row in which the first value to send is stored 04 Number of bytes The number of values to send Returned Values 01 Sent bytes The number of bytes ...

Page 188: ...s The padded bytes will be set to 0 The format specified in the sting will have precedence over the format in the table cell E g if the table cell holds a float and the string specifies an integer the value will be truncated to an integer For padding bytes no table cell is accessed Example If the telegram holds two integers with 2 bytes one integer with 4 bytes and three floats with 4 bytes the st...

Page 189: ... Err 8003 The specified connection is for receiving data only Err 8970 Parsing error The format string may be empty Err 8971 Syntax error The format string does not have the correct format e g the string contains an invalid character Err 8972 Precision error The number of bytes is not valid for the specified data type Err 8974 Buffer too long The total number of bytes to send exceeds the size of t...

Page 190: ... connection was opened is used as the parameter Open Step Input Parameters 01 Open step The program step in which the connection was opened 02 Timeout The time in milliseconds during which the camera will try to send data This includes the time it takes to establish the connection if necessary 03 String The string to send Returned Values 01 Sent bytes The number of characters bytes that were sent ...

Page 191: ... the definition of an already specified parameter For example if one Communi cation setup tool defines that the value from table row 1 should be published as a certain parameter and another Communication setup tool defines that table row 2 should be published as the same parameter the actual content of the parameter depends on which Communication setup tool that was executed last Input Parameters ...

Page 192: ...arameters to subscribe to and publish use the Communication setup tool Input Parameters 01 Read Write Specifies whether values should be read from the network written to the network or both Read Read updated values for the subscribed parameters Write Write updated values for the parameters published on the network Read Write Read and write updated values Returned Values None Error Messages Err 810...

Page 193: ...ty factor parameter sets the compression ratio for the images when saving in JPEG format When saving data the tool saves the values from the table to the file from row number Table index and up to but not including row number Table index Number of elements The tool can transmit images and table data in the same call In this case the filename and folder will specify the location for the image file ...

Page 194: ... floating values Input Parameters 01 IP address The IP address of the FTP server to connect to 02 Port The port number used on the FTP server to connect to 03 Username A user name used for connecting to the FTP server 04 Password The password for the user on the FTP server 05 Timeout Timeout in milliseconds for connection and transmission of the data 06 Passive mode Specifies whether or not to use...

Page 195: ...ation stored in the table data file The parameter can have the following values Configuration The contents of the file can be reloaded using the Get from FTP tool The file will always be overwritten if it exists CSV Overwrite The data is stored with each value separated with a comma The file is always overwritten CSV Append The data is stored with each value separated with a comma The data is appe...

Page 196: ...ll be reported The tool can also be used to transfer a file from an FTP server directly to the flash disk of the camera In this case the parameters Image bank Table index and Data block shall be set to 1 The file will be copied to the flash with the same name as on the FTP server The length of the file name is limited to 15 characters including extension for the flash Note that the file will overw...

Page 197: ...s and try using Passive mode Err 8901 The account for the specified user name is invalid Err 8902 Access denied Err 8903 Timeout Err 8904 No connection to the FTP server Err 8905 The specified file was not found Err 8906 The specified directory was not found Err 8909 At least one datatype image datablock or table must be speci fied Err 8910 When storing a file to the flash the parameters Data bloc...

Page 198: ...ow the date shall be returned The following table shows the available combina tions Format Value Example YYYY MM DD hh mi ss 0 2010 09 02 20 51 33 DD MM YYYY hh mi ss 1 02 09 2010 20 51 33 MM DD YYYY hh mi ss AM PM 2 09 02 2010 08 51 33 PM The tool returns the synchronized time both as seconds and as a date time string as specified in the table above Input Parameters 01 IP address The IP address o...

Page 199: ...e selected state When executing the program step using Execute Step or Step by Step the tool will time out after 100 ms Input Parameters 01 Input number The input signal to read the status of Value Signal Pin Color 0 Trigger In In 0 Power connector pin 1 White 1 In 1 Power connector pin 5 Gray 2 In 2 Power connector pin 6 Pink 3 In 3 IVC 2D RS485 connector pin 8 Red Color is valid for cable type D...

Page 200: ...tatus on a selected pin Input Parameters 01 Output number Selects pin where to set output status Value Signal Pin Color 0 Out 0 Power connector pin 3 Green 1 Out 1 Power connector pin 4 Yellow 2 Out 2 RS485 connector pin 3 Green Color is valid for cable type DOL 1208 Color is valid for cable type STL 1208 02 Signal value Status High Low Returned Values None ...

Page 201: ...me Input Parameters 01 Set all outputs Value Outputs Out 0 Out 1 Out 2 0 Low Low Low 1 High Low Low 2 Low High Low 3 High High Low 4 Low Low High 5 High Low High 6 Low High High 7 High High High Output Pin Color Out 0 Power connector pin 3 Green Out 1 Power connector pin 4 Yellow Out 2 RS485 connector pin 3 Green Color is valid for cable type DOL 1208 Color is valid for cable type STL 1208 Returne...

Page 202: ...e Pulse on Pulse off Pulse on starts a pulsed signal on the output which alters between high and low after specified duration times This signal is stopped by using another Set timed output tool with Pulse off Fixed on Fixed off Immediately sets the signal to high or low respectively Trigger Time Low High Output signal Delay Delay from trigger Signal value High On duration Low High Delay Delayed Si...

Page 203: ...ets it to low for the time in Off duration This is repeated until a Set timed output tool is exe cuted with Type set to Pulse off the output is set by another tool or the camera is powered down Pulse off Stops a pulsing output that has been started by a Set timed output tool with Type set to Pulse on Fixed on Immediately sets the output to high Fixed off Immediately sets the output to low 03 Delay...

Page 204: ...al Sensors www sick com All rights reserved Input Output Set LED This tool sets the color of the LED with the label function on the device or turns it off Input Parameters 01 Set LED Select one of the four options Off Green on Red on Yellow on Returned Values None ...

Page 205: ...the barcode to reduce variations in exposure which may make the reading more accu rate If the barcode type supports checksums the tool will verify the read barcode if the Use checksum parameter is set The tool returns the code that was read as a string in Read string In addition Edge has defects indicates whether there was any dark areas found in the edge of the barcode When reading Pharmacode bar...

Page 206: ...hether or not the read code should be added to the image in the destination bank 11 Use checksum Specifies whether or not the read code should be verified using the checksum in the barcode Checksums are only used in certain barcode types 12 Min number of characters The minimum number of characters to be read for the barcode to be considered valid 13 Destination bank Image bank in which the resulti...

Page 207: ...e 4 The angle that the 2D code is rotated 5 1 if the 2D code is mirrored 0 if not Input Parameters 01 Source bank Image bank containing the image with the 2D code to be read 02 Search full image Indicates if the algorithm shall search for a code using the whole image or the search area specified by the parameters 03 06 03 X coordinate X coordinate for the upper left corner of the ROI in which to s...

Page 208: ...Chapter 4 Reference Manual IVC 2D 208 SICK AG Advanced Industrial Sensors www sick com All rights reserved Reader ...

Page 209: ...ed in a data block in the memory of the camera From the interactive setup it is possible to add a new data block containing a reference shape edit the contents of an existing data block or permanently delete a data block from the working memory The Add Shape and Edit shape buttons open the Add Edit Shape Interactive Setup see page 212 Note A data block created by the Add Shape Runtime tool cannot ...

Page 210: ...highest score will continue through the process The overlap distance is based on the center of gravity of the reference shape i e the center point of the Teach ROI This point is visualized in the interactive setup for Add Shape as a blue circle with a cross The example below shows how the Overlap Distance parameter affects the result of the matching algorithm The top image shows the reference shap...

Page 211: ...lts The tool will return information about the overall search status and the number of shapes that was found In addition to this information about the first shape is returned The interac tive setup can show information about all shapes but this is only available in the GUI and not in the step program Replacing the Source image It is possible to replace the image currently stored in the Source bank...

Page 212: ...he execution of the step program Reference Shape The ID of the data block that holds the reference shape is specified in the Shape Locator GUI and cannot be modified in this interactive setup IT is however possible to edit the name of the data block Teach ROI Settings The Add ROI and Add Mask buttons are used to create a Teach ROI that specifies the part of the shape or image that shall be include...

Page 213: ...e to zoom in and out of the image by using the Zoom buttons E g if the Zoom in button is pressed each mouse click in the image will zoom in around the clicked posi tion and vice versa for the Zoom out button The Pan button can be used to move the visible part of the image when it is zoomed in When the Pointer button is pressed it is possible to work with the ROI s and Masks composing the Teach ROI...

Page 214: ...lean high contrast image with a large reference shape the robustness trade off can be set to high speed For cluttered or low contrast images with a small reference shape the robustness trade off should be towards high robustness The Accuracy trade off controls the fine tuning of the second step in a similar manner For applications where the sub pixel accuracy requirements are high the trade off sh...

Page 215: ... Using a higher value will lead to a longer execution time even if only one shape is present in the image Advanced algorithm details Lens distortion and perspective distortion of 2D images have a negative impact on both the score and position results of the tools Try to minimize these types of image distortion if high robustness and accuracy is required The rotation handling of the tools is based ...

Page 216: ...be used in a number of various workflows These examples show some of the most common ways to use the tools In all examples exclu ding the last the reference shape is created using the interactive setup Add Edit Shape available in the interactive setup for Shape Locator During the configuration phase of the development the interactive setup for the Shape Locator tool is used to create one or more r...

Page 217: ...ator Transform ROI A ROI defined in the reference image is moved and rotated to the position of the located shape Teach using external operator interface ROI step An arbitrary shaped ROI defined in the step program Add Shape Runtime The reference shape is created during runtime by specify ing a source image and the ROI specified previously Shape Locator Get Shape Transform Image or Transform ROI ...

Page 218: ...nation bank Select the geometrical interpretation for the start and end points of the line by clicking the input box with the caption Type Select one of the three available options The values are shown in the four input boxes with the caption Line coordinates Note that depending on the selected geometrical interpretation the Line end X and Line end Y values have different interpretations like delt...

Page 219: ...tion Table settings Figure Screenshot of the input boxes to set the Input Parameters Results The total number of found transitions is displayed in the field Number of transitions found A table shows the table index number and the coordinates that are stored in the table beginning with the first found pixel The maximum number of shown and stored coordina tes depends on the selected value in the inp...

Page 220: ... working memory To avoid having to re align after restarting the camera the result can be saved to the camera s flash memory by using a Save data block to flash tool Figure The Coordinate alignment interactive setup window To create a transform with the Coordinate alignment interactive setup do the following Print the calibration target and grab an image of it It is not necessary to have the entir...

Page 221: ...rence point is entered in the Measurements point field on the General tab Click on the table for external coordinates The table is now updated with the correct number of rows according to the number of measurements per point Enter the external coordinates in the table To import external coordinates from a file simply click Import coordinates to select the file containing the coordinates The number...

Page 222: ...last value on each line Results from the calibration The calibration is performed by finding the corners of the squares in the checkered pat tern When a calibration is successfully performed the coordinates of the corners of the squares are displayed in the Transformed Points table on the Advanced tab For each corner the image coordinates X Y and the transformed coordinates X Y Z are dis played Th...

Page 223: ...device should publish and subscribe to and whether to use the Ethernet IP or the OPC protocol for the communication This tool only specifies the values that should be read from or written to the network The actual reading and writing of values occurs when a Communication Read Write tool is executed Figure The Communication Setup dialog box The Interactive Setup for this tool is not available when ...

Page 224: ...T49 INT0 Figure Reading and writing values in the IVC s buffer Parameter Types Each parameter in the buffer can store values of a certain type The following types are supported by the IVC devices Short integer SINT 128 127 Integer INT 32 768 32 767 Double integer DINT 2 147 483 648 2 147 483 647 Floating point REAL 3 40282347e 38 3 40282347e 38 Short string SSTRING 61 characters Long string LSTRIN...

Page 225: ...ernal device the strings will occupy 64 bytes and 500 bytes respectively The format of the strings when read from the buffer is shown in the following figure Figure Format of strings in the buffer OPC To use the OPC protocol for reading and writing data on an IVC device the OPC server from SICK must be running on a PC in the network The OPC server is included with the installation of IVC Studio an...

Page 226: ...g with the IVC device using Ethernet IP are listed in the following table Name Description Input assembly instance to IVC device Output assembly instance from IVC device Allround All types represented except long string 100 101 No strings More room for numbers 102 103 Large string One long string 104 105 Small Small set with all types 106 107 Please contact tech support if an assembly of another s...

Page 227: ...r to map to Parameters are made available by first selecting the parameter type in the Type column Source Destination The table row program step result or constant value to be written to the selected parameter in the output buffer or the table row in which to write the value from the parameter in the input buffer Name For Ethernet IP the name is only used for display in the interactive setup dialo...

Page 228: ... of the L pattern must lie inside the ROI Figure The parts of a 2D code symbol The number of scan lines used depends on the provided cell size that is the approxima te size in pixels of the modules squares in the 2D code the symbol size that is the number of cells in the symbol Figure Scan lines used for locating the symbol By default the tool will use 2 5 scan lines for each symbol Using smaller ...

Page 229: ...n which to display the filtered image and if so specified the outline of the 2D code and the ROI You can switch between viewing the original image Source and the image with added diagnosis graphics Destination by clicking on the corresponding button under the image By clicking Change image you can grab another image from the camera to use for setting the parameters for the tool The Test live butto...

Page 230: ...cent where 100 means a difference of 255 grayscale levels Robustness Allows for trade offs between speed and reading perfor mance Use the Fast mode if the code quality is good and the execution time is critical Use Robust mode if the code quality is poor or if there are other objects near the code in the image Dot Size Compensation Dot size Use a dilate erode filter to enlarge or shrink the dots i...

Page 231: ...tion of the 2D code Mirrored code Indicated whether or not the 2D code was mirrored 0 Not mirrored 1 Mirrored Grades Print quality grades according to ISO IEC 16022 2000 Overall grade Indicates the overall print quality of the 2D code Decode Indicates whether the symbol was successfully decoded A or not F Symbol contrast Indicates if the contrast between the dark and light cells in the symbol is s...

Page 232: ... compared to all or a limited set of its neighbouring points The Operator Type defines which set of neighbouring points that shall be considered for example hori zontal vertical or diagonal neighbours Choose Horizontal to identify vertical patterns in an image and Vertical to identify horizontal patterns choose Four points or Eight points to identify smaller deviations of any form It is also possi...

Page 233: ... visual representation of the results Detail pixels are white Other pixels are black The image is by default stretched to fill the preview window Click the Fit to Window button to toggle between showing a stretched image and showing the image in its original size The stretching does not preserve the aspect ratio of the image It is only when showing the image in its original size that one pixel on ...

Page 234: ...anual to set the upper and lower thresholds yourself by dragging the threshold bars Choose an automatic mode when you know that the threshold level will shift from scan to scan You can use an automatic mode first to find suitable thresholds while configuring the tool and then switch to manual mode The manual thresholds are updated to the values found by the automatic method Using the automatic thr...

Page 235: ...e others because their areas are too small Blob list The blobs found with the current settings are listed below the image sorted according to the Sorting settings The number of blobs listed depends on the Max number of blobs in table setting Input Output Choose an image for the Blob Finder by typing the number of the Source bank that con tains the desired image Also choose a storage place for the ...

Page 236: ...is measured in pixels If holes are filled the examined area includes the holes Check the Discard edge blobs checkbox to ignore blobs that are partly outside the ROI or that are touching the border of the ROI If edge blobs are not discarded only the part of the blob inside the ROI is detected and compared with the Minimum blob area and Maximum blob area parameters Check the Fill Holes in Blobs chec...

Page 237: ...ents one pixel of the image Table Use the Table Index to set the starting position row number in the table for where the found blob centroids and areas are stored The default value is 1000 This is only an extra option All blobs are always stored internally and are thus accessible using the Blob Analyzer tool Storing in the table is intended for simple applications where only centroids and area are...

Page 238: ...n of Results the results are visuali zed in the Destination Bank If Display Centroid is enabled the centroid of the blobs will be displayed A ROI can be generated from the blob The blob ROI can be referred to in later steps by other tools This means that you can perform any analysis or filtering operation that takes a ROI as input and run it on the blob area of the picture only You can for instanc...

Page 239: ...a U shaped object The measured values are obtained by computing the diameter for all lines through the centroid of the blob starting and stopping at the two most distant points in the blob The Compute Blob Perimeter measure computes the length of the external perimeter of the blob Computing the perimeter length in a discrete image is an ambiguous task The measure returned by this function is fairl...

Page 240: ...equipped with wireless network IVC may be using the wrong network Solutions Try the following Check network connections The PC must be connected to the device either through a switch or directly with a crossover cable The IVC devices do not support wireless connections or connections through a hub Choose Options Æ Configuration Æ Ethernet Devices and check that the IP address shown in the dialog b...

Page 241: ...ment Do not run the device with F6 from IVC Studio In this mode there is a lot of communication between the device and IVC Studio e g images and this may disturb the PLC communica tion Try to start the device in standalone mode instead Choose Start Program from the context menu in the Device list Function LED is flashing Red Green Yellow and the camera cannot be accessed If the initialization of t...

Page 242: ...e may have run out of free flash memory blocks In this case the device needs to clear a previously used but now unused memory block before saving something that takes some time The execution time can in this case be shortened by manually clearing the unused memory Solution Check the amount of free memory on the device by right clicking the device in the device list and choosing Device Mana gement ...

Page 243: ...atically checking for updates 1 Start Acrobat 2 Choose Edit Æ Preferences from Acrobat s main menu The Preferences dialog box is displayed 3 Click on Updates in the list to the left 4 Acrobat 5 6 Choose Manually from the Check for Updates menu Acrobat 7 Select Do not automatically check for critical updates 5 Click OK to close the Preferences dialog box 6 4 Debugging Step Programs The results of p...

Page 244: ...status of the troubles hooting especially if it is before or after the point where the problem is reproducible Examples of content are Brief application description System configuration o Firmware version i e IVC version o Hardware type code and serial number o Network architecture Expected behavior Observed symptoms o What happens and how often does it happen How to reproduce step by step Log fil...

Page 245: ...ed to include a single quotation mark in a string preceed it with a backslash Hello she said Note If fractional values are used in expressions the decimal delimiter must always be a dot regardless of any local settings made on the PC Commas are always used in expressions for separating parameters The following operands are used for referring to table and parameter values Operand Meaning Vx Value i...

Page 246: ...or 3 1415 3 Ceil x The smallest integer that is larger than or equal to a decimal value For example Ceil 3 1415 4 Round x decimals Rounds off a value to a specified number of decimals Abs x Absolute value Deg x Conversion from radians to degrees Rad x Conversion from degrees to radians Min x y Minimum Max x y Maximum Equ x y Equality Not Logical not Bitwise and Bitwise or Not equal to Equal to Les...

Page 247: ... The number of characters in the string Eval str Evaluates the string as if it were an expression For example eval 1 2 3 returns 6 Str number A string representation of the number For example Str 1 23 returns the string 1 23 Repr number A string representation of the number that can be re evaluated to its original value For example Repr 1 23 returns the string 1 230000e 000 A 3 Time stamps It is p...

Page 248: ...his expression uses the first result from program step 3 S3R1 and a value from the table V 5 S2R1 Which table row to get the value from is calculated by using a result from program step 2 Assume that we have the following values Variable Value Result 1 from step 2 S2R1 7 Result 1 from step 3 S3R1 6 Row 35 in the table V35 2 The expression is resolved in the following way Not S3R1 V 5 S2R1 10 Not S...

Page 249: ...l restart the device Parameter category Parameter name Parameter explanation IP Specifies the IP address of the network interface It can be set manually or automatically through the DHCP if this protocol is enabled The number must be written in the following format aaa bbb ccc ddd The default value is 192 168 0 110 We recommend that the number 255 is not used for the four parts of the address in o...

Page 250: ... the SNTP protocol UDP port 123 The number must be written in the following format aaa bbb ccc ddd The default value is 0 0 0 0 In the event that this parameter is not necessary it should be set to 0 0 0 0 or an empty string DHCP Specifies if the DHCP is en abled The default value is 1 enabled The accepted values are 1 enabled 0 disabled If the DHCP client is enabled the following parame ters are ...

Page 251: ...n the system s flash memory enter ftp IP address_of device in the address bar of Internet Explorer and login with user name anonymous and pass word guest HTTP Server Enabled Specifies that access to a web page in flash memory is allowed when it is set to 1 This enables to monitor the selected parameters during runtime using the Web Status Page tool Communication Enabled Specifies if the Ethernet I...

Page 252: ...s are used for profiles Handling of invalid IP addresses The device verifies the IP address specified in the IP field If the value is invalid e g if an invalid character is entered in the field the device will set the default IP address 192 168 0 110 and activate the FTP server The FTP server is activated to allow direct access to the configuration files of the device The following addresses are n...

Page 253: ...os Bejarano Parc 119 C P I Las Quemadas 14014 Córdoba Tel 957 326 200 info fluitronic es Madrid Avda Vía Láctea 4 local 32 San Fernando de Henares 28830 Madrid Tel 910 562 969 Sevilla Avda Arquitectura 1 Torre 6 Pta 4 Mod 1 Parque Empresarial Torneo 41015 Sevilla Tel 954 186 840 ...

Reviews: