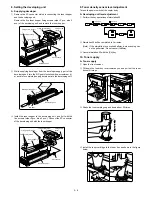


2. Secure the copier to the desk.
Use the included four mounting screws to securethe copier to the
desk.
•
In addition to securing the copier to the desk, these screws also
function to electrically ground the desk, so be sure to tighten all
four mounting screws securely.
3. Remove the rear coverlet of the copier.
Remove the mounting screw which holds the rear coverlet to the rear
cabinet panel, then remove the rear coverlet.
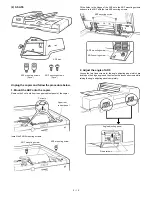
4. Connect the desk relay harness.
Remove the 14-pin connector harness from the clamp which bundles
the desk relay harness together.
Next, remove the temporary connector which is attached to the 14-pin
connector of the desk relay harness, and connect the 14-pin connec-
tor from the copier into the connector on the desk.
*
Note that the temporary connector will no longer be used.
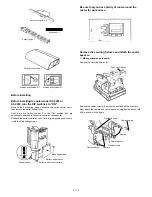
5. Remount the rear coverlet of the copier.
Return the rear coverlet to its original position and use its mounting
screw to mount it.
6. Secure the desk on the floor.
Turn clockwise the two adjusters at the lower front of the desk to
lower them to the floor and secure the desk in place.
Use the caster lock levers on the front side (right and left) of the desk
to lock the casters in place.
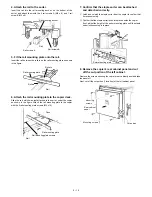
The cassette is factory set for A4 size paper (AB
series) or letter size paper (inch series). To change
to paper of another size, adjust the cassette in
accordance with the procedure described below.
Left side
Right side
Mounting screws
Mounting screws
Desk
Desk
Copier
Copier
Mounting screw
Rear coverlet
Rear cabinet panel
Clamp
03pin connector
Rear cabinet panel
Mounting screw
Rear coverlet
Caster
Caster lock lever
Adjuster
5 – 22
Summary of Contents for SF-2040
Page 27: ...9 Desk unit SF D23 11 12 16 17 13 18 10 9 8 7 6 2 5 4 3 1 23 21 22 19 20 14 15 4 10 ...
Page 63: ...5 5 C F 10 D 7 6 11 G E 8 9 H 12 6 2 ...
Page 65: ...3 B 3 E 13 C 4 5 6 7 8 F 14 D 10 11 9 6 4 ...
Page 67: ...2 1 3 A D 9 8 11 10 B 4 5 E 12 13 14 C 7 6 6 6 ...
Page 69: ...A a 1 1 D 4 4 B 1 b 1 1 E 5 5 7 6 8 9 8 5 C 2 3 3 F 5 11 12 6 8 ...
Page 71: ...1 2 3 3 4 5 A D 13 11 10 7 6 6 7 B E 14 8 12 9 C F 15 G 16 16 6 10 ...
Page 73: ...A a 1 D 11 10 10 9 8 B 4 2 3 E 13 12 12 C 5 7 6 7 6 12 ...
Page 75: ...C 4 F 9 9 9 10 9 5 6 D G 11 E 8 7 6 14 ...
Page 78: ...Volume PWB 8 9 10 10 6 17 ...
Page 80: ...C 5 F 11 P D F R 7 6 6 12 13 G 12 13 E 8 9 a 8 H 14 6 19 ...