


(2) SF-A55
Unplug the copier and follow the procedure below.
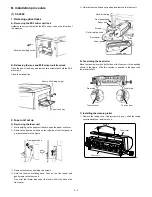
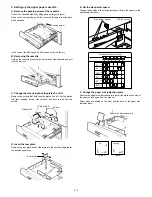
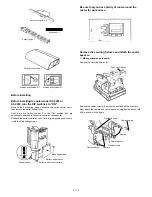
1. Mount the ADF onto the copier.
Remove the 2 cut-outs from the upper cabinet panel of the copier.
Install the 2 ADF mounting screws.
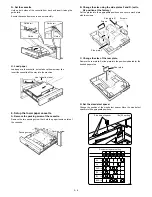
Fit the holes in the hinges of the ADF onto the ADF mounting screws
and secure the ADF with the two ADF securing screws.
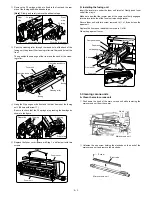
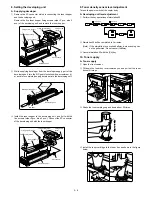
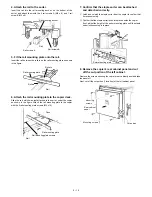
2. Adjust the angle of ADF.
Loosen the two fixed screws for the angle adjusting panel which are
located on the hinge angle and then fasten the loosened screws while
raising the angle adjusting panel completely.
ADF tray
ADF mounting screws
(2pcs.)
ADF securing screws
(2pcs.)
Cut-outs
Upper rear
cabinet panel
ADF mounting screw
ADF mounting screw
ADF securing screw
ADF securing screw
ADF mounting screw
Angle adjusting panel
Fixed screws
5 – 10
Summary of Contents for SF-2040
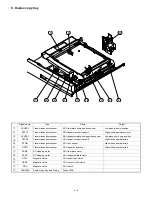
Page 27: ...9 Desk unit SF D23 11 12 16 17 13 18 10 9 8 7 6 2 5 4 3 1 23 21 22 19 20 14 15 4 10 ...
Page 63: ...5 5 C F 10 D 7 6 11 G E 8 9 H 12 6 2 ...
Page 65: ...3 B 3 E 13 C 4 5 6 7 8 F 14 D 10 11 9 6 4 ...
Page 67: ...2 1 3 A D 9 8 11 10 B 4 5 E 12 13 14 C 7 6 6 6 ...
Page 69: ...A a 1 1 D 4 4 B 1 b 1 1 E 5 5 7 6 8 9 8 5 C 2 3 3 F 5 11 12 6 8 ...
Page 71: ...1 2 3 3 4 5 A D 13 11 10 7 6 6 7 B E 14 8 12 9 C F 15 G 16 16 6 10 ...
Page 73: ...A a 1 D 11 10 10 9 8 B 4 2 3 E 13 12 12 C 5 7 6 7 6 12 ...
Page 75: ...C 4 F 9 9 9 10 9 5 6 D G 11 E 8 7 6 14 ...
Page 78: ...Volume PWB 8 9 10 10 6 17 ...
Page 80: ...C 5 F 11 P D F R 7 6 6 12 13 G 12 13 E 8 9 a 8 H 14 6 19 ...