


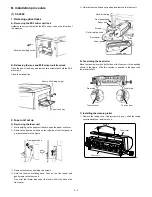
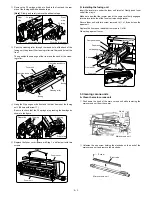


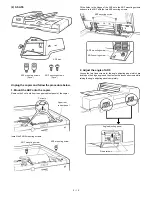


8. Setting the developing unit
A. Supplying developer
1
Remove the 5P connector which is connecting the toner hopper
and the developing unit.
Remove the five toner hopper fixing screws (silver 3 pcs., blue 2
pcs.) of the developing unit, and remove the toner hopper.
2
While supplying developer from the developer supply port of the
developing unit, turn the MG gear clockwise with a screwdriver (+)
or a scale to completely supply developer into the developing unit.
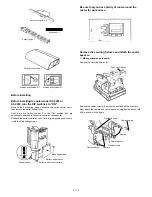
3
Install the toner hopper to the developing unit, and fix it with the
five screws (silver 3pcs., blue 2 pcs.). Connect the 5P connecter
of the developing unit with the toner hopper.
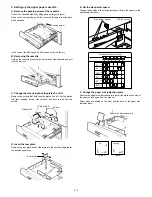
9. Toner density sensor level adjustment
Turn on the power switch of the copier body.
A. Developing unit level adjustment
1
Perform the key operations of simulation 25.
2
Simulation 25 will be completed in 3 minutes.
(Note) If the simulation is cancelled halfway, auto scanning can-
not be performed. Do not cancel it halfway.
3
Cancel simulation 25 with the [CA] key.
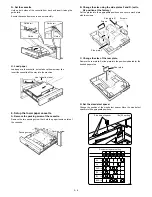
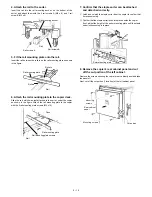
10. Toner supply
A. Toner supply
1
Open the front cabinet.
2
Tilt down the toner box lever towards you and pull out the toner
box until it stops.
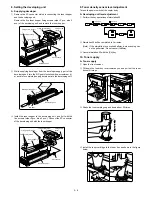
3
Shake the toner cartridge up and down about 20 times.
4
Install the toner cartridge to the toner box as shown in the figure
below.
5P connector
Developing unit
Fixing screw (silver)
Fixing screws (silver)
Toner hopper
Fixing screws (blue)
Fixing screw
(blue)
Developer supply port
Developer
Developing unit
MG gear
Fixing screw (silver)
Fixing screw (silver)
Fixing screw (blue)
Fixing screw
(blue)
Toner hopper
Developing unit
5P connector
C
0 /
2
5
2
Interruption
Interruption
Copy
Copy
Toner box lever
5 – 8
Summary of Contents for SF-2040
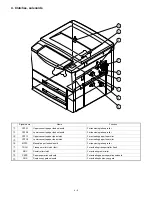
Page 27: ...9 Desk unit SF D23 11 12 16 17 13 18 10 9 8 7 6 2 5 4 3 1 23 21 22 19 20 14 15 4 10 ...
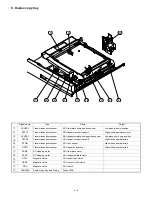
Page 63: ...5 5 C F 10 D 7 6 11 G E 8 9 H 12 6 2 ...
Page 65: ...3 B 3 E 13 C 4 5 6 7 8 F 14 D 10 11 9 6 4 ...
Page 67: ...2 1 3 A D 9 8 11 10 B 4 5 E 12 13 14 C 7 6 6 6 ...
Page 69: ...A a 1 1 D 4 4 B 1 b 1 1 E 5 5 7 6 8 9 8 5 C 2 3 3 F 5 11 12 6 8 ...
Page 71: ...1 2 3 3 4 5 A D 13 11 10 7 6 6 7 B E 14 8 12 9 C F 15 G 16 16 6 10 ...
Page 73: ...A a 1 D 11 10 10 9 8 B 4 2 3 E 13 12 12 C 5 7 6 7 6 12 ...
Page 75: ...C 4 F 9 9 9 10 9 5 6 D G 11 E 8 7 6 14 ...
Page 78: ...Volume PWB 8 9 10 10 6 17 ...
Page 80: ...C 5 F 11 P D F R 7 6 6 12 13 G 12 13 E 8 9 a 8 H 14 6 19 ...