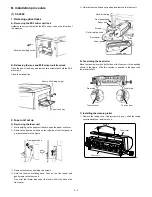


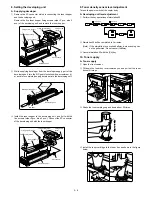


9. Attach the sorter connectors.
Loosely screw in one of the two supplied bracket screws in the posi-
tion shown in the figure.
Hook the bottom of the bracket in place over this screw, then insert
the other screw into the top of the bracket and tighten both screws
securely.
[A]
Disconnect the 6-pin and 10-pin connectors from the main
copier unit.
[B]
Connect the sorter’s 6-pin and 10-pin connectors to the copier’s
6-pin and 10-pin connectors. Then insert the clasp of the tie
band into the hole on the bottom of the mounting plate for the
circuit board.
•
Step [A] is only required for models SF-2025 and SF-2030.
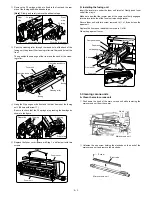
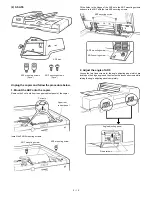
10. Reattach the rear cabinet panel.
Reattach the rear cabinet panel in its original position with the mount-
ing screws.
11. Affix the stapling location labels.
Affix the stapling location labels to the copier and RADF as shown in
the figure.
★
Copier
★
RADF
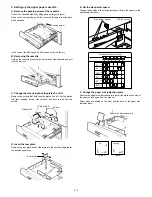
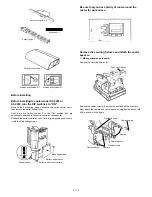
12. Affix the green label.
Lifting up on the staple sorter’s release lever, separate the sorter from
the copier.
Next, affix the green label to the paper output section handle as
shown in the figure.
Holding the staple sorter’s release lever, return the sorter to its
original position. At this time, confirm that the staple sorter locks
securely into place beside the copier.
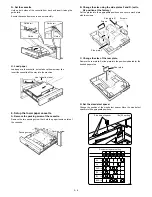
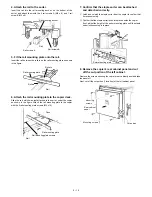
Plug the copier’s power cord into an electric outlet,
switch on the power, and then perform the
following procedure.
13. Set the mode.
•
Perform the following key operations on the copier to set the
mode.
Performing the above operation will cause the current setting to
be displayed.
•
If only the SF-S53 is being set, continue by performing the follow-
ing key operation to complete the mode setting.
Bracket screws
Bracket
10-pin connector
6-pin
connector
Tie band
Bracket
screws
Mounting
screws
Rear cabinet
panel
Mounting screws
Green label
Paper output section handle
Staple sorter
C
0 /
6
2
1
0 /
0 /
1
5 – 16
Summary of Contents for SF-2040
Page 27: ...9 Desk unit SF D23 11 12 16 17 13 18 10 9 8 7 6 2 5 4 3 1 23 21 22 19 20 14 15 4 10 ...
Page 63: ...5 5 C F 10 D 7 6 11 G E 8 9 H 12 6 2 ...
Page 65: ...3 B 3 E 13 C 4 5 6 7 8 F 14 D 10 11 9 6 4 ...
Page 67: ...2 1 3 A D 9 8 11 10 B 4 5 E 12 13 14 C 7 6 6 6 ...
Page 69: ...A a 1 1 D 4 4 B 1 b 1 1 E 5 5 7 6 8 9 8 5 C 2 3 3 F 5 11 12 6 8 ...
Page 71: ...1 2 3 3 4 5 A D 13 11 10 7 6 6 7 B E 14 8 12 9 C F 15 G 16 16 6 10 ...
Page 73: ...A a 1 D 11 10 10 9 8 B 4 2 3 E 13 12 12 C 5 7 6 7 6 12 ...
Page 75: ...C 4 F 9 9 9 10 9 5 6 D G 11 E 8 7 6 14 ...
Page 78: ...Volume PWB 8 9 10 10 6 17 ...
Page 80: ...C 5 F 11 P D F R 7 6 6 12 13 G 12 13 E 8 9 a 8 H 14 6 19 ...