


55
1.
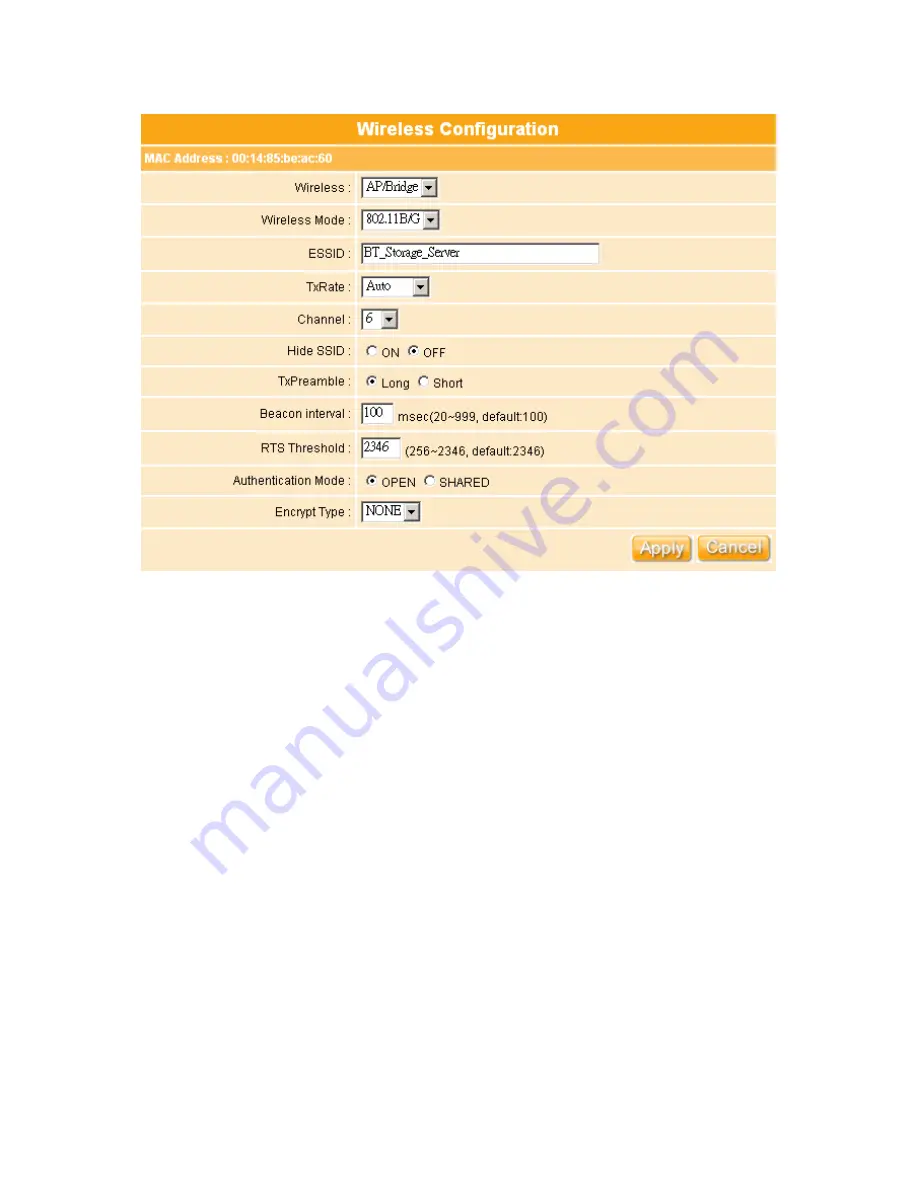
Wireless:
Select
AP/Bridge
or
WDS
to allow or disallow the wireless operation.
2.
Wireless Mode:
This field indicates the 802.11g interface mode.
802.11G
prevents
the 802.11b clients from accessing the router.
802.11B/G
allows both 802.11b and
802.11g clients to access the router.
802.11B
will enable the network as an 802.11b
wireless network. By default, the mode is
802.11B/G
.
3.
ESSID:
You can use the default ESSID and radio channel unless more than one NES
Storage Server with BT or access point is deployed in the same area. Under this
situation, it is advised that you should use a different ESSID and radio channel for
each of NES Storage Server with BT or access point in order to distinguish from each
other. All of NES Storage Server with BTs and your wireless LAN cards must have the
same ESSID to extend the coverage of your wireless network and allow a wireless
mobile client roaming in between. By default, the ESSID is set to
Storage_Server_Router
.
4.
TxRate:
Select the transmission rate for the network. The default setting is
Auto.
5.
Channel:
IEEE 802.11g and 802.11b devices are direct sequence spread spectrum
devices that spread a radio signal over a range of frequencies. The range of
frequencies used by a direct sequence device is called Channel. The 802.11g and
802.11b specification supports up to 14 overlapping Channels for radio communication.
But only 11 Channels are supported in the United States and therefore built-in on NES
Summary of Contents for WE-1530
Page 1: ...1 ...
Page 15: ...15 Step 1 Go to Start Settings Network Connections and then select Local Area Connection ...
Page 16: ...16 Step 2 Click on Properties Step 3 Double click on Internet Protocol TCP IP ...
Page 19: ...19 ...
Page 67: ...67 ...
Page 77: ...77 Step 2 Fill in blank address field with 192 168 1 1 ...
Page 92: ...92 ...
Page 97: ...97 Step 2 Click on Add a printer item ...
Page 114: ...114 ...
Page 116: ...116 ...
Page 165: ...165 ...
Page 190: ...190 ...
Page 194: ...194 Each block shows configuration status you may click Refresh to update the screen list ...
Page 215: ...215 ...
Page 282: ...282 Step 2 Fill in the form as required and then click on Create Account button ...
Page 284: ...284 Step 5 Click on login Step 6 Click My Services after logging in ...
Page 285: ...285 Step 7 Click Add New Hostname Step 8 Please click on Add Dynamic DNS Host ...


