2-10
Chapter 2 Maintenance
Adjustment
Procedure
1.
[DC956] Enter
DC956
Belt Edge Learn and click [Execute].
• When completed successfully, the [DC956 Edge Learn Table Created Successfully]
screen will appear.
• When not completed successfully, the [DC956 Edge Learn Table Not Created
Successfully.] screen will appear. Perform DC956 again in such a case.
In case that [Table Not Created Successfully] appears even if repeating the process
many times, repair the trouble on the Belt Controls, since there is a high possibility of
trouble occurring on the Belt Controls.
2.
[DC685-1]: Enter
DC685
-1 Skew Fine SetUP and click [Execute].
• When working normally: if it is determined to be OK, go to Step 3.
• When not working normally: if it is determined to be NG, go to Step 9 to perform
DC685-4.
3.
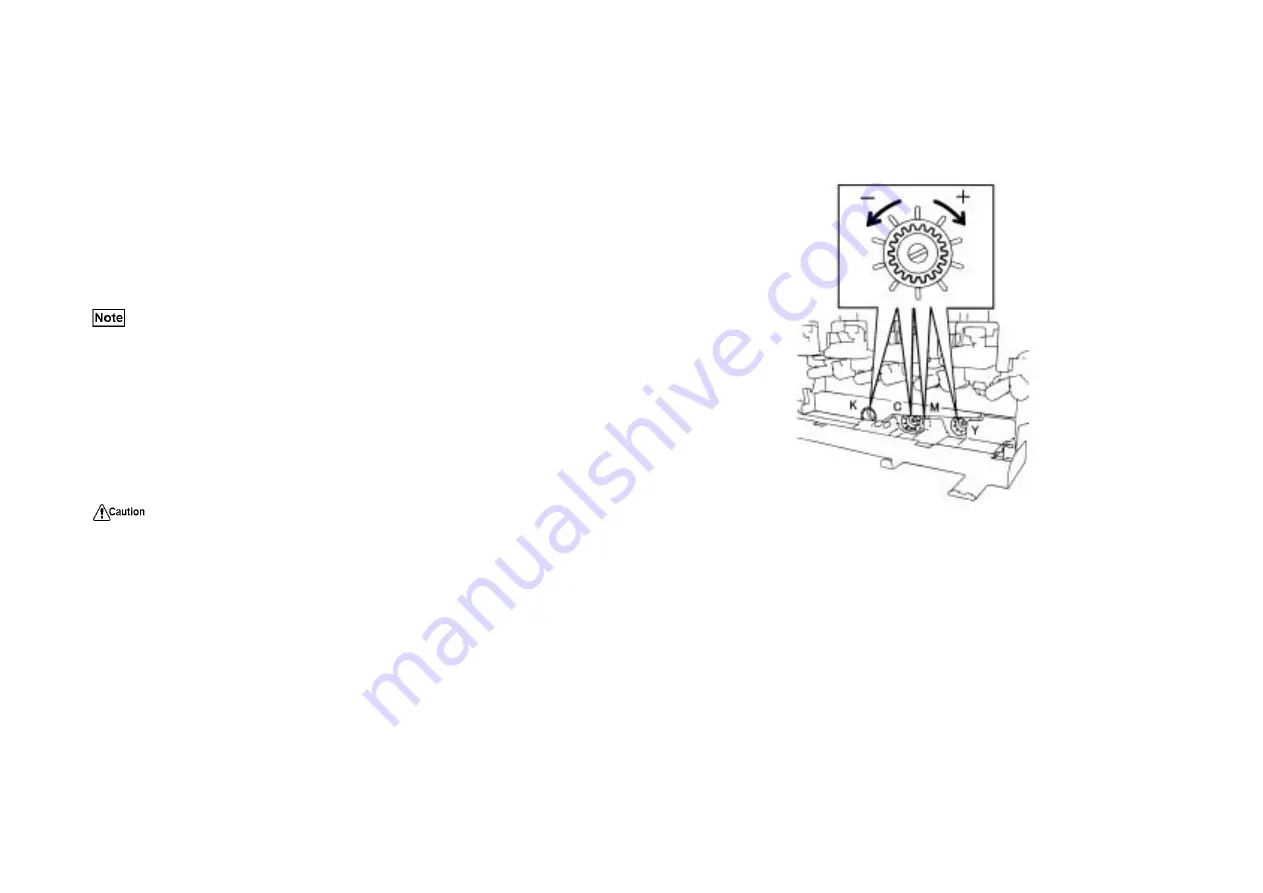
[DC685-1] Rotate the Screw with the Adjust screw as many times as necessary. Refer to
Fig. 2.
The UI on PSW indicates the rotation amount and direction of the LSU (ROS) skew
adjustment screw. The number indicates the rotation amount, + meaning to turn the screw
clockwise, and - meaning to turn it counter--clockwise.
For adjustment quantity, one click of the adjustment screw (rotate it until it makes a click
sound) is equivalent to 0.05 in number. One rotation is equivalent to 20 clicks.
When the number that cannot be divided by 0.05 is displayed, round it up to 0.05 to reduce
the variation, and rotate the screw for as many times as the numbers rounded up.
E.g.
When 1.08, 1.09, 1.11, 1.12: make 22 clicks as they are rounded up to 1.10.
When 1.13, 1.14, 1.16, 1.17: make 23 clicks as they are rounded up to 1.15.
(Fig. 2)
(1) Open the Front Cover and remove the collection bottle.
(2) Adjust the adjustment quantity read from the UI display with the adjustment screw.
(3) Return the collection bottle and cheat the Interlock.
(Fig. 2) j0mf40951
Enter DC685 with the Front Cover opened (Interlock is cheated).
Perform the following in order to avoid laser exposure.
Make sure to set the collection bottle when instructing the print after cheating the
Front Cover Interlock.
Summary of Contents for DP-C321
Page 4: ...This page is intentionally left blank ...
Page 5: ...Chapter 1 General ...
Page 22: ...1 16 Chapter 1 General 1 3 Type of Paper ...
Page 23: ...1 17 Chapter 1 General ...
Page 24: ...Chapter 2 Maintenance ...
Page 63: ...Chapter 3 Troubleshooting ...
Page 118: ...3 44 Chapter 3 Troubleshooting I F PWB PL9 1 MCU PWB PL13 1 ...
Page 445: ...Chapter 4 Parts List ...
Page 548: ......


