APPLIED OPERATIONS
/Image Acquisition
OPERATION INSTRUCTIONS
2 - 3 5
Page
1 Setting the Z-direction scanning range
While acquiring image, move the Z stage according to the range of the multiple sections to
be observed (i.e. the Z-direction scanning range).
From the panel page tabs shown on the bottom right of the [Acquire] panel, select the [Z
Stage] sub-panel.
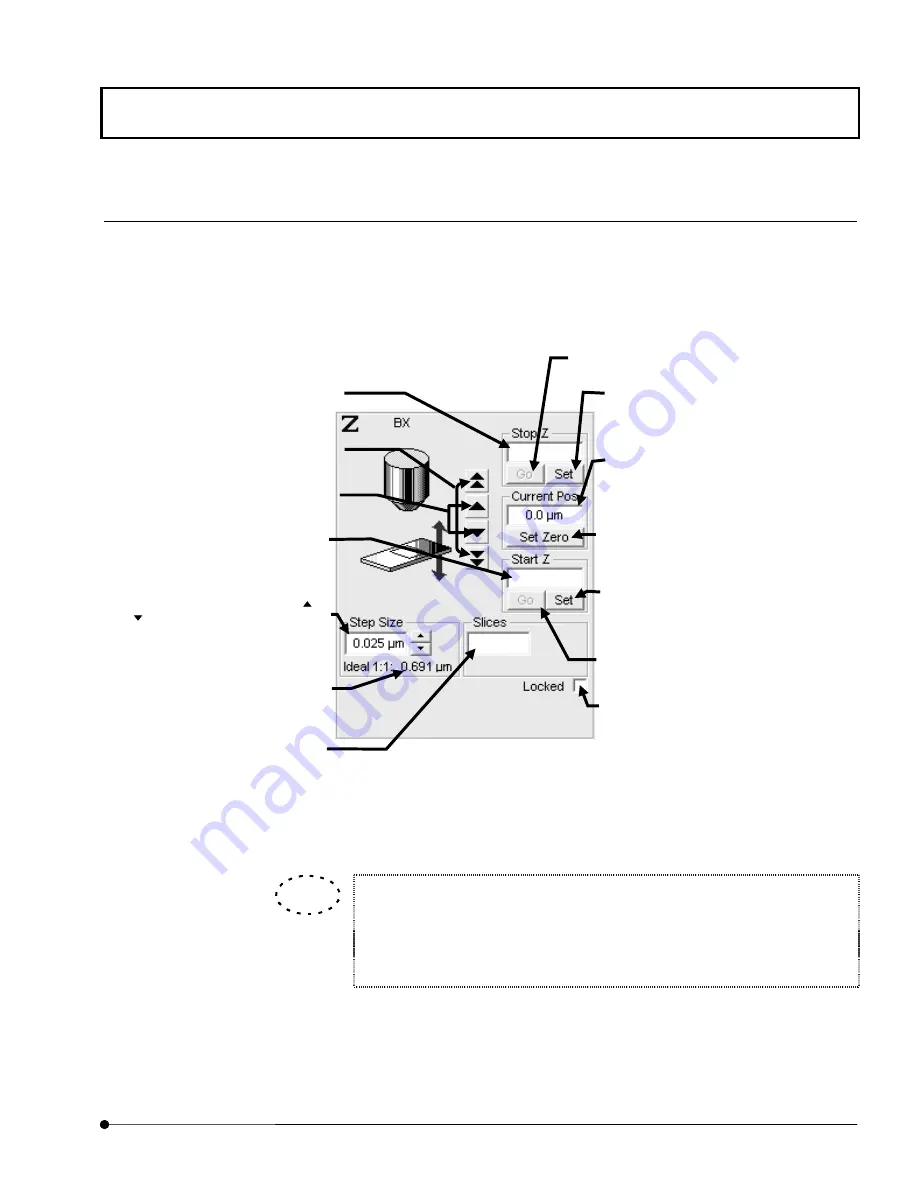
Fig. 2-13 [Z Stage] Sub-panel
The moving amount assigned to the <Z stage fine adjustment> and <Z stage
coarse adjustment> buttons can be changed.
See section 1-3 in MAINTENANCE, “Setting the System Configuration” for
detailed operations.
1.
Check the [Locked] check box in the [Z Stage] sub-panel.
<Z stage fine adjustment> buttons
Displaces the Z stage on a fine
scale.
<Z stage coarse adjustment> buttons
Displaces the Z stage on a large scale.
[Current Pos] text box
Shows the current position of the stage.
<Set Zero> button
Sets the current stage position as the
home position. Pressing this button also
clears the [Stop Z] and [Start Z] values.
When stage movement takes time, it
changes to <Stop> button. By pressing
<Stop> button, the move stops.
[Stop Z] text box
Shows the scan stop position in the
range of the observed cross-section (Z-
direction scanning range).
[Start Z] text box
Shows the scan start position in the
range of the observed cross-section (Z-
direction scanning range).
<Set> button
Sets the current stage position as the
scanning start position of the range of the
observed cross-section (Z-direction
scanning range).
<Set> button
Sets the current stage position as the
scanning stop position of the range of
the observed cross-section (Z-direction
scanning range).
[Slices] text box
Shows the number of images acquired.
This number can also be input directly
from the keyboard. Under text box, it
displays max. number of slices that can
be acquired with use of physical
memory only available at that time.
[Step Size] text box
Set the number of steps using the <
>
or <
> button. This number can also
be input directly from the keyboard.
<Go> button
Moves to the set scanning stop position. Use
this button to check the scanning stop position.
[Locked] check box
Z-motor is engaged by checking this box.
Recommended step size
Shows the number of steps calculated
by the system so that the scale of depth
in the Z-direction of the acquired image
is identical to the scale of the plane in
the X- and Y-directions.
TIP
<Go> button
Moves to the set scan start position. Use
this button to check the scan start position.


