2
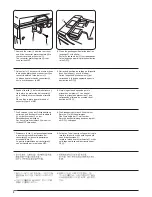
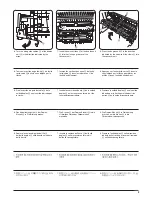
3. DP
A
のヒンジ部の穴
2
にピン
B
をは
め込み手前にスライドさせて、複写機また
はMFP(プリンタ標準機)本体にDP
A
を
のせる。
4. DP
A
をTPタップタイトクロメートビス
M4x10
C
2本および手順1で取り外した
ビス
1
2本で固定する。
5. DP
A
を閉じ、右ヒンジの後側から固定金
具
D
をはめ込み、TPブロンズビス
M3x06
E
2本で固定する。
6. DP
A
のケーブル
3
を本体に接続する。
※ 必ずコネクタ両側の固定ツマミを締め付け
てください
2
2
B
B
A
1
C
C
1
A
D
E
3
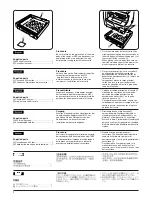
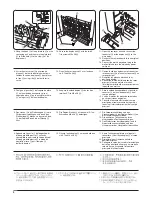
3. Place the DP
A
on the main body of the
copier or MFP by fitting the pins
B
into the
holes
2
at the hinge sections of the DP
A
and sliding them toward the front side.
4. Secure the DP
A
with the two TP Taptite
chromate screws M4 x 10
C
and the two
screws
1
that have been removed in step
1.
5. Close the DP
A
, fit the fixing fitting
D
from
the rear side of the right hinge, and secure it
with the two bronze TP screws M3 x 06
E
.
6. Connect the cable
3
of the DP
A
to the
main body.
* Be sure to tighten the fixing screws on both
sides of the connector.
3. Placez le DP
A
sur le corps principal du
copieur ou du MFP en fixant les goupilles
B
dans les trous
2
aux sections des
charnières du DP
A
et en les faisant glisser
vers l'avant.
4. Fixez le DP
A
avec les deux Vis chromées
taptite TP M4 x 10
C
et les deux vis
1
que
vous aviez enlevées auparavant à l'étape 1.
5. Fermez le DP
A
, placez la fixation
D
à
l'arrière de la charnière droite, et fixez-la
avec les deux vis TP en bronze M3 x 06
E
.
6. Connectez le câble
3
du DP
A
au corps
principal.
* Veillez à serrer les vis de fixation sur les
deux côtés du connecteur.
3. Instale el DP
A
en el cuerpo principal de la
copiadora o MFP introduciendo los
pasadores
B
en los orificios
2
en las
secciones de bisagra del DP
A
y
deslizándolos hacia el lado delantero.
4. Asegure el DP
A
con los dos tornillos
cromado Taptite TP M4 x 10
C
y los dos
tornillos
1
quitados en el paso 1.
5. Cierre el DP
A
introduciendo el herraje de
fijación
D
del lado trasero de la bisagra
derecha y asegúrelo con los dos tornillos TP
de bronce M3 x 06
E
.
6. Conecte el cable
3
del DP
A
en el cuerpo
principal.
* Asegúrese de apretar los tornillos de fijación
en ambos lados del conector.
3. Den DP
A
auf die Haupteinheit des
Kopierers oder MFP setzen; dabei die
Zylinderschrauben
B
in die Löcher
2
an
den Scharnierteilen des DP
A
einführen
und zur Vorderseite schieben.
4. Den DP
A
mit den zwei TP-Taptite-
Chromschrauben M4 x 10
C
und den in
Schritt 1 entfernten zwei Schrauben
1
befestigen.
5. Den DP
A
schließen, den
Montagebeschlag
D
von der Rückseite des
rechten Scharniers aus anbringen und mit
den zwei Bronze-TP-Schrauben M3 x 06
E
befestigen.
6. Das Kabel
3
des DP
A
an die
Haupteinheit anschließen.
* Die Befestigungsschrauben auf beiden
Seiten des Steckverbinders anziehen.
3. Collocare il DP
A
sul corpo principale della
copiatrice o dell’MFP inserendo i perni
B
nei fori
2
delle sezioni di giuntura del DP
A
e farli scorrere verso il lato anteriore.
4. Fissate il DP
A
a mezzo delle due viti
cromata TP Taptite M4 x 10
C
e delle due
viti
1
che sono state rimosse nel passo 1.
5. Chiudere il DP
A
, montare l’accessorio di
fissaggio
D
dal lato posteriore della
giuntura destra e fissarlo con le due viti TP
M3 x 06 in bronzo
E
.
6. Collegare il cavo
3
del DP
A
al corpo
principale.
* Accertarsi di stringere le viti di fissaggio su
entrambi i lati del connettore.
Summary of Contents for d-Copia 1600
Page 1: ...SERVICE MANUAL Published in October 2005 842HB110 First Edition d Copia 1600 d Copia 2000...
Page 3: ...Revision history Revision Date Replaced pages Remarks...
Page 4: ...This page is intentionally left blank...
Page 10: ...This page is intentionally left blank...
Page 14: ...2HA 2HB 1 4 30 This page is intentionally left blank...
Page 20: ...2HA 2HB 1 4 30 This page is intentionally left blank...
Page 126: ...2HA 2HB 1 4 30 This page is intentionally left blank...
Page 162: ...2HA 2HB 1 4 30 This page is intentionally left blank...
Page 180: ...2HA 2HB 1 4 30 This page is intentionally left blank...
Page 213: ...INSTALLATION GUIDE FOR THE 300 SHEET CASSETTE...
Page 220: ...INSTALLATION GUIDE FOR THE DOCUMENT PROCESSOR...
Page 231: ...INSTALLATION GUIDE FOR THE DUPLEX UNIT...
Page 239: ...INSTALLATION GUIDE FOR THE Printing System X...
Page 242: ......


