1
A
A
2005.10
303KC56710
Printing System(X)安装手册
Printing System (X)
設置手順書
English
Français
日本語
简体中文
Español
Deutsch
Italiano
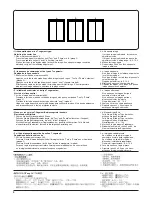
付属部品
A プリンタボード ................. 1
取り付け作業を行う前には、
必ず複写機本体
の電源スイッチを OFF にし、電源プラグを抜
いてから作業すること。
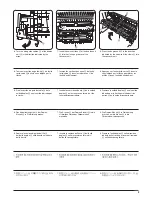
プリンタボードの取り付け
1. ビス
(1)
2 本を外し、
カバー(2)
を取り外
す。
2. プリンタボード(A)を奥まで挿入し、
手順
1 で取り外したビス
(1)
2 本で固定する。
附属品
A 打印板 ......................... 1
在安装作业之前,必须切断 (OFF) 复印机主
机的电源开关,并拔下电源插头后再进行操
作。
安装打印板
1. 卸下 2 颗螺钉 (1),然后卸下盖板 (2)。
2. 将打印板 (A) 插入到底,用步骤 1 卸下的
2 颗螺钉 (1) 加以固定。
INSTALLATION GUIDE FOR
THE Printing System (X)
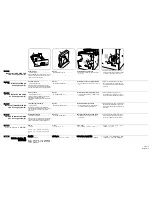
Supplied part
A Printer board ................................... 1
Before installing the printing system, turn the
copier’s power switch OFF and unplug the
copier from the power supply.
Installing the printer board
1. Remove two screws (1) and remove the
cover (2).
2. Insert the printer board (A) all the way
into the slot and secure it with two screws
(1) that have been removed in step 1.
GUIDE D’INSTALLATION DU
Printing System (X)
Contenu standard
A Carte d’imprimante........................... 1
Avant d’installer le système d’impression,
mettre le copieur hors tension à l’interrupteur
principal et le débrancher de la prise secteur.
Installation de la carte d’imprimante
1. Oter les deux vis (1) et retirer le couvercle
(2).
2. Insérer la carte d’imprimante (A) à fond
dans la fente et la fixer à l’aide de deux
vis (1) qui avaient été retirées auparavant
à l’étape 1.
GUIA DE INSTALACION PARA
EL Printing System (X)
Índice general
A Tarjeta de impresora ........................ 1
Antes de instalar el sistema de impresión,
apague la fotocopiadora a OFF y
desenchufe la fotocopiadora del suministro
eléctrico.
Instalación de la tarjeta de impresora
1. Quite los dos tornillos (1) y desmonte la
cubierta (2).
2. Inserte la tarjeta de impresora (A)
completamente en la ranura y asegure
con los tornillos (1) quitados en el paso 1.
INSTALLATIONSANLEITUNG
FUR Printing System (X)
Lieferumfang (Standard)
A Druckerkarte .................................... 1
Bevor Sie das Drucksystem installieren,
schalten Sie den Netzschalter des Kopierers
aus, und trennen Sie den Kopierer vom
Stromnetz.
Installieren der Druckerkarte
1. Die zwei Schrauben (1) herausdrehen,
und die Abdeckung (2) abnehmen.
2. Die Druckerkarte (A) bis zum Anschlag in
den Steckplatz einschieben und mit den
in Schritt 1 entfernten zwei Schrauben (1)
befestigen.
GUIDA ALL’INSTALLAZIONE
PEL Printing System (X)
Dotazione standard
A Scheda stampante ........................... 1
Prima di eseguire il montaggio del sistema di
stampa, spegnere l’interruttore principale e
sfilare la spina della copiatrice dalla presa.
Montaggio della scheda stampante
1. Rimuovere le due viti (1) per togliere il
pannello (2).
2. Inserire la scheda stampante (A) fino in
fondo nello slot e fissarla con le due viti
(1) che sono state rimosse nel passo 1.
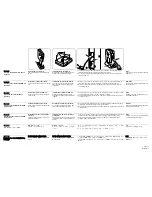
オプション
B USB インタフェース IB-110 .......1
选购件
B USB 接口 IB-110 .................1
Option
B USB interface IB-110 ........................1
Option
B Interface USB IB-110........................1
Opción
B Interfaz USB IB-110..........................1
Option
B USB-Schnittstelle IB-110 ..................1
Opzione
B Interfaccia USB IB-110 ....................1
B
1
2
Summary of Contents for d-Copia 1600
Page 1: ...SERVICE MANUAL Published in October 2005 842HB110 First Edition d Copia 1600 d Copia 2000...
Page 3: ...Revision history Revision Date Replaced pages Remarks...
Page 4: ...This page is intentionally left blank...
Page 10: ...This page is intentionally left blank...
Page 14: ...2HA 2HB 1 4 30 This page is intentionally left blank...
Page 20: ...2HA 2HB 1 4 30 This page is intentionally left blank...
Page 126: ...2HA 2HB 1 4 30 This page is intentionally left blank...
Page 162: ...2HA 2HB 1 4 30 This page is intentionally left blank...
Page 180: ...2HA 2HB 1 4 30 This page is intentionally left blank...
Page 213: ...INSTALLATION GUIDE FOR THE 300 SHEET CASSETTE...
Page 220: ...INSTALLATION GUIDE FOR THE DOCUMENT PROCESSOR...
Page 231: ...INSTALLATION GUIDE FOR THE DUPLEX UNIT...
Page 239: ...INSTALLATION GUIDE FOR THE Printing System X...
Page 242: ......

