2HA/2HB
1-2-9
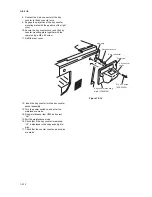
5. Remove the two screws and open the power
source PWB in the direction indicated by the
arrow.
Take care not to open the power source
PWB too much.
6. Fit the wire of the drawer heater into the
groove of the frame and put it inside the
power source PWB.
Fit the wire into the groove so that the band
mounted to the wire is located above the
frame.
Figure 1-2-9
7. Reattach the power source PWB to its origi-
nal position and connect the connector of
the drawer heater to YC8 of the power
source PWB.
8. Refit all the removed parts.
Figure 1-2-10
Power source PWB
Wire of the drawer heater
Band
YC8
Connector
Summary of Contents for d-Copia 1600
Page 1: ...SERVICE MANUAL Published in October 2005 842HB110 First Edition d Copia 1600 d Copia 2000...
Page 3: ...Revision history Revision Date Replaced pages Remarks...
Page 4: ...This page is intentionally left blank...
Page 10: ...This page is intentionally left blank...
Page 14: ...2HA 2HB 1 4 30 This page is intentionally left blank...
Page 20: ...2HA 2HB 1 4 30 This page is intentionally left blank...
Page 126: ...2HA 2HB 1 4 30 This page is intentionally left blank...
Page 162: ...2HA 2HB 1 4 30 This page is intentionally left blank...
Page 180: ...2HA 2HB 1 4 30 This page is intentionally left blank...
Page 213: ...INSTALLATION GUIDE FOR THE 300 SHEET CASSETTE...
Page 220: ...INSTALLATION GUIDE FOR THE DOCUMENT PROCESSOR...
Page 231: ...INSTALLATION GUIDE FOR THE DUPLEX UNIT...
Page 239: ...INSTALLATION GUIDE FOR THE Printing System X...
Page 242: ......


