2HA/2HB
1-5-27
1-5-6 Transfer section
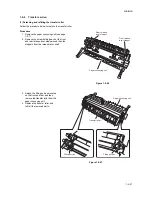
(1) Detaching and refitting the transfer roller
Follow the procedure below to replace the transfer roller.
Procedure
1. Remove the paper conveying unit (see page
1-5-7).
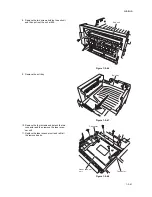
2. Remove the screw holding each of the front
and rear release lever stoppers and then the
stoppers from the release lever shaft.
Figure 1-5-56
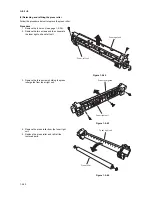
3. Detach the fitting portions located
on the front and rear and then
remove the transfer roller from the
paper conveying unit.
4. Replace the transfer roller and
refit all the removed parts.
Figure 1-5-57
Paper conveying unit
Rear release
lever stopper
Front release
lever stopper
Transfer roller
Fitting portion
Fitting portion
Paper conveying unit
Summary of Contents for d-Copia 1600
Page 1: ...SERVICE MANUAL Published in October 2005 842HB110 First Edition d Copia 1600 d Copia 2000...
Page 3: ...Revision history Revision Date Replaced pages Remarks...
Page 4: ...This page is intentionally left blank...
Page 10: ...This page is intentionally left blank...
Page 14: ...2HA 2HB 1 4 30 This page is intentionally left blank...
Page 20: ...2HA 2HB 1 4 30 This page is intentionally left blank...
Page 126: ...2HA 2HB 1 4 30 This page is intentionally left blank...
Page 162: ...2HA 2HB 1 4 30 This page is intentionally left blank...
Page 180: ...2HA 2HB 1 4 30 This page is intentionally left blank...
Page 213: ...INSTALLATION GUIDE FOR THE 300 SHEET CASSETTE...
Page 220: ...INSTALLATION GUIDE FOR THE DOCUMENT PROCESSOR...
Page 231: ...INSTALLATION GUIDE FOR THE DUPLEX UNIT...
Page 239: ...INSTALLATION GUIDE FOR THE Printing System X...
Page 242: ......

