background image

d-Color MF651/551/451

7-9

7.1

System Settings

7

7.1.6

Restrict User Access

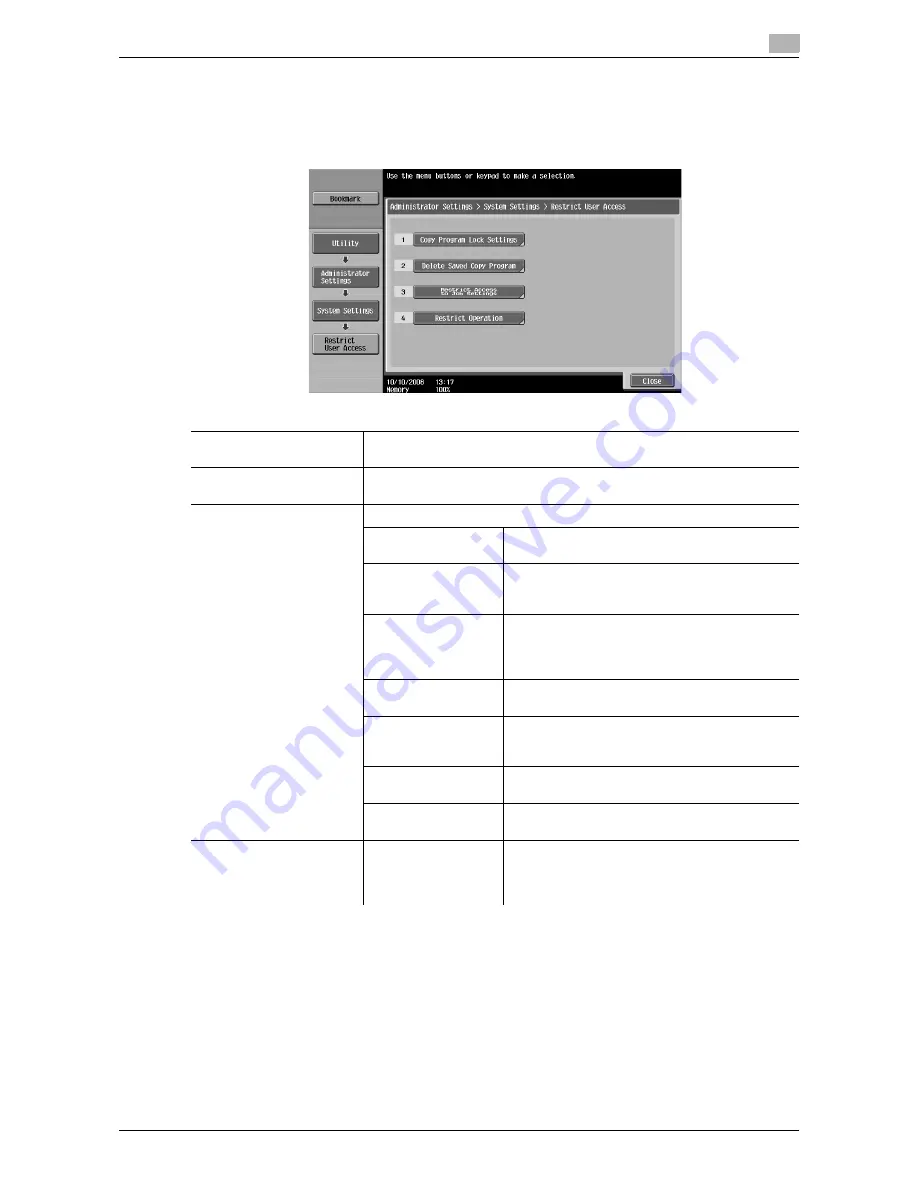
Restrict the machine operation, or change or delete the copy programs by the user.

%

Press the [Utility/Counter] key 

ö

 [Administrator Settings] 

ö

 [System Settings] 

ö

 [Restrict User 

Access].

Settings

Copy Program Lock Set-
tings

Configure the registered copy programs that are prevented from being 
changed or deleted.

Delete Saved Copy Pro-
gram

Delete the registered copy programs.

Restrict Access to Job Set-
tings

Configure whether to allow users to configure the following settings.

Changing Job Priority

Configure whether to allow users to change the 
print priority of jobs.

Delete Other User 
Jobs

Configure whether to allow other users to delete 
jobs when the user authentication settings have 
been specified.

Registering and 
Changing Addresses

This setting is for the network scan, fax, and net-
work fax operations.
For details, refer to the "User's Guide [Network 
Scan/Fax/Network Fax Operations]".

Changing Zoom Ra-
tio

Configure whether to allow users to change reg-
istered zoom ratios.

Changing the "From" 
Address

This setting is for the network scan operations.
For details, refer to the "User's Guide [Network 
Scan/Fax/Network Fax Operations]".

Change Registered 
Overlay

Configure whether to allow users to change reg-
istered image overlays.

Biometric/IC Card In-
fo. Registration

Allow or restrict the registration or deletion of au-
thentication information.

Restrict Operation

Restrict Broadcast-
ing

This setting is for the network scan, fax, and net-
work fax operations.
For details, refer to the "User's Guide [Network 
Scan/Fax/Network Fax Operations]".

Summary of Contents for d-color MF451

Page 1: ...COPY OPERATION d Color MF651 553603en GB d Color MF451 d Color MF551...

Page 2: ...uld compromise the conformity attested to above as well as the characteristics of the product incorrect electrical power supply incorrect installation incorrect or improper use or use not in complianc...

Page 3: ...side 2 12 2 2 4 Control panel 2 14 Adjusting the angle of the control panel 2 15 2 2 5 Touch panel 2 16 2 3 Option 2 18 2 3 1 Finisher FS 526 Saddle stitcher SD 508 Punch kit PK 516 2 18 2 3 2 Job sep...

Page 4: ...16 4 10 The C Clear key 4 18 4 11 The Proof Copy key 4 19 Printing one set to check the copy result Proof Copy 4 19 Using a preview image to check the copy result Advanced Preview 4 20 5 Copy Function...

Page 5: ...rlay 5 58 5 4 9 Card Copy 5 60 5 4 10 Save in User Box 5 61 5 5 Left panel display 5 62 5 5 1 Job List 5 63 5 5 2 Check Job 5 64 6 User Settings 6 1 System Settings 6 4 6 2 Custom Display Settings 6 7...

Page 6: ...15 Default Bypass Paper Type Setting 7 30 7 1 16 Advanced Preview Setting 7 30 7 1 17 Page Number Print Position 7 31 7 2 Administrator Machine Settings 7 32 7 3 One Touch User Box Registration 7 33...

Page 7: ...inal glass control panel paper take up roller 8 12 Housing document pad 8 13 9 Troubleshooting 9 1 When the message Trouble appears call a service representative 9 3 Problems that cannot be corrected...

Page 8: ...d Color MF651 551 451 12 5 Automatic duplex unit 12 8 Reverse automatic document feeder 12 8 12 3 Options 12 9 Large capacity unit LU 301 12 9 Large capacity unit LU 204 12 9 Finisher FS 526 12 9 Sadd...

Page 9: ...1 Introduction...

Page 10: ......

Page 11: ...e settings of this machine Specifications of originals and copy paper Copy function Maintaining this machine Troubleshooting Enlarge Display Operations This manual describes details on operating proce...

Page 12: ...l knowledge about the product is required to enable users to perform maintenance work or troubleshooting operations Limit your maintenance and troubleshooting operations to the areas explained in this...

Page 13: ...o mishandling that may cause injury or property damage NOTICE This symbol indicates a risk that may result in damage to this machine or originals Follow the instructions to avoid injury or property da...

Page 14: ...r screen power switch etc 1 2 2 Indication for originals and paper Paper size The following explains the indication for originals and paper described in this manual When indicating the original or pap...

Page 15: ...2 Part names and their functions...

Page 16: ......

Page 17: ...e main unit or the d Color MF651 551 throughout the manual 2 Authentication unit biometric type AU 101 Performs user authentication by scanning vein pat terns in the finger Working table WT 506 is req...

Page 18: ...ps and staples printed paper before feeding out 15 Punch kit PK 516 Installed onto the finisher to punch holes 16 Post Inserter PI 505 Installed onto the finisher to enable insertion of a cover sheet...

Page 19: ...Enables PDF document encryption and configuration of a digital signature and property settings when dis tributing a PDF document using the scan or User Box function 28 i Option LK 105 Provides the se...

Page 20: ...by scanning information recorded on the IC card Working table WT 506 is required to install the authen tication unit 5 Working table WT 506 Provides an area to temporarily place an original or other m...

Page 21: ...t EK 604 Mount this kit to use an external keyboard For details on external keyboards contact your service representative 22 Local Interface Kit EK 605 Install this kit when using the connection funct...

Page 22: ...lease lever 3 Left side cover 4 Lateral guide 5 ADF 6 Original tray 7 Original output tray 8 Sub power switch 9 USB port type A USB 2 0 1 1 10 USB port type A USB 2 0 1 1 For compact keyboard 11 Autom...

Page 23: ...ass tray door 16 Bypass Tray 17 Bypass tray door release lever 18 Lower right side door 19 Lower right side door release lever 20 Paper empty indicator 21 Total counter 22 Main power switch 23 Tray 4...

Page 24: ...Body 2 2 10 d Color MF651 551 451 2 2 2 2 2 Outside of the main body rear The illustration above shows the main unit with an optional video interface kit fax kit and mount kit 1 2 13 10 11 12 9 8 3 4...

Page 25: ...dehumidifying heater 5 Jack for connecting a telephone TEL PORT2 6 Telephone jack 2 LINE PORT2 7 Jack for connecting a telephone TEL PORT1 8 Telephone jack 1 LINE PORT1 9 USB port type A USB 2 0 1 1 1...

Page 26: ...Main Body 2 2 12 d Color MF651 551 451 2 2 2 2 3 Main body Inside 1 8 2 3 4 5 9 7 10 11 12 13 6...

Page 27: ...l glass 2 Fusing unit 3 Fusing unit cover lever 4 Print head glass cleaning tool 5 Waste toner box 6 Imaging unit 7 Charger cleaning tool 8 Imaging unit release lever 9 Toner cartridges 10 Slit glass...

Page 28: ...14 d Color MF651 551 451 2 2 2 2 4 Control panel No Name 1 Stylus pen 2 Touch panel 3 Main power indicator 4 Sub power switch 5 Function key 6 Data indicator 7 Keypad 8 Brightness adjustment dial 1 2...

Page 29: ...se the control panel at an angle convenient to use NOTICE When tilting the control panel do not grab the touch panel 1 Pull the control panel release lever toward you and then pull the control panel u...

Page 30: ...ens differ with the Basic tab and Quick Copy tab however the functions that can be set are the same This manual describes procedures for configuring settings from the Basic tab The Quick Copy tab disp...

Page 31: ...s Default Tab To configure color selection settings for buttons and tabs Press the Utility Counter key User Settings Custom Display Settings Color Selection Settings No Name 1 Message display area 2 F...

Page 32: ...Option 2 2 18 d Color MF651 551 451 2 3 2 3 Option 2 3 1 Finisher FS 526 Saddle stitcher SD 508 Punch kit PK 516...

Page 33: ...am removal dial FN8 6 Guide lever FN7 7 Guide lever FN9 8 Jam removal dial FN6 9 Jam removal dial FN5 10 Guide lever FN3 11 Guide lever FN4 12 Punch kit 13 Punch scrap box 14 Guide lever FN10 15 Reces...

Page 34: ...Option 2 2 20 d Color MF651 551 451 2 3 2 3 2 Job separator JS 602 No Name 1 Finishing tray 2 Job separator cover...

Page 35: ...d Color MF651 551 451 2 21 2 3 Option 2 2 3 3 Z Folding Unit ZU 606...

Page 36: ...451 2 3 No Name 1 Z folding conveyance unit 2 Guide lever FN1 3 Punch scrap box 4 Front door 5 Guide lever FN6 6 Guide lever FN7 7 Guide lever FN8 8 Recessed pull FN2 9 Jam removal dial FN5 10 Guide l...

Page 37: ...lor MF651 551 451 2 23 2 3 Option 2 2 3 4 Post Inserter PI 505 No Name 1 Post inserter control panel 2 Lower tray paper guide 3 Lower Tray 4 Upper Tray 5 Upper Tray paper guide 6 Upper unit release le...

Page 38: ...Option 2 2 24 d Color MF651 551 451 2 3 2 3 5 Finisher FS 527 Saddle Stitcher SD 509 Punch Kit PK 517 Job Separator JS 603...

Page 39: ...5 2 3 Option 2 No Name 1 Output tray 2 2 Output tray 1 3 Front door 4 Horizontal transport unit cover 5 Stapler 6 Guide lever FN3 7 Jam removal dial FN2 8 Guide lever FN1 9 Guide lever FN4 10 Staple h...

Page 40: ...504 12 Saddle stitcher 13 Jam removal dial FN6 14 Recessed pull FN5 15 Transport unit 16 Punch kit 17 Job separator 18 Staple cartridge 19 Folding output tray No Name No Name 1 Jam removal dial 2 Ejec...

Page 41: ...Color MF651 551 451 2 27 2 3 Option 2 2 3 7 Large capacity unit LU 301 LU 204 No Name 1 Jam removal cover 2 Upper door 3 Paper take up roller 4 Paper empty indicator 5 Release lever 1 3 2 5 4 1 3 2 5...

Page 42: ...Option 2 2 28 d Color MF651 551 451 2 3...

Page 43: ...3 Using this machine...

Page 44: ......

Page 45: ...selected immediately after the machine is turned on and before any settings are configured from the control panel or touch panel and those that are selected when the Reset key is pressed to cancel all...

Page 46: ...the main power switch 2 Close the main power switch cover 3 Press the sub power switch Check that the touch panel is turned on 4 To turn the power off press the sub power switch then the main power sw...

Page 47: ...riginals printed on paper thicker than 210 g m2 Originals printed on paper thicker than 128 g m2 for 2 sided printing Originals that are bound for example with staples or paper clips Originals that ar...

Page 48: ...original glass is not a laser beam and will not expose the user to the related hazards 0 When Non Image Area Erase is selected you do not have to close the ADF to copy the original Place the original...

Page 49: ...enter the correct number 3 Press the Start key The original is scanned and copied To interrupt the copy operation being performed press the Stop key A Ready to accept another job message that appears...

Page 50: ...ing multiple functions This section describes copy operations using combination of functions 1 Load the original 2 Press Original Setting For details on original setting refer to page 5 17 3 Press Bas...

Page 51: ...ion setting refer to page 5 8 For details on image quality of originals refer to page 5 19 For details on copy density setting refer to page 5 19 For details on the setting not to rotate images refer...

Page 52: ...scanned and copied To interrupt the copy operation being performed press the Stop key A Ready to accept another job message that appears during the current printing job indicates that the next origina...

Page 53: ...4 Control Panel Keys...

Page 54: ......

Page 55: ...power switch 3 Sub power switch Turns on or off machine operations When turned off the machine is in the power saving mode 4 Power Save Enters Power Save mode While the machine is in Power Save mode t...

Page 56: ...idance screen You can display descriptions of the functions and operating proce dures p 4 16 16 Enlarge Display Enters Enlarge Display mode If you are using Au thentication Manager for authentication...

Page 57: ...n and press the Delete key The Interrupt key Press this key to start a new copy job with different copy settings by suspending the current job in process This is convenient when you need to make copie...

Page 58: ...user can select a desired function The indicator on the selected key lights up in green The Copy key Enters Copy mode The basic settings screen appears The Fax Scan key Press this key to enter Fax Sca...

Page 59: ...ting items that can only be operated by the administrator of the machine Check Consumable Life Allows you to check the status usage level of consumables Banner Printing Allows you to select whether to...

Page 60: ...key Administrator Settings System Settings Restrict User Access Delete Saved Copy Program Settings Recall Copy Program Select the button for the copy program registered with the copy settings to be re...

Page 61: ...on on the user name account name password and server name 0 The login page that appears may vary depending on the user authentication account track settings 0 The user authentication settings can be u...

Page 62: ...Server Name Indicates the name of the default server Press Server Name to display the names of the regis tered servers Select the desired server Login Displays the basic settings screen enabling you t...

Page 63: ...is being used 0 From the Password for Non Business Hours screen displayed from Administrator Settings mode the machine can be set so that the screen for entering the password for non business hours is...

Page 64: ...eturning to ready for copy state from Sleep mode is more time consuming 0 As the factory default Low Power mode is set to restart after 15 minutes and Sleep mode after 30 minutes In other words the ma...

Page 65: ...when they do not respond cor rectly because they may not be correctly aligned with the position of the actual touch sensor The touch sensors are not aligned in the touch panel if pressing Touch Panel...

Page 66: ...for example when an incorrect operation is performed Sound Setting Configure the settings for sounding associated with key operations The following sound setting functions are available To produce a...

Page 67: ...sing a screen with a layout with larger size characters For details on the Enlarge Display screen refer to the User s Guide Enlarge Display Operations 0 Press the Enlarge Display key to return to norm...

Page 68: ...ting in Enlarge Display mode or operating in Accessibility mode 0 While the Guidance screen is displayed the following keys on the operation panel are disabled Start C Interrupt Proof Copy Access Mode...

Page 69: ...n Informa tion Check the name extension number and E mail address of the administra tor Consumables Replace Processing Procedure Check procedures for replacing the toner cartridge imaging unit or wast...

Page 70: ...key 4 4 18 d Color MF651 551 451 4 10 4 10 The C Clear key Clears a value such as the number of copies a zoom ratio and size entered using the keypad Press the C key The value is deleted Enter the co...

Page 71: ...ter changing the copy settings in the Change Settings screen press OK Number of Sets in the proof copy screen indicates the number of sets printed in the proof copy mode the number of sets specified t...

Page 72: ...Punch settings are available only if the Punch Kit PK 516 or Z Folding Unit is installed on the Finisher FS 526 or the Punch Kit PK 517 is installed on the Finisher FS 527 0 Fold and Center Staple Fo...

Page 73: ...y size Page Rotation Rotate the preview image 180 degrees in order to correct the orientation of the original if necessary Pressing Rotate current page rotates the currently displayed page Pressing Se...

Page 74: ...The Proof Copy key 4 4 22 d Color MF651 551 451 4 11...

Page 75: ...5 Copy Function...

Page 76: ......

Page 77: ...ic Configure the basic settings for making copies p 5 4 Original Setting Configure the type and size of the original p 5 17 Quality Density Configure the quality or density for the original to optimiz...

Page 78: ...finishing functions by simply pressing this button p 6 9 Finishing Press this button to select the settings for offsetting and finishing copies p 5 11 Separate Scan Select this item to divide a large...

Page 79: ...of the scanned original determined to be in color with the specified color and prints all areas determined to be black in black Black Prints the copy in black and white regardless of whether the scann...

Page 80: ...g special paper in the paper tray be sure to set the paper type For details on special paper refer to page 12 3 Press Basic Paper Settings Auto Automatically selects the paper size according to the or...

Page 81: ...per Settings X Y Enter the length X and width Y of the paper Store Register custom paper sizes memory 1 to 5 Select the memory button where the paper size is to be stored Change Custom Size Name Renam...

Page 82: ...nal image in the size identical to the original 100 Manual Enter the zoom ratio 25 0 400 0 of the copy Under Set Individual Zoom you can enter different zoom ratios for the X and Y directions Set Zoom...

Page 83: ...al and copies to be output Without setting the Binding Position the resulting copy may not be what you intended When 1 Sided 1 Sided is selected the binding position cannot be set Original Binding Pos...

Page 84: ...lected If Output Binding Position is set to Auto the binding position is set at the top or on the left Original Direction Select the orientation of the original loaded into the ADF or placed on the or...

Page 85: ...FS 527 0 The Fold Bind is available only if the Saddle Stitcher is installed on the optional Finisher 0 The Z fold settings are available only if the Z Folding Unit is installed on the optional Finish...

Page 86: ...with the v orientation in another tray Auto paper selection is specified for the paper size setting If a finisher is installed The copies are fed out and stacked on top of each other with each set sh...

Page 87: ...relative to the original direction loaded A staple or hole punch position is set along the long side of the paper if the original length is 297mm or less Staple or hole punch positions are set along t...

Page 88: ...face up To perform Bind load the front side of the bound paper face down To perform Tri Fold load the outside of the tri folded paper face down 2 Punch settings are available together with the corner...

Page 89: ...the machine 0 When making 2 sided or combined copies using the original glass the machine can scan a number of original pages without enabling Separate Scan 1 Load the original 2 In the Basic tab pre...

Page 90: ...451 5 1 5 1 8 Auto Rotate OFF Select this setting to copy the original according to the paper orientation without rotating the image 0 For some paper sizes or zoom values part of the image may be cut...

Page 91: ...e original size Photo Size Select the photo size Binding Position Specify the original binding position page margin to prevent the copy from being printed upside down when scanning a 2 sided original...

Page 92: ...ixed Original To cancel the setting press Mixed Original again to deselect it The following chart shows the possible combinations of standard sized paper that can be used for the Mixed Original settin...

Page 93: ...lect this setting to copy printed originals con taining both text and images such as pamphlets or catalogs Photo Photo Paper Select this setting when the original photos are printed on photographic pa...

Page 94: ...Auto for Background Removal Level to enable automatic back ground density adjustment for copying with the optimal background density For Background Removal normally Bleed Removal is selected However w...

Page 95: ...copies of the respective parts p 5 34 Page Margin Select the binding margin blank area of the paper used for copy ing p 5 38 Image Adjust Configure the layout for the image when the paper is larger th...

Page 96: ...nsparency that has been through the machine even once It may lead to reduced print quality a paper jam or a damage to the machine Even if a transparency has been discharged without printing it cannot...

Page 97: ...eet For 2 sided copy Copies the second page of the original onto the back of the paper for the front cover sheet Front Blank Adds paper for the front cover sheet as the first page of the copy Back Cop...

Page 98: ...ferent paper type Sort Sorts specified pages in the ascending order Insert Paper Select the paper tray loaded with the paper to be inserted You can select the paper tray of the Post Inserter when Blan...

Page 99: ...0 If the original scanned on the original glass has fewer pages than the number of pages specified in the Insert Image screen the missing insertion pages will not be printed 0 If the same page number...

Page 100: ...nserted on the original glass 5 Press the Start key To insert a multi page original repeat steps 4 and 5 until all pages of the insertion original are scanned in the order that they are to be inserted...

Page 101: ...d 0 Make sure that the paper loaded for the first page of the chapter and for text copies have the same size and orientation Press Application Sheet Cover Chapter Insert Chapters d Reference To config...

Page 102: ...unction can be set after the entire original is scanned and then all copies can be printed together 0 Up to 100 types of originals can be scanned 0 When configuring a program job the Group setting can...

Page 103: ...t the desired copy settings and then press the Start key Repeat Steps 3 to 5 until all originals have been scanned 6 After all original pages have been scanned press Finish 7 Press Yes 8 Specify finis...

Page 104: ...photographs 0 If a single color is selected the images are reversed relative to the selected color 0 If a background color is selected colors are reversed relative to the selected base color and the...

Page 105: ...mages Press Application Edit Color Mirror Image Settings Original Size Select Auto to detect the size of the original automatically If the size of the original is not automatically detected select the...

Page 106: ...of the original with a specified background color Press Application Edit Color Background Color Color Adjustment Adjust the image quality to fit an image based on the color copied original 1 Press Ap...

Page 107: ...Hue Adjust the hue for full color copies The hue refers to a color trend relative to discrete colors such as red blue and yellow By adjusting the hue the image can attain more red dish or bluish tone...

Page 108: ...Press Application Book Copy Repeat Book Copy Settings Book Spread Copies both pages of a two page spread original as a one page original Separation Copies the right and left pages of two page spreads...

Page 109: ...of the scanned area of the original so that the sheet is filled with the copied image However some parts of the image may be lost Auto Detect Automatically detects the area to be scanned Set Range Sel...

Page 110: ...pies of sections on eight A3 size sheets and join them together 0 Place the original on the original glass 0 In Poster Mode the number of copies is set to 1 Press Application Book Copy Repeat Poster M...

Page 111: ...the original To use the original glass position the pages in order starting with the side that includes the first page then the side that includes the second page then the side that includes the third...

Page 112: ...e staples or punched holes are different from the binding position the positions of the staples or punched holes are given priority 0 If part of the image is lost when copied with the specified bindin...

Page 113: ...297mm a binding position along the short side of the paper is selected The binding position is set on the upper or left side end Be sure to load the original so that its top side is placed in the back...

Page 114: ...per Place the original on the original glass Center Zoom Enlarges the image up to the largest possible paper size that can contain the entire original and copies the image at the center of the paper H...

Page 115: ...zoom Press the Utility Counter key User Settings Copier Settings Auto Zoom for Combine Booklet Settings Left Bind Right Bind Select the output binding position for copies to be output Center Staple Fo...

Page 116: ...f punched holes All four sides around the original can be erased in the same width or in a different width for each side Press Application Erase Frame Erase Settings Frame Erases the four sides of the...

Page 117: ...or closing the ADF so that you can make copies promptly In addition toner consumption will be reduced as the area outside the original text is erased 0 If erasing is not performed as desired set Eras...

Page 118: ...th copy inhibit infor mation or password embedded Using this function you can prevent original information from being leaked Stamp Repeat Repeats copying of a stamp or the date and time onto the paper...

Page 119: ...al is stamped on the paper Press Application Stamp Composition Date Time d Reference To enable printing on blank pages Press the Utility Counter key Administrator Settings System Settings Blank Page P...

Page 120: ...ngs to enable blank page printing Press Application Stamp Composition Page Number Settings Starting Page Number Set Page Number between 99999 and 99999 and set Chapter be tween 100 and 100 Press to sw...

Page 121: ...k Cover Only Prints a page number on the back cover but not on the front cover Page number printing starts with 2 for 1 sided copy and with 3 for 2 sided copy Do not print Page Number Disables printin...

Page 122: ...pages in Administrator Settings to enable blank page printing Press Application Stamp Composition Stamp d Reference To enable printing on blank pages Press the Utility Counter key Administrator Settin...

Page 123: ...nection or Copy Protection Utility to register a registered stamp 0 Multiple registered stamps or preset stamps cannot be selected Press Application Stamp Composition Copy Security Copy Protect Settin...

Page 124: ...be used in combination for up to six text lines 0 You can select the preset stamp date time and the other items together 0 Multiple preset stamps cannot be selected 0 A Copy Guard cannot be printed on...

Page 125: ...ans a Password Copy pattern and prompts you to enter the password When the correct password is entered copying will start Settings Copy Guard Type Preset Stamp Select a stamp to be printed from the ei...

Page 126: ...l be erased 0 If multiple originals with different passwords are scanned you will need to enter a password for each original Press Application Stamp Composition Copy Security Stamp Repeat d Reference...

Page 127: ...ation Stamp Composition Stamp Repeat Settings Registered Stamp Select one from registered stamps Preset Stamp Select a stamp to be printed from the eight types available Date Time Select the type of d...

Page 128: ...ion Change the angle as required when there are no more than four lines in the selected repeating stamp Change Pos Delete Change the arrangement order Select the target Stamp Repeat and press Up or Do...

Page 129: ...a header footer Press the Utility Counter key Administrator Settings System Settings Stamp Settings Header Footer Settings Settings Recall Header Footer Select a header footer to be used Check Change...

Page 130: ...pied paper 0 The watermark is printed on all pages at an angle of 45 degrees It is printed once per page 0 In case other settings affect the watermark printing to cause partial loss the Watermark func...

Page 131: ...on functions on the original Press Application Stamp Composition Overlay Settings Pages Select to print the overlay image on all pages or only on the first page Se lecting 1st Page Only prints only on...

Page 132: ...age Background Compo sition Original Composes the original as the background The overlay image is superimposed on the original when they are printed Back Composes the overlay image as the background T...

Page 133: ...when they are printed Image Details Check the Name Registered Date Image Size and Color of the overlay image To confirm the enlarged overlay image press Pre view Register Overlay Image New Enter the n...

Page 134: ...erect mode on the original glass 0 The card copy function and the auto paper function cannot be selected at the same time 0 For some zoom values part of the image may be cut off Select Application Car...

Page 135: ...g documents saved in User Boxes refer to the User s Guide Box Operations Press Application Save in User Box Settings User Box Select the destination User Box Document Name Specify a document name for...

Page 136: ...bs Press the Utility Counter key Administrator Settings System Settings Restrict User Access Restrict Access to Job Settings Changing Job Priority To hide the file name and destination in the job log...

Page 137: ...fax reception jobs For details refer to the User s Guide Network Scan Fax Network Fax Operations Save Opens the screen for saving jobs For details refer to the User s Guide Box Operations Current Jobs...

Page 138: ...queued time completed time number of original pages and number of copies for jobs in process To delete the job press Delete in the Detail screen Job History Lists completed jobs This list includes job...

Page 139: ...6 User Settings...

Page 140: ......

Page 141: ...ience of the user Copier Settings Configure the settings for copy functions to be used in copy operations Scan Fax Settings Configure setting for fax and scan operations Printer Settings Configure set...

Page 142: ...paper of the same size is selected automatically when a paper tray that was selected manually becomes empty while printing copies No Matching Paper in Tray Setting Specify the action to be taken when...

Page 143: ...t in the touch panel Factory default Language Selection English Measurement Unit Settings This value varies depending on the area Auto Tray Selection Set tings Tray Priority Tray 1 Tray 2 Tray 3 Tray...

Page 144: ...lor MF651 551 451 6 1 d Reference To enable Auto Paper Press Basic Paper Auto Paper To enable Auto Color Press Basic Color Auto Color To configure Background Removal to Auto Press Basic Quality Densit...

Page 145: ...the User s Guide Network Scan Fax Network Fax Opera tions User Box Settings Configure settings for the User Box operations For details refer to the User s Guide Box Operations Copy Screen Configure w...

Page 146: ...ess Book Index De fault Fax Scan Settings Favorites Shortcut Key 1 Shortcut Key 2 Fax Scan Settings OFF Default Address Book Fax Scan Settings Index Default Address Type Fax Scan Settings Group Defaul...

Page 147: ...is pressed Current Setting The current settings are used as the default set tings Factory Default The factory settings are used as the default set tings Default Enlarge Display Settings This setting...

Page 148: ...ars in the basic settings screen This item is set if the finisher is installed Card Shot Settings Appears when user access is permitted under Administrator settings For details refer to page 7 45 Fact...

Page 149: ...g is for the printer operations For details refer to the User s Guide Print Operations 6 6 Change Password Change the password for the user who is currently logged in 0 A public user cannot use this f...

Page 150: ...ccess is permitted under Administrator settings For details refer to page 7 50 1 Press the Utility Counter key User Settings Change E Mail Address 2 Press E mail Address 3 Change the E mail address 4...

Page 151: ...when performing the following operations 0 In Restrict Access to Job Settings of Administrator Settings set Register biometric IC card information to Allow 0 In User Authentication Settings of Admini...

Page 152: ...nger vein patterns place the same finger and press Authentication Test If your finger vein patterns have been authenticated in the authentication test press Register If authentication has failed retry...

Page 153: ...7 Administrator Settings...

Page 154: ......

Page 155: ...unt Track Configure the authentication settings to restrict the functions of this ma chine Network Settings Configure network settings Copier Settings Configure the settings for copy functions to be u...

Page 156: ...ower save function to be started when you press the Power Save key Low Power Provides power saving effect higher than normal Sleep Although this machine conserves more energy in the sleep mode than in...

Page 157: ...tions Output Tray Settings Configure an output tray given priority for outputting by function This item is displayed when the Finisher or Job Separator JS 504 is in stalled Shift Output Each Job Selec...

Page 158: ...Press the Utility Counter key Administrator Settings System Settings Date Time Settings d Reference To cancel the current settings Press the C key Settings Year Configure the current date and time Mon...

Page 159: ...ted to the network where UTC Coordinate Universal Time is specified For details refer to the User s Guide Network Administrator Press the Utility Counter key Administrator Settings System Settings Day...

Page 160: ...he same day of the week in other weeks Delete Cancels the selected input value Date Settings Configure the days when timer operation is activated individually To can cel the setting press the same day...

Page 161: ...delete jobs when the user authentication settings have been specified Registering and Changing Addresses This setting is for the network scan fax and net work fax operations For details refer to the...

Page 162: ...ing Job Priority Allow Delete Other User Jobs Restrict Registering and Changing Addresses Allow Changing Zoom Ratio Allow Changing the From Ad dress Restrict Change Registered Over lay Allow Biometric...

Page 163: ...x Side 2 p 7 15 Centering Duplex 2nd Side p 7 15 Erase Leading Edge Adjust leading edge erase width For details on displaying this item contact your service representative Vertical Adjustment Adjust t...

Page 164: ...r amount to be used by color depending on the paper type To correct the toner amount to be used in the black print mode press Black Image Density Image Stabilization Image Stabilization Only Press the...

Page 165: ...play format and contamination detection level Detection While Feeding Setting Configure whether to remove dust and dirt on the original glass when scan ning an original using ADF Trail Edge Adjust Cor...

Page 166: ...inisher FS 527 0 Vertical Punch Z Fold Po sition Adjustment 0 0 mm Horizontal Punch Z Fold Position Adjustment 0 0 mm 1st Z Fold Position Adjust ment 0 0 mm 2nd Z Fold Position Ad justment 0 0 mm Post...

Page 167: ...test pattern to the edge of the paper a is 4 2 mm Press or to adjust the width Press the Start key to print a test pattern 6 Press OK Centering Adjust the starting print position at the left edge of e...

Page 168: ...ion 0 Adjust the half fold position before adjusting the center stapling position 0 Before making any adjustments create a sample using the center staple function Adjust the center staple position whi...

Page 169: ...just the punched hole position while checking the sample 4 Press OK 5 Create a sample and check the print result Tri Fold Position Adjustment Adjust the folding position for each paper size when print...

Page 170: ...les Adjust the horizontal position of the punched holes as appropriate for each installed option or paper type 0 Before making any adjustments create a sample using the punch settings Adjust the punch...

Page 171: ...n to adjust the inclination of punch holes when the Finisher FS 526 and Post Inserter PI 505 or Z Folding Unit ZU 606 are installed 2 Select a paper type for which the punch hole angle is adjusted 3 P...

Page 172: ...punched hole position is adjusted 3 Press or to adjust the punched hole position while checking the sample 4 Press OK 5 Create a sample and check the print result Horizontal Punch Z Fold Position Adju...

Page 173: ...ministrator Settings System Settings Expert Adjustment Finisher Adjustment 1st Z Fold Position Adjustment 2 While checking the sample press or to adjust the first folding position 3 Press OK 4 Create...

Page 174: ...t be 2 mm or more 3 Press OK 4 Create a sample and check the print result Punch Unit Size Detect Sensor If the punch position is displaced depending on the paper tray the punch unit is automatically a...

Page 175: ...istration Adjust 2 Select a color to be corrected 3 Select a paper type for which color registration is adjusted 4 Load the paper into the bypass tray The loadable paper size is A3w 11 e 17w A4v or 8...

Page 176: ...to output a test pattern As a paper size select A3 w 11 e 17 w A4 v or 8 1 2 e 11 v By default A3 w is selected Paper in the bypass tray cannot be selected 7 Press the Start key A test pattern is pri...

Page 177: ...nagement List Job Settings List Configure paper tray settings for printing the job settings list and specify a print side Paper Size Type Counter Register a combination of paper size and paper type fo...

Page 178: ...creen appears if this machine is not operated The specified time is not canceled d Reference If user authentication or enhanced se curity mode is enabled the adminis trator settings mode or user authe...

Page 179: ...tility Counter key Administrator Settings System Settings Standard Size Setting Factory default Priority Mode Copy System Auto Reset Time 1 minute Auto Reset Copy 1 Minute Scan Fax 1 Minute User Box 1...

Page 180: ...ooter settings Configure whether to print a header and footer and then configure print contents Text Enter text Date Time Select a format to display the date and time Other Specify the distribution co...

Page 181: ...tops due to running out of paper in the paper tray Selecting Yes provides no print queue time due to job stopping Press the Utility Counter key Administrator Settings System Settings Skip Job Operatio...

Page 182: ...Press the Utility Counter key Administrator Settings System Settings Default Bypass Paper Type Setting 7 1 16 Advanced Preview Setting Configure settings to fax or scan a document For details refer t...

Page 183: ...on positions symmetric with respect to the stapling position Press the Utility Counter key Administrator Settings System Settings Page Number Print Position Settings Left Right Bind All the Same Top...

Page 184: ...istrator Settings Administrator Machine Setting Settings Administrator Registration Register administrator information displayed on the Service Admin Infor mation screen of the Guidance screen and the...

Page 185: ...r Box Registration 7 7 3 One Touch User Box Registration This setting is for the User Box network scan fax and network fax operations For details refer to the User s Guide Network Scan Fax Network Fax...

Page 186: ...Box for each user and group box Controls the access allowed level of the destination Prohibits jobs of other users from being deleted Account Track Appropriate for controlling groups or multiple users...

Page 187: ...on server settings are configured ON MFP Restricts users who can access this machine us ing this machine Public User Access Allows public user accesses when the enhanced security mode is disa bled Res...

Page 188: ...thentication to log in When of Jobs Reach Maximum Configure the action of this machine that is taken when the output count of the job reaches the limit specified for the user or account Skip Job Stops...

Page 189: ...s who are authenticated on the external server ID Print Settings Configure whether to use the ID print function Also configure whether to immediately print un authenticated jobs or public user job or...

Page 190: ...e number of copies that can be out put by the user Individual Allowance Specify the number of black copies and color copies that can be output by the user Auth info registri eren Press Edit and then r...

Page 191: ...ID Print Settings ID Print OFF when the authentication unit is not installed ON when the authentication unit is installed Public User Print Immediately ID Print Operation Set tings Print All Jobs Out...

Page 192: ...e following restrictions to the selected account or all accounts Print Specify whether to allow color or black copy or print output to the user of the account If black copy or print is restricted prin...

Page 193: ...y and print format to be used for printing the counter list 0 This function is enabled when user authentication or account track settings are configured Press the Utility Counter key Administrator Set...

Page 194: ...tting is for the network scan fax and network fax operations For details refer to the User s Guide Network Scan Fax Network Fax Operations User s Guide Network Administrator Settings Select a number f...

Page 195: ...n Device Settings Settings General Settings When the authentication unit biometric type AU 101 authentication unit biometric type AU 102 is installed Configure whether to give a notice sound and to se...

Page 196: ...strator 7 4 11 Scan to Authorized Folder Settings This setting is for the network scan fax and network fax operations For details refer to the User s Guide Network Scan Fax Network Fax Operations and...

Page 197: ...aded with paper for the cover pages front cover inserted sheets and the chapter title pages Print Jobs During Copy Operation Configure whether to accept print data or fax data while a copy operation i...

Page 198: ...ting is for the fax and network fax operations For details refer to the User s Guide Network Scan Fax Network Fax Operations Factory default Auto Zoom Platen OFF Auto Zoom ADF ON Specify Default Tray...

Page 199: ...of client certificate select Enable Certificate Verification Level Settings To verify a certificate configure settings to verify the certificate Validity Period Select whether to check that the targe...

Page 200: ...tion and Printer URI The Printer Information setting is linked to Printer Information in HTTP Server Settings Cellular Phone PDA Set ting Specify whether to allow the user to print data in a cellular...

Page 201: ...ine In this case contact your service representative 1 Press the Utility Counter key Administrator Settings Security Settings Administrator Password 2 Enter the administrator password and then press O...

Page 202: ...el 1 Allows the user to change the following settings Power Save Settings Auto Zoom Platen Auto Zoom ADF Specify Default Tray when APS Off Select Tray for Insert Sheet Automatic Image Rotation Card Sh...

Page 203: ...ted Only half width symbols can be used For some of the passwords specification of and space is restricted A password that consists of a repetition of the same character cannot be specified The same p...

Page 204: ...ions Hide Personal Information Display Activity Log Initialize Initializes Job History Network Settings Copy Program or Store Address Job History Thumbnail Dis play Configure whether to perform thumbn...

Page 205: ...ministrator Password Set a password complying with password rules Security Settings HDD Settings HDD Lock Pass word Set an HDD lock password Security in Web Connection PKI Settings SSL Setting Set Mod...

Page 206: ...ngs FTP Server Settings is not displayed Network Settings SNMP Setting SNMP v1 v2c Settings Write Setting is set to Disable Network Settings SNMP Setting SNMP v3 Set tings In Write User Security Level...

Page 207: ...the settings for the network manage ment that are difficult to count when managing operations OFF The following functions cannot be used if Net work Function Usage Settings is set to OFF PC FAX transm...

Page 208: ...perations For details refer to the User s Guide Print Operations Settings Stamp Settings Apply Stamps Configure whether to add a stamp when printing or sending To add a stamp configure stamp contents...

Page 209: ...rchased For details contact your service representative Press the Utility Counter key Administrator Settings License Settings Reference When the functions of an optional component i Option LK 101 LK 1...

Page 210: ...7 7 58 d Color MF651 551 451 7 12 7 12 OpenAPI Authentication Management Settings Configure settings to prevent our deprecated OpenAPI connection application from being registered in this machine For...

Page 211: ...8 Maintenance...

Page 212: ......

Page 213: ...printer or an inkjet printer Folded curled wrinkled or torn paper Paper that has been left unwrapped for a long period of time Damp paper perforated paper or paper with punched holes Extremely smooth...

Page 214: ...tected 1 Pull out tray 1 NOTICE Be careful not to touch the film 2 Slide the lateral guides to fit the size of paper being loaded If the lateral guides are not positioned correctly for the loaded pape...

Page 215: ...side of the paper to be printed on the side facing up when the package was unwrapped faces up Do not load so many sheets of paper that the top of the stack is higher than the mark Do not load tray 3...

Page 216: ...paper that the top of the stack is higher than the mark If paper is curled flatten it before loading it Push the paper guides firmly up against the edges of the paper Load letterhead paper so that the...

Page 217: ...ard then you can stick the label to other objects 3 Slide the lateral guides to fit the size of paper being loaded 4 Select the paper type To use label sheets select Thick 1 OHP transparencies can be...

Page 218: ...and 2 Lift up the paper take up roller and then load the paper into the tray Load the paper into the tray so that the side of the paper to be printed on the side facing up when the package was unwrapp...

Page 219: ...When it is almost time to replace the toner or imaging unit an advanced warning message similar to the one shown below appears When the message appears prepare to replace the toner cartridge accordin...

Page 220: ...t is empty printing can continue using black Press Continue and then select the job to be printed NOTICE Do not replace the imaging unit until a Please replace message appears Checking consumables sta...

Page 221: ...the consumed amount of toner can be viewed 1 Press the Utility Counter key 2 Press Meter Count Check Details To print the counter list press Print List select paper and then press the Start key To dis...

Page 222: ...it glass cleaner 2 Wipe stains off the slit glass using the slit glass cleaner Wipe off stains from the back side to the front side along the guide Original glass control panel paper take up roller NO...

Page 223: ...51 451 8 13 8 3 Cleaning procedure 8 Housing document pad NOTICE Never use solvents such as benzene or thinner to clean the document pad Wipe the surface using a soft cloth moistened with a mild house...

Page 224: ...Cleaning procedure 8 8 14 d Color MF651 551 451 8 3...

Page 225: ...9 Troubleshooting...

Page 226: ......

Page 227: ...he problem is not resolved perform the following operations and then contact your service representative Normally the phone number and fax number of your service representative appear in the center of...

Page 228: ...1 9 1 Problems that cannot be corrected by the user 1 Write down the malfunction code in the Service Call screen 2 Turn off the sub power switch 3 Turn off the main power switch 4 Unplug the machine 5...

Page 229: ...t the desired copy density p 5 19 Was the original not pressed close enough against the original glass Position the original so that it is pressed closely against the orig inal glass p 3 6 The printed...

Page 230: ...r size that is the same size as the original Otherwise select Auto to enlarge the copy to the selected paper size p 5 8 Is the size or orientation of the original different from that of the paper With...

Page 231: ...puter correctly p 10 3 p 11 3 No notice sound is given when scanning is started or authenti cation is finished on this ma chine Has the notice sound being set to OFF on this machine Set the notice sou...

Page 232: ...uthentication unit to the computer starts the hardware uninstall wizard Is the USB port to which the au thentication unit is connected the same as the one used when in stalling the driver If you conne...

Page 233: ...nd then touch Login or press the Access key User authentication settings have been configured Copies cannot be made unless a user name and correct password are entered Enter the correct user name and...

Page 234: ...p box is full 2 The punch scrap box is not in stalled 1 Throw punch scraps away from the punch scrap box 2 Install the punch scrap box Reset the following number of originals XX After clearing a paper...

Page 235: ...power switch and then wait at least 10 sec onds before turning it on again The job log has reached the maximum allowed Contact the administrator The write area of the job log has reached the maximum a...

Page 236: ...again Appears when there is a message indicating that consumables must be re placed or the machine requires maintenance Press this button to display the message and then carry out the replacement or...

Page 237: ...w the procedure described below to clean the electrostatic charger wire 0 When replacing the waste toner box follow the Quick Guide to clean the electrostatic charger wire 1 Open the machine s lower f...

Page 238: ...es dirty print quality may be reduced If this occurs clean the print head according to the following procedure 1 Pull out tray 1 2 Remove the print head glass cleaning tool from tray 1 3 Open the mach...

Page 239: ...9 5 Insert the print head glass cleaning tool into the print head cleaning opening pull it out and then repeat this back and forth movement two or three times 6 Install the waste toner box 7 Place ba...

Page 240: ...If print quality is deteriorated 9 9 16 d Color MF651 551 451 9 3...

Page 241: ...10 Authentication unit biometric type...

Page 242: ......

Page 243: ...hentication unit to prevent your forefinger to be used for authentication from rotating For details on how to place your forefinger on the authentication unit refer to the Quick Guide Copy Print Fax S...

Page 244: ...the finger vein pattern can log in to this machine or execute a print job This section explains how to configure the required settings in this machine register users and log in with authentication No...

Page 245: ...tion To combine account track settings with user authentication settings set Synchronize User Authentication Account Track to Synchronize 1 Use the control panel of this machine to display the Adminis...

Page 246: ...ine after registration 1 to many authentication Allows the user to log in by simply placing his or her finger 1 to 1 authentication Allows the user to log in by entering the user name and placing his...

Page 247: ...a is saved in the HDD of this machine Changing the user authentication type of this machine or formatting the HDD will erase the registered user data Registering a user using the control panel of this...

Page 248: ...press Register If authentication has failed retry scanning the finger 7 Press Close twice 8 Enter the user name and password 9 Configure function permission settings as required 10 Press OK 11 Press C...

Page 249: ...he Plug in version 3 In Plug in information list confirm the plugin version of Data Administrator This software is available if the plugin version is 4 x Setup 1 Turn the main power of this machine of...

Page 250: ...wse my computer for driver software advanced 6 Check that the driver s search location is the application DVD ROM and then click the Next When the driver s search location is not the application DVD R...

Page 251: ...Installation of BioDriver USB Driver is completed 8 Install Data Administrator Bio Plugin Open the DA_Bio_Plugin folder on the application DVD ROM and then click setup exe 9 Select a language and the...

Page 252: ...Using an authentication unit biometric type 10 10 12 d Color MF651 551 451 10 1 11 Click the Next 12 Select I accept the terms in the license agreement and then click the Next 13 Click the Install...

Page 253: ...ted to the computer go to step 4 NOTICE To turn the main power switch off and on first turn the main power switch off and then turn it on after 10 or more seconds has elapsed Not doing so may result i...

Page 254: ...ministrator starts and device information of this machine is imported The Device Information window appears For details on how to import device information refer to the Data Administrator User s Guide...

Page 255: ...t biometric type 10 6 Select the desired template and then click the OK The User Registration window appears 7 Enter the user name and password select the AU 101 or AU 102 tab and then click the Impor...

Page 256: ...51 551 451 10 1 8 Place your finger on the authentication unit and then click the Start Reading Scan the finger vein pattern three times reset the same finger for each scanning For authentication unit...

Page 257: ...10 17 10 1 Using an authentication unit biometric type 10 10 Click the OK Repeat steps 5 to 10 to register all users 11 Click the Export to the device Select the user name and click the Edit to chang...

Page 258: ...Click the OK 14 Disconnect the authentication unit from the USB port of the computer 15 Turn the main power switch of this machine off connect the authentication unit to this machine and turn the mai...

Page 259: ...red properly Register finger vein patterns again Authentication is carried out when you simply place your finger on the 1 to many authentication Authentication is carried out when you enter the user n...

Page 260: ...551 451 10 1 When 1 to 1 authentication has been specified 1 Select User Name and enter the user name 2 Place your finger on the authentication unit The basic settings screen appears Authentication un...

Page 261: ...11 Authentication unit IC card type...

Page 262: ......

Page 263: ...ed in this machine To use the authentication unit first register the card ID of the user in this machine The registered user who is authenticated with the card ID can log in to this machine or execute...

Page 264: ...Track settings refer to page 7 34 To combine account track settings with user authentication settings set Synchronize User Authentication Account Track to Synchronize 1 Use the control panel of this...

Page 265: ...ard Authentication Allows the user to log in by simply placing the IC card Card Authentication Password Allows the user to log in by placing the IC card and entering the password For details on how to...

Page 266: ...ister the target user NOTICE The registered user data is saved in the HDD of this machine Changing the user authentication type of this machine or formatting the HDD will erase the registered user dat...

Page 267: ...as required 10 Press OK 11 Press Close Registering a user using Data Administrator To use Data Administrator configure this machine and set up Data Administrator For setup install the IC Card Driver U...

Page 268: ...Data Administrator select Version Information NOTICE This software cannot be used if the version is 3 x Install 4 x If Data Administrator V3 x is installed it is removed when V4 x is installed 2 Click...

Page 269: ...hine 2 Install IC Card Driver USB Driver Connect the authentication unit to the USB port of your computer The Found New Hardware dialog box appears 3 Select Locate and install driver software recommen...

Page 270: ...1 6 Check that the driver s search location is the application DVD ROM and then click the Next When the driver s search location is not the application DVD ROM click the Browse Select the IC Card Driv...

Page 271: ...Driver USB Driver is completed 8 Install Data Administrator IC Card Plugin Open the IC_Card_Plugin folder on the application DVD ROM and then click setup exe 9 Select a language and then click the OK...

Page 272: ...1 12 d Color MF651 551 451 11 1 12 Select I accept the terms in the license agreement and then click the Next 13 Click the Install 14 Click the Finish Installation of the Data Administrator IC Card Pl...

Page 273: ...has elapsed Not doing so may result in an operation failure When connecting or disconnecting the USB cable hold the plug Otherwise the cable may be damaged 2 Turn the main power on 3 Connect the auth...

Page 274: ...IC card type 11 11 14 d Color MF651 551 451 11 1 5 In Select Function select Authentication Settings User Setting and then click the Add 6 Select the desired template and then click the OK The User Re...

Page 275: ...rd and select the IC card authentication tab Enter the E mail address and other information as required 8 Place the IC card on the authentication unit and click the Start reading If necessary select I...

Page 276: ...the user name and click the Edit to change the registered data 11 Click the Write Data Administrator provides the batch copy function that batch configures the registered user data in multiple machin...

Page 277: ...gging in to this machine This section explains how to log in to this machine with IC card authentication To use authentication unit IC card type register the information recorded in the IC card in adv...

Page 278: ...d Color MF651 551 451 11 1 When IC card authentication password authentication is enabled 1 Place the IC card on the working table 2 Press Password and then enter the password 3 Press either Login or...

Page 279: ...12 Specifications...

Page 280: ......

Page 281: ...000 sheets Large capacity unit LU 204 2 500 sheets Thick 1 User Paper 3 5 91 to 120 g m2 Bypass tray 100 sheets Tray 1 2 400 sheets Tray 3 1 150 sheets Tray 4 750 sheets Large capacity unit LU 301 2...

Page 282: ...r trays loaded with media such as OHP transparencies and colored paper If the paper size and paper type have not been correctly specified a paper jam may occur or poor image quality may result When yo...

Page 283: ...r transparency postcard envelope label sheet banner paper 127 to 210 g m2 2 Sided Plain paper 64 to 90 g m2 Thick1 1 2 3 91 to 256g m2 Available for bypass tray Available for bypass tray or tray 3 4 W...

Page 284: ...d or label sheet 50 sheets Envelope 10 sheets Warm up time Period from the time the main power switch was turned on to the time sub power switch was turned on to get ready for printing room tempera tu...

Page 285: ...umber of continuous copies 1 to 9999 sheets Density adjustment Copy density Manual density adjustment 9 levels Background density Manual or automatic density adjustment 9 levels Power supply AC 220 24...

Page 286: ...8 1 8 e 13 1 4 w and 8 e 13 w Any one of these sizes is selectable For details contact your service representative Power supply Supply from machine Specification Original feed function 1 sided origin...

Page 287: ...eight Approx 18 kg Specification Paper type Plain paper 64 to 90 g m2 Thick 1 91 to 120g m2 Thick 1 121 to 157g m2 Thick 2 158 to 209g m2 Thick 3 210 to 256g m2 Paper size 12 e 18 w 11 e 17 w to 8 1 2...

Page 288: ...w v 1 500 sheets 12 e 18 w 2 8 1 2 e 14 w A3 w B4 w 8 e 13 w 3 8K w 500 sheets 5 1 2 e 8 1 2 w v A5 w v B6 w A6 w 1 2 500 sheets when saddle stitcher SD 508 is installed 2 12 e 18 is 304 8 e 457 2 mm...

Page 289: ...ng Paper type Center Staple Plain paper 64 to 90 g m2 Half Fold or Tri Fold Plain paper 64 to 90 g m2 Paper size Center Staple and Fold Half Fold A3 w B4 w A4 w 12 e 18 w to 8 1 2 e 11 w 8K w Width 21...

Page 290: ...s Staple MS 5C For EH 554 Product No 500 manufactured by MAX 5 000 staples includ ed e 1 unit Power supply Supply from finisher Specification Specification Number of punch holes 2 holes 3 holes or 4 h...

Page 291: ...w 50 sheets Size Width 341 mm e Depth 537 mm e Height 149 mm Weight Approx 1 75 kg Specification Number of punch holes 2 holes 3 holes 4 holes Paper type when hole punching is selected Plain paper 64g...

Page 292: ...g function Group Sort Offset Group Offset Sort Staple Fed into Output tray 2 Paper type Group Sort Plain paper 60 g m2 to 90 g m2 Thick 91 g m2 to 300 g m2 Transparency Postcards Envelope Label sheets...

Page 293: ...sheets 20 sheets 50 sets 21 sheets 30 sheets 30 sets 31 sheets 40 sheets 25 sets 41 sheets 50 sheets 20 sets Paper loading height 375 mm 8 1 2 e 11 w A4 w or less 187 5 mm 8 1 2 e 14 w B4 w or more M...

Page 294: ...d into the folding output tray Number of stapled and folded sheets 1 sheets 3 sheets 20 sets 4 sheets 10 sheets 10 sets 11 sheets 15 sheets 5 sets Size Width 239 mm e Depth 579 mm e Height 534 mm Weig...

Page 295: ...Label sheets 20 sheets Envelope 10 sheets Banner Paper 1 sheets Power supply Supply from machine Max power consumption 40 W or less Shift amount 30 mm Offset function Output tray 2 Plain paper Thick...

Page 296: ...ity 10 to 80 No dew condensation System conditions during non operation Ambient temperature 10 C to 60 C Humidity 10 to 80 No dew condensation Compatible computer CPU PC AT compatible 1 GHz or more Me...

Page 297: ...temperature 5 C to 35 C Humidity 20 to 80 No dew condensation System conditions during non operation Ambient temperature 0 C to 50 C Humidity 20 to 80 No dew condensation Compatible computer CPU PC A...

Page 298: ...85 No dew condensation Radio law division Self guided read write communication facility Applicable card ISO 14443 TypeA FeliCa based noncontact IC card HID iClass Acquired standard VCCI class B Compat...

Page 299: ...13 Appendix...

Page 300: ......

Page 301: ...d a lemon is yellow and the sky is blue Hue is the tint by which the color of an object is classified as red yellow blue etc What is brightness Brightness is the degree of lightness in a color as comp...

Page 302: ...yellow of a pear By saying that the lemon is a more vivid yellow and the pear is a duller yellow the difference between the two colors is stated in terms of saturation as opposed to brightness As opp...

Page 303: ...d Color MF651 551 451 13 5 13 1 Colors 13 Red green and blue This machine allows you to adjust red green and blue in 19 levels Red Green Blue...

Page 304: ...t You can finely adjust an image in between soft smooth and crisp Copy density You can finely adjust the shading of an image Sharpness You can adjust the amount of contours in text and images You can...

Page 305: ...color copy reproduces colors of the original by mixing toners of four colors yellow magenta cyan and black By changing the amount of each of the four toners adjust the tints in the copy You can adjust...

Page 306: ...ue in the image for example if you wish to emphasize the blue of water or the sky Brightness Function that makes the image either lighter or darker Center Staple Fold Function that folds the copies in...

Page 307: ...ction that detects the size of each original page and prints a copy on paper of the appropriate size when loading originals in different page sizes into the ADF Neg Pos Reverse Function that copies th...

Page 308: ...ll of the first copy set is finished Staple Function that staples copies Text Enhancement Function that allows you to configure the reproduction quality of the text when copying originals consisting o...

Page 309: ...14 Index...

Page 310: ......

Page 311: ...16 Biometric type 10 3 Blank page print settings 7 29 Blue 13 5 Book copy 5 34 Book copy repeat 5 34 Booklet 5 41 Booklet original 5 37 Brightness 13 3 Brightness adjustment dial 2 14 Bypass tray 2 8...

Page 312: ...display area 2 16 Icons 9 12 Image adjustment 5 40 Image controller 2 3 Image quality 13 6 Image Repeat 5 35 Imaging unit 2 12 Imaging unit release lever 2 12 Inserting images 5 25 Inserting sheets 5...

Page 313: ...serter control panel 2 23 5 13 Post Inserter PI 505 2 23 12 14 Poster mode 5 36 Power cord 2 10 Power Save 4 12 Power save settings 7 4 Power switch for dehumidifying heater 2 10 Print head 9 14 Print...

Page 314: ...l counter 2 8 Touch panel 2 14 2 16 Touch pen 2 14 Tray 1 2 8 Tray 2 2 8 Tray 3 2 8 Tray 4 2 8 Tray extension 2 26 Troubleshooting 9 3 Troubleshooting table 9 5 Turning off automatic rotation 5 16 U U...

Page 315: ...uto Rotate OFF 5 16 Auto Sort Group Selection 6 9 Auto Tray Selection Settings 6 4 Auto Tray Switch ON OFF 6 4 Auto Zoom ADF 6 9 7 45 Auto Zoom Platen 6 9 7 45 Auto Zoom for Combine Booklet 6 9 Automa...

Page 316: ...5 61 Dot Matrix Original 5 20 Driver Password Encryption Setting 7 56 Duplex Combine 5 9 E Edit Color 5 30 Edit Name 4 8 E Mail Address 7 37 Enhanced Security Mode 7 53 Enlarge Display 4 15 Enlarge Di...

Page 317: ...19 Margin Position 5 39 Max Allowance Set 7 38 7 40 Measurement Unit Settings 6 4 Media Adjustment 7 16 Message Display Time 4 14 Meter Count 8 11 Minimal 5 8 Mirror Image 5 31 Mixed Original 5 17 Mo...

Page 318: ...rict Operation 7 9 Restrict User Access 7 9 Right 5 42 Right Bind 5 41 S Saturation 5 33 Save 5 63 Save Print 5 61 Save in User Box 5 61 Scan to Authorized Folder Settings 7 44 Scan to Home Settings 7...

Page 319: ...r Authentication Settings 7 37 User Authentication Account Track 7 34 User Box 4 6 5 61 User Box Administrator Setting 7 49 User Box Settings 6 7 7 27 User Counter 7 38 User Name 4 10 7 37 User Name L...

Page 320: ...Index by button 14 14 12 d Color MF651 551 451 14 2...

Page 321: ...you need and the instructions for handling the waste correctly for example location and times of the waste collection centres etc b When you purchase a new device of ours give a used device similar t...

Reviews: