


Switch between main
and aux output
Press
Main/Aux
button.
3.2.2 Using the Mouse in Live View
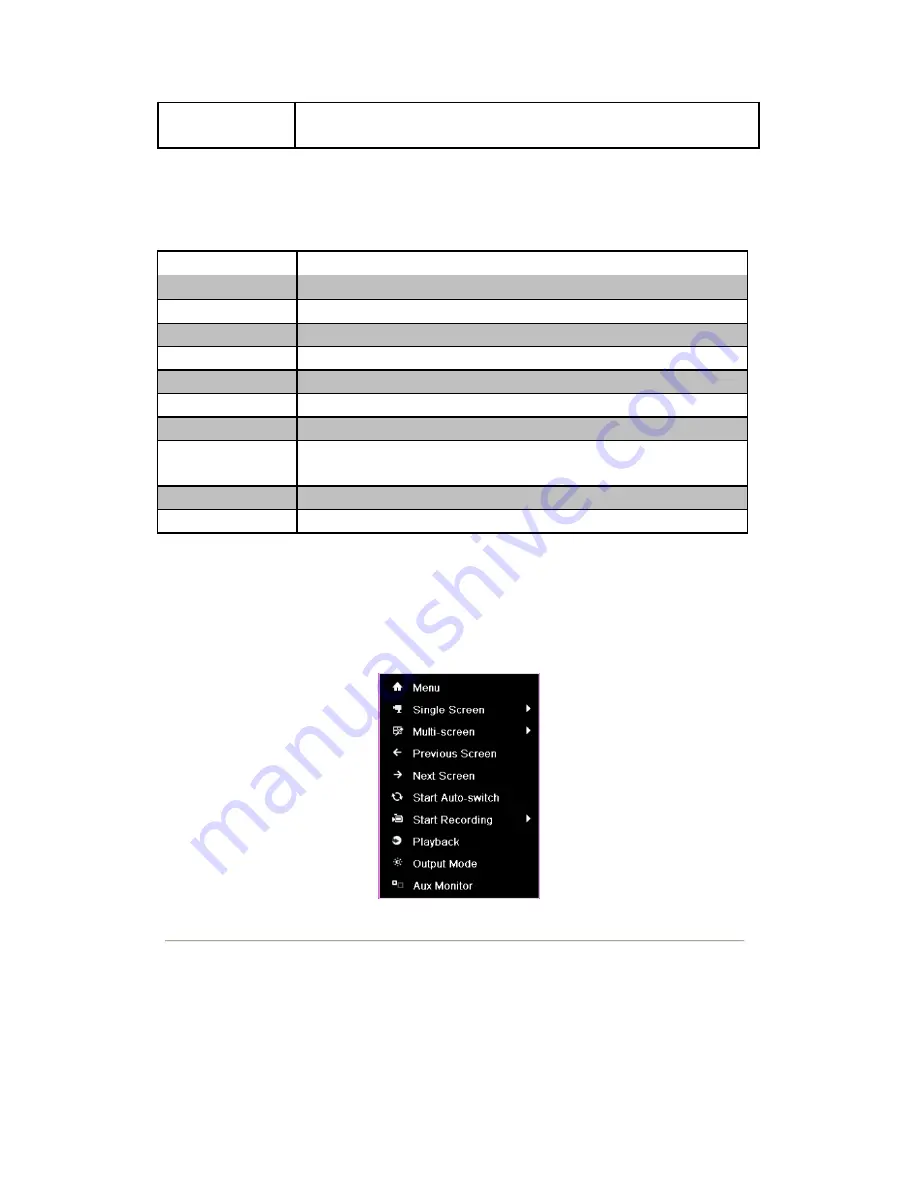
Table 3. 4 Mouse Operation in Live View
Name
Description
Menu
Enter the main menu of the system by right clicking the mouse.
Single Screen
Switch to the single full screen by choosing channel number from the dropdown list.
Multi-screen
Adjust the screen layout by choosing from the dropdown list.
Previous Screen
Switch to the previous screen.
Next Screen
Switch to the next screen.
Start/Stop Auto-switch
Enable/disable the auto-switch of the screens.
Start Recording
Start normal recording or motion detection recording of all channels.
Playback
Enter the playback interface and start playing back the video of the selected channel
immediately.
Output Mode
Four modes of output supported, including Standard, Bright, Gentle and Vivid.
Aux Monitor
Switch to the auxiliary output mode and the operation for the main output is disabled.
Note:
The
dwell time
of the live view configuration must be set before using
Start Auto-switch
.
Note:
If you enter Aux monitor mode and the Aux monitor is not connected, the mouse operation is disabled; you
need to switch back to the Main output with the MAIN/AUX button on the front panel or remote.
Note:
If the corresponding camera supports intelligent function, the Reboot Intelligence option is included when
right-clicking mouse on this camera.
Figure 3. 1 Right-click Menu
3.2.3 Using an Auxiliary Monitor
Certain features of the Live View are also available while in an Aux monitor. These features include:
•
Single Screen:
Switch to a full screen display of the selected camera. Camera can be selected from a
Summary of Contents for NVR-52 Series
Page 1: ...NVR 52XX 58XX 60XX Series NVR...
Page 11: ...Chapter 1 Introduction...
Page 26: ...Chapter 2 Getting Started...
Page 38: ...Chapter 3 Live View...
Page 44: ...Figure 3 6 Live View Strategy...
Page 49: ...Chapter 4 PTZ Controls...
Page 59: ...Chapter 5 Record and Capture Settings...
Page 66: ...Figure 5 12 Copy Schedule to Other Channels...
Page 80: ...Chapter 6 Playback...
Page 92: ...Figure 6 21 Interface of External File Playback...
Page 97: ...Chapter 7 Backup...
Page 116: ...Chapter 8 Alarm Settings...
Page 121: ...inputs to copy the settings to them Figure 8 8 Copy Settings of Alarm Input...
Page 130: ...Chapter 9 Network Settings...
Page 148: ...Chapter 10 HDD Management...
Page 150: ...Figure 10 5 HDD Status Changes to Normal Note Initializing the HDD will erase all data on it...
Page 160: ...Figure 10 22 View HDD Status 2...
Page 164: ...Chapter 11 Camera Settings...
Page 168: ...Chapter 12 NVR Management and Maintenance...
Page 172: ...Figure 12 5 HDD Information Interface...
Page 180: ...Chapter 13 Others...
Page 189: ...Appendix...
Page 192: ......


