background image

48

CHECK AND ADJUSTMENT PROCEDURES

Bevel Width and Height Adjustment for Step Beveling (Type PLB-8S only)

3.12.2 Bevel height in step beveling

Check the bevel height.

1) Load the circle 45 internal data and process a lens with 2 mm in step width and 1.5 mm in

step height.

Use a lens of CR39 and -4 to -5 D.

2) Check that the bevel height of the processed lens is the same as the setting.

2

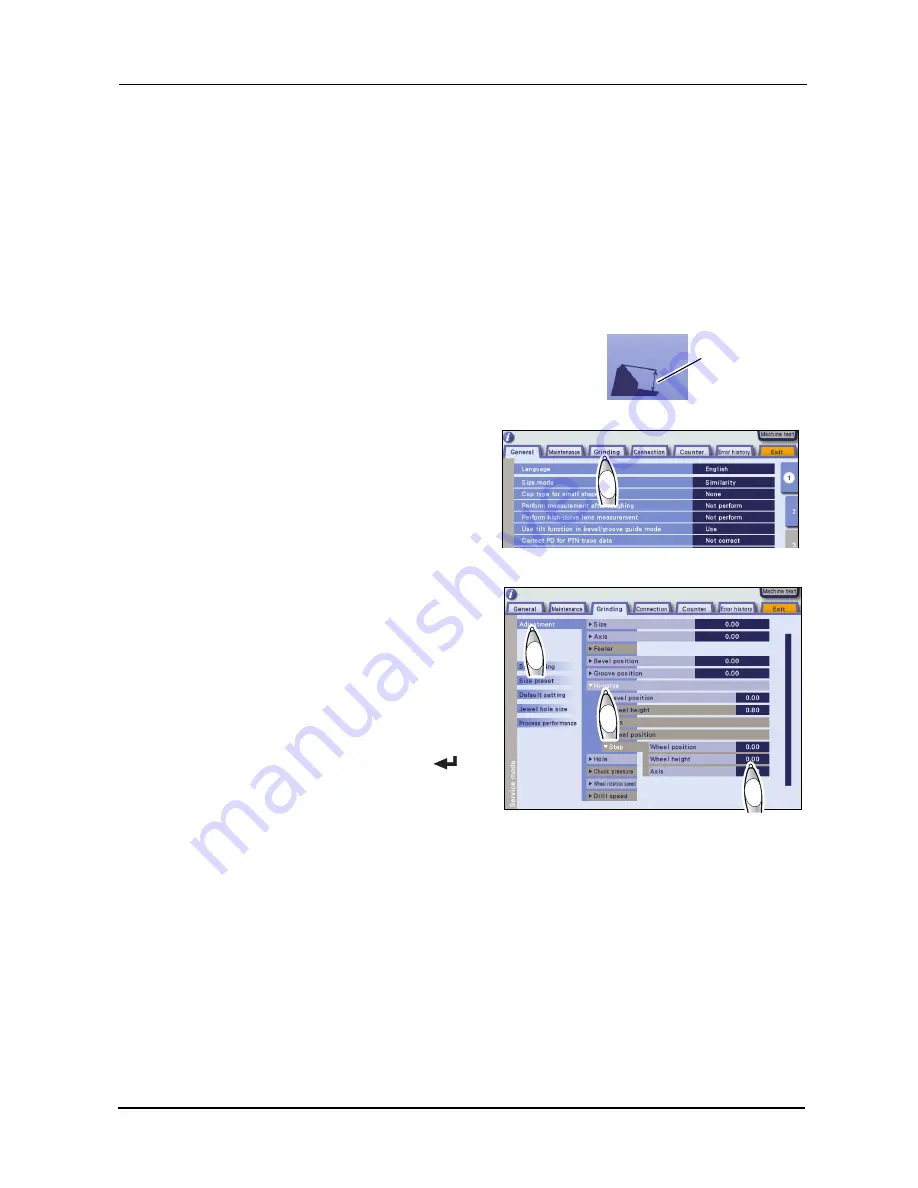
When the bevel height is not 1.5 mm, change the
parameter. 

1) Display the menu screen in service mode. See

“3.2.1 Entering service mode” (page 16)

2) Press the Grinding tab on the menu

screen.

The Grinding screen is displayed.

3) Press the Adjustment button.

4) Press the Hi-curve button.

5) Press the "Wheel height" numeric

field.

The numeric keypad appears.

6) Change the parameter value.

Enter the value and press the 

 but-

ton with the numeric keypad.

Increase the value. 

 The height

becomes higher.

Decease the value. 

 The height becomes lower.

3

Press the Exit tab to return to the layout screen.

4

Repeat Steps 

1

 to 

3

 until the bevel height becomes proper.

Bevel height

2)

2)

3)

3)

4)

4)

5)

5)

Summary of Contents for ME 1200

Page 1: ...ith the instrument for use by service personnel during installation The contents are not intended for customer use and should only be conducted by qualified personnel INSTALLATION MANUAL INSTALLATION MANUAL Multifunction edger ...

Page 2: ... 113 0033 Japan Telephone 81 3 5844 2641 Facsimile 81 3 5844 2642 NIDEK INCORPORATED 47651 Westinghouse Drive Fremont California 94539 U S A United States Agent Telephone 1 510 226 5700 Facsimile 1 510 226 5750 NIDEK S A Europarc 13 rue Auguste Perret 94042 Créteil France EU Authorized Representative Telephone 33 1 49 80 97 97 Facsimile 33 1 49 80 32 08 October 2010 44501 P932A Printed in Japan Or...

Page 3: ... this manual signal words are used to designate a degree or level of safety alerting The def initions are as follows WARNING Indicates a potentially hazardous situation which if not avoided could result in death or serious injury CAUTION Indicates a potentially hazardous situation which may result in bodily injury or damage to equipment Even situations indicated by CAUTION may result in serious in...

Page 4: ...or transporting the instrument Unpack the package in an area with ample space checking the safety of the environment Keep the packing materials to move or transport the instrument Do not install the instrument in a place exposed to direct sunlight or hot and humid places Do not install the instrument in a place which has a tilted floor or vibration Leave a space of 10 cm or more behind the instrum...

Page 5: ...material selection for the lens being processed If an improper material is selected the lens may break or the lifetime of processing wheels may be reduced substantially Be sure not to drop the removed screws inside the instrument or lose them ...

Page 6: ...IV ...

Page 7: ...tment 18 3 3 1 Checking the size 18 3 3 2 Adjusting the size 18 3 4 Surface Measurement LMU Calibration 20 3 5 Safety Bevel Check and Adjustment 22 3 5 1 SFB setting 22 3 6 Drilling Check and Adjustment 24 3 6 1 Loading the drilling confirmation shape data 24 3 6 2 Adjusting the hole diameter 27 3 6 3 Adjusting the hole depth 28 3 6 4 Adjusting the hole slot reference drill zero point and drill ho...

Page 8: ...44 3 11 Groove Depth Adjustment 45 3 12 Bevel Width and Height Adjustment for Step Beveling Type PLB 8S only 47 3 12 1 Bevel width in step beveling 47 3 12 2 Bevel height in step beveling 48 3 13 Clock Check 49 4 CHECK LIST 51 4 1 Me 1200 Installation Work Check List 51 ...

Page 9: ...ration Digital caliper marked in 0 01 mm for adjustment ø2 0 m6 straight pin for adjustment Centering device for adjustment Axis adjustment jig 40300 1530 Graduated loupe for adjustment Test lens for adjustment CR39 SPH 3 00 to 5 00 D 17 pieces CR39 SPH 1 00 D 2 pieces The number of test lenses above is necessary for check Prepare extra lenses for adjustment ...

Page 10: ...2 REQUIREMENTS Requirements ...

Page 11: ...oduced and normal processing may not be performed WARNING Use a hand cart to move the instrument to a different location At least two persons are necessary to lift the instrument Back injury or stumbling may occur when a single person attempts to move the instru ment When lifting the instrument do not lift it by its cover Lift it by placing hands at front lower parts A and B rear lower parts C and...

Page 12: ...or removal 3 Remove the accessory case upper pad and upper right and left packing support in order 4 Place the main body in the instal lation position by two persons or more The weight of the main body is approximately 52 kg See 2 1 Installation Location and Instrument Main Body Movement page 3 㸣 㸣 Υ Υ 㸯 㸣 㸣 Υ Υ 㸯 3 1 2 4 Pallet base Tape Shipping carton Joints 4 units Shipping carton accessory ca...

Page 13: ...it Hexagonal screwdriver 2 5 mm 1 unit Hexagonal wrench 3 mm 1 unit Hexagonal wrench 5 mm 1 unit Wrench for attaching removing grooving wheel 1 unit Wrench for attaching removing drill bit 1 unit Drill bit o0 8 L6 5 1 set 10 bits Drain hose adapter set 1 set Feedwater hose 2 units Tray 1 unit Dressing stick for glass roughing wheel WA80K 1 unit types PLB G PL 8 PLB 2R8 Dressing stick for finishing...

Page 14: ...when it is closed 2 Loosen two set screws on the spacer with the provided hexagonal screwdriver 2 5 mm 3 Push the bottom of the spacer to remove the spacer from the wheel shaft 4 Push the lens chuck shaft up The lens chuck shaft moves slightly upward Store the removed screw in the accessory case It is used for securing the carriage when moving the instrument Carriage fixing screw Accessory tray Sp...

Page 15: ... the right LMU surface feeler until all the way to the left return it to the right 8 After manually moving the left LMU surface feeler until all the way to the right return it to the right Be sure to move the surface feelers as described in Steps 7 and 8 The right and left feelers may be sluggish just after the instrument is unpacked If the surface feel ers are not moved as described the initializ...

Page 16: ...k Drain pipe Cuff Connect the two feedwater hoses to the inlets on the underside of the main body Connect the feedwater hose labeled as to the rear inlet and feedwater hose labeled as to the front inlet 1 2 Connect the two feedwater hoses to the tank as follows Connect the feedwater hose labeled as to Pump 1 and feedwater hose labeled as to Pump 2 1 2 Inlets ...

Page 17: ...sion cord 2 units Drain pipe 1 unit Feedwater hose 2 units Cuff 1 unit Stocking filter 20 units Pump and tank 1 unit 2 Screw the drain pipe into the cuff 3 Screw the other end of the drain pipe into the hose adapter Drain pipe Feedwater hoses 2 units Stocking filter 20 units Cuff Extension cords 2 units Pump and tank Drain pipe Cuff Hose adapter ...

Page 18: ...k is that for Pump 2 1 Push the feedwater hose labeled as into the rear inlet Push the hose until it clicks 2 Push the feedwater hose labeled as into the front inlet Push the hose until it clicks See 2 5 1 Pump and tank connection diagram page 8 6 Put water into the tanks up to the guide of water volume illustrated in the figure to the right Do not put a plastic sheet in the tank The pump fill may...

Page 19: ...he table and connect it to the outlet for Pump 1 in the right side of the main body 3 Connect the power cord with label 2 with the extension code with label 2 4 Route the extension code through the hole on the top or rear of the table and connect it to the outlet for Pump 2 in the right side of the main body 9 Put the tank back into the table 10 Connect the feedwater hoses to the tank 1 Push the f...

Page 20: ...ngth causes it to bend cut it to the proper length 12 Connect the power cord to the outlet on the rear side of the main body 13 Connect the plug of the power cord to a wall outlet CAUTION Connect the main power plug to a grounded outlet Electric shock or fire may occur in the event of malfunction or power leakage Drain pipe Feedwater hoses ...

Page 21: ...e right of Dressing 5 Check the cleaning water and water curtain Pressing the Cleaning button displays the screen as below 1 Press the button and confirm that water flows from the cleaning water nozzle 2 Press the button and water flows from the water curtain nozzle Check connection of the feedwater hoses and pump and tank power codes when the cleaning water and or water curtain do not flow proper...

Page 22: ...de of the processing chamber increases or decreases 4 Turn the flow control RIGHT valve to the left and right and check that the water volume in the rear side of the processing chamber increases or decreases 6 Press the button to exit cleaning mode 7 Press the Exit tab to return to the layout screen Flow control LEFT valve Flow control RIGHT valve ...

Page 23: ...nt Safety bevel adjustment Drilling confirmation shape processing Hole diameter check Hole depth check Hole slot reference drill zero point drill hole vertical position check Front surface offset Axis check and adjustment Polish check and adjustment Bevel check and adjustment Groove position and depth check and adjustment Finish Load the circle 45 internal data and pro cess a lens with the Two Poi...

Page 24: ...ice mode Press the button while pressing the button The menu screen in service mode is displayed 2 While in service mode the gray bar indi cating service mode is displayed in the left side of the screen 3 Press the Exit tab to return to the layout screen Processing performances may be affected by transport and or the installation conditions of the instrument Check and adjust the processing perform...

Page 25: ...d internal shape data 1 Press the desired button to the right of Shape for adjustment Circle 45 Press the Circle 45 button to the right of Shape for adjustment Square 45 Press the Square 45 button to the right of Shape for adjustment Rectangle 50 25 Press the Rectangle 50 25 button to the right of Shape for adjustment 2 Loading the internal shape data auto matically returns to the layout screen Th...

Page 26: ...ssed lens with a caliper and check the size The outer diameter of the flat edged lens is within ø45 00mm 0 05 3 3 2 Adjusting the size 1 Display the menu screen in service mode See 3 2 1 Entering service mode page 16 Outer diameter Within ø45 00 mm 0 05 Calibrate surface measurement LMU once when the size is outside the range See 3 4 Surface Measurement LMU Calibration page 20 After the surface me...

Page 27: ... numeric keypad appears 3 Change the parameter by the differ ence from 45 00 mm Enter the value with the numeric keypad and press the button Example When the outer diameter is ø45 20 reduce the parameter value by 0 20 3 Press the Exit tab to return to the layout screen 4 Repeat Steps 1 to 3 until the outer diameter becomes within ø45 00 0 05 for beveled lens and ø45 00 0 10 for flat edged lens 2 1...

Page 28: ... Maintenance screen is displayed 4 Attach the RMU LMU calibration jig to the lens adapter 1 Set the RMU LMU calibration jig to the lens adapter as shown to the right 2 Press the button to secure the jig CAUTION Clean the surface feelers LMUs before calibration Dirty feelers may cause improper measurement The RMU LMU calibration jig easily comes loose from the lens adapter As it may fall in the pro...

Page 29: ...alibration jig and press the button to unlock it for removal 8 Load the circle 45 internal data and process a lens with the settings as Two Point Flat None polish None S F B Size 0 00 Measure the outer diameter of the processed lens to check the size The outer diameter of the flat edged len must be within ø45 00 mm 0 05 See 3 3 1 Checking the size page 18 9 Adjust the size when the outer diameter ...

Page 30: ...the menu screen The Grinding screen is displayed 3 Press the SFB setting button The SFB setting parameters are dis played 4 Check the safety bevel amount of Medium Press Medium Rear Bevel 0 4 Front Bevel 0 3 Exec Rear Flat 0 4 Font Flat 0 3 2 3 4 Safety bevel amount of the front surface Safety bevel amount of the rear surface Safety bevel amount of the front surface Safety bevel amount of the rear...

Page 31: ...Measure the front and rear safety bevel amounts of the processed lens and check them 6 Change the parameter corresponding to the wheel position until the safety bevel amount becomes 0 2 mm to the value set in Step 4 after flat edging To increase the safety bevel amount increase the value To reduce the safety bevel amount decrease the value 7 Check and adjust the bevel including the bevel position ...

Page 32: ...ing service mode page 16 2 Press the Maintenance tab The Maintenance screen is displayed 3 Load the drilling confirmation shape data 1 Press the desired drilling confirma tion shape button Confirmation Hole Hole diameter Hole position Front surface offset Hole depth 2 Loading the internal shape data automatically returns to the layout screen The screen to the right is an example of Confirmation Ho...

Page 33: ... 18 50 5 00 0 8 Auto 4 9 60 18 90 9 60 18 90 0 8 Angle 0 0 0 0 drilled through 5 9 60 21 00 9 60 18 90 0 8 X Y 0 0 0 5 0 0 drilled through 6 9 60 21 00 9 60 18 90 0 8 X Y 0 0 0 5 0 0 drilled through 7 17 00 17 00 0 8 Angle 0 0 0 0 drilled through 8 17 00 17 00 0 8 Angle 30 0 0 0 drilled through 9 17 00 17 00 2 0 Auto 0 0 drilled through 10 4 00 18 90 4 00 18 90 0 8 Angle 0 0 0 0 drilled through 11...

Page 34: ... to 6 and 10 to 12 Hole slot reference It is normal when the difference between A and B in the figure below is within 0 1 mm Drill zero point It is normal when the difference between C and D in the figure below is within 0 1 mm Drill hole vertical position It is normal when the L in the figure below is 37 0 0 1 mm 5 Check the front surface offset It is normal when holes 7 and 8 are drilled in the ...

Page 35: ...ng screen is displayed 1 Press the Adjustment button 2 Press the Hole button 3 Adjust the hole diameter Press the Diameter adjustment numeric field Change the parameter value with the numeric keypad Enter the value and press the button When the ø2 0 straight pin does not pass through the hole increase the hole diameter When the ø2 0 straight pin is loose around the hole reduce the hole diameter 4 ...

Page 36: ...creen is displayed 1 Press the Adjustment button 2 Press the Hole button 3 Adjust the hole depth Press the Depth adjustment numeric field Change the parameter value with the numeric keypad Enter the value and press the button When holes 1 to 3 are all drilled the reference value of Depth adjustment is 0 2 mm When holes 1 to 3 are not drilled at all the reference value of Depth adjustment is 0 2 mm...

Page 37: ...n shape is checked 1 Display the menu screen in service mode See 3 2 1 Entering service mode page 16 2 Press the Grinding tab on the menu screen The Grinding screen is displayed 1 Press the Adjustment button 2 Press the Hole button zAdjusting the hole slot reference When the difference between A and B is 0 1 mm or more press the Hole slot ref erence numeric field Change the parameter value with th...

Page 38: ...erence between C and D is 1 0 mm set the parameter to 0 5 zAdjusting the drill hole vertical position Press the Drill hole vertical position numeric field when the L length is not 37 0 mm 0 1 mm Change the parameter value with the numeric keypad Enter the value and press the button For L 37 2 mm set the parameter to 0 1 3 Press the Exit tab to return to the layout screen 4 Repeat processing the le...

Page 39: ... 16 2 Press the Grinding tab on the menu screen The Grinding screen is displayed 1 Press the Adjustment button 2 Press the Hole button 3 Adjust the front surface offset 1 Press the Front surface offset numeric field when the hole positions of 7 and 8 are not aligned The numeric keypad appears 2 Change the parameter value with the numeric keypad Enter the value and press the button When the 30º til...

Page 40: ...3 2 1 Entering service mode page 16 3 Load the square 45 internal data See 3 2 2 Loading the shape for adjust ment page 17 Process a lens with the settings as Two Point Flat None polish Medium S F B and Size 0 00 4 Check the axis angle using the axis adjustment jig Adjust the axis angle when it is not 0 5º 5 Adjust the axis angle Pliable cup The edged surface rises up to the right Axis adjust ment...

Page 41: ...c keypad appears 5 Change the parameter value with the numeric keypad Enter the value and press the button Change the parameter value by the shifted axis angle When the lens edge is shifted in the upper right direction when viewed from the rear surface increase the value Example When lens edge is shifted 1º in the upper right direction increase the parameter value by 1 00 6 Press the Exit tab to r...

Page 42: ...e mode See 3 2 1 Entering service mode page 16 2 Press the Grinding tab on the menu screen The Grinding screen is displayed 3 Press the SFB setting button The SFB setting parameters are dis played 2 Set the safety bevel amount on the SFB axis parameter 1 Press the SFB axis button 2 Press the Rear Flat numeric field The numeric keypad appears 3 Change the parameter value with the numeric keypad Ent...

Page 43: ... of the upper right is larger when viewed from the front surface increase the value When the safety bevel amount of the upper left is larger decrease the value 3 Press the Exit tab to return to the layout screen 4 Repeat Steps 1 to 3 until the safety bevel amount is proper 5 Perform beveling Change Rear Bevel Front Bevel in the same manner 㸩 㸫 Front surface The safety bevel amount of the upper lef...

Page 44: ...ode See 3 2 1 Entering service mode page 16 2 Press the Grinding tab on the menu screen The Grinding screen is displayed 3 Press the Adjustment button 4 Press the Size button 5 Press the Polish differential button 6 Press the CR39 Bevel numeric field The numeric keypad appears 7 Change the parameter value with the numeric keypad Enter the value and press the button When the lens edge is left unpol...

Page 45: ...lished surface of a plastic lens processed with the circle 45 internal data If one side of the beveled edge is left unpolished change the Bevel position Polish parameter 1 Change the Bevel position Polish parameter 1 Display the menu screen in service mode See 3 2 1 Entering service mode page 16 2 Press the Grinding tab on the menu screen The Grinding screen is displayed 3 Press the Adjustment but...

Page 46: ... surface of a plastic lens processed with the circle 45 internal data If the right or left of the lens edge remains unpolished change the Polish axis parameter 1 Decrease CR39 Flat of the Polish differential parameter by 0 2 See 3 8 1 Lens edge is left unpolished or burnt page 36 2 Change the Polish axis parameter 1 Display the menu screen in service mode See 3 2 1 Entering service mode page 16 2 ...

Page 47: ...of the edge remains unpolished increase the value Example When viewed from the lens front the upper right of the edge remains unpolished decrease the value 3 Press the Exit tab to return to the layout screen 4 Repeat Steps 1 and 2 until the polishing becomes uniform in circumference 5 Set the parameter values of CR39 Flat of the Polish differential parameter back to their original values 3 3 4 4 5...

Page 48: ...ish and flat polish a lens 2 Measure the outer diameter of the processed lens When the outer diameter is not within ø45 00 0 10 mm change the Polish size parameter See 3 2 2 Loading the shape for adjustment page 17 See 3 3 Size Check and Adjustment page 18 2 Adjust the polish size 1 Display the menu screen in service mode See 3 2 1 Entering service mode page 16 2 Press the Grinding tab on the menu...

Page 49: ... the bevel polished lens size is not correct Hi index Bevel zWith the lens material set to Hi index the flat polished lens size is not correct Hi index Flat zWith the lens material set to Polyca or Acrylic the bevel polished lens size is not correct Polyca Acrylic Bevel zWith the lens material set to Polyca or Acrylic the flat polished lens size is not correct Polyca Acrylic Flat zWith the lens ma...

Page 50: ...m and the outer diameter Change the parameter value with the numeric keypad Enter the value and press the button Example When the outer diameter is ø45 15 decrease the parameter value by 0 15 3 Press the Exit tab to return to the layout screen 4 Repeat Steps 1 to 3 until the outer diameter becomes ø45 10 0 10 mm ...

Page 51: ... menu screen in service mode See 3 2 1 Entering service mode page 16 3 Press the Grinding tab on the menu screen The Grinding screen is displayed 1 Press the Adjustment button 2 Press the Bevel position numeric field The numeric field turns orange and the numeric keypad appears 3 Change the parameter value Enter the value and press the button with the numeric keypad Decrease the numeric value The ...

Page 52: ...enu screen in service mode See 3 2 1 Entering service mode page 16 3 Press the Grinding tab on the menu screen The Grinding screen is displayed 1 Press the Adjustment button 2 Press the Groove position numeric field The numeric field turns orange and the numeric keypad appears 3 Change the parameter value Enter the value and press the button with the numeric keypad Decrease the value The groove mo...

Page 53: ...y made the depth is within 0 10 mm on the processed lens 2 Display the menu screen in service mode See 3 2 1 Entering service mode page 16 3 Press the Grinding tab on the menu screen The Grinding screen is displayed 1 Press the Adjustment button 2 Press the Groove position button 3 Press the Depth numeric field in the Groove position parameter The numeric field turns orange and the numeric keypad ...

Page 54: ...ve Depth Adjustment Example To deepen the groove depth by 0 5 mm increase the value by 0 50 4 Press the Exit tab to return to the layout screen 5 Repeat steps 1 to 4 until the groove depth becomes proper Increase the value Decrease the value ...

Page 55: ...sed lens is the same as the setting 2 When the bevel width is not 2 mm change the parameter in the following procedure 1 Display the menu screen in service mode See 3 2 1 Entering service mode page 16 2 Press the Grinding tab on the menu screen The Grinding screen is displayed 3 Press the Adjustment button 4 Press the Hi curve button 5 Press the Wheel position numeric field The numeric keypad appe...

Page 56: ...hange the parameter 1 Display the menu screen in service mode See 3 2 1 Entering service mode page 16 2 Press the Grinding tab on the menu screen The Grinding screen is displayed 3 Press the Adjustment button 4 Press the Hi curve button 5 Press the Wheel height numeric field The numeric keypad appears 6 Change the parameter value Enter the value and press the but ton with the numeric keypad Increa...

Page 57: ...49 CHECK AND ADJUSTMENT PROCEDURES Clock Check 3 3 13 Clock Check Check the date and time of the internal clock Change the time and date referring to Date and time in the operator s manual ...

Page 58: ...50 CHECK AND ADJUSTMENT PROCEDURES Clock Check ...

Page 59: ...installation After adjustment Medium Front Bevel At installation After adjustment Complete if the parameter setting of any other items has been changed Is the safety bevel axis proper Rear Flat At installation After adjustment Front Rear At installation After adjustment Rear Bevel At installation After adjustment Front Bevel At installation After adjustment Complete if the parameter setting of any...

Page 60: ...been changed Is the bevel position proper Bevel position At installation After adjustment Complete if the parameter setting of any other items has been changed Is the grooving proper Groove position At installation After adjustment Groove depth At installation After adjustment Complete if the parameter setting of any other items has been changed Is the step beveling proper Wheel position At instal...

Reviews: