background image

Option Installation     3-7

4. 

Slide the cover forward to meet the front panel.


NOTE:

  The cover fits tightly. If the cover does

not slide all the way to the front panel, place one
hand on the front of the unit while you slide the
cover forward from the rear.

5. 

Secure the cover by tightening the three thumb screws. Lock the system with a
padlock if you desire.

6. 

Connect the monitor, keyboard, mouse, and any other external options to the rear
of the system unit.

7. 

Plug in the power cable(s).

ADDING INTERNAL OPTIONS

This subsection provides instructions for installing the following options:

n


expansion boards

n


SIMM upgrade

n


processor upgrade

n


video upgrade

n


data storage devices


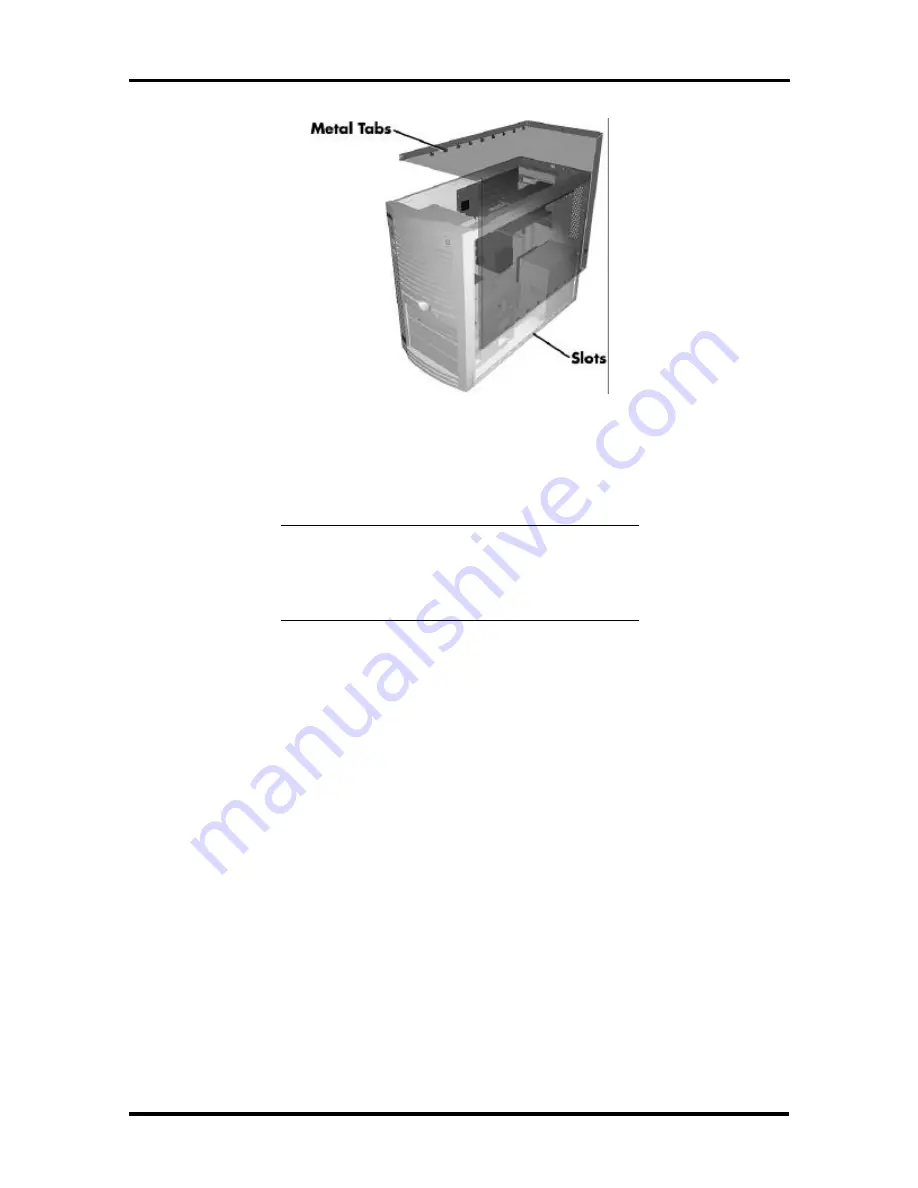
Figure Section 3-4   System Unit Cover Replacement

Summary of Contents for POWERMATE PRO2180 - SERVICE 1996

Page 1: ...re warranted in accordance with the terms of the Warranty Statement accompanying each product However actual performance of each such product is dependent upon factors such as system configuration customer data and operator control Since implementation by customers of each product may vary the suitability of specific product configurations and applications must be determined by the customer and is...

Page 2: ... Play 1 11 ISA Bus 1 11 PCI Local Bus 1 11 PCI IDE Ports 1 11 Parallel Interface 1 12 Serial Interface 1 12 Infrared Interface 1 13 Video Board 1 14 Video Support 1 14 Video Playback 1 15 Audio 1 15 SCSI Board 1 16 Diskette Drive 1 17 Hard Disk Drive 1 17 IDE Hard Drives 1 17 SCSI Hard Disk 1 18 Eight Speed CD ROM 1 19 CD ROM Reader Operation 1 19 CD ROM Reader Settings 1 20 Power Supply 1 20 Keyb...

Page 3: ...port 2 14 Intel Bus Mastering IDE Driver Installation 2 14 Installing the IDE Drivers 2 14 Configuring the IDE Drivers 2 15 SCSI Adaptec 7800 2 15 NEC DMI Installation 2 16 Microsoft Internet Explorer 2 16 McAfee s Virus Scan for Windows NT 2 17 Release Notes 2 18 Infrared IR Interface 2 18 Universal Serial Bus USB Connectors 2 18 AT T Interchange 2 18 Unsupported Monitor Resolutions 2 18 Interrup...

Page 4: ...8 Boot Speed 2 28 NumLock 2 29 Speaker 2 29 Setup Prompt 2 29 Hard Disk Pre Delay 2 29 Typematic Rate Programming 2 30 Video Mode 2 30 Mouse 2 30 Base Memory 2 31 Extended Memory 2 31 BIOS Version 2 31 Advanced Menu 2 31 Processor Type 2 31 Processor Speed 2 32 Cache Size 2 32 Peripheral Configuration 2 32 Peripheral Submenu 2 32 Advanced Chipset Configuration 2 34 Advanced Chipset Submenu 2 34 Ba...

Page 5: ...lity 2 43 NEC Bulletin Board Service 2 44 Using the BIOS Update Utility 2 45 SCSISELECT Utility 2 45 Desktop Management Interface 2 46 DMI Components 2 46 Manageable Components 2 46 CI Module 2 47 DMI Browser 2 47 Usage 2 48 Troubleshooting 2 48 Video Drivers 2 48 Changing Video Drivers 2 49 Section 3 Option Installation General Rules for Installing Options 3 1 Precautions 3 1 Optional Hardware 3 ...

Page 6: ...Diskette Drive Signal Cable 3 22 IDE Signal Cables 3 23 SCSI Cable 3 23 System Power Cables 3 24 Cabling an IDE or SCSI Device 3 24 Cabling a Diskette Drive 3 25 Storage Device Installation 3 26 3 1 2 Inch Drive Installation 3 26 Removing the Side Panel 3 29 Removing the Front Panel 3 30 Installing the 5 1 4 Inch Device 3 32 Replacing the Front and Side Panels 3 34 Adding External Options 3 34 Par...

Page 7: ... Drive Removal 5 8 3 1 2 inch Hard Disk Drive Removal 5 10 5 1 4 Inch Device Removal 5 11 Power Supply Removal 5 13 System Board Removal 5 14 Illustrated Parts Breakdown 5 15 Appendix A Connector Pin Assignments Parallel Interface Connector A 2 Serial Interface Connectors A 3 Keyboard and Mouse Connectors A 4 Power Supply Connector A 5 Storage Device Connectors A 6 Diskette Drive Connector A 7 IDE...

Page 8: ...C 4 Appendix D CD ROM Reader Specifications and Jumper Settings CD ROM Reader Specifications D 1 CD ROM Reader Connectors and Jumper Settings D 2 List of Figures 1 1 System Controls and Storage Device Slots 1 2 1 3 Hard Disk Drive Jumper Settings 1 18 1 4 CD ROM Reader Controls and Indicators 1 19 1 5 CD ROM Jumper Settings 1 20 2 1 Voltage Selector Switch 2 2 2 2 Keyboard Mouse Connections 2 3 2 ...

Page 9: ...nectors 3 23 3 16 Power Cable Connectors 3 24 3 17 Connecting IDE Device Cables 3 25 3 18 Connecting 1 2 MB Diskette Drive Cables 3 25 3 19 Locating the Power Supply 3 27 3 20 Removing the Power Supply Screws 3 28 3 21 Securing a 3 1 2 inch Drive 3 29 3 22 Removing Side Panel Screws 3 30 3 23 Removing the Front Panel 3 31 3 24 Removing the Slot Cover 3 31 3 25 Attaching the Device Rails 3 32 3 26 ...

Page 10: ...stem Board Removal 5 14 5 18 PowerMate Pro2200 2180 Series Illustrated Parts Breakdown 5 17 A 1 System Board Power and Interface Port Locations A 1 A 2 Parallel Interface Connector A 2 A 3 Serial Interface Connectors A 3 A 4 PS 2 Style Keyboard and Mouse Interface Connectors A 4 A 5 Storage Device Connector Locations A 6 A 7 Hard Disk LED Connector A 9 A 8 Power LED Connector A 10 A 9 Reset Button...

Page 11: ...3 13 4 1 NEC Service and Information Telephone Numbers 4 1 4 2 System Error Messages 4 4 4 3 PCI Error Messages 4 6 4 4 Problems and Solutions 4 7 4 5 Diagnostic Beep Codes 4 12 5 1 PowerMate Pro2200 2180 Series System Unit Disassembly Sequence 5 1 5 2 PowerMate Pro2200 2180 Series Field Replaceable Parts List 5 15 5 3 PowerMate Pro2200 2180 Series Memory Options 5 18 5 4 PowerMate Pro2200 2180 Se...

Page 12: ...Assignments A 10 A 11 Infrared Pin Assignments A 11 A 12 ISA Bus Pin Assignments A 12 A 13 PCI Bus Pin Assignments A 13 C 1 Hard Disk Specifications C 2 C 2 2 5 GB SCSI Hard Disk Jumper Settings C 3 D 1 Specifications for Eight Speed CD ROM Reader D 2 D 2 Jumper A Settings D 3 D 3 Jumper B Settings D 4 ...

Page 13: ...d operation information Also included are procedures for installing Window NT and configuring the system through the Setup utility program Using the BIOS Update utility information is also included Section 3 Option Installation provides installation procedures for adding optional expansion boards diskette and hard disk storage devices system and video memory and processor upgrades Section 4 Mainte...

Page 14: ...DIP dual in line package DMA direct memory access DMAC DMA controller DOS disk operating system DRAM dynamic RAM ECC error checking and correction ECP enhanced capabilities port ECP EGA Enhanced Graphics Adapter EPP Enhanced Parallel Port EPROM erasable and programmable ROM EVGA Enhanced Video Graphics Array F Fahrenheit FAX facsimile transmission FCC Federal Communications Commission FG frame gro...

Page 15: ... assistant PFP plastic flat package PIO parallel input output pixel picture element PROM programmable ROM RAM random access memory RAMDAC RAM digital to analog converter RGB red green blue RGBI red green blue intensity ROM read only memory rpm revolutions per minute R read RTC real time clock R W read write S slave SCSI Small Computer System Interface SG signal ground SIMM single inline memory mod...

Page 16: ... video Windows random access memory WRAM installed on a Matrox video board Multimedia configurations come with the above features and an eight speed CD ROM reader 20 watt W external speakers and a microphone The SCSI multimedia configurations come with 32 MB of system memory a 2 0 GB SCSI hard disk an Adaptec SCSI controller board and a 4 MB Matrox video board All systems ship with the following s...

Page 17: ...ble devices and two internal hard disk drive devices The accessible devices include the standard one inch high 3 1 2 inch 1 44 MB diskette drive and up to three 1 6 inch high 5 1 4 inch storage devices The internal device slots support up to two 1 inch high 3 1 2 inch hard disks Figure Section 1 1 shows the front panel features and the locations of the accessible storage devices in a system Figure...

Page 18: ...ntroller and support for an IrDA compatible infrared interface n PCI and ISA peripheral connectors on the system board n Support for up to 256 MB of 60 nanosecond ns single in line memory modules SIMMs n AMI BIOS in a flash memory device 2 MB Intel PA28FB200BX supports system setup and PCI auto configuration n Sound Blaster Pro compatible Crystal CS4236 audio chip COM1 Port COM1 Port COM2 Port COM...

Page 19: ... 3 5 inch drives one externally accessible two internal access only Device bay for installing externally accessible 5 25 inch devices up to three half height drives or one half height plus one full height drive n One 1 44 MB 3 5 inch high density diskette drive installed n PS 2 style keyboard and mouse connector n Speaker mounted on the system board n Password protection and padlock slot for syste...

Page 20: ...ance memory subsystem for Pentium Pro based systems PC87308 I O Controller Multimode parallel port Centronics compatible standard mode Enhanced capabilities port ECP Enhanced parallel port EPP Two RS 232C serial ports that support an IrDA and Consumer IR compliant Infrared interface Integrated real time clock with Century calendar functionality and 242 byte battery backed CMOS RAM Integrated 8042 ...

Page 21: ... always shadowed Shadowing allows any BIOS routine to be executed from fast 32 bit onboard DRAM instead of from the slower 8 bit flash device NEC s Flash ROM allows fast economical BIOS upgrades NEC Flash ROMs are reprogrammable system and video EPROMs With NEC s Flash ROM a ROM BIOS change n is fast and easily done using a Flash utility n eliminates the expensive replacement of ROM BIOS chips and...

Page 22: ...ilable HI DOS memory open to ISA and PCI bus A0000 C7FFF 160 KB Available HI DOS memory normally reserved for Video BIOS 9FC00 9FFFF 1 KB Extended BIOS data 80000 9FBFF 127 KB Extended conventional 00000 7FFFF 512 KB Conventional base memory I O Addressing The processor communicates with I O devices by I O mapping The hexadecimal hex addresses of I O devices are listed in Table Section 1 3 Table S...

Page 23: ... 01F7 Primary IDE channel 0200 0207 Game port 0220 022F CS4236 audio 0278 027F Parallel port 2 02F8 02FF On board serial port 2 0330 0331 MPU 401 MIDI 0376 Secondary IDE channel command port 0377 Secondary IDE channel status port 0378 037F Parallel port 1 0388 038B CS4236 audio 03BC 03BF Parallel port 3 03E8 03EF Serial port 3 03F0 03F5 Floppy channel 1 03F6 Primary IDE channel command port 03F7 w...

Page 24: ...MMs have not been qualified for use but they will be supported by the system board when they become available The SIMMs are 1 MB x 32 bit 4 MB 2 MB x 32 bit 8 MB 4 MB x 32 bit 16 MB 8 MB x 32 bit 32 MB and 16 MB x 32 bit 64 MB When the standard SIMMs are removed four 64 MB SIMMs may be installed for a total of 256 MB CAUTION SIMMs must match the tin metal plating used on the system board SIMM sock...

Page 25: ...eration for information on changing the interrupts using Setup Table Section 1 4 Interrupt Level Assignments Interrupt Priority Interrupt Device NMI I O channel check IRQ00 Reserved Interval Timer IRQ01 Reserved Keyboard buffer full IRQ02 Reserved Cascade interrupt from slave IRQ03 Serial Port 2 IRQ04 Serial Port 1 IRQ05 On board audio on multimedia configurations or User Available IRQ06 Diskette ...

Page 26: ...m Pro processor The bus supports burst modes that send large chunks of data across the bus allowing fast displays of high resolution images The PCI bus operates at half the Pentium Pro s processor speed and supports memory transfer rates of up to 105 MB per second for reads and up to 120 MB per second for writes depending on processor configuration The high bandwidth PCI bus eliminates the data bo...

Page 27: ...BCh 378h and 278h I O addresses and interrupts for the parallel port are given in Table Section 1 5 NOTE Any interrupts used for the built in parallel port are not available for ISA parallel ports Table Section 1 5 Parallel Port Addressing and Interrupts Starting I O Address Interrupt Level Port 378 IRQ05 LPT1 278 IRQ05 LPT1 or LPT2 3BC IRQ05 LPT1 or LPT2 378 IRQ07 LPT1 278 IRQ07 LPT1 or LPT2 3BC ...

Page 28: ...up and Operation for information on resetting the port through Setup Serial interface specifications include n Baud rate up to 19 2 KB per second n Word length 5 6 7 or 8 bits n Stop bit 1 1 5 or 2 bits n Start bit 1 bit n Parity bit 1 bit odd parity or even parity Serial interface signals are output through the system board s 9 pin D subconnector The connectors are located at the rear of the syst...

Page 29: ...ard VGA connector a video feature connector is supplied on the MGA Millennium video board The following subsections provide information about the graphics features Video Support The system comes with 2 MB of dual ported WRAM on the video board upgradeable to 4 MB of WRAM SCSI configurations come with 4 MB of WRAM upgradeable to 8 MB The default video mode is 800 by 600 pixels with 256 colors To ch...

Page 30: ... video data up to 30 frames per second fps Support includes n MPEG 1 n Video for Windows MPEG is a compression decompression standard developed by a professional video group called the Motion Picture Experts Group MPEG produces full screen 30 frames per second broadcast quality digital video This basically means viewing movies on your computer MGA Millennium accelerates color space conversion and ...

Page 31: ...bility The CS4236 includes a full Plug and Play interface and is comprised of seven logical devices including the Synthesizer Game Port Sound Blaster Sound System MPU 401 CD ROM and the CS4243 device itself Each logical device is configured into the host environment using the Plug and Play configuration methodologies The audio subsystem requires two DMA channels and one interrupt see below for def...

Page 32: ... GB per disk n Drivers may be single ended active or programmable via SCSI configuration utility DISKETTE DRIVE Up to two diskette drives are supported in the system The installed 3 1 2 inch diskette drive is connected by a single ribbon cable with two drive connectors The diskette drive cable plugs directly into the system board Typically there are no switches or jumpers that need to be set both ...

Page 33: ...evice Installation procedures in Section 3 when installing optional devices Figure Section 1 3 IDE Hard Disk Drive Jumper Settings NOTE When ATA and ATAPI devices are installed on the same channel primary or secondary the ATA device must be configured as the master SCSI Hard Disk All SCSI configuration systems ship with one internal 3 1 2 inch hard disk 1 inch high thin height installed behind the...

Page 34: ...ting headphones with a stereo mini jack plug n volume control for adjusting the headphone volume n busy lamp that lights during read operations n open close button for opening or closing the CD tray when the power is on n CD tray that opens and closes when the eject retract button is pressed n emergency eject hole in the front panel for manually opening the CD tray if power is lost Insert a jewele...

Page 35: ...ventilation The power supply provides 200 watts Connector locations are in Appendix A KEYBOARD The Chicony style 104 key keyboard is standard equipment for the system The keyboard provides a numeric keypad separate cursor control keys and 12 function keys capable of up to 48 functions Status lamps on the keyboard indicate Num Numeric Lock Caps Capital Lock and Scroll Lock key status The keyboard s...

Page 36: ...ystem specifications are included in Table Section 1 7 Table Section 1 7 Specifications Item Specification Dimensions and Weight Width 8 5 inches 215 mm Depth 18 3 inches 465 mm Height 14 6 inches 371 mm Weight 20 5 lb 9 32 kg dependent upon options Keyboard Dimensions and Weight Width 19 0 inches 48 3 cm Depth 8 4 inches 21 3 cm Height 1 6 inches 4 1 cm Weight 3 5 to 4 0 lb 1 6 to 1 8 kg Recommen...

Page 37: ...nfigurations 68 pin External SCSI connector Front Panel Power button Power indicator lamp Hard disk drive busy indicator lamp Reset button Infrared IrDA transceiver Processor Intel Pentium Pro 180 MHz or 200 MHz depending on the model Cache Memory 16 KB of primary cache 8 KB data 8 KB instruction and 256 KB of secondary cache integrated in the processor Flash ROM 2 MB Intel PA28FB200BX Flash ROM C...

Page 38: ...er rate Sustained 900 KB sec burst 14 3 MB sec PIO mode3 DMA mode2 Access time typical 140 msec Built in buffer 256 KB 128 KB Host interface IDE ATAPI SCSI Adapter Board PCI local bus 32 bit bus width Up to 133 MB second data transfer rate Fast and wide 20 MB second SCSI synchronous data rate 6 MB second SCSI asynchronous data rate Bus master DMA interface protocol SCSI 2 and SCSI 3 device protoco...

Page 39: ... refresh rate of 60 110 Hz and horizontal refresh rate of 63 107 Kz 1152 by 882 pixels 256 65K 16 7 million colors vertical refresh rate of 60 120 Hz and horizontal refresh rate of 54 110 Kz 1024 by 768 pixels 256 65K 16 7 million colors vertical refresh rate of 60 120 Hz and horizontal refresh rate of 48 104 Kz 640 by 480 pixels 256 65K 16 7 million colors vertical refresh rate of 60 200 Hz and h...

Page 40: ...ns required for playing and recording audio Yamaha OPL3 FM synthesizer MPU 401 Sound Blaster MIDI and game port interface Speakers 20 watt stereo speakers Power on off switch power lamp volume control Treble and bass tone control Magnetically shielded Built in stereo amplifier 20W RMS power output 2 way speaker system 2 inch tweeter 4 inch woofer Subwoofer output jack External DC jack Headphone ja...

Page 41: ...devices that generate magnetic fields electric motors transformers etc Place the carton on a sturdy surface and carefully unpack the system The carton contents include the system unit keyboard mouse power cord microphone Windows NT software software driver diskettes and user documentation Repack the system using the original shipping carton and packing material Part numbers for replacement shippin...

Page 42: ...g the power cord into the power socket see Figure Section 2 1 Figure Section 2 1 Voltage Selector Switch NOTE The correct AC input voltage must be properly set Select the appropriate voltage with the voltage selector switch located at the rear of the system set the switch down for 115V up for 230V ...

Page 43: ... Mouse Connections Monitor Connection NOTE Use the documentation that comes with your monitor along with the instructions in this subsection to set up the monitor 1 Locate the monitor signal cable 2 Connect the monitor signal cable to the VGA connector on the rear of the system unit Secure the cable with the connector screws Mouse Keyboard ...

Page 44: ...ection 3 Connect the monitor power cable to a properly grounded wall outlet Speaker and Microphone Connections Connect the speakers and microphone to the system unit as follows 1 Locate the speaker with the control knobs This is the right speaker see Figure Section 2 4 ...

Page 45: ...Y cable has a red and white connector at one end and a black connector with two rings at the other end Figure Section 2 5 Speaker Cables 3 Attach the left speaker cable to the speaker as follows n Insert one end of the speaker cable into the jack marked LEFT SPEAKER INPUT on the back of the left speaker Headphone Jack Bass Control Treble Control Volume Control Right Speaker Power Button Power Lamp...

Page 46: ... cable as follows n Insert the red connector into the red jack marked RIGHT LINE IN on the back of the right speaker n Insert the white connector into the white jack marked LEFT LINE IN on the back of the right speaker n Insert the other end of the cable into the Line Out jack on the rear of the system unit 5 Connect the microphone cable to the Microphone In connector on the rear of the system uni...

Page 47: ...ng the Microphone and Y Cable 1 Locate the AC adapter 2 Plug the AC adapter into the jack marked 15 DC on the back of the right speaker 3 Plug the other end of the cable into a properly grounded wall outlet Figure Section 2 8 Connecting the AC Adapter ...

Page 48: ...The power lamp lights green indicating that the system is on The system automatically goes into its Power On Self Test POST and checks system components One beep indicates that the system has successfully completed the POST If a problem occurs a series of beeps may sound If this happens repeatedly after powering on power off the system and Troubleshoot If a problem occurs and is not indicated by b...

Page 49: ...1 Insert the Setup Boot Diskette from the Windows NT kit into drive A 2 Power on the monitor and system unit The system performs a self test and starts to install Windows NT from the diskette in drive A 3 When prompted insert Setup Disk 2 and press Enter The Welcome to Setup screen appears with the following message The setup program for the Microsoft R Windows NT TM operating system version 3 51 ...

Page 50: ... Enter 10 Choose whether to install Windows NT on the FAT or NTFS file system see your installation guide for more information The default is the FAT file system press Enter to continue 11 The default path for installing Windows NT is WINNT35 Press Enter to accept the default 12 Place the Windows NT CD into the CD ROM reader and press Enter 13 When prompted remove any diskette in drive A and press...

Page 51: ...Local Account Password enter the user s name and tab to the next field and enter the password Click on Continue or press Enter 23 Choose the default application name and click on Continue or press Enter Windows NT will find the applications MS DOS Editor is the default 24 Set the local time date and time zone for your area and click on OK or press Enter 25 At the Detected Display window click on O...

Page 52: ...illennium Win NT Drivers diskette into drive A 7 From the Install From Disk window type A and click on OK 8 Scroll down and select the Matrox MGA Millennium 800x600x256 colors from the list Click on the Install button 9 Click on Yes to install the driver 10 Click on Continue at the prompt for the OEM driver files to install 11 After the drivers install a message box appears stating that the driver...

Page 53: ...upport Read this section before installing your drivers If you do not have a multimedia system skip to Intel Bus Mastering IDE Driver Installation Installing Audio Drivers Use the following procedure to install audio drivers 1 From the Main group double click on Control Panel The Control Panel menu appears 2 From the Control Panel double click on the Drivers icon 3 In the Driver window click on th...

Page 54: ...iver Installation The following procedures describe how to install and configure the IDE Bus Master drivers Read the instructions before installing the drivers Installing the IDE Drivers Use this procedure to install the IDE drivers 1 Insert the Intel Bus Master diskette into drive A 2 From the Program Manager menu select File Run 3 Type A SETUP EXE and click on OK 4 When a message box appears ask...

Page 55: ...k on the Close button to close the SCSI adapters screen 9 Close the Windows NT Setup program and click OK 10 From the Program Manager menu select File then Shutdown 11 Select Shutdown and Restart and click OK SCSI Adaptec 7800 Use the following procedure to install the Adaptec 7800 Family Manager If you do not have a SCSI installed adapter skip to NEC DMI Installation 1 From Program Manager select...

Page 56: ...and click OK 5 When the Welcome screen appears click on the Next button 6 Accept C DMINT and click on the Next button 7 A prompt appears asking for diskette 2 Insert the second diskette and click OK 8 When the Information window appears remove the diskette 9 Click OK and the computer automatically restarts with DMI installed 10 A General Information window appears Enter the information at this tim...

Page 57: ...s administrator and use the Windows NT password to continue with the installation 2 Insert the McAfee Virus Scan diskette into drive A 3 From Program Manager select File then Run 4 Type A SETUP EXE and click OK 5 At the Welcome screen click on NEXT 6 At the Installer Rights screen click on NEXT 7 For the Destination Location accept the directory C WIN32APP VirusScanNT and click on NEXT 8 Accept th...

Page 58: ...following NEC monitor resolutions are not supported n XP21 default VGA 640 by 480 by 256 and 1600 by 1200 by 256 n XP17 640 by 480 by 256 n M500 640 by 480 by 256 n 6FG 1280 by 1024 by 256 If you have one of these monitors at the stated resolutions you will experience screen wavering At the present time there is no fix for this except to avoid the resolutions Interrupt Assignment The BIOS setup un...

Page 59: ...ty Log txt 4 Click on Scan Now To maintain logging follow this procedure 1 Double click on the Scan icon from the VirusScan group 2 Change the pathname to read as follows C WIN32app VirusScanNT Scan Activity Log txt 3 Click on Scan Now and you can scan and collect logging information When you leave the application the settings are not saved so you must make this change every time you use the Scan ...

Page 60: ...on information when system power is off see Replacing the CMOS Battery in Section 4 NOTE NEC recommends that you print out or write down your current Setup parameters and store the information in a safe place This lets you restore your system to the current parameters if you ever need to replace the battery When to Use Setup The Setup utility lets you view and set system parameters Use the Setup u...

Page 61: ... system boots up to start the Setup utility There is about five seconds to press F1 before system boot continues 3 Setup s Main Menu appears and looks similar to the following screen Figure Section 2 10 Main Menu Main Advanced Security Exit System Date June 26 1996 F1 Help System Time 08 18 20 ESC Back Enter Select Floppy Options Press Enter Primary IDE Master NEC Previous Item Primary IDE Slave N...

Page 62: ...enu F6 Selects the Previous Value for the field F10 Loads the Previous Configuration values for this menu To display a submenu use the arrow keys to move the cursor to the submenu you want Then press Enter Main Menu The following subheadings describe the parameters available from the Main Menu Other Main Menu parameters are available by selecting submenus NOTE See How to Start Setup for a look at ...

Page 63: ...rive in your system Unless you are changing your hardware you do not need to change the diskette drive floppy A or B settings If you add an optional 5 1 4 inch diskette drive to your system select Floppy B and change the parameter to 1 2 MB 5 25 IDE Devices The standard hard disk drive C shipped with the system is configured Primary IDE Master This field reports the presence of and identification ...

Page 64: ...rtitions on them partitions beyond the primary partition will be assigned in ascending order based on available drive letters and other installed drives Partitions are assigned to primary partitions first and then to secondary partitions This means that when there are multiple drives with multiple partitions the logical drive numbering scheme may result in discontinuous logical partitions on the s...

Page 65: ... select User Definable and set the Number of Cylinders Number of Heads and Number of Sectors Maximum Capacity The hard disk maximum capacity value is calculated from the cylinder head and sector information in the Hard Disk Type IDE Translation Mode The IDE Translation Mode parameter controls the way in which the BIOS interacts with the drive in terms of drive geometry Proper choice is dependent u...

Page 66: ...ilities regarding IDE translation modes n UNIX does not currently support either LBA or ECHS and must utilize the Standard CHS method UNIX can support drives large than 528 MB but does so in its own way n OS 2 2 1 and OS 2 WARP can support LBA ECHS or Standard CHS methods Note that LBA support may require a switch setting on an OS 2 driver in order to operate in the mode n OS 2 2 0 and Novel Netwa...

Page 67: ...he BIOS will default to the largest number of sectors smaller than the value supported by the drive Fast Programmed I O Modes The Fast Program I O mode field controls the speed in which programmed I O PIO transfers occur on the PCI IDE interface This field should only be set to Disabled if a drive is being used which incorrectly reports an ability to function with advanced timings The following tw...

Page 68: ...load the operating system in the sequence listed below The defaults are as follows n First boot device CD ROM n Second boot device floppy disk n Third boot device hard disk n Fourth boot device disabled System Cache The default for the System Cache field is Enabled This field controls both the primary and secondary caches Setting the system cache to Disabled will hurt performance but might be requ...

Page 69: ...ing the Speaker field to Disabled will turn off the on board speaker Setup Prompt The Setup Prompt field allows you to disable the Press F1 Key To Enter Setup message displayed during POST It does not control access just the message This field can be either Enabled or Disabled the default is Enabled Hard Disk Pre Delay The Hard Disk Pre Delay field causes the BIOS to wait a specified time before a...

Page 70: ...he delay times are as follows n 250 msec default n 500 msec n 750 msec n 1000 msec Typematic Rate The Typematic Rate Delay field controls the speed characters repeat when you hold down a keyboard key The higher the number the faster the repeat delay times are as follows n 6 char sec default n 8 char sec n 10 char sec n 12 char sec n 15 char sec n 20 char sec n 24 char sec n 30 char sec Video Mode ...

Page 71: ... bar on the Main Menu displays a menu with the following options Use the arrow keys to select an item from the Advanced menu and press Enter n Processor Type n Processor Speed n Cache Size n Peripheral Configuration n Advanced Chipset Configuration n Power Management Configuration n Plug and Play Configuration n Event Logging Configuration CAUTION Setting items in this menu to incorrect values can...

Page 72: ... the following peripheral parameters Peripheral Configuration Mode The Peripheral Configuration Mode fields control whether the onboard resources are manually or automatically setup The options are as follows n Auto default automatically configures the IDE devices diskette drive serial ports and parallel port during power up n Manual provides the following options This selection allows you to cust...

Page 73: ...d applications This field can be either Enabled or Disabled The default is Disabled Parallel Port Address The parallel ports may be Auto detected or Disabled The default is Auto When Auto is selected the first free LPT port is assigned regardless of what is selected The parallel port address options are as follows n Disabled n LPT3 3BCh n LPT1 378h default n LPT2 278h n Auto Parallel Port Mode The...

Page 74: ...ses between 512 KB and 640 KB The two choices are described as follows n 512 KB directs address mapping between 512 KB and 640 KB to the ISA bus n 640 KB default directs address mapping between 512 KB and 640 KB to the system DRAM Unless using an ISA expansion board that requires access to this address range this field should not be changed ISA LFB Size The ISA Video Linear Frame Buffer LFB Size p...

Page 75: ...alette snooping feature is broken on the PCI card Latency Timer PCI Clocks The Latency Timer PCI CLOCK field controls the length of time an agent on the PCI bus can hold the bus when another agent has requested the bus Value choices range between 0 and 256 The default value is 66 In general this should not be changed If there are latency sensitive cards in the system such as audio cards and or net...

Page 76: ...dvanced Power Management field enables or disables power management support in BIOS Power management reduces the amount of energy used after specified periods of inactivity The Advanced Power Management menu offers you the choice of operating the system in a full on state or standby state with partial power reduction when idle NOTE This field must be enabled to be Energy Star Compliant n Enabled d...

Page 77: ...e the feature Typically there is some delay before the system enters power management mode and the speaker issues two tones The default setting for this parameter is None If there is a User Password in effect the Num Lock Caps Lock and Scroll Lock lamps on the keyboard flash in sequence indicating that the system is in Secure Mode See Set User Password field in Security Menu In this case the passw...

Page 78: ...S to set up PCI and ISA plug and Play expansion boards without conflicting with the legacy ISA cards The choices are as follows n Use ICU The BIOS depends upon the information provided by run time Plug and Play software Configuration Managers and ICU When Use ICU is chosen the BIOS depends on run time software to ensure that there are no conflicts between ISA boards with plug and play capabilities...

Page 79: ...oices When a value other than Disabled is selected a block is unshawdowed and the ISA Shared Memory Base Address field will appear Disabled default 16 KB 32 KB 48 KB 64 KB 80 KB 96 KB NOTE If a value of 96 KB is selected then the ISA Shared Memory Base Address field can only be set to C8000h if 80 KB then a value of C8000 or CC000h etc ISA Shared Memory Base Address The ISA Shared Memory Base Addr...

Page 80: ...rd is used to control access to the Setup Utility The following table describes the interaction between these passwords Table Section 2 5 Security Passwords Password Enabled Password at Boot Access Setup Access All Setup Fields Set Unat tended Start Set Security Hot Key User Password Only Yes No Yes Yes Yes Administrative Password Only No Yes Yes No No Both User and Administrative Passwords Yes No...

Page 81: ... or Disabled The default is Disabled n Administrative Password This field allows you to enable an administrative level password during POST and to enter Setup When both the User Password is and Administrative Password is are Enabled only the Administrative Password gives you full access to all Setup fields This field can be either Enabled or Disabled The default is Disabled Set User Password and S...

Page 82: ...the system enters secure mode locks the keyboard When this Hot Key combination is entered the Num Lock Caps Lock and Scroll Lock lamps on the keyboard will flash in sequence indicating that the system is in secure mode Exit Menu Selecting Exit from the menu bar displays the following exit options Click on a topic for a description of the Exit Menu options Note that Esc does not exit this menu You ...

Page 83: ...you have made in the Setup menus in since Setup was last saved select Discard Changes The program displays this message Discard Changes Press Enter to Continue Press ESC to Abort To reset all changes made in the current session of Setup press Enter Press Esc to return to the Exit submenu without affecting your changes FLASH UTILITY The system BIOS resides on a flash ROM in the system The flash ROM...

Page 84: ... menu click on Communications check that the settings match the following BBS parameters and click OK when done n Baud rate select a baud rate that matches the modem n Parity none n Data bits 8 n Stop bits 1 n Flow control Xon Xoff select Hardware if using 14 4 bps or higher 3 From the Phone menu click on Dial enter the BBS phone number 508 635 4706 and click OK Your business phone or location mig...

Page 85: ...drive A and turn on the system 4 When the flash upgrade menu appears choose Update Flash Memory Area from a file 5 When the menu asks you to enter a path filename use the arrow keys to select the bio file and press Enter 6 The utility asks for a confirmation that you want to load the new flash into memory Select Continue with Programming 7 After the upgrade completes remove the upgrade disk 8 Rebo...

Page 86: ...cations and managed components such as systems network cards and printers With DMI a management application such as Hewlett Packard s Openview provides a simplified method to collect information from different vendors computers operating on the network DMI is not a protocol but an interface that complements network protocols like the Simple Network Management Protocol SNMP DMI Components The NEC D...

Page 87: ...set attributes and manage DMI components The NEC Browser can only access the local MIF database The Browser lets you access MIF attributes according to the structure defined by the DMTF It is not intended to be a general PC management application If a more comprehensive management application is desired use a product such as Intel s LANDesk Manager The NEC DMI Browser has two sections an Overview ...

Page 88: ...each category The service topic option invokes the Windows utility SYSEDIT This utility displays all of your important system files CAUTION Using the SYSEDIT utility can put either your system or Windows into a state where it cannot operate If you are not familiar with the use of these files and their maintenance do not make any changes Troubleshooting If you experience trouble using the NEC DMI B...

Page 89: ... Board Service see NEC Bulletin Board Service earlier in this section NOTE A multi frequency monitor such as an NEC MultiSync monitor is required to access the extended graphics mode Changing Video Drivers The following procedure provides instructions on how to change your video drivers after they have been installed 1 From the Main program window double click the MGA Control Panel Display icon 2 ...

Page 90: ...ystem options n Turn off system power and unplug the power cable n Turn off and disconnect all peripherals n When handling boards or chips touch the system unit frame to discharge static n Do not disassemble parts other than those specified in the procedure n All screws are Phillips head unless otherwise specified n Label any removed connectors Note where the connector goes and in what position it...

Page 91: ...ld a chip or board by its edges Avoid touching the components on the board n Take care when connecting or disconnecting cables A damaged cable can cause a short in the electrical circuit Misaligned connector pins can cause damage to system components at power on When installing a cable be sure to route the cable so it is not pinched by other components and it is out of the path of the system unit ...

Page 92: ...Drives System accommodates a total of six data storage devices With the standard diskette drive and hard disk installed in the 3 1 2 inch drive slot there is still one more 3 1 2 inch slot available for a second hard disk drive The system also provides three accessible 5 1 4 inch 1 6 inch high device slots for optional storage devices In multimedia configurations a CD ROM reader is installed in th...

Page 93: ... only when the power cable is unplugged 1 Turn off and unplug the system unit 2 Disconnect the keyboard mouse monitor and any other device such as a printer connected to the rear of the system Label all cables to make reinstallation easier CAUTION Electrostatic discharge can damage computer components Discharge static electricity by touching a metal object before you remove the system unit cover 3...

Page 94: ...Option Installation 3 5 Figure Section 3 1 Cover Screws 4 From the rear of the system grasp the handle and pull it back so that the cover clears the padlock slot see Figure Section 3 2 ...

Page 95: ...lly tuck the cables out of the path of the cover 1 Position the cover on the side of the system unit about one inch back from the front panel Turn off and unplug the system unit 2 Insert the metal tabs on the top of the system unit cover into their slots on the chassis 3 Insert the metal tabs on the bottom of the cover into the slots on the chassis see Figure Section 3 4 Figure Section 3 2 Releasi...

Page 96: ...the cover by tightening the three thumb screws Lock the system with a padlock if you desire 6 Connect the monitor keyboard mouse and any other external options to the rear of the system unit 7 Plug in the power cable s ADDING INTERNAL OPTIONS This subsection provides instructions for installing the following options n expansion boards n SIMM upgrade n processor upgrade n video upgrade n data stora...

Page 97: ...y expansion boards see Plug and Play Support in Section 1 Plug and Play expansion boards allow you to simply install the board in an expansion slot without changing the hardware settings There are no system resource conflicts to resolve Plug and Play automatically configures the board for the system Industry standard 8 or 16 bit ISA and 32 bit PCI expansion boards are supported in the system unit ...

Page 98: ... industry standard 8 bit or 16 bit expansion boards The shared PCI ISA slot can be used either for a PCI or an ISA expansion board Figure Section 3 8 Expansion Slots Locations Expansion Board Installation 1 Remove the system unit cover see Removing the System Unit Cover in this section 2 Follow any preinstallation instructions that comes with the expansion board such as setting switches or jumpers...

Page 99: ... when removing the screw If the slot cover does fall into the unit remove it before replacing the cover 4 Hold the board by its edges and insert it into the expansion slot Align full size expansion boards with the guide rail at the front of the system unit Press the board firmly into the expansion slot connector You might have to gently rock the board from side to side to seat it into the connecto...

Page 100: ...ction Expansion Board Removal 1 Remove the system unit cover see Removing the System Unit Cover in this section 2 Label and remove any cables connected to the expansion board 3 Remove the screw that secures the board to the support bracket see Expansion Board Installation in this section 4 Pull the board out of the connector You might have to gently rock the board from side to side to release it f...

Page 101: ... parity generation and checking is not supported NOTE The system ships with EDO SIMMs SIMM sockets must contain the same size SIMMs SIMM memory must be installed in pairs of the same memory type The factory installed SIMMs are installed in bank 1 sockets 3 and 4 Bank 0 sockets 1 and 2 is empty CAUTION To avoid corrosion between different metals only use tin plated SIMM sticks To determine the memo...

Page 102: ... Empty 48 MB 8 MB 8 MB 16 MB 16 MB 80 MB 8 MB 8 MB 32 MB 32 MB 32 MB 8 MB 8 MB 8 MB 8 MB 40 MB 16 MB 16 MB 4 MB 4 MB 48 MB 16 MB 16 MB 8 MB 8 MB 64 MB 16 MB 16 MB 16 MB 16 MB 96 MB 16 MB 16 MB 32 MB 32 MB 64 MB 32 MB 32 MB Empty Empty 72 MB 32 MB 32 MB 4 MB 4 MB 80 MB 32 MB 32 MB 8 MB 8 MB 96 MB 32 MB 32 MB 16 MB 16 MB 128 MB 32 MB 32 MB 32 MB 32 MB 128 MB 64 MB 64 MB Empty Empty 136 MB 64 MB 64 M...

Page 103: ...Figure Section 3 13 4 Push the SIMM away from the locking tabs and remove it from the socket Figure Section 3 13 Removing a SIMM SIMM Installation 1 Remove the system unit cover see Removing the System Unit Cover 2 Locate the correct SIMM sockets for the desired configuration see Figure Section 3 6 and Table Section 3 1 If you need to remove a currently installed SIMM see SIMM Removal CAUTION Befo...

Page 104: ...nstalled check that you installed the SIMMs correctly Processor Upgrade The zero insertion force ZIF socket makes a processor upgrade easy The ZIF socket accepts a modified staggered pin grid array SPGA processor along with a programmable voltage regulator for the CPU core The socket provides a performance upgrade path to Pentium Pro OverDrive technology The voltage regulator programming is automa...

Page 105: ... away from the socket and as far back as it goes CAUTION Before picking up the processor reduce static discharge by touching the metal frame of the system unit 5 Lift the processor out of the socket 6 Install the new upgrade processor see the following procedure Processor Installation Processor Installation Install the processor into the system board s processor socket as follows 1 Remove the proc...

Page 106: ...n optional 2 MB video WRAM for a total of 4 MB of video WRAM SCSI configurations come with 4 MB of video WRAM and can be upgraded to 8 MB Install the upgrade module into the video board as follows 1 Remove the system unit cover see Removing the System Unit Cover 2 Remove the video board installed in the PCI expansion board slot see Expansion Board Removal 3 Locate the upgrade module connectors on ...

Page 107: ...RAM Module with the Socket 5 Replace the removed video board see Expansion Board Installation earlier in this section 6 Replace the system unit cover NOTE After upgrading the video memory different video driver can be used to display more colors at higher resolutions ...

Page 108: ... n up to four external IDE devices fifteen SCSI devices in SCSI configurations In the SCSI configuration the SCSI adapter board supports up to fifteen SCSI devices Other storage devices might require the installation of a compatible controller board Device Slots The system has six storage device slots see Figure Section 3 18 n a 3 1 2 inch accessible device slot which contains the standard 1 44 MB...

Page 109: ...age Device Slots You can install accessible devices such as a diskette drive tape drive or CD ROM reader with a 5 1 4 inch form factor frame in the 5 1 4 inch slots You can also install a hard disk with a 5 1 4 inch form factor in the 5 1 4 inch slots ...

Page 110: ...reader in multimedia models is the master device on the secondary IDE connector n SCSI device check the jumper settings on the device before you install it See the documentation that comes with the device for jumper setting information Each SCSI device must have a SCSI ID number set for the device The SCSI adapter board can have as many as fifteen devices connected to the board internal and extern...

Page 111: ...n the system does not require the replacement of the existing diskette drive signal cable Connect an optional diskette drive to the middle connector on the standard diskette drive signal cable The colored edge of the cable goes to pin 1 on the cable connector Align the red edge of the cable with pin 1 the notched end on the drive connector The following figure shows the standard three connector di...

Page 112: ...lowing figure shows a typical three connector IDE signal cable If the IDE cable is not keyed with a connector tab align the colored edge of the cable with the pin 1 side of the drive connector Figure Section 3 14 IDE Cable Connectors SCSI Cable SCSI configurations come with a three connector SCSI interface cable attached to the installed SCSI host adapter The following figure shows a typical three...

Page 113: ...es shipped with the system are already connected To connect an optional IDE or SCSI device proceed as follows If you are installing a second diskette drive see Cabling a Diskette Drive 1 Connect the appropriate connector on the IDE signal cable to the IDE connector on the IDE device Align the colored edge of the cable with the pin 1 side of the device connector NOTE For best performance connect th...

Page 114: ...r Cabling a Diskette Drive 1 Connect the appropriate connector on the diskette drive signal cable to the signal connector on the diskette drive see Figure Section 3 18 Align the colored edge of the cable with the pin 1 side of the device connector 2 Locate an available power connector coming from the power supply see System Power Cables 3 Connect the appropriate power cable to the power connector ...

Page 115: ...nt Panel and Side Panel 3 1 2 Inch Drive Installation Use the following procedure to install a hard disk drive 1 Remove the system unit cover see System Unit Cover Removal earlier in this section 2 Follow the preinstallation instructions that come with the device such as setting jumpers and switches 3 Remove and label any cables that interfere with installing the device 4 To install the internal h...

Page 116: ...Option Installation 3 27 Remove the power supply as follows n Locate the power supply as shown Figure Section 3 20 Locating the Power Supply n Disconnect the power supply cables from the system board ...

Page 117: ...screws attaching the power supply from the rear of the system Figure Section 3 21 Removing the Power Supply Screws n Remove the power supply from the system 5 Align the holes in the hard disk drive with the holes at the bottom of the system ...

Page 118: ...7 Connect the drive cables 8 Replace the power supply and reattach the power supply cables to the system board 9 Replace the four screws Removing the Side Panel Remove the side panel only if you are installing a 5 1 4 inch device The side panel does not need to be removed if you are installing a 3 1 2 inch hard disk drive ...

Page 119: ... screws from the top of the panel Figure Section 3 23 Removing Side Panel Screws Removing the Front Panel Remove the front panel only if you are installing a 5 1 4 inch device The front panel does not need to be removed if you are installing a 3 1 2 inch hard disk drive If you are installing a 3 1 2 inch hard disk drive see Installing the 3 1 2 Inch Drive 1 Remove the front panel by releasing the ...

Page 120: ... front panel by pressing the tabs inside the front panel and pushing the blank panel out 4 Remove the slot cover from the selected slot on the chassis by unscrewing the screws on each side of the cover Store the slot cover in case you choose to reinstall it in the future Figure Section 3 25 Removing the Slot Cover 5 Install the device see the following section Installing the 5 1 4 Inch Device ...

Page 121: ...eady attached See the documentation that comes with the device 4 Locate the device rails that ship with the system unit Attach the rails to the sides of the device with the four screws that come with the device see Figure Section 3 26 NOTE The device rails are labeled A and B and are not interchangeable If the rails prevent the device from aligning properly in the system reattach the rails on the ...

Page 122: ...e that come with the device Use the two screws you removed from the slot cover to secure the drive in place on the front of the system chassis Figure Section 3 28 Inserting the Device 8 Replace the system unit front panel and side panel see Replacing the Front and Side Panels 9 Replace the system unit cover see Replacing the System Unit Cover NOTE If you installed a 1 2 MB diskette drive remove th...

Page 123: ...of the system unit 2 Evenly press the front panel into position until the tabs lock the panel in place Figure Section 3 29 Aligning the Front Panel 3 Replace the side panel and reinsert the screws to hold the side panel in place 4 Continue at step 8 of the Installing the 5 1 4 Inch Device procedure ADDING EXTERNAL OPTIONS The following subsections provide information about attaching peripherals to...

Page 124: ...f 2 Connect the printer cable to the printer port on the rear of the system unit 3 Secure the cable with the screws provided 4 Connect the other end to the printer Figure Section 3 30 Connecting a Printer Cable Serial Devices NOTE Before connecting a serial device to the system be sure that you have set up the serial device correctly Follow the setup instructions that come with the option 1 Make s...

Page 125: ...Cable Figure Section 3 31 Connecting an RS 232C Cable SCSI Devices Connect an external SCSI device to the back of the system unit as follows NOTE Before connecting a SCSI device to the system be sure the SCSI device is set up correctly including the SCSI ID Follow the setup instructions that come with the option 1 Make sure the power to the system unit and SCSI device are off 2 Connect one end of ...

Page 126: ...SI device NOTE After powering on the system and SCSI device access the SCSISelect utility to set the SCSI ID and remove the termination on the SCSI adapter board see Section 2 for information on accessing SCSISelect Figure Section 3 32 Connecting a SCSI Cable ...

Page 127: ...rder NEC spare parts for customers In the U S call 1 800 233 6321 In Canada call 1 800 727 2787 To obtain option information literature dealer locations and sales leads Call 1 800 NEC INFO To open a service call or speak to a technician In the U S call 1 800 632 4565 To log onto the NEC Electronic Bulletin Board System BBS for down loading software drivers and the latest BIOS for ROM flashing Call...

Page 128: ...wing procedure for cleaning the system 1 Power off the system and unplug all power cables 2 Periodically wipe the outside of the system keyboard mouse and monitor with a soft clean cloth Remove stains with a mild detergent Do not use solvents or strong abrasive cleaners on any part of the system 3 Clean the monitor screen with a commercial monitor screen cleaning kit Or use a glass cleaner then wi...

Page 129: ... Do not wet or dampen the keyboard s printed circuit board PCB If the PCB acci dentally gets wet thoroughly dry it before reattaching the keyboard to the system unit Mouse Cleaning Under normal conditions the mouse has a self cleaning mechanism that prevents a buildup of dust or lint around the mouse ball and tracking mechanism Periodically however the mouse ball must be cleaned Use the following ...

Page 130: ...in Appendix A Switch settings are given in Appendix B Error Messages Messages may appear during the POST or at other times during computer operation Table Section 4 2 describes possible system error messages Table Section 4 4 describes possible PCI error messages Table Section 4 2 System Error Messages Message Description Address Line Short Error in the address decoding circuitry on the system boa...

Page 131: ...A20 on the keyboard controller is not working Call for service Invalid Boot Diskette The BIOS can read the disk in diskette drive A but cannot boot the system Use another boot diskette Keyboard Controller Error The keyboard controller has failed during POST Keyboard is Locked Please Unlock It Keyboard lock on the system is engaged The system must be unlocked to continue Keyboard Stuck Key Detected...

Page 132: ...n moved to the Clear position and CMOS RAM has been cleared NVRAM Data Invalid NVRAM Cleared Invalid entry in the ESCD Parallel Port Resource Conflict The parallel port has requested a resource that is already in use PCI Error Log is Full This message is displayed when more than 15 PCI conflict errors are detected No additional PCI errors can be logged PCI I O Port Conflict Two devices requested t...

Page 133: ...r off the system and try again If the beeping persists see Table Section 4 6 The table summarizes problems that may develop during system operation and lists in se quential order suggested corrective actions Table Section 4 6 Problems and Solutions Problem Symptom Solution No power Power lamp on computer status panel will not light 1 Check that the power cord is plugged into the AC connector on th...

Page 134: ...eeping at power on Computer beeps more than once and is unable to complete boot up 1 Check system configuration and switch settings refer to Appendix B 2 Verify that drives are enabled 3 Reseat SIMMs and option boards in their connectors Inspect system board for dropped objects 4 Remove option boards and reboot 5 Replace system board Invalid Configuration message displayed 1 Press F1 to run Setup ...

Page 135: ...ailure message displayed 1 Check that the IDE port and hard disk drives are enabled in Setup Cannot access hard disk 1 Check signal power connections between hard disk PCB power supply 2 Check drive jumper settings 3 Check power supply 4 Check hard disk cable and hard disk Replace as necessary 5 Replace system board or hard disk controller PCB if the system board controller is not used Memory malf...

Page 136: ...ty is not selecting a refresh rate resolution that is not supported by the monitor 4 Check that the driver used matches the capabilities of the video board and WRAM Wavy display 1 Check that the computer and monitor are not near motors or electric fields Blank display 1 Press any key or move mouse to ensure power management has not blanked the display 2 Check that the VGA connector is attached to ...

Page 137: ...ader PCB power supply 2 Check master slave settings 3 Check power supply 4 Check IDE cable Replace as necessary 5 Replace system board No sound from CDs 1 Check that speaker power is on and volume is adjusted 2 Check audio software settings 3 Check CD audio cable Replace as necessary 4 Replace CD ROM reader 5 Replace system board Communication Error No or bad data when communicating 1 Check cable ...

Page 138: ...nal 4 Memory failure in the 64 KB of memory or timer 1 on the system board is not functioning Processor Error 5 The CPU on the system board generated an error 8042 Gate A20 Failure 6 The keyboard controller 8042 may be bad The BIOS cannot switch to protect mode Processor Exception Interrupt Error 7 The CPU generated an exception interrupt Display Memory Read Write Error 8 The system s video adapte...

Page 139: ...ttery Socket Location 4 Carefully lift the battery from the socket tabs and out of the socket Figure Section 4 4 Battery Removal 5 With the positive side facing up press the new battery into the socket 6 Replace the system unit cover 7 Connect external peripherals and power cables 8 Run Setup to reconfigure your system parameters ...

Page 140: ...4 14 Maintenance and Troubleshooting ...

Page 141: ...ly order listed in Table Section 5 1 To reassemble follow the table and procedures in reverse order Individual removal procedures do not require the total disassembly of the computer Each of the following subsections lists the parts that must be removed before beginning the removal procedure Table Section 5 1 PowerMate Pro2200 2180 Series System Unit Disassembly Sequence Sequence Part See Page 1 S...

Page 142: ...r chips ground yourself to release static System Unit Cover Removal Remove the system unit cover as follows WARNING Before removing the system unit cover turn off the power and unplug the system power cable Power is removed only when the power cable is unplugged 1 Turn off and unplug the system unit 2 Disconnect the keyboard mouse monitor and any other device such as a printer connected to the rea...

Page 143: ... Screws 4 From the rear of the system grasp the handle and pull it back so that the cover clears the padlock slot see Figure Section 5 2 Figure Section 5 2 Releasing the System Unit Cover 5 Pull the cover up and free it from the chassis ...

Page 144: ...er and unplug the system power cable Power is removed only when the power cable is unplugged 1 Remove the system unit cover as previously described see System Unit Cover Removal 2 Remove the two screws from the top of the panel see Figure Section 5 3 Figure Section 5 3 Removing Side Panel Screws 3 Lift the side panel away from the system unit ...

Page 145: ...hem 3 Remove the screw that secures the board to the support bracket see Figure Section 5 4 4 Pull the board out of the connector You might have to gently rock the board from side to side to release it from its connector Figure Section 5 4 Expansion Board Removal SIMM Removal Remove any optional SIMM sticks from the system board as follows CAUTION Reduce static discharge by touching the system s m...

Page 146: ...Connectors 3 Press the metal clips at the outer edges of the socket away from the SIMM see Figure Section 5 7 4 Push the SIMM away from the locking tabs and remove it from the socket Repeat steps 3 and 4 for each SIMM being removed NOTE For information on installing SIMM sticks see Section 3 Options Figure Section 5 6 Removing a SIMM ...

Page 147: ...Figure Section 5 7 Removing the Front Panel 4 Slide the front panel cables through the hole in the chassis Blank Panel and Metal Cover Plate Removal Remove the blank panels and the metal cover plates from the chassis as follows 1 Remove the front panel as previously described see Front Panel Removal 2 Remove the blank panel from the selected slot in the front panel by pressing the tabs inside the ...

Page 148: ...follows 1 Remove the system unit cover as previously described see System Unit Cover Removal 2 Unplug the diskette drive power cable and signal cable from the diskette drive see Figure Section 5 9 Figure Section 5 9 3 1 2 Inch Diskette Drive Cables 3 Remove the four diskette drive screws two to a side from the 3 1 2 inch diskette drive bracket see Figure Section 5 10 and Figure Section 5 11 ...

Page 149: ...of the system chassis see Figure Section 5 11 Figure Section 5 11 Diskette Drive Removal NOTE When reinstalling the diskette drive note that all power cables are keyed to fit only in the correct position The red edge of the diskette drive signal cable is positioned as shown in Figure Section 5 9 ...

Page 150: ...cover as previously described see System Unit Cover Removal 2 Unplug the hard disk drive power and signal cables from the hard disk drive see Figure Section 5 12 NOTE When reinstalling the drives note that all power cables are keyed to fit only in the correct position Figure Section 5 12 3 1 2 Inch Hard Disk Drive Cables ...

Page 151: ...D ROM reader or other device from the 5 1 4 inch device cage as follows 1 Remove the system unit cover side panel and front panel as previously described NOTE The 5 1 4 inch devices are installed with drive rails 2 Disconnect the device signal and power cables from the inside of the system unit If removing a CD ROM reader also disconnect the audio cable 3 Remove the 51 4 inch device by releasing t...

Page 152: ...o screws securing the drive to the front of the system chassis see Figure Section 5 14 Slide the device out of the slot Figure Section 5 14 Removing the Device 5 Remove the rails from the sides of the device by removing the four screws shown in Figure Section 5 15 Figure Section 5 15 Removing the Device Rails ...

Page 153: ...oard s connectors See Appendix A for connector locations 3 Unplug the power cables from all installed devices 4 Cut any tie wraps that may be securing the power cables to the system unit chassis or drive brackets 5 Remove the four screws securing the power supply to the system unit chassis see Figure Section 5 16 Figure Section 5 16 Power Supply Screws 6 Remove the power supply from the system uni...

Page 154: ...expansion slot boards n SIMMs 2 Remove and label all cables connected to the system board Appendix A provides the connector identifiers and pin assignments for each connector 3 Remove the nine screws that hold the system board to the system unit chassis Remove the system board from the system unit see Figure Section 5 17 Figure Section 5 17 System Board Removal ...

Page 155: ...r Cable 158 052170 001 3 HDD LED Cable 158 052169 001 4 Sleep Switch Cable Assembly 158 050895 004 5 Reset Switch Cable Assembly 158 050685 031 6 Audio Cable 158 050824 000 7 Microsoft Mouse 158 052115 000 8 Keyboard Chicony 158 050939 000 9 Plastic Blank Panel 5 1 4 158 030810 000 10 Microphone 158 052116 000 11 Front Bezel w IR 158 052129 000 12a PowerMate Pro2200 Logo Panel 158 030872 021 12b P...

Page 156: ...ium Pro P6 Processor w 256K cache 158 082625 003 24b 180 MHz Pentium Pro P6 Processor w 256K cache 158 082625 002 25 Heatsink w Clip 158 060423 000 26a 8MB EDO SIMM 2 x 32 158 082778 060 26b 16MB EDO SIMM 4 x 32 158 082662 060 27a System Board w o Audio 158 052130 000A 27b System Board with Audio 158 052130 001A 28 Coin cell Battery 158 060436 000 29 NEC 8X CD ROM Reader CDR 1450A BR 30 3 1 2 inch...

Page 157: ...tion 5 18 PowerMate Pro2200 2180 Series Illustrated Parts Breakdown ____________ This data was prepared July 1996 For an up to date listing of spare parts please call FastFacts 800 366 0476 and order document number 42181519 ...

Page 158: ...able Section 5 4 lists PowerMate Pro2200 2180 Series documentation and packaging Table Section 5 4 PowerMate Pro2200 2180 Series Documentation and Packaging Description Part Number PowerMate Pro2200 Series User s Guide 819 181488 000 PowerMate Pro2180 Series User s Guide 819 181559 000 PowerMate Pro2200 Series Service and Reference Manual 819 181519 000 Corner Blocks 4 158 040395 004 Shipping Cart...

Page 159: ...face Connectors COM1 COM2 A 3 Keyboard and Mouse Connectors A 4 Power Supply Connector A 5 Diskette Drive Connector A 7 IDE Interface Connectors A 8 Hard Disk LED Connector A 9 Power LED Connector A 10 Reset Button Connector A 10 Infrared IRDA Connector A 11 ISA Expansion Board Connectors A 11 PCI Expansion Board Connectors A 13 Figure Appendix A 1 shows the locations of the system board power SCS...

Page 160: ...s Power Connector Figure Appendix A 1 System Board Power and Interface Port Locations PARALLEL INTERFACE CONNECTOR The following figure shows the parallel interface connector on the system board Table Appendix A 2 provides the pin assignments Figure Appendix A 2 Parallel Interface Connector ...

Page 161: ...2 17 SLCT IN 5 Data Bit 3 18 Ground 6 Data Bit 4 19 Ground 7 Data Bit 5 20 Ground 8 Data Bit 6 21 Ground 9 Data Bit 7 22 Ground 10 ACK 23 Ground 11 BUSY 24 Ground 12 ERROR 25 Ground 13 SLCT SERIAL INTERFACE CONNECTORS The following figure shows the serial interface connector s on the system board Table Appendix A 3 provides the pin assignments Figure Appendix A 3 Serial Interface Connectors ...

Page 162: ...rd and mouse connectors on the system board The keyboard and mouse are PS 2 style connectors and can be plugged into either connector The system unit will detect their presence at power on Table Appendix A 3 provides the pin assignments Figure Appendix A 4 PS 2 Style Keyboard and Mouse Interface Connectors Table Appendix A 4 Keyboard and Mouse Pin Assignments Pin Signal Name 1 Data 2 No connection...

Page 163: ...pply connector pin assignments Table Appendix A 5 Power Connector Pin Assignments Pin Signal Name Pin Signal Name 1 3 3Vdc 11 3 3Vdc 2 3 3Vdc 12 12Vdc 3 Ground 13 Ground 4 5Vdc 14 CD Remote Enable 5 Ground 15 Ground 6 5Vdc 16 Ground 7 Ground 17 Ground 8 Power Good 18 5Vdc 9 Standby Voltage 19 5Vdc 10 12Vdc 20 5Vdc ...

Page 164: ...ORAGE DEVICE CONNECTORS The following figure shows the connectors on the system board for the diskette drive and IDE hard disks For more information see the following subsections Figure Appendix A 5 Storage Device Connector Locations ...

Page 165: ... Name Pin Signal Name 1 Ground 2 DENSEL 3 Ground 4 Reserved 5 Key 6 FDEDIN 7 Ground 8 Index 9 Ground 10 Motor Enable A 11 Ground 12 Drive Select B 13 Ground 14 Drive Select A 15 Ground 16 Motor Enable B 17 Ground 18 DIR 19 Ground 20 STEP 21 Ground 22 Write Data 23 Ground 24 Write Gate 25 Ground 26 Track 00 27 Ground 28 Write Protect 29 Ground 30 Read Data 31 Ground 32 Side 1 Select 33 Ground 34 Di...

Page 166: ...ta 7 4 Host Data 8 5 Host Data 6 6 Host Data 9 7 Host Data 5 8 Host Data 10 9 Host Data 4 10 Host Data 11 11 Host Data 3 12 Host Data 12 13 Host Data 2 14 Host Data 13 15 Host Data 1 16 Host Data 14 17 Host Data 0 18 Host Data 15 19 Ground 20 Key 21 DRQ0 DRQ1 22 Ground 23 I O Write 24 Ground 25 I O Read 26 Ground 27 IOCHRDY 28 BALE 29 DDACK0 DDACK1 30 Ground 31 IRQ14 1RQ15 32 Vcc Pull up 33 Addr 1...

Page 167: ...gure Appendix A 6 LED Connectors Hard Drive LED Connector The following figure shows the hard disk LED connector on the system board Table Appendix A 8 provides the pin assignments Figure Appendix A 7 Hard Disk LED Connector Table Appendix A 8 Hard Disk LED Pin Assignments Pin Signal Name 1 5V white 2 HD ACTIVE 3 Key 4 5V LED Connectors 1 4 SPKR HDLED INFRARED RST PWRLED SLP RP ...

Page 168: ... 9 Power LED Pin Assignments Pin Signal Name 1 LED_PWR green 2 Key 3 Ground blue Reset Button Connector The following figure shows the reset button connector on the system board Table Appendix A 10 provides the pin assignments Figure Appendix A 9 Reset Button Connector Table Appendix A 10 Reset Pin Assignments Pin Signal Name 1 RESET 2 Ground 1 3 SPKR HDLED INFRARED RST PWRLED SLP RP 1 2 SPKR HDLE...

Page 169: ...gure Appendix A 10 Infrared Connector Table Appendix A 11 Infrared Pin Assignments Pin Signal Name 1 IRTX 2 Ground 3 IRRX 4 Key 5 5 V ISA CONNECTORS Figure Appendix A 11 shows the location of the ISA connectors on the system board Table Appendix A 12 provides ISA connector pin assignments Figure Appendix A 12 ISA Connector Locations 1 5 SPKR HDLED INFRARED RST PWRLED SLP RP ...

Page 170: ...CS16 C2 LA23 B10 GND A10 IOCHRDY D3 IRQ10 C3 LA22 B11 SMEMW A11 AEN D4 IRQ11 C4 LA21 B12 SMEMR A12 SA19 D5 IRQ12 C5 LA20 B13 IOW A13 SA18 D6 IRQ15 C6 LA19 B14 IOR A14 SA17 D7 IRQ14 C7 LA18 B15 DACK3 A15 SA16 D8 DACK0 C8 LA17 B16 DRQ3 A16 SA15 D9 DRQ0 C9 MEMR B17 DACK1 A17 SA14 D10 DACK5 C10 MEMW B18 DRQ1 A18 SA13 D11 DRQ5 C11 SD8 B19 REFRESH A19 SA12 D12 DACK6 C12 SD9 B20 SYSCLK A20 SA11 D13 DRQ6 ...

Page 171: ... 12 V A32 AD16 B32 AD17 A2 12 V B2 No Connect A33 3 3 V B33 CBE2 A3 No Connect B3 GND A34 FRAME B34 GND A4 No Connect B4 No Connect A35 GND B35 IRDY A5 Vcc B5 Vcc A36 TRDY B36 3 3 V A6 PCIINT3 B6 Vcc A37 GND B37 DEVSEL A7 PCIINT1 B7 PCIINT2 A38 STOP B38 GND A8 Vcc B8 PCIINT4 A39 3 3 V B39 PLOCK A9 Reserved B9 No Connect A40 SDONE B40 PERR A10 Vcc B10 Reserved A41 SBO B41 3 3 V A11 Reserved B11 No ...

Page 172: ...A19 Reserved B19 Vcc A50 KEY B50 KEY A20 AD30 B20 AD31 A51 KEY B51 KEY A21 3 3 V B21 AD29 A52 CBEO B52 AD8 A22 AD28 B22 GND A53 3 3 V B53 AD7 A23 AD26 B23 AD27 A54 AD6 B54 3 3 V A24 GND B24 AD25 A55 AD4 B55 AD5 A25 AD24 B25 3 3 V A56 GND B56 AD3 A26 AD22 IDSEL B26 CBE3 A57 AD2 B57 GND A27 3 3 V B27 AD23 A58 AD0 B58 AD1 A28 AD22 B28 GND A59 Vcc B59 Vcc A29 AD20 B29 AD21 A60 SREQ64 B60 SACK64 A30 GN...

Page 173: ...ault settings n denying access to CMOS Setup NOTE The clear CMOS jumper is intended to be used only if the BIOS has been corrupted during a BIOS upgrade A description of how to use the jumper is found later in this section under BIOS Recovery The system board in your computer contains a 30 pin block of configuration jumpers in a 2 x 15 array CAUTION Jumpers are set correctly at the factory for you...

Page 174: ...ving the System Unit Cover in Section 3 3 Locate the jumper bank on the system board see Figure Appendix B 1 You may have to remove any installed expansion boards to access the jumpers see Expansion Board Removal in Section 3 4 Change the jumper setting to the appropriate position Change the jumper setting by lifting the plastic block and placing it on the appropriate pins as shown in the followin...

Page 175: ...System Board Settings B 3 The Figure Appendix B 1 shows the jumper location on the system board Explanations follow the figure Figure Appendix B 1 System Board Jumper Locations ...

Page 176: ... to recover your BIOS 1 Power off the system and unplug any peripherals NOTE The system power must be off before removing the cover and changing a jumper setting 2 Remove the system unit cover see Removing the System Unit Cover in Section 3 Processor Bus Speed 200 MHz Processor 9 11 66 MHz Bus Speed 12 14 19 21 180 MHz Processor 9 11 60 MHz Bus Speed 12 14 17 19 166 MHz Processor 10 12 66 MHz Bus ...

Page 177: ...Appendix B 4 BIOS Recovery Jumper 5 Replace the system unit cover see Replacing the System Unit Cover in Section 3 6 Connect system power cables and monitor 7 Power on the system The system displays a system configuration error message 8 Power off unplug the system and monitor and remove the cover 9 Remove the jumper block from pins 2 4 and replace it on pins 4 6 10 Reinstall any removed expansion...

Page 178: ...ection 3 3 Locate the CMOS Clear jumper pins on the system board see Figure Appendix B 6 You may have to remove any installed expansion boards to access the jumpers see Expansion Board Removal in Section 3 4 Remove the jumper block from pins 20 22 and set it on pins 18 20 Figure Appendix B 6 Clear CMOS Jumper 5 Replace the system unit cover see Replacing the System Unit Cover in Section 3 6 Connec...

Page 179: ... Use the following procedure to change the jumper setting 1 Power off the system and unplug any peripherals WARNING The system power must be off before removing the cover and changing a jumper setting 2 Remove the system unit cover see Removing the System Unit Cover in Section 3 3 Locate the Deny CMOS Access jumper pins on the system board see Figure Appendix B 8 You may have to remove any install...

Page 180: ...heral devices 12 Power on the system 13 Run Setup see Section 2 Password Clear Jumper Use the following procedure to clear the current password and to set a new one This procedure should only be done if the user password has been forgotten 1 Turn off and unplug the system and any external options WARNING The system power must be off before removing the cover and changing a jumper setting 2 Remove ...

Page 181: ...ion 3 6 Connect system power cables and monitor 7 Power on the system The system lets you boot your computer 8 Power off unplug the system and monitor and remove the cover 9 Remove the jumper block from pins 25 27 and replace it on pins 27 29 10 If you removed any expansion boards replace them see Expansion Board Installation in Section 3 11 Replace the system unit cover 12 Power on the system 13 ...

Page 182: ... disk type is automatically detected by the system and the remaining drive parameters are automatically set by the system See Section 2 Setup and Operation for information on auto setup using the Autotype Fixed Disk parameter HARD DISK DRIVE SPECIFICATIONS Specifications for the 3 1 2 inch IDE and SCSI hard disk drives are given in Table Appendix C 1 Jumper settings are described in the following ...

Page 183: ...nsfer Rate buffer to disk 67 7 MB s max 66 0 MB s max Data Transfer Rate buffer to host 16 6 MB s PIO Mode 4 40 0 MB s Synchronous Start Stop Cycles 20 000 10 000 Buffer Size 256 KB 512 KB Interface IDE SCSI 2 1 GB IDE HARD DISK DRIVE JUMPER SETTINGS The 2 1 GB IDE hard drive has a jumper block used to configure the drive This block is located on the side of the drive opposite the IDE and power co...

Page 184: ...g an ID cable to the host backplane The following table details the pin functions for each jumper block The factory default configuration for the SCSI drive is for ID 0 termination enabled and termination power supplied by the drive Table Appendix C 2 2 5 GB SCSI Hard Disk Jumper Settings Jumper Block Pins Function J2 TE DS ME WP PD RES TP TP 3 4 5 6 7 8 9 10 11 12 Terminator enable default Delay ...

Page 185: ...n on the CD ROM reader s controls and indicators NEC part numbers are provided in Section 5 CD ROM READER SPECIFICATIONS Table Appendix D 1 lists the specifications for the eight speed CD ROM reader Table Appendix D 1 Specifications for Eight Speed CD ROM Reader Feature Specification Performance Data Transfer Rate Mode 1 1200 KB sec 8X speed Mode 2 1368 8 KB sec 8X speed Burst Transfer Rate PIO Mo...

Page 186: ...ng connectors and jumpers n Analog audio line output connector 4 pin male connector that connects the reader to the system s sound system via an audio cable n Digital audio line output connector 2 pin male connector n Configuration jumpers enables or disables the cable select feature slave device configuration or master device configuration The CD ROM reader is set as the master device on the seco...

Page 187: ...ed Factory use only 3 Disabled unshorted Factory use only The jumper block immediately adjacent to the IDE connector jumper B sets the following functions using pin 1 pin 3 as read from left to right CSEL SL and MA see Table Appendix D 3 The following is a summary of the jumper settings n CSEL cable select enables disables the cable select feature Factory set at disabled pin not jumpered n SL slav...

Page 188: ... CD ROM Reader Specifications and Jumper Settings Table Appendix D 3 Jumper B Settings Pin Setting Signal 1 Disabled unshorted CSEL cable select 2 Disabled unshorted SL slave 3 Enabled shorted Master default setting ...

Page 189: ...per B 6 Configurations 1 1 Connections 2 1 monitor 2 3 printer 3 35 rear 2 3 SCSI 3 36 serial 3 35 speakers 2 4 Connectors A 1 diskette drive A 7 hard disk LED A 9 IDE A 8 infrared A 11 ISA A 11 keyboard A 4 mouse A 4 parallel A 2 PCI A 13 power LED A 10 power supply A 5 reset A 10 serial A 3 system board A 1 Controls CD ROM 1 19 system 2 8 Cover removal 3 4 5 2 replacement 3 6 D Date set 2 23 Den...

Page 190: ...n 3 9 removal 3 11 Expansion boards removal 5 4 Expansion slots 1 2 3 9 External options 3 3 F Fast page mode 2 36 Flash utility 2 43 Front panel removal 3 30 5 7 replacement 3 34 H Hard disk system board connector A 8 jumper settings C 2 C 4 LED connector A 9 specifications C 1 Hard disk assignments 2 24 Hard disk drive 1 17 C 1 settings 1 18 C 2 Hardware options 3 2 I I O addressing 1 7 address ...

Page 191: ... 2 1 Options 3 2 device support 3 19 devices 3 26 3 32 expansion boards 3 8 external 3 3 3 34 internal 3 7 memory 3 12 5 18 printer 3 35 processor 3 15 SCSI 3 36 serial devices 3 35 storage devices 3 19 video 3 17 P Packaging part number 5 18 Packing 2 1 Parallel connector A 2 Parallel interface 1 12 addressing and interrupts 1 12 Parallel port 3 35 Part numbers 5 15 Password jumpers B 8 Passwords...

Page 192: ... 32 processor 2 32 security 2 40 start 2 21 typing 2 30 Side panel 5 4 removal 3 29 SIMM installation 3 14 removal 3 14 5 5 SIMMs 1 9 Slot locations 3 9 Speakers 1 21 2 4 Specifications 1 21 Starting DMI 2 48 Switches See Jumpers System BIOS 1 6 System board 1 3 BIOS 1 6 chip sets 1 4 features 1 3 infrared interface 1 13 interrupt controller 1 10 ISA bus 1 11 jumper locations B 3 jumper setting B ...

Page 193: ...Index 5 V Video drivers 1 1 mode 2 30 Video board 1 14 playback 1 15 resolution 1 14 support interface 1 14 upgrade 3 17 Voltage select switch 2 2 W Windows NT installation 2 9 ...

Page 194: ...r there is no guarantee that interference will not occur in a particular installation If this equipment does cause harmful interference to radio or television reception which can be determined by turning the equipment off and on the user is encouraged to try to correct the interference by one or more of the following measures n Reorient or relocate the receiving antenna n Increase the separation b...

Page 195: ...ou d un type recommandé par le constructeur Mettre au rébut les batteries usagées conformément aux instructions du fabricant BATTERY DISPOSAL Do not place used batteries in your regular trash The nickel cadmium or nickel metal hydride batteries must be collected recycled or disposed of in an environmentally approved manner The incineration landfilling or mixing of batteries with the municipal soli...

Reviews: