5 - 24
(00292)H
■ Cropping
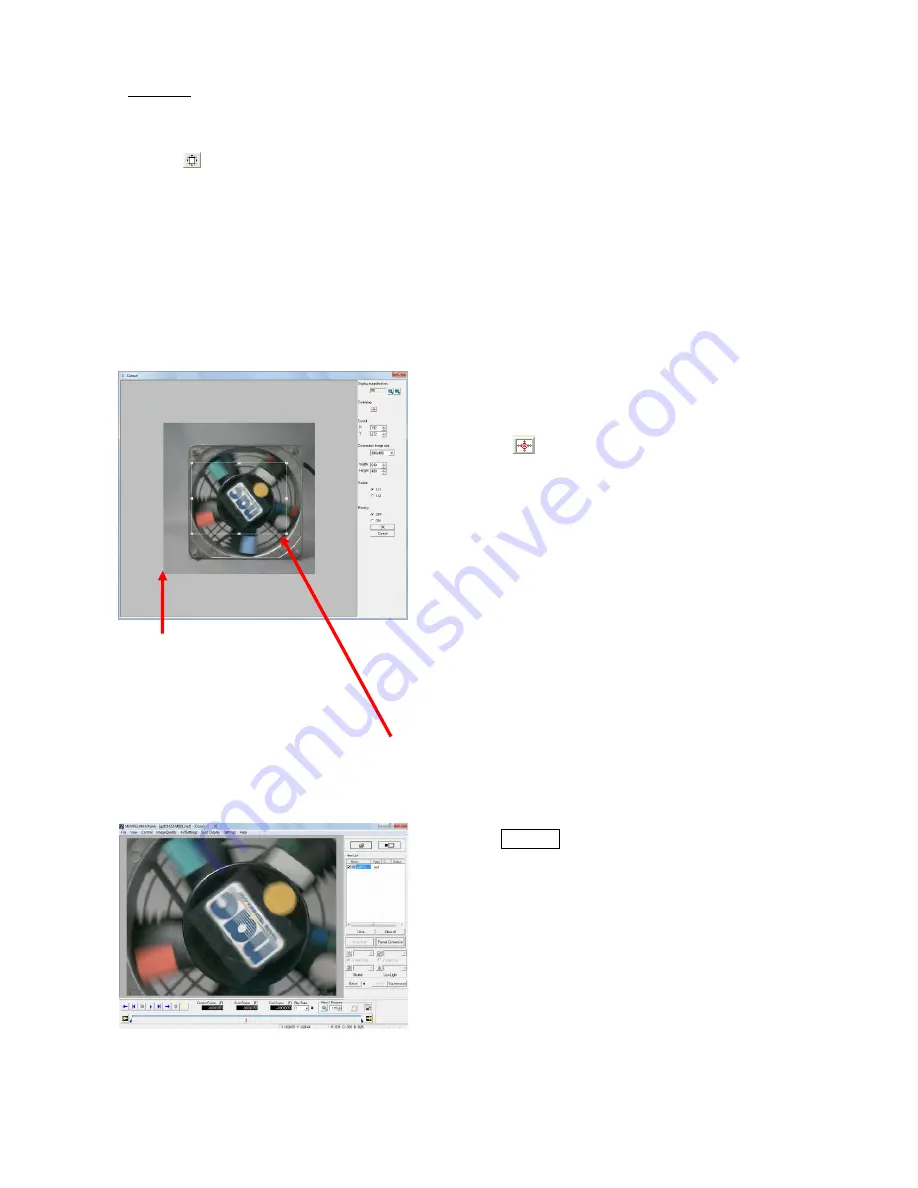
“Crop” cuts the camera image to the desired range so the image can be shrunk.
Click “ON” in “Crop” in the “Conversion Settings” to crop.
Click on the “Main Toolbar” to crop. (Expert Mode only)
If “Crop” is ON, the window for cropping opens to specify the area to be cropped.
In the “Crop” window, specify the range of the image to be cropped and resizing settings to reduce
the image after conversion. If the converted image size is larger than the cropped image, a gray
area is shown on the cropped image, and information can be superimposed without blocking the
image.
If “Crop” is OFF, the settings are disabled and the original image is shown.
The image shown for the cropped converted image is as follows.
If cropping, reversing and rotating the image,
select the crop settings.
If reversing or rotating the image after
cropping, the cropping settings are
disabled after setting.
・
Display Magnification
Select
a
display
magnification
from
50,100,200,400%
(This display magnification is not reflected on
the converted image)
・
Center
Click
to move the center of the image to
the center of the cropped range
・
Crop Position
Numerically specify the coordinates for
the lower left corner of the range to be
cropped.
(the coordinate origin is the lower left
corner of the image shown)
・
Converted Image Size
Select the converted image size from
previously set sizes
Numerically specify the width and height of
the converted image size
・
Resize
Select the resize settings for the cropping and
conversion.
Caution
Specify the range to be cropped by dragging the frame with the mouse. Right click
the mouse in the “Crop” window to change the frame color.
Coordinate origin specified
for the cropping
Summary of Contents for SP-642
Page 1: ...800292 0H Oct 2015 User s Manual DigitalHighSpeed HXLink SP 642 ...
Page 2: ... Blank page ...
Page 4: ... Blank page ...
Page 6: ... Blank page ...
Page 10: ...iv 00292 H Blank page ...
Page 18: ...xii 00292 H Blank page ...
Page 19: ... 00292 H 1 1 1 Overview ...
Page 25: ... 00292 H 2 1 2 Installation ...
Page 49: ... 00292 H 3 1 3 Basic Operations ...
Page 77: ... 00292 H 4 1 4 Camera Operation ...
Page 106: ...4 30 00292 H Q series Detail Settings dialog ...
Page 179: ... 00292 H 5 1 5 File Operation ...
Page 221: ... 00292 H 6 1 6 Camera Connection Settings ...
Page 238: ...6 18 00292 H Blank Page ...
Page 239: ... 00292 H 7 1 7 Setting Options ...
Page 263: ... 00292 H 8 1 8 Settings for the Recording Methods ...
Page 295: ... 00292 H 9 1 9 Menus ...
Page 308: ...9 14 00292 H Blank page ...
Page 309: ... 00292 H 10 1 10 System Settings HXUtility ...
Page 326: ...10 18 00292 H Blank Page ...
Page 327: ... 00292 H 11 1 11 Batch Conversion of Files Batch Conversion Software ...
Page 340: ...11 14 00292 H Blank page ...
Page 341: ... 00292 H 12 1 12 Auto Pilot ...
Page 357: ... 00292 H 13 1 13 Measurement Functions ...
Page 384: ...13 28 00292 H Blank page ...
Page 385: ... 00292 H 14 1 14 Troubleshooting ...
Page 400: ...14 16 00292 H blank page ...
Page 401: ... 00292 H 15 1 15 Specifications ...
Page 404: ...15 4 00292 H Blank page ...
Page 405: ... 00292 H A 1 Appendix A ...
Page 408: ...A 4 00292 H Blank page ...
Page 409: ... 00292 H B 1 Appendix B ...
Page 415: ... 00292 H C 1 Appendix C ...
Page 418: ...C 4 00292 H Blank Page ...
Page 419: ... 00292 H D 1 Appendix D ...
Page 421: ... 00292 H E 1 Appendix E ...
Page 425: ... 00292 H F 1 Appendix F ...
Page 436: ...F 12 00292 H Blank Page ...


