4 - 66
(00292)H
■ Low Light
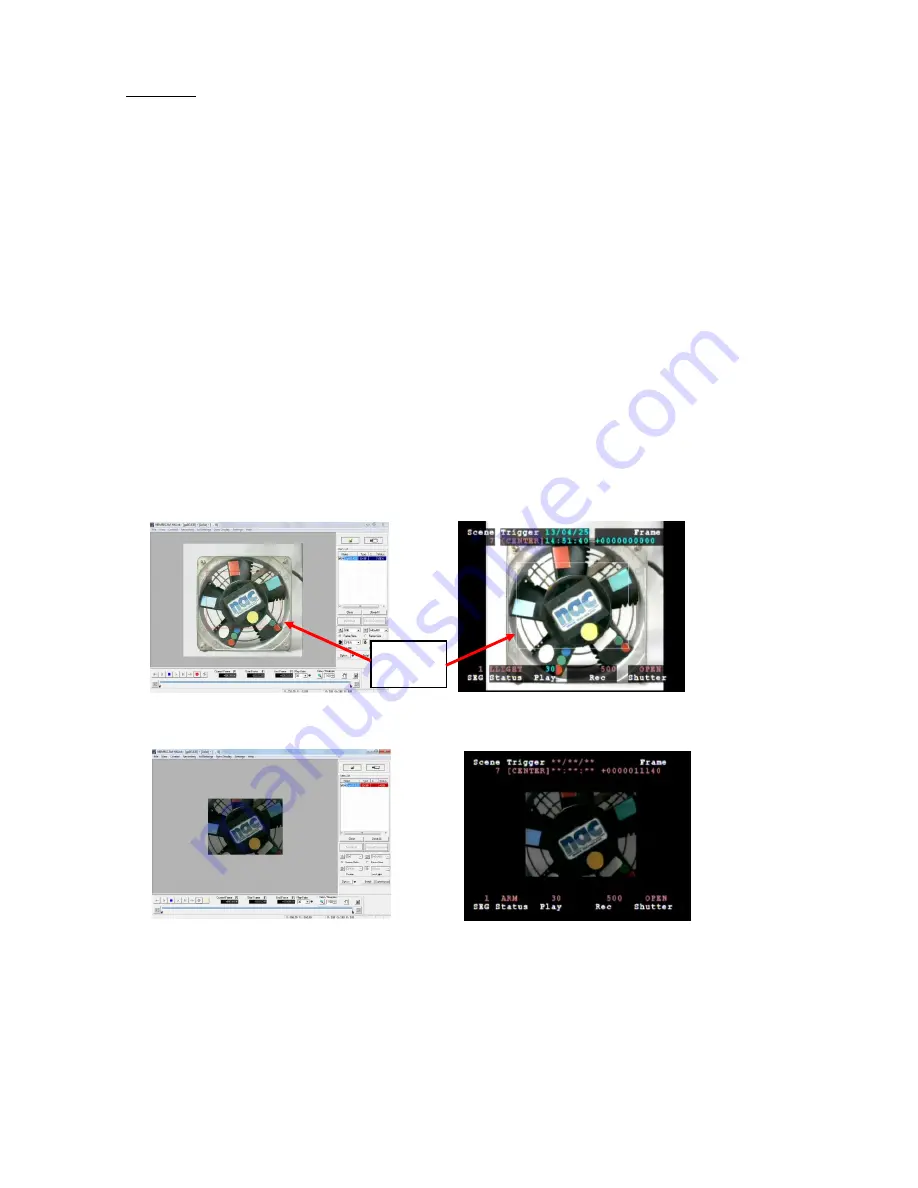
There may be cases when a clear monitor image cannot be obtained in the VIEW mode with
temporary low levels of lighting during recording. During VIEW with the low light mode ON,
images brighter than the frame rate and shutter settings are displayed on the monitor, which can be
used to confirm the angle of view and focus. Start recording in the ARM mode and the low light
mode display disappears, and the image with the set brightness is shown on the monitor.
With low light mode display, in addition to the angle of view for the recorded frame size, the
image for the maximum angle of view of the camera is displayed, and the border is shown around
the recorded angle of view. Since the area around the recorded image is also displayed, it is handy
for matching the angle of view when the frame size is small.
(Confirm the aperture for the amount of light corresponding to the frame rate parameters actually
set in the step for image recording. Also, adjust the position to fit the subject recorded inside the
frame for the angle of view.)
Low Light can be set with the "Low Light” button in the “Item Toolbar” (Basic Mode) or the
“Camera Parameters Toolbar” (Expert Mode).
Low light can also be set with the “Camera Details” dialogue of the “Control” window under the
“Recording Parameters” tab of the “List of Camera Settings” window.
Brightness settings for the low light mode use a low light frame rate of 100/250/500/1000 pps in
the right pull-down menu of “Low Light”, or can be selected from CUSTOM.
Settings using the low light button only apply to image display in the VIEW mode, and do not
affect image display in the ARM, REC modes or actual recording. Verification of the images
during VIEW can be performed with the “Low Light” settings but the actual recording is
implemented with the set recording parameters.
VIEW (Low Light Mode) Live Display VIEW (Low Light Mode) Video Display
ARM Live Display
ARM Video Display
Frame
borders
Summary of Contents for SP-642
Page 1: ...800292 0H Oct 2015 User s Manual DigitalHighSpeed HXLink SP 642 ...
Page 2: ... Blank page ...
Page 4: ... Blank page ...
Page 6: ... Blank page ...
Page 10: ...iv 00292 H Blank page ...
Page 18: ...xii 00292 H Blank page ...
Page 19: ... 00292 H 1 1 1 Overview ...
Page 25: ... 00292 H 2 1 2 Installation ...
Page 49: ... 00292 H 3 1 3 Basic Operations ...
Page 77: ... 00292 H 4 1 4 Camera Operation ...
Page 106: ...4 30 00292 H Q series Detail Settings dialog ...
Page 179: ... 00292 H 5 1 5 File Operation ...
Page 221: ... 00292 H 6 1 6 Camera Connection Settings ...
Page 238: ...6 18 00292 H Blank Page ...
Page 239: ... 00292 H 7 1 7 Setting Options ...
Page 263: ... 00292 H 8 1 8 Settings for the Recording Methods ...
Page 295: ... 00292 H 9 1 9 Menus ...
Page 308: ...9 14 00292 H Blank page ...
Page 309: ... 00292 H 10 1 10 System Settings HXUtility ...
Page 326: ...10 18 00292 H Blank Page ...
Page 327: ... 00292 H 11 1 11 Batch Conversion of Files Batch Conversion Software ...
Page 340: ...11 14 00292 H Blank page ...
Page 341: ... 00292 H 12 1 12 Auto Pilot ...
Page 357: ... 00292 H 13 1 13 Measurement Functions ...
Page 384: ...13 28 00292 H Blank page ...
Page 385: ... 00292 H 14 1 14 Troubleshooting ...
Page 400: ...14 16 00292 H blank page ...
Page 401: ... 00292 H 15 1 15 Specifications ...
Page 404: ...15 4 00292 H Blank page ...
Page 405: ... 00292 H A 1 Appendix A ...
Page 408: ...A 4 00292 H Blank page ...
Page 409: ... 00292 H B 1 Appendix B ...
Page 415: ... 00292 H C 1 Appendix C ...
Page 418: ...C 4 00292 H Blank Page ...
Page 419: ... 00292 H D 1 Appendix D ...
Page 421: ... 00292 H E 1 Appendix E ...
Page 425: ... 00292 H F 1 Appendix F ...
Page 436: ...F 12 00292 H Blank Page ...


