4 - 40
(00292)H
■Custom Trigger
Use any of the following to set the custom trigger.
・
Click the “Trigger Timing” button in the “Controls” window.
・
Click the “Trigger Timing” button in the “Camera Details” dialogue.
・
Select “CUSTOM” for individual cameras from “Trigger Timing” under the “Recording
Parameters” tab in the “List of Camera Settings” window.
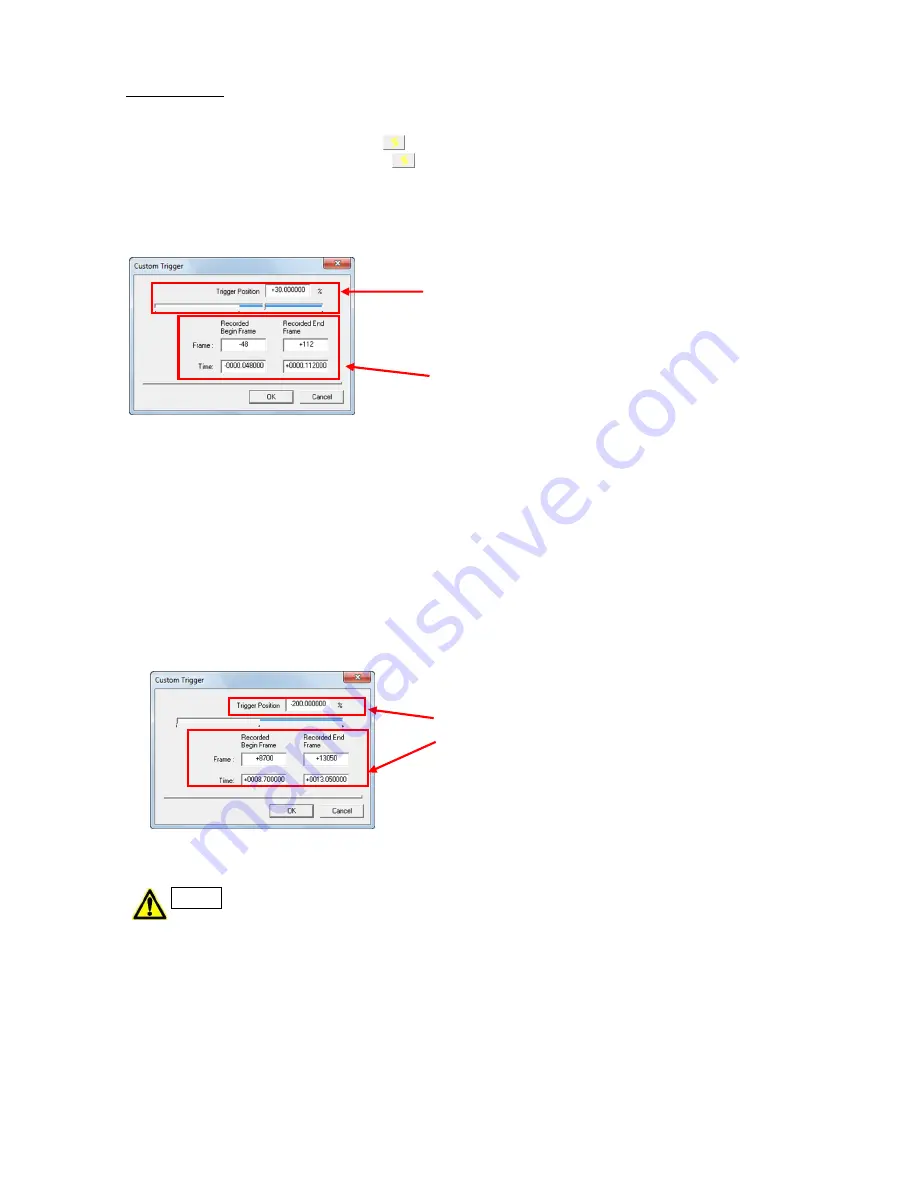
Specify the custom trigger with the “Custom Trigger” dialogue.
Specify the trigger position in the recording
memory in percentages.
The range is -100~+100%.
The trigger position can also be set with the
slider.
Specify the start frame/end frame in the recording
memory with frame numbers or relative time.
Since the memory segment size and number of recordable frames differs by camera, custom
trigger settings cannot be batch set on multiple cameras.
Furthermore, changes to custom trigger settings cannot be batch set with the following.
・
“Batch” in the “Recording Parameters” tab of the “List of Camera Settings” window
・
Camera parameters toolbar (but the trigger timing can be selected as CUSTOM
)
With the HX cameras and the GX-8, the range of custom trigger positions is expanded.
The time from trigger input to the recording start frame is the maximum value for the number of
frames corresponding to the memory “-100%”
・
“65536 frames”
・
“10 minutes” (600 seconds).
Just as with other cameras, the custom trigger can
be specified with the GX-8 using numerical input
in “Trigger Location”, “First Recorded Frame” or
“Last Recorded Frame”. The slider can only be
set to -100%.
・
The number of frames that can be recorded changes when the frame size, time
stamp or pixel bit length are changed. If specifying the custom trigger in frames,
confirm the recording range with the “Custom Trigger” dialogue and correct to the
proper range.
・
Event recording is not possible if the trigger position is less than 0%.
Caution
Summary of Contents for SP-642
Page 1: ...800292 0H Oct 2015 User s Manual DigitalHighSpeed HXLink SP 642 ...
Page 2: ... Blank page ...
Page 4: ... Blank page ...
Page 6: ... Blank page ...
Page 10: ...iv 00292 H Blank page ...
Page 18: ...xii 00292 H Blank page ...
Page 19: ... 00292 H 1 1 1 Overview ...
Page 25: ... 00292 H 2 1 2 Installation ...
Page 49: ... 00292 H 3 1 3 Basic Operations ...
Page 77: ... 00292 H 4 1 4 Camera Operation ...
Page 106: ...4 30 00292 H Q series Detail Settings dialog ...
Page 179: ... 00292 H 5 1 5 File Operation ...
Page 221: ... 00292 H 6 1 6 Camera Connection Settings ...
Page 238: ...6 18 00292 H Blank Page ...
Page 239: ... 00292 H 7 1 7 Setting Options ...
Page 263: ... 00292 H 8 1 8 Settings for the Recording Methods ...
Page 295: ... 00292 H 9 1 9 Menus ...
Page 308: ...9 14 00292 H Blank page ...
Page 309: ... 00292 H 10 1 10 System Settings HXUtility ...
Page 326: ...10 18 00292 H Blank Page ...
Page 327: ... 00292 H 11 1 11 Batch Conversion of Files Batch Conversion Software ...
Page 340: ...11 14 00292 H Blank page ...
Page 341: ... 00292 H 12 1 12 Auto Pilot ...
Page 357: ... 00292 H 13 1 13 Measurement Functions ...
Page 384: ...13 28 00292 H Blank page ...
Page 385: ... 00292 H 14 1 14 Troubleshooting ...
Page 400: ...14 16 00292 H blank page ...
Page 401: ... 00292 H 15 1 15 Specifications ...
Page 404: ...15 4 00292 H Blank page ...
Page 405: ... 00292 H A 1 Appendix A ...
Page 408: ...A 4 00292 H Blank page ...
Page 409: ... 00292 H B 1 Appendix B ...
Page 415: ... 00292 H C 1 Appendix C ...
Page 418: ...C 4 00292 H Blank Page ...
Page 419: ... 00292 H D 1 Appendix D ...
Page 421: ... 00292 H E 1 Appendix E ...
Page 425: ... 00292 H F 1 Appendix F ...
Page 436: ...F 12 00292 H Blank Page ...


