background image

1-14

Getting Started

Reviewing the document list

Items

Description

Header

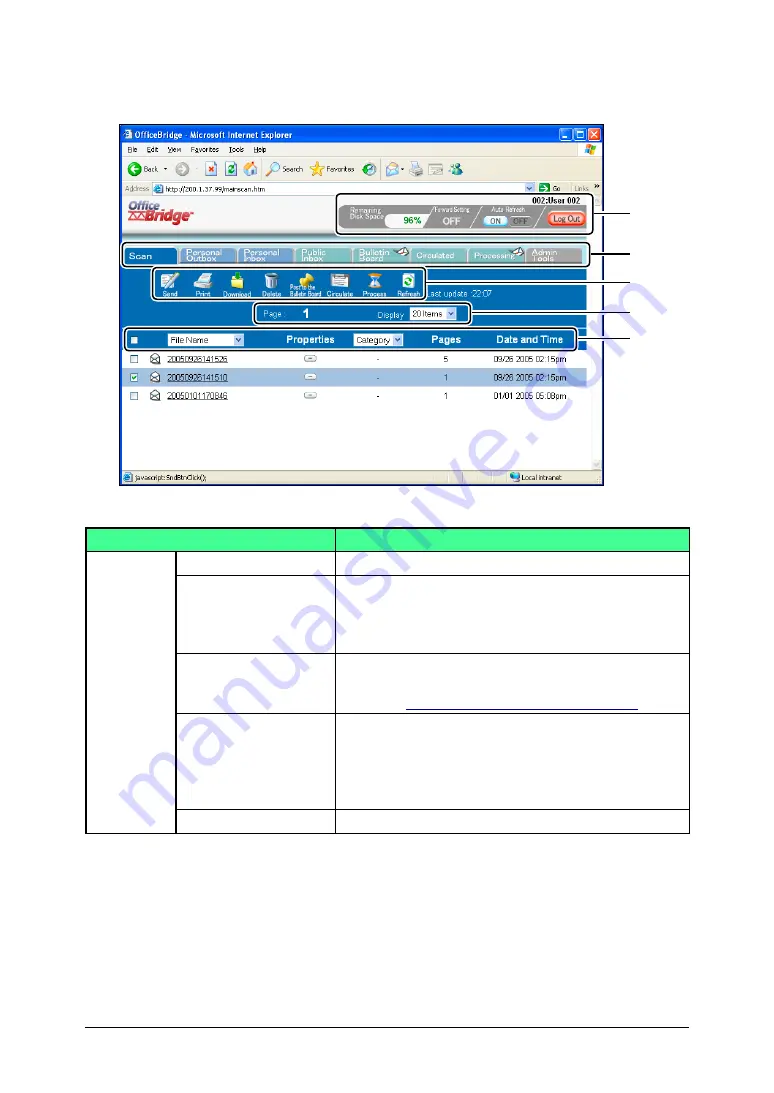
“User Name”

The user name will be displayed here.

“Remaining Disk 

Space”

This displays the amount of free memory remaining 

within OfficeBridge. If there is not enough memory, 

you may not be able to scan documents with large 

contents or receive documents.

“Forward Setting”

This shows the status for the Forward setting for 

your Personal Inbox.  To set up or change the set-

tings, see 

“Forwarding Settings” on page 3-22

.

“Auto Refresh”

Select whether to make the Auto Refresh function 

active or not. The selected status will be high-

lighted. If [ON] is selected, it will be refreshed every 

five minutes automatically. If [OFF] is selected, 

press [Refresh] to see the latest information.

[Log Out]

Select this button to log-out of OfficeBridge.

Header

Tabs

Buttons

List Items

View

Summary of Contents for MFX-1330

Page 1: ...for MFX 1330 User s Guide...

Page 2: ...on functions 2 11 Sending documents again 2 13 Forwarding received documents 2 13 Canceling your transmissions 2 14 Reading your received documents 2 14 Network Scanning 2 15 Operation flow 2 15 Scann...

Page 3: ...56 E mail Settings 3 59 LDAP Settings 3 64 Folder Shortcuts 3 68 FTP Shortcut setting 3 71 Archive Settings 3 73 Chapter 4 Using the InfoMonitor 4 1 What is InfoMonitor 4 2 Environment settings 4 3 Us...

Page 4: ...file 7 2 Chapter 8 Trouble shooting 8 1 Troubleshooting the browser 8 2 Printing problems 8 7 Trouble with InfoMonitor 8 10 Trouble with Document Download Manager 8 11 Chapter 9 Appendix and Index AI...

Page 5: ...rata machinery Ltd and Muratec America Inc Microsoft Windows Windows 98 Windows Me Windows 2000 Windows XP Windows Server 2003 and Internet Explorer are registered trademarks of the Microsoft Corporat...

Page 6: ...equest processing 1 6 Network printing 1 7 OfficeBridge InfoMonitor 1 8 OfficeBridge Document Download Manager 1 8 OfficeBridge CoverPage Editor 1 8 Muratec OB TIFFMaker 1 9 Installing OfficeBridge on...

Page 7: ...dge you not only can send a document from a PC application to a remote fax machine or e mail location but also read documents that have been routed to your PC This process allows you to save time and...

Page 8: ...that internally stores images read by the unit and reuses the images when prompted Scanned documents can be sent as fax documents posted to the bulletin board or circulated etc Also if you use TWAIN c...

Page 9: ...where any registered OfficeBridge users can view documents You can add personal Inbox documents scanned documents etc to the Bul letin Board Document list and notify all users of the contents Also a...

Page 10: ...p members simultaneously You can add personal Inbox documents scanned documents etc to the Circu lation Document list and notify users of the contents Both the originator and recipients can check the...

Page 11: ...users to request document processing to other users The processor can notify the originator of its status and completion If the processor cannot process the document she he can forward the document t...

Page 12: ...AI Network printing OfficeBridge allows the machine to be used as a network printer By selecting the dedicated Muratec OfficeBridge print driver you can use the machine to print high resolution docume...

Page 13: ...ments to a specified location on your computer If you always have this application running documents can be routed either automatically or manually See Using the Document Download Manager for more inf...

Page 14: ...e application For example if you attach a TIFF file converted by TIFFMaker to the Muratec Internet Fax via e mail you can use the Muratec Internet Fax machine as a PC printer Also by using the e mail...

Page 15: ...1 10 Getting Started Installing OfficeBridge on your PC Refer to the Setup Guide located on the CD supplied with OfficeBridge expan sion kit...

Page 16: ...alog click your user name to login When only one user is registered the User List screen does not appear skip to step 4 Item Description Page The large number is the page currently being displayed The...

Page 17: ...1 12 Getting Started 3 Enter your password If you have not setup a password skip to step 4 4 You are now logged in...

Page 18: ...1 13 Getting Started 1 2 3 4 5 6 7 8 9 10 11 Getting Started 12 13 AI Logging out of OfficeBridge 1 Press Log Out NOTE Simply closing the window does not mean that you have logged out Office Bridge...

Page 19: ...documents Forward Setting This shows the status for the Forward setting for your Personal Inbox To set up or change the set tings see Forwarding Settings on page 3 22 Auto Refresh Select whether to m...

Page 20: ...d on this tab Processing The files that you have requested or you are requested to process are listed on this tab Admin Tools The tab contains OfficeBridge settings and func tions that can be adjusted...

Page 21: ...nal Inbox and Public Inbox tab Selecting a file and clicking this button will forward the selected file to other destinations See Forwarding received documents on page 2 13 for details Re assign This...

Page 22: ...lic Inbox tab The fax and e mail destinations are displayed here When at a broadcast transmission the first entered destination will be displayed To see all broadcasted destinations in detail click Br...

Page 23: ...atus This item is only at Processing tab The job status of the files are displayed here When you click the list button and select a status the list will be narrowed down by that status Receiver This i...

Page 24: ...make sure to perform the shutdown opera tion Also make sure to perform the shutdown operation every time when the power supply to the machine is turned OFF 1 Press Menu 8 Program No 8 8 OB Shutdown 2...

Page 25: ...ived documents 2 14 Network Scanning 2 15 Operation flow 2 15 Scanning documents from the MFP 2 15 Download the scanned image from the scan box 2 18 Download the scanned image using the TWAIN driver 2...

Page 26: ...to a remote fax machine or e mail location When you set up the Forward Settings or Received Fax Forwarding in Admin Tools you can receive faxes and e mails in the Public Inbox or in a Personal Inbox S...

Page 27: ...o perform a PC fax from PC applications you need to have the FAX driver installed on your PC prior to attempting this function The following steps provide the basic procedure for sending a PC fax 1 St...

Page 28: ...ansmission Settings dialog will appear 6 Specify the destinations and adjust any settings To enter destinations see How to enter the destinations on page 2 5 To adjust settings see Setting transmissio...

Page 29: ...ing desti nations on page 2 10 Entering the destinations directly 1 Insert the cursor in the box next to Fax Destination and enter the fax number 2 Click Add 3 Repeat steps 1 and 2 until you have ente...

Page 30: ...in advance For details on registering or editing destinations see Address Book on pages 3 14 to 3 21 2 Select your desired destinations Check the boxes next to the Names and click Add Refer to the ref...

Page 31: ...e addresses will be displayed Page Proceeds to the next page of the address book The underlined numbers indicate pages that can be displayed the number that is not underlined indicates the page curren...

Page 32: ...ax number or a part of a fax number to be searched E mail Enter part of the e mail address to be searched Department This is not an independent field To use this field either the Name Fax or e mail sh...

Page 33: ...or NOTE The Search Login dialog can be skipped when you register the informa tion to the User Set up dialog in advance Or you can also skip this dialog by setting up LDAP Server Settings by checking t...

Page 34: ...lick Address book either in Fax Destination or in E mail Destination 2 Review the entered destinations in the lower area of the screen Click FAX and I FAX to switch the screen between fax destinations...

Page 35: ...ill be displayed in the list To change the file or add more files click Change The Sending Document dialog will be displayed Add or remove a file on the list You may add temporary storage files You ca...

Page 36: ...To perform an F Code transmission enter the Sub Address and Pass word here Refer to your machine s User Guide for more information regarding F Code transmissions Start Time To perform a delayed transm...

Page 37: ...ransmission will appear 5 Make the setting for each item in the Fax Transmission Settings dialog 6 Click Send Forwarding received documents You can forward received documents to other users or user gr...

Page 38: ...the transmission is in progress 4 Click Cancel and then OK Reading your received documents When you set up the Forward Settings or Received Fax Forwarding in Admin Tools you can receive faxes and e m...

Page 39: ...ument size by pressing Doc Size 3 Set the scanning settings if necessary Resolution Press Doc Resolution to select the resolution Document type Available resolution Text Photo Text Photo 200 300 600 d...

Page 40: ...to select a preset ratio or directly enter your desired ratio using the numeric keys 3 Press again Preset ratio Version Preset ratio Inch version 50 Min 64 8 5 11 5 5 8 5 78 8 5 14 8 5 11 100 129 5 5...

Page 41: ...File Name appears 2 Press Enter 3 Press or to select a file name 4 Press Enter NOTE To use this feature you must first register a file name See the File Name on page 3 40 4 Press Speed Dial Group fiv...

Page 42: ...the scan box NOTE Your screen images may vary by browser 1 Start OfficeBridge and login 2 Open the Scan tab 3 Select the file you want to download by checking the box next to the file 4 Click Download...

Page 43: ...tor see Step 6 Installing the OfficeBridge programs in Setup Guide 1 Start a TWAIN compliant application on your PC 2 Select the Muratec OB TWAIN Connector as the scanning device and then click OK 3 P...

Page 44: ...the document If you do not wish to change the linear resolution check the box No change to change the linear resolution check the box 200 dpi 300 dpi or 400 dpi F Page range Enter the number of pages...

Page 45: ...ant to other user s files click here and change the login user When changing the user select the UserID and enter the password If a password was not set during user registration a password is not requ...

Page 46: ...e to share information among registered users Posting a file from your browser 1 Start OfficeBridge and login 2 Select the file you want to post by checking the box next to the file 3 Click Post to th...

Page 47: ...t Enter the subject of the document being posted The subject may contain up to 80 characters Comments Enter a comment concerning the file being posted The message may contain up to 1 024 characters Po...

Page 48: ...m a PC application 1 Start the desired application program and create open a document 2 Click Print or Print Setup from the File menu Make sure that Muratec MFX 1330 Fax is selected as the printer If...

Page 49: ...2 23 6 Click Post Viewing the posted files NOTE If InfoMonitor is active it will automatically notify registered users when a new bulletin board document has been posted 1 Start OfficeBridge and log...

Page 50: ...o confirm whether the users have opened the docu ment or not Circulating a file from your browser 1 Start OfficeBridge and login 2 Select the file you want to circulate by checking the box next to the...

Page 51: ...0 characters Category Enter the document type The name may contain up to 20 characters You can also select a pre registered document type Click the drop down list next to the box and select the desire...

Page 52: ...pplication 1 Start the desired application program and create open a document 2 Click Print or Print Setup from the File menu Make sure that Muratec MFX 1330 Fax is selected as the printer If you want...

Page 53: ...ge 2 27 7 Click Circulate Viewing circulated files NOTE If InfoMonitor is active it will automatically notify registered users when a new circulation document has been posted 1 Start OfficeBridge and...

Page 54: ...rculated file q If you have circulated a file 1 Start OfficeBridge and login 2 Click the Circulated tab 3 Confirm the Confirmation item If the status is Completed the users you sent the document have...

Page 55: ...Start OfficeBridge and login 2 Click the Circulated tab 3 Click the Properties button and open the Circulated Document Proper ties 4 Click Confirmation in the Sender row 5 Check the individual status...

Page 56: ...ers Deadline Set the processing deadline 1 Click Set Deadline 2 Set the date To go to the next month click the arrow next this month 3 Set the time The minutes are selected in 15 min utes steps 4 Clic...

Page 57: ...y forward the document to another user This function is very useful in situations that require a fixed workflow Ex Document submitted to sales forwarded to accounting and then forwarded to shipping Cr...

Page 58: ...art the desired application program and create open a document 2 Click Print or Print Setup from the File menu Make sure that Muratec MFX 1330 Fax is selected as the printer If you want to make any ad...

Page 59: ...ocument has been posted 1 Start OfficeBridge and login 2 Click the Processing tab 3 Click on Subject to view the file 4 Click the icon in the properties to view the comments 5 Click Close to close Vie...

Page 60: ...n processed and the deadline has passed 4 Click on Subject to view the file 5 Click the icon in the properties to view the comments 6 Click Close to close Redirect the processing request to another us...

Page 61: ...2 6 Click Re assign Changing the job status to Completed When the requested job has been completed change the job status to Com pleted so that the person initiating the request is alerted 1 Start Offi...

Page 62: ...box next to the file Here we select a file from the scan box 3 Click Print 4 Click Yes To cancel without printing click Cancel Printing a document from a PC application After the print driver has bee...

Page 63: ...the desired application program and create open a document 2 Click Print or Print Setup from File menu Make sure that Muratec MFX 1330 Fax is selected as the printer If you want to make any adjustment...

Page 64: ...also send documents stored in temporary stor age to a fax or e mail address without adding another file For transmission we describe the details in PC fax transmission and reception from page 2 2 Atta...

Page 65: ...2 41 Using the OfficeBridge 1 2 3 4 5 6 7 8 9 10 11 12 Using the OfficeBridge 13 AI 3 Click Temporary Storage to open it...

Page 66: ...splayed destinations will be selected If you add a wrong destination select the file from the list below and select Delete 5 After you have added all of the desired destinations click Save 6 After you...

Page 67: ...ttings 3 29 Fax History 3 31 Mail History 3 33 Setup 3 35 Initial Settings 3 35 Scan Settings 3 36 Personal Outbox setting 3 37 Personal Inbox setting 3 39 File Name 3 40 Received Fax Forwarding 3 42...

Page 68: ...the Admin Tools tab to keep other users from changing the settings Register and edit the Shared address book Import the destination s information to the Shared address book Initial Settings Scan Sett...

Page 69: ...TE Only one user can be registered as the administrator 4 Click Register as Administrator The administrator can protect these settings to keep other user from changing settings Click this box to set t...

Page 70: ...3 4 Using the Admin Tools 5 Set the Password 6 Click Save 7 The administrator has been registered The password can be set up to 20 characters Administrator appears next to the user name...

Page 71: ...screen does not appear 2 Click the user name of administrator 3 Enter the password NOTE If the password has not been set this dialog box will not appear You can skip this step NOTE If you forget the p...

Page 72: ...min Tools Opening the Admin Tools tab 1 Log in to OfficeBridge If the administrator is registered you should log in as an administrator to access all settings 2 Click Admin Tools tab The Admin Tools m...

Page 73: ...on the machine Fax History This is for checking the fax sending receiving history Mail History This is for checking the e mail sending receiving history Setup page 3 35 Initial Settings This creates d...

Page 74: ...for processing period etc Configuration page 3 52 TCP IP This sets the network environment IP address sub net mask etc SMTP POP This sets the e mail environment e mail addreses servers etc E mail Sett...

Page 75: ...Tools User Registration User Registration Register a new user 1 Log in to OfficeBridge NOTE If the administrator is registered you may log in as an administrator to access this setting 2 Click Admin T...

Page 76: ...sed to log in to Office Bridge Up to 20 alphanumeric characters Company Enter the user s company name Up to 50 characters Department Group Enter the name of the department or group name the user belon...

Page 77: ...ss When registering the user as an administrator check Resister as Administrator Access Settings When the administrator has been registered the User Registration cannot setup by the user other than ad...

Page 78: ...a new user 2 In the User Registration list click a user name you want to modify The User Set up dialog will appear 3 Modify items in the User Set up dialog then click Save The settings are registered...

Page 79: ...name will be displayed 4 Specify the folder and file name to save to and click Save The data is converted to a vCard format file and stored in a specified loca tion 5 If you want to export another us...

Page 80: ...Address Book 0 Displays the registered informa tion in Personal Address Book Shared Address Book 0 Displays the registered information in Shared Address Book NOTE The number in the parentheses indicat...

Page 81: ...6 In Sort by Name mode click New In Sort by Number mode click an address book number that does not contain destination information The Set Shared Address dialog will appear Item Description Name Ente...

Page 82: ...tination information The Set Personal Address dialog will appear Item Description Name Enter the name of destination Up to 30 characters Fax Number Enter the fax number for the destination The fax num...

Page 83: ...h the registration click Close in the Address Book screen Exporting importing destination information You can export destination information to vCard or CSV format file and import data from vCard or C...

Page 84: ...rmat vCard or CSV If you select CSV format you can set the following options Select Overwite or Append Tag Settings If your address book data contains separate fields for the destination s first name...

Page 85: ...the Personal Group 1 On the Admin Tools tab click Address Book The Address Book dialog will appear 2 In the Address Book dialog click Personal Group 3 Click New 4 Select the one or more destinations...

Page 86: ...nish Registering a new group into the Shared Group NOTE If the administrator is registered you should log in as an administrator to register a new group into the Shared address book 1 On the Admin Too...

Page 87: ...oup dialog or Set Shared Group dialog will be dis played 4 Edit the contents of the items in the Set Personal Group dialog or the Set Shared Group dialog then click Save The edited group information w...

Page 88: ...on Forwarding Selects On or Off for the forwarding function Received Document Handling Selects leaving received documents in the document list or forwarding them to another user Leave in Personal Inbo...

Page 89: ...ntain up to 50 characters At the same time select the file format for the forwarding document by checking it Period This sets the forwarding period for the received docu ment Always Check this to alwa...

Page 90: ...y being displayed Display Sets the number of users to be displayed 10 20 or all File Name The temporary storage document file name will be displayed When you click the list and select a file name the...

Page 91: ...Communication screen will appear Item Description Page Switches the page of the scheduled communication display The underlined numbers indicate pages that can be displayed the number that is not unde...

Page 92: ...ime scheduled for the start of commu nications the actual date and time for communica tions underway are displayed Job Cancel button Check the communication you want to cancel and click The cancel con...

Page 93: ...ntly being displayed Display Sets the number of commands displayed 10 20 or all Document Name The document file name is displayed When you click the list and select the file name the displayed print j...

Page 94: ...the job you want to cancel printing of and click The cancel confirmation screen will appear When you click the OK the printing is canceled and the job is deleted from the list Close button Closes the...

Page 95: ...Settings screen will appear Item Description Device Name Enter the name of the main unit in order to identify the device The name may contain up to 40 charac ters Installation Loca tion Enter the loc...

Page 96: ...ions The attached optional unit name and status of it is displayed Initialize Initializes the value of device setting Save When you click this the settings are registered Close When you click this the...

Page 97: ...currently being displayed Display Sets the number of communications displayed 10 20 or all Destination The fax address sender is displayed When you click the list button and select an address sender t...

Page 98: ...destination folder and file name dialog is displayed After specifying the folder to download to enter the file name then click the Save The fax history is downloaded to the specified loca tion in the...

Page 99: ...indicate pages that can be displayed the number that is not underlined indi cates the page currently being displayed Display Sets the number of communications displayed 10 20 or all Transmission Histo...

Page 100: ...wnload button When you click this the download confirmation dia log box will be displayed When you click OK the Windows download desti nation folder and file name dialog will be displayed After specif...

Page 101: ...loaded File This selects whether or not to delete a file from the disk after it has been downloaded To not delete select Do not delete from disk to delete select Delete from disk Temporary Docu ment H...

Page 102: ...period of scanned documents in the Scan tab To hold indefinitely check Do not delete automati cally To delete a document after the retention period check Delete automatically and specify the reten tio...

Page 103: ...o automatically delete sending documents on the Personal Outbox tab To disallow automatic document deletion check Do not delete automatically To delete automatically check Delete automatically and set...

Page 104: ...e You can preview the selected cover page by clicking the Preview Subject Enter the default setting for the subject when attaching a cover page The subject can be regis tered up to 80 characters Messa...

Page 105: ...Description Document Hold Time Sets whether or not to automatically delete received documents To disallow automatic deletion check Do not delete automatically To delete automatically check Delete aut...

Page 106: ...n To edit a file name click the desired file name The File Name Setting screen will appear 4 Enter or edit the file name then click Save NOTE The name can contain up to 20 characters You cannot enter...

Page 107: ...9 10 11 12 13 AI Using the Admin Tools Deleting a file name 1 Repeat steps 1 through 2 in Register or edit file name 2 Select the file name you want to delete 3 Click Initialize to delete the file na...

Page 108: ...the Admin Tools tab The Fax Forwarding Setting screen will appear Item Description General Setting Specifies whether to enable the Forwarding feature You can toggle ON or OFF by clicking the button W...

Page 109: ...is disabled the settings are invalid even if they are set Setting Name When making multiple distribution settings this sets a name for identifying a distribution setting The name can contain up to 30...

Page 110: ...ress Book The Destination Settings dialog will appear 2 Select the destination 3 Click Add 4 Click Save NOTE To change or delete fax destination 1 Click the Address Book 2 Modify the contents of the D...

Page 111: ...ne When printing check ON when distributing with out printing check OFF Advanced Setting Set this when distributing a received document as a public received document bulletin board document circulatio...

Page 112: ...ed fax forwarding setting in Admin Tools the received document can be forced to print by following this procedure on the MFP 1 Press Menu 6 3 Program No 63 3 Print Server Data 2 Press Enter Password U...

Page 113: ...ifies the retention period of documents received in the Public Inbox To hold indefinitely check Do not delete automati cally To delete a document after the retention period check Delete automatically...

Page 114: ...tely check Do not delete automatically To delete after the retention period check Delete automatically and specify the preservation period to from 1 to 99 days The default setting is Do not delete aut...

Page 115: ...ed Completed Circula tion Document Hold Time Specifies the circulation document retention period To hold indefinitely check Do not delete automati cally To delete after the retention period check Dele...

Page 116: ...s set to Off the Processing tab disappears and the request processing function cannot be used Initial Deadline Specifies the number of days 1 to 30 from the date on which processing is requested until...

Page 117: ...essing tab Delete Document s Sets whether or not an administrator other than the requester is allowed to delete requested process documents To enable this check The administrator can delete the job NO...

Page 118: ...ss servers etc E mail Settings This sets the e mail settings such as attachment format e mail template registrations etc LDAP Settings This sets the LDAP server settings Folder Shortcuts This sets the...

Page 119: ...should log in as an administrator to access this setting 1 Log in to OfficeBridge 2 Click TCP IP on the Admin Tools tab The TCP IP Settings screen will appear 3 Configure the settings then click Save...

Page 120: ...n the net work DHCP Setting If a DHCP server is installed on your network select ON After rebooting the machine an IP address and Subnet Mask will be automatically assigned by the DHCP server Accordin...

Page 121: ...Office Bridge sends notification of newly arrived faxes etc to InfoMonitor Normally set to 60000 InfoMonitor Port No This sets the UDP port number used for automati cally searching OfficeBridge when i...

Page 122: ...field when sending e mail Up to 40 characters can be registered E mail Address Enter the e mail address that is assigned to your machine Up to 50 characters can be registered Mail Server Sending mail...

Page 123: ...on the display 3 Press Next to show the next screen 4 Press Check Mail Receive before Send For some providers POP authentication is required before sending send request to SMTP server In this case ch...

Page 124: ...rt No Input the SMTP port number Normally set to 25 SMTP Reception Security button You can register up to five computer IP addresses or domains for clients allowed to receive Click the Security button...

Page 125: ...ion environment for convenient e mail usage NOTE If the administrator is registered you should log in as an administrator to access this setting 1 Log in to OfficeBridge 2 Click E mail Settings on the...

Page 126: ...d for sending documents with TIFF Select MH MR MMR or JBIG NOTE This setting is effective only for an e mail sending from the PC For the attached file format of an e mail sending from the machine you...

Page 127: ...plate Registration screen will appear 2 To register a new template click a number that does not contains the template To edit the template click the template name you want to edit The E mail Template...

Page 128: ...ery Status Notification DSN from receive server Requests a delivery confirmation Message Disposition Notification MDN showing that recipient read the mail Requests a read receipt Request both receptio...

Page 129: ...curity for Fax Forwarding This is set when fax forwarding requests are accepted but this is restricted to requests from specific e mail addresses and domain names Up to five can be registered Click th...

Page 130: ...ill appear Item Description No The LDAP server number Name The registered LDAP server name Default Settings The default LDAP server To change the default server select the OFF button of the LDAP serve...

Page 131: ...rver is using The default port number is 389 Account Enter the account name used to log on to the LDAP server Password Enter the password used to log on to the LDAP server Log in Required If the LDAP...

Page 132: ...e you want to search Searching method Any Displays the search results that contain the value you entered Initial Displays the search results that begin from the value you entered Final Displays the se...

Page 133: ...used for search filter And then the machine will retrieve the records that include the registered attributes you set For example when the LDAP parameters are set as follows and you entered a name for...

Page 134: ...ll path should be within 100 characters The folder should be in the same segment with your machine 1 Log in to OfficeBridge 2 Click Folder Shortcuts on the Admin Tools tab A list of registered folder...

Page 135: ...you do not know the exact folder path select Browse to browse the network User Name If the folder requires authentication please enter the user name If your machine is on a windows domain controlled...

Page 136: ...sing the Admin Tools Deleting a folder shortcut 1 Repeat steps 1 through 2 in Creating or editing folder shortcut 2 Select the folder shortcut you want to delete 3 Click Initialize 4 When prompted cli...

Page 137: ...on the Admin Tools tab A list of registered FTP shortcuts will be displayed Item Description No The FTP shortcut number Name The registered FTP shortcut name Initialize To delete an FTP shortcut sele...

Page 138: ...r the FTP server name Folder Name Enter the folder name on the FTP server User Name Enter the user name for the FTP server Password Enter the password for the FTP server 4 Configure the settings then...

Page 139: ...d indicates that transmission to the Archive has failed You may better inform the users in advance that this message does not mean the trans mission to the desired destination has failed when you set...

Page 140: ...2 Enter the fax number and click Add or Click Address Book Select the destination and click Add Then click Save To delete a fax number from the archive destina tion list 1 Click Address Book 2 Select...

Page 141: ...Click Shortcut List Select the folder shortcut and click Add Then click Save To delete a folder shortcut from the archive desti nation list 1 Click Folder Distribution Settings 2 Delete the settings...

Page 142: ...3 76 Using the Admin Tools Archive activation 1 Click the settings button and toggle the archive setting ON or OFF NOTE This cannot be turned ON if the archive setting has not been created...

Page 143: ...or 4 2 Environment settings 4 3 User settings 4 4 OfficeBridge settings 4 5 Notification Set up 4 6 Using InfoMonitor 4 7 Check a new document 4 7 Disabling the pop up notification 4 7 Chapter Using t...

Page 144: ...ents the fax e mail transmission results or other Office Bridge events If InfoMonitor is running a pop up message will be displayed and the desktop icon will be flashing NOTE To use OfficeBridge InfoM...

Page 145: ...Alert dialog will be displayed when OfficeBridge InfoMonitor initially starts up 1 When the following dialog appears click Unblock NOTE If you click other buttons except Unblock by mistake 1 Click Con...

Page 146: ...s in the Environment settings 3 Click Search 4 Select your User name from the drop down list NOTE If the drop down list does not appear after clicking Search first see the OfficeBridge settings on the...

Page 147: ...the task tray while OfficeBridge InfoMonitor is running 2 Click OfficeBridge Settings in the Environment settings 3 Click Search 4 Select the IP address of your MFP and click OK 5 Enter the Monitor In...

Page 148: ...When document transmission is successful Tx Failed When transmission did not end successfully Inbox Newly received documents in the Personal Inbox Public Inbox Newly received documents in the Pubic In...

Page 149: ...onal inbox To view the arrived document click Open the document Select Close if you want to check it later Disabling the pop up notification To disable the pop up notification please follow this proce...

Page 150: ...settings 5 3 User settings 5 4 OfficeBridge settings 5 5 Download setting 5 6 Using Download Manager 5 8 Creating new download tasks 5 8 Editing a task 5 10 Deleting a task 5 10 Download the files 5...

Page 151: ...cations on your com puter If this application is kept active documents can be downloaded auto matically or manually While a document is being downloaded the task tray icon will flash to notify you NOT...

Page 152: ...Environment settings by the following procedure 1 Double click the OfficeBridge Document Download Manager icon on the task tray The icon will appear when OfficeBridge Document Download Manager is acti...

Page 153: ...arch 2 Select your user name from the drop down list NOTE If the drop down list does not appear after clicking Search first see the OB setting on the next page and set up the IP address 3 Enter you pa...

Page 154: ...ges 1 Click OfficeBridge settings in the Environment settings 2 Click Search NOTE On Windows XP Service Pack 2 or Windows Server 2003 when Windows Security Alert dialog appears click Unblock 3 Select...

Page 155: ...r and click OK 4 Click OK Click Apply to save the setting and keep the screen active Click Close to close the screen without saving the changes File format Select the file format in which to download...

Page 156: ...anager Advanced settings You can make a log file for the operation and download logs 1 Click Advanced settings under Download in the Environment settings 2 Make a setting and click OK Click Apply to s...

Page 157: ...lect from which box you want to download the files B Register the name of the subfolder into which the files will be stored C Select whether to delete the file from the machine memory after down loadi...

Page 158: ...en you have selected Auto set up when to run the download task Check one of the following then click the list button and set the day of the week or date and time Interval Downloads the files in a set...

Page 159: ...t 3 Adjust any settings as necessary Refer to Creating new download task page 5 8 if needed 4 Click OK Click Cancel to close the screen without saving the changes Deleting a task 1 Open the Document D...

Page 160: ...nload the files 1 Open the Document Download Manager 2 Select the task you want to run and click Run When you want to run all the tasks click Run All 3 The selected tasks will be executed and you will...

Page 161: ...What is CoverPage Editor 6 2 Creating a new cover page 6 3 Editing the CoverPage 6 5 How to send a cover page 6 7 Chapter Using the CoverPage Editor 6...

Page 162: ...name fax number e mail address or in the User Set up field The information will automatically be inserted to the correct field everytime you specify a destination so there is no need to create a cove...

Page 163: ...ption it may be extended up to 20 1 Click Start point to All Programs locate OfficeBridge then CoverPage Editor to start the program 2 Click File and select New 3 Edit the cover page For more informat...

Page 164: ...have already registered five cover pages you should delete an exist ing one by overwriting it 7 If you want to register more cover pages repeat steps 2 to 6 8 Select Exit from the File menu to close t...

Page 165: ...will be inserted here Company The company name registered in the User Set up field will be inserted here Department The department registered in the Department Group of User Set up field will be inser...

Page 166: ...d on the page 4 Move align or edit it as you like For details refer to the Help screen Inserting text drawings and pictures You can also enter text drawings and pictures onto your cover page Click Ins...

Page 167: ...a quick cover page attachment NOTE You cannot send a registered cover page from your machine to an fax desti nation In this case the fax cover page will be transmitted 1 Either click Send from Office...

Page 168: ...the message The message may contain up to 1024 characters 6 Click Save 7 Specify the destinations and make any adjustments To enter destinations see How to enter the destinations on pages 2 5 to 2 9 T...

Page 169: ...What is TIFFMaker 7 2 Creating a TIFF file 7 2 Chapter Using the OB TIFFMaker 7...

Page 170: ...FMaker it is necessary to install this program on your computer For details of how to install Muratec OB TIFFMaker refer to the Setup Guide Creating a TIFF file 1 Open the document you want to convert...

Page 171: ...Troubleshooting the browser 8 2 Printing problems 8 7 Trouble with InfoMonitor 8 10 Trouble with Document Download Manager 8 11 Chapter Trouble shooting 8...

Page 172: ...network LAN settings and clicking on LAN Set tings Is the LAN cable loose or disconnected c Check the LAN cable connection and secure it firmly Is the LAN cable damaged c Replace the LAN cable Is the...

Page 173: ...vice s instruction manual and correct the network settings The size of tables on the screen charac ter spacing or line spacing is different from the screens in the manual Computer Is a browser other t...

Page 174: ...eBridge SMTP POP settings dialog Consult the Setup Guide and correct the network settings Is the LAN cable loose or disconnected c Check the LAN cable connectivity and secure it firmly Is the LAN cabl...

Page 175: ...uratec MFX 1330 Fax as the printer to use from the application s print menu Is the Muratec MFX 1330 Fax port set cor rectly c Check the printer port in Muratec MFX 1330 Fax and set it to the correct p...

Page 176: ...alled Close OfficeBridge and install Muratec OB TWAIN Connector Is Muratec OB TWAIN Connector set as the input device c In the application set the input device to Muratec OB TWAIN Connector Processed...

Page 177: ...1330 Is the power on c Turn the power on Is paper loaded c Load paper properly Are the drum cartridge and toner bottle installed c Re install the toner and drum cartridge Is the LAN cable loose or di...

Page 178: ...rinter s print settings configured correctly c Correctly configure the print settings for Muratec MFX 1330 Does Windows have sufficient system memory c Confirm the total memory meets the Office Bridge...

Page 179: ...r text gar bled Computer Does Windows have sufficient system memory c Confirm the total memory meets the Office Bridge system requirements and install more memory if needed c If multiple applications...

Page 180: ...the correct user selected c In the User Settings dialog of the OfficeBri dge InfoMonitor select the correct user Is the popup display set to ON c Right click the OfficeBridge InfoMonitor task tray ic...

Page 181: ...eBridge Settings dialog of OfficeBridge Document Download Manager enter the same IP address as OfficeBridge Is the correct user selected c In the User settings dialog of OfficeBridge Document Download...

Page 182: ...System requirements AI 2 Specifications AI 3 Internet Fax AI 3 PC FAX AI 3 Network scanner AI 4 Network printer AI 4 Index AI 5 Chapter Appendix and Index 9...

Page 183: ...ish version Operating System is guaranteed Operation with Windows 98 Me upgraded from Windows 95 3 1 cannot be guaranteed Not compatible with command prompt of MS DOS and Win dows and DOS prompt CPU a...

Page 184: ...MH MR MMR JBIG Standard T 37 Halftones 256 levels Data attachment format TIFF or PDF PC FAX Item Requirements Original document size Inch version Letter 8 5 11 Metric version A4 210 297 mm Encoding me...

Page 185: ...mode 100 200 300 600 dpi Halftones 256 levels Data format TIFF Zoom Preset ratios Inch version 50 64 78 100 129 200 Metric version 50 70 81 86 100 115 122 141 200 Zoom range ADF 25 to 100 Document gla...

Page 186: ...4 1 Initial Settings 3 35 L LDAP Settings 3 64 Log in 1 11 Log out 1 13 M Mail History 3 33 Mail server settings 3 56 N Network printing 1 7 2 38 from a PC application 2 38 from the machine memory 2...

Page 187: ...AI 6 Appendix and Index Trouble shooting 8 1 with Document Download Manager 8 11 with ImfoMonitor 8 10 U User Registration 3 9 Changing 3 12 Deleting 3 12 Exporting importing 3 13 Register 3 9...

Page 188: ...Plano Parkway Suite 100 Plano Texas 75074 www muratec com multifunction made easy Muratec UK Ltd Unit 23 Hewitts Industrial Estate Elmbridge Road Cranleigh SURREY GU6 8LW www muratec co uk 2005 Murat...

Reviews: