Page 32 MSI-3750CS RF Weighmeter • User Guide
3750CS
C
ELL
S
CALE RF DIGITAL WEIGHT INDICATOR
®
ID CODE STRING 1 & STRING 2
Each ID code can be further identified with one or two ID Code Strings. A string is simply a set of alphanumeric
characters that can be displayed and/or printed. The ID Code Strings differ from the ID Code Name in that they
are only used in conjunction with the RS-232 option and can’t be displayed on the Message display (except
during the text entry process). Each string can be up to 20 characters in length. The MSI “@ codes” can also be
embedded in the string which provides an extremely versatile output capability. See Section 7 – Comm Ports,
for more details on programming “@ codes”.
Use the ID Code Strings to set up a print string that changes with every ID code. Combined with the standard
Comm Port print strings, the Code Labels can be used to design a very sophisticated bar code label with three
fields that change with every ID Code – the ID Code Name, and ID String 1 and 2.
The entry procedure for ID Code Strings is identical to the Name procedure, except that you are not limited to 8
characters. After the first 8 characters are entered, the letters will scroll to the left.
The Function keys can be programmed to allow one button access to 1 or both ID Strings. This can be
used for Operator ID entry, or direct access to the label printer data when the ID string is embedded in
the main Comm Port output.
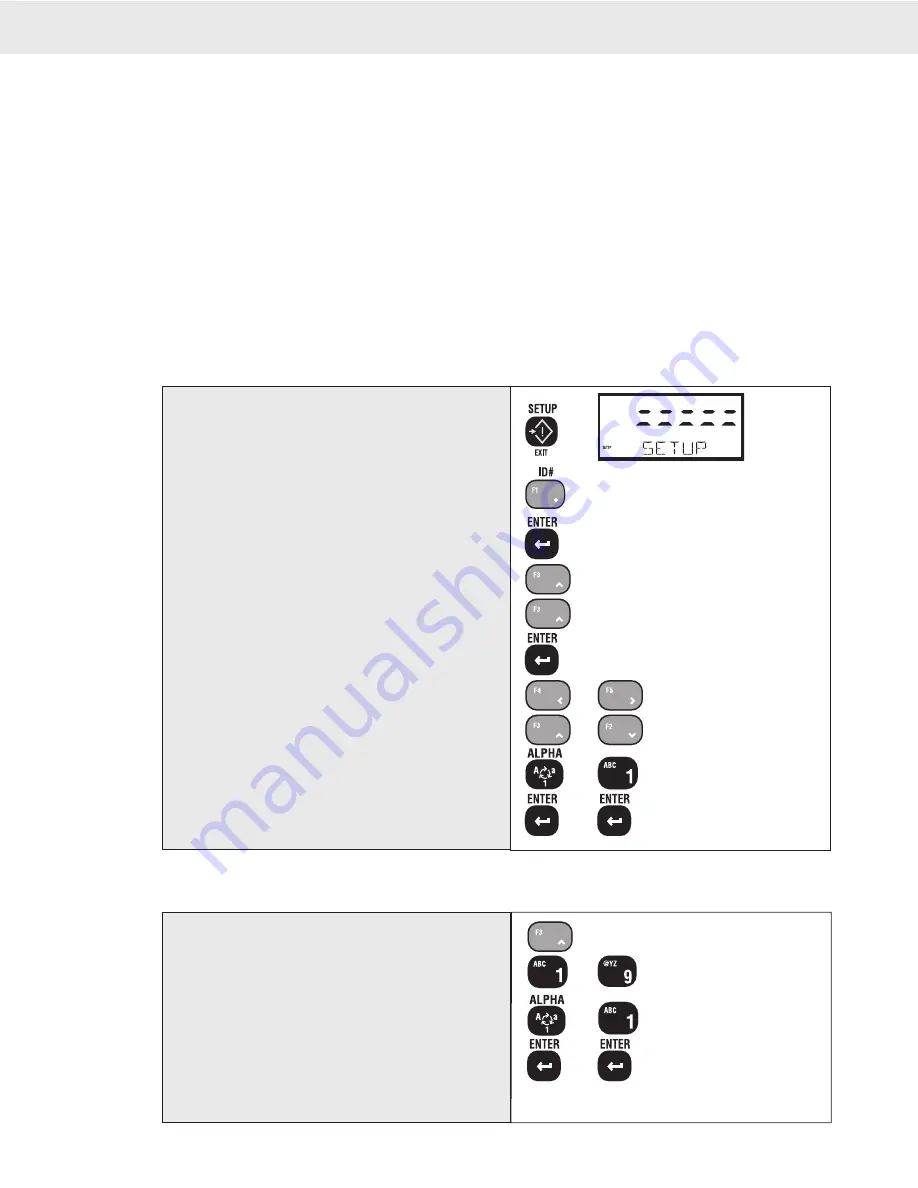
To Add or Edit an ID Code String
Select the ID Code you wish using the procedure "To Access an Existing ID Code" (page 41)
1
2
ID NUMBR
3
ID NAME
4
NUM DISP
4
STRING 1
5
6
...to select char.
6
...to scroll char.
6
...to input char.
7
...to finalize edit.
1) Push SETUP.
2) Push the ID # key. The message reads “ID
NUMBR”
3) Push ENTER to access the menus.
4) Use the UP key to find the desired ID Code String
(“STRING 1” or “STRING 2”).
5) Push ENTER. The current string (if any) will be
displayed.
6) The message display will show the far left character
blinking. Use the LEFT / RIGHT Cursor keys
to select the character you wish to edit. Use the
UP/DOWN keys or use the standard Alpha-Numeric
entry procedure to change the letter(s). When
finished, push the ENTER key twice. (See “General
Alpha-Numeric Character Entry Procedure”)
The characters will scroll left or right when the string is larger than 8
characters. Use the LEFT or RIGHT cursor keys to maneuver through
the string.
1
STRING 1
2
...for numbers.
2
...to input char.
2
...to finalize edit.
1) Push the FUNCTION key once to access a STRING.
The current string (if previously entered) will
display. F3 shown for example only. Use the key
you programmed for the STRING entry.
2) The current string is displayed. Use the UP/DOWN
keys to enter characters. Push ENTER when the
desired character is displayed. Use the LEFT and
RIGHT cursor keys to move the cursor to allow
editing the String. When finished, push the ENTER
key twice.
See “General Alpha-Numeric Character Entry Procedure”.
To Access the ID Code Strings with the FUNCTION keys
For this procedure to function, a FUNCTION key must be programmed for “STRING 1” and/or “STRING 2”. The key(s) used for this purpose can be labeled to suit
your needs (e.g. “CUSTOMER” or ‘OPERATOR”, etc.) See Section 4– FUNCTION KEY PROGRAMMING for details.


