background image


Revision 1.7.2 


Page 257 

 
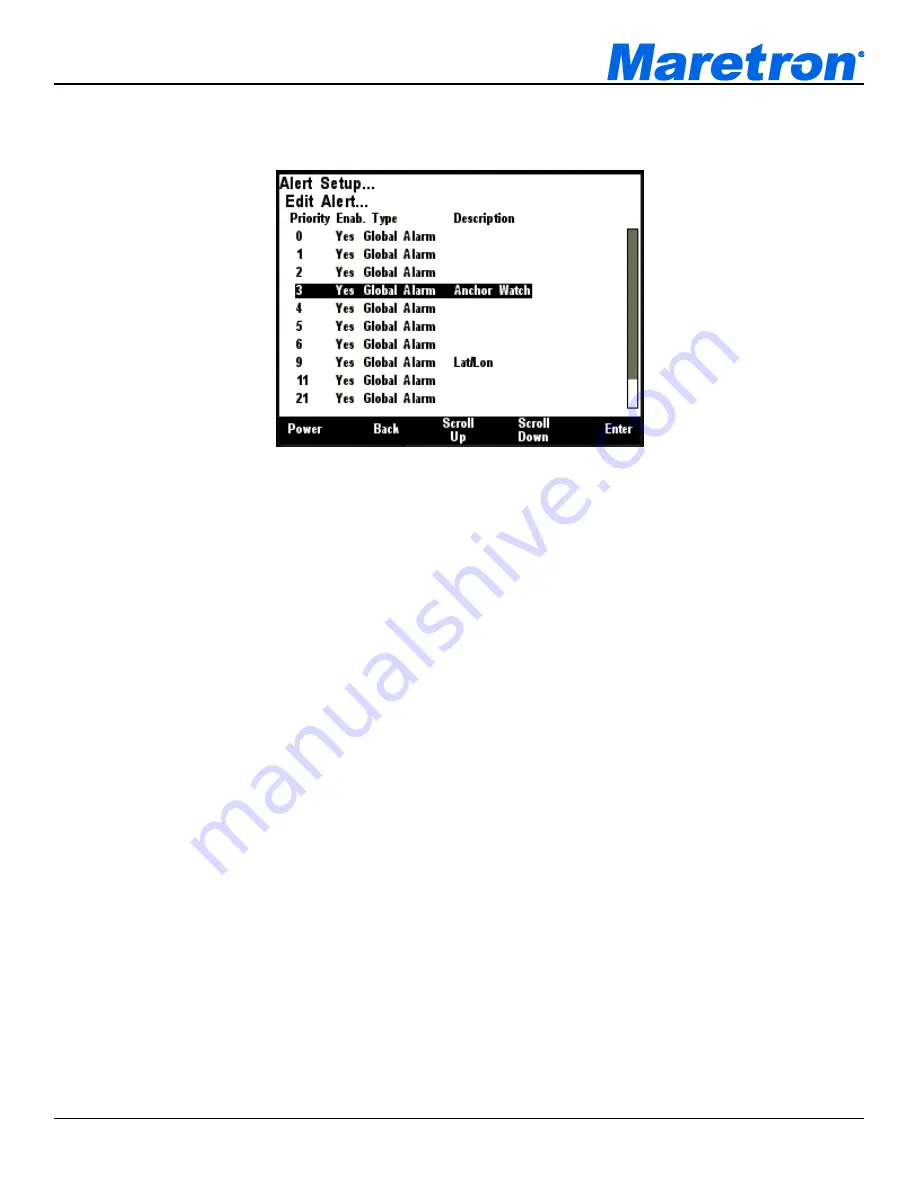
This brings up the list of Alerts managed by the DSM410. 


Figure 303 

– Editing an Alert: Alert List 

 
The following information is shown for each alert that is in the system. 
 

Priority


– The priority of the Alert (see 8.3.3). 

Enab

– Whether the Alert is Enabled or Disabled. 

Type


– The Type of Alert. This is a combination of whether the Alert is Local or Global (8.3.15) 

and whether the Alert is an Alarm or a Warning (4.3.1) 

Description


– The textual description of the Alert (8.3.5) 

 
Scroll up and down using the 

Scroll Up

 and 

Scroll Down

 buttons until the alert that must be edited is 

highlighted, and press the 

Enter

 button. 

The Alert Editor is opened, pre-populated with the parameters of the chosen Alert. See Section 8.1 
for details of these parameters. 

8.6 Setting the Vessel Operating Mode 

The Vessel Operating Mode must be set on each DSM410. This is a potentially risky operation, in 
that Alerts that are Active in the existing mode may be ignored in the new Operating Mode. The 
DSM410 will warn the operator about these Alerts to minimize the risk. However, if the new vessel 
status was transmitted to other Alert Sources that are unmanned, then the warnings would be lost. 
For this reason, the Vessel Operating mode must be changed at each DSM410 or N2Kview, and 
those alerts, which would be disabled, noted by the user. 
The Vessel Operating Mode is set through the Alert Setup Screen. 

Scroll Down

 to the required 

Operating Mode entry, press 

Enter

 and then use the 

Scroll Up

 / 

Scroll Down

 buttons to select the 

new Mode. Press 

Enter

 to complete the operation. 


Summary of Contents for DSM410

Page 1: ...NMEA 2000 Multi function Color Graphic Display User s Manual Revision 1 7 2 Copyright 2017 Maretron LLP All Rights Reserved Maretron LLP 9014 N 23rd Ave 10 Phoenix AZ 85021 7850 http www maretron com...

Page 2: ...DSM410 User s Manual Page ii Revision 1 7 2 Revision History Revision Description 1 7 2 Original document...

Page 3: ...3 3 2 Choosing a Value from a List 6 3 3 3 Entering a Numeric Value 6 3 3 4 Entering a Textual Value 6 3 4 Settings Lock Mode 8 4 Important Concepts 9 4 1 Favorite Screens 9 4 2 Categories and Data T...

Page 4: ...2 6 Favorite Screens Setup Menu 36 5 2 7 Units Menu 41 5 3 Control Mode 45 6 Device Configuration 47 6 1 Airmar Depth Speed Temperature Transducers 50 6 1 1 Advanced Configuration 50 6 1 2 Device Ins...

Page 5: ...lection 81 6 9 2 Copy alarms settings from local display 82 6 9 3 Copy device selection from local display 83 6 9 4 Copy display settings from local display 84 6 9 5 Copy favorite settings from local...

Page 6: ...Maretron FPM100 Configuration 113 6 14 1 Advanced Configuration 113 6 14 2 Channel 0 5 115 6 15 Maretron GPS100 Configuration 122 6 15 1 Advanced Configuration 123 6 15 2 Cold Start GPS 127 6 15 3 GP...

Page 7: ...stance 161 6 22 4 Channel Configuration 161 6 23 Maretron SMS100 Configuration 162 6 23 1 Advanced Configuration 162 6 23 2 Label 163 6 23 3 Test 164 6 24 Maretron SSC200 SSC300 Configuration 165 6 24...

Page 8: ...Password 201 6 31 4 DHCP 201 6 31 5 IP Address 201 6 31 6 Subnet Mask 201 6 31 7 Default Gateway 202 6 31 8 Default DNS 202 6 32 Maretron WSO100 Configuration 202 6 32 1 Advanced Configuration 202 6...

Page 9: ...rt Type 236 8 3 3 Priority 236 8 3 4 Trigger Source 237 8 3 5 Description 237 8 3 6 Location 237 8 3 7 Trigger Configuration 237 8 3 8 Local Audible 251 8 3 9 Tone 252 8 3 10 Remote Annunciators 252 8...

Page 10: ...een Format 38 Figure 25 Setting the Auto Change Interval 38 Figure 26 Selecting the Data Category 39 Figure 27 Selecting the Data to be displayed 39 Figure 28 DSM410 Units Menu 41 Figure 29 Device Con...

Page 11: ...re 69 DSM150 DSM250 DSM410 Copy display settings from local display 84 Figure 70 DSM150 DSM250 DSM410 Copy favorite settings from local display 84 Figure 71 Favorite Settings Transfer Completion Scree...

Page 12: ...ing Antenna Altitude on a GPS100 123 Figure 116 Configuring Satellite Elevation Mask on a GPS100 124 Figure 117 Configuring PDOP Mask on a GPS100 125 Figure 118 Configuring SNR Mask on a GPS100 125 Fi...

Page 13: ...EA 2000 PGN Enable Disable Screen 160 Figure 167 SIM100 Channel Configuration Screen 161 Figure 168 SMS100 Configuration Screen 162 Figure 169 SMS100 Advanced Configuration Menu 162 Figure 170 SMS100...

Page 14: ...stom Calibration of the Tank Level Monitor 190 Figure 213 Tank Levels Calibration Capacity Estimation 191 Figure 214 Empty Level Calibration 191 Figure 215 Intermediate Level Calibration 192 Figure 21...

Page 15: ...lay 223 Figure 260 Time hh mm Display 223 Figure 261 Time hh mm ss Display 224 Figure 262 VDR Status Display 224 Figure 263 Weather Display 225 Figure 264 Wind Rose Display 226 Figure 265 Moon Phase D...

Page 16: ...Annunciator Enable Disable 252 Figure 297 SMS Text Settings Screen 253 Figure 298 SMS Text Phone Number x Screen 253 Figure 299 Deleting an Alert 255 Figure 300 Deleting Alert List 255 Figure 301 Dele...

Page 17: ...ctions for installation configuration and usage of the Maretron DSM410 in order to ensure optimal performance 1 2 Firmware Revision This manual corresponds to DSM410 firmware revision 1 7 2 1 3 DSM410...

Page 18: ...easy access to the rear side of the mounting surface The steps for this type of mounting are as follows 1 Attach the Mounting Template see Section 13 to the surface where the DSM410 is to be located...

Page 19: ...ecurely and that the collar on the cable connector is tightened firmly Connect the other end of the cable male to the NMEA 2000 network in the same manner The DSM410 is designed such that you can plug...

Page 20: ...elow Figure 2 DSM410 Power Up Screen Alternatively you may power down the DSM410 by pressing and holding the power key see Section 3 2 below for details 3 2 Turning the DSM410 Off To turn the DSM410 o...

Page 21: ...ht brightness between three programmed brightness levels see Section 5 2 4 3 on page 32 for details while a long press cycles the DSM250 through 8 programmable color palettes see Section 5 2 4 4 on Pa...

Page 22: ...Choosing a Value from a List When editing a value chosen from a list the keys on the DSM410 keypad have the following functions Power Key turns the DSM410 off see Section 3 1 on page 4 for details Bac...

Page 23: ...ton top return to the choices on the left To append a numeral use the Scroll Up and Scroll Down buttons to select Numeric and then press Enter to go across to the numbers Now use the Scroll Up and Scr...

Page 24: ...The DSM410 has a settings lock mode in which the settings of the DSM410 cannot be changed To enter the lock mode do the following steps 1 Begin with the DSM410 powered off 2 Press and hold the Up and...

Page 25: ...settings data to display and formats in which to display the data The DSM410 supports up to 16 different favorite screens 4 2 Categories and Data Types The DSM410 is capable of displaying many types...

Page 26: ...L N Voltage displays average line to neutral RMS voltage of the AC power on the generator Average L L Voltage displays average line to line RMS voltage of the AC power on the generator Total Real Powe...

Page 27: ...utility Total Apparent Power displays apparent power output by the utility Total Power Factor displays power factor of the utility Total kWH Export displays total energy produced by the utility for th...

Page 28: ...e DSM410 supports the display of information for up to 64 DC sources including alternators batteries solar cells wind generators etc with special parameters for batteries i e State of Charge Time Rema...

Page 29: ...14 for details Hardware ON Timer displays the value of a hardware timer in Maretron s DCR100 SIM100 and RIM100 that accumulates the elapsed time that the indicator has spent in the ON state This time...

Page 30: ...nt dew point based on air temperature and humidity Temp Engine Room displays the air temperature from a sensor mounted in an engine room Temp Inside displays the air temperature from a sensor mounted...

Page 31: ...displays total fuel remaining in all fuel tanks specified within the favorite screen setup see Section 5 2 6 4 2 In order for the DSM410 to properly calculate total fuel remaining tank monitors connec...

Page 32: ...to true or magnetic north depending on the unit setting of the heading parameter see Section 5 2 7 1 Rate of Turn displays the angular rate of rotation of the vessel about the vertical axis Variation...

Page 33: ...otational Rate displays rotational rate e g shaft speed Velocity displays linear velocity 4 2 19 Navigation The DSM410 is not a primary navigation device that is it does not provide means for entering...

Page 34: ...of the vessel s rudder as indicated by the rudder sensor as well as the angle to which the rudder has been commanded by an autopilot or steering device 4 2 22 SMS Text Status Status displays the stat...

Page 35: ...al time offset see Section 5 2 7 12 on page 43 for details on how to set the local time offset UTC Date displays the current date referenced to Universal Time Coordinated Moon Phase displays the phase...

Page 36: ...rotation about the horizontal axis parallel to the ship s keel Trim Tabs displays the position of the vessel s trim tabs Trim Tab Port displays the position of the port trim tab Trim Tab Starboard di...

Page 37: ...Revision 1 7 2 Page 21 SOG depending on the unit setting of the Wind True Vessel Ref Parameter see Section 5 2 7 6...

Page 38: ...ctive and always appear above the warnings on the Alert Status Screen Warning A warning is a type of alert announcing a condition requiring non immediate attention for precautionary reasons Warnings a...

Page 39: ...and is still present and the operator has not accepted the alert An active alert is indicated by a flashing indicator on the Alert Status Screen and by a flashing colored box at the top right of the D...

Page 40: ...e time specified in the Set Delay field Course Alert The alert will become active if the monitored course differs from the Reference Direction by more than the Offset COG Set Point for longer than the...

Page 41: ...ay can show any displayable data in any display type supported by that data In favorite screens mode the DSM410 can operate in one of two ways Manual mode a particular favorite screen remains on the d...

Page 42: ...lowing structure Alert Setup 5 2 1 Add New Alert 8 2 Delete Alert 8 4 Edit Alert 8 5 Operating Mode 8 6 SMS Text Phone Book 0 Advanced Configuration 8 8 Restore Factory Defaults 8 9 Alert Status 5 2 2...

Page 43: ...be received The available options within the Configuration screen are shown in Figure 8 Figure 8 Configuration Screen 5 2 3 1 Device Configuration The ability to calibrate and configure other devices...

Page 44: ...es Online or has been disconnected from the bus has lost power or for some other reason is not responding to queries Offline The Display column indicates whether data from that particular device is ac...

Page 45: ...lly advanced configuration is only done at installation and should not need to be done while at sea Figure 11 DSM410 Advanced Configuration 5 2 4 1 1 Installation Description This entry allows you to...

Page 46: ...re 12 DSM410 Primary Device Selection 5 2 4 1 3 Refresh Network Information The Device Configuration 5 2 3 1 and Device Selection 5 2 3 2 menus display a list of devices that have been detected on the...

Page 47: ...nected network given in bits per second bps Voltage the network voltage as measured by the DSM410 in Volts Traffic the percent usage of the total available bandwidth measured by the DSM410 Receive Rat...

Page 48: ...Low Medium and High brightness levels The value that appears next to the appropriate setting is measured in percent of full brightness The Backlight menu can be seen in Figure 15 below Figure 15 Back...

Page 49: ...ghts key when the DSM410 is operating in favorite screens mode Change the Color Set back to On to enable this color palette Notice that Color Set 1 has a white background 100 Red 100 Green and 100 Blu...

Page 50: ...enter the demo mode while programming this option for Off Normal Use Mode will cause the DSM410 to return to using data from the NMEA 2000 bus In order to be able to demonstrate all of the DSM410 s ca...

Page 51: ...nguages is planned for future firmware releases To change the currently used language use the Scroll Up or Scroll Down keys to move the highlight to the Language menu item and then press the Enter key...

Page 52: ...s in which the DSM410 will display the next higher or lower numbered favorite screen respectively that is enabled for Manual mode Figure 21 Setting the Favorite Screens Mode 5 2 6 Favorite Screens Set...

Page 53: ...will be displayed taking up the entire screen 2 3 Top 1 3 Bottom two parameters will be displayed the first occupying the top 2 3 of the screen and the second occupying the bottom 1 3 of the screen 1...

Page 54: ...creen Four Quarters four parameters will be displayed the first occupying the upper left hand corner of the screen the second occupying the upper right hand corner of the screen the third occupying th...

Page 55: ...pt this category at which time the highlight will move to the data type field where you can display the particular data type from the selected category to be displayed as shown in Figure 27 Figure 27...

Page 56: ...Section 7 25 on page 229 5 2 6 4 2 Instance Instance is used to specify which product on the network will be used as the source of the displayed information For example there may be two GPS s on the n...

Page 57: ...earing information is displayed in true or magnetic measurements True heading can only be displayed if a variation is available on the NMEA 2000 bus If the DSM410 is not showing heading or COG i e no...

Page 58: ...ted information Units that may be selected are the following Knots Miles Hour Km Hour Beaufort Meters second 5 2 7 6 Wind True Vessel Ref This menu items allows you to select whether the true wind dir...

Page 59: ...information Units that may be selected are the following Liters Imperial Gallons UK Gallons Gallons US Gallons 5 2 7 11 Time Format This menu item allows you to select whether measurements indicating...

Page 60: ...the display of resistance Units that may be selected include the following Ohms Kilohms 5 2 7 17 Motion Distance This menu item allows you to select the units to be used for the display of distance U...

Page 61: ...of angular acceleration Units that may be selected include the following Degrees Second2 Degrees Minute2 Radians Second2 5 3 Control Mode Control mode may be entered from the favorite screens mode of...

Page 62: ...these steps to reset the appropriate display 1 Press the Enter key for approximately one second This will place the display into Control mode and one of the controllable items on the screen will be hi...

Page 63: ...etron Depth Speed Temp Transducer DST110 reset trip log set depth offset speed calibration and temperature offset Maretron Engine Monitoring System EMS100 set the gauge types for boost pressure drive...

Page 64: ...able disable individual NMEA 2000 PGN transmissions Maretron Tank Level Adapter TLA100 set tank type and tank number set operating mode set tank capacity and calibrate for irregular shaped tanks Maret...

Page 65: ...ays the manufacturer of the device The Model column displays the model number of the device The SN column displays the serial number of the device so that any of two or more devices of the same manufa...

Page 66: ...tion functions are supported not all functions apply to every model of transducer Reset trip log Set depth Offset Perform Speed Calibration Program Temperature Offset Figure 30 Airmar Depth Speed Temp...

Page 67: ...isable menu item selected causes the DSM410 to display the NMEA2000 PGN Enable Disable screen You can enable or disable the transmission of these messages or set the frequency of transmission of the m...

Page 68: ...and calm winds Finally use the Increase and Decrease keys to adjust the display value until it matches the known speed of the boat Press the Accept key to accept the value when you are satisfied If y...

Page 69: ...ance from the waterline to the depth of the depth transducer The DSM410 will then add the measured depth of the water as seen by the depth transducer to the programmed offset value to produce the tota...

Page 70: ...program multiple displays each with the corresponding offset information as the information is stored at a single place at the source 6 1 10 Trip Log The DSM410 is capable of clearing the trip log co...

Page 71: ...ngle entry Trim Tabs Calibration Figure 36 EP 30 Trim Tabs Configuration Screen 6 2 1 Trim Tabs Calibration The Bennett EP 30 NMEA1 trim tabs calibration opening screen is shown in Figure 37 below The...

Page 72: ...ping in order for the calibration process to succeed Figure 38 EP 30 Intermediate Calibration Screen After you have lowered both trim tabs to their full down position and a few seconds have elapsed th...

Page 73: ...be performed by an advanced user Typically advanced configuration is only done at installation and should not need to be done while at sea Figure 41 ACM100 Advanced Configuration Screen 6 3 1 1 Curren...

Page 74: ...ormal Install to Inverse Install to correct for this Valid options are Inverse Install Normal Install Use the Scroll Up and Scroll Down buttons to select the correct option and then press Enter to sav...

Page 75: ...it to a value in the range of 0 2 seconds to 10 seconds Use the Increase and Decrease buttons to select the correct option and then press Enter to save the value 6 3 1 9 Installation Description This...

Page 76: ...3 Phase Y Phase A B C use this value when power is connected via the three hot wires 120 out of phase with each other and single neutral wire from a three phase Y connected circuit 6 3 3 AC Device Typ...

Page 77: ...ced by a Generator or a Utility Pressing the Enter key while this item is highlighted will start the process to reset this value to zero The following confirmation screen is displayed Figure 43 Reset...

Page 78: ...figuration is only done at installation and should not need to be done while at sea Figure 45 ALM100 Advanced Configuration Screen 6 4 1 1 Device Instance This entry allows you to program the NMEA 200...

Page 79: ...ssing the Enter key on the message to be configured Options are Disable The Annunciator message will not be transmitted Default The Annunciator message will be transmitted at its default NMEA2000 rate...

Page 80: ...User s Manual Page 64 Revision 1 7 2 6 4 4 Test Annunciator The Annunciator may be tested by scrolling the cursor to highlight this entry and then pressing the Enter button The ALM100 will emit a sing...

Page 81: ...is only done at installation and should not need to be done while at sea Figure 48 CLM100 Advanced Configuration Screen 6 5 1 1 Device Instance This entry allows you to program the NMEA 2000 device i...

Page 82: ...the frequency of transmission of the message by pressing the Enter key on the message to be configured Options are Disable The message will not be transmitted Default The message will be transmitted a...

Page 83: ...y different types This field allows you to select the type of parameter that is being monitored by this channel You may select from the following parameter types please refer to the CLM100 User s Manu...

Page 84: ...transducer when it is sourcing a current of 4mA You can determine this value by examining the specification of the transducer being used 6 5 3 6 Value at 20mA Program this parameter to match the read...

Page 85: ...600 S Select the required transducer using the Scroll Up and Scroll Down keys followed by the Enter key 6 6 1 2 Device Instance This entry allows you to program the NMEA 2000 device instance for the u...

Page 86: ...e message will be transmitted at the period specified Select the required option using the Scroll Up and Scroll Down keys followed by the Enter key 6 6 1 5 Restore Factory Defaults This option restore...

Page 87: ...d Figure 55 Current Sensor Zero Offset Calibration Complete Screen Press the Back button to return to the previous menu 6 6 3 DC Type You can configure the DCM100 as to what type of DC power source it...

Page 88: ...ttery generally increases with increasing temperature So that the DCM100 can properly calculate the battery s state of charge program this parameter with the increase in battery capacity in percent pe...

Page 89: ...rged from the battery before the battery becomes discharged By default the DCM100 considers a battery to be discharged when its state of charge reaches the Time Remaining Floor value which is by defau...

Page 90: ...ters within the device and should only be performed by an advanced user Typically advanced configuration is only done at installation and should not need to be done while at sea Figure 57 DCR100 Advan...

Page 91: ...e 59 DCR100 Current Sensor Zero Offset Calibration Completion Screen Press the Back button to return to the previous menu 6 7 1 2 Device Instance This entry allows you to program the NMEA 2000 device...

Page 92: ...le Disable Screen 6 7 1 5 Restore Factory Defaults This option restores all settings on the device to their factory default state 6 7 2 Device Label This entry allows you to assign a text label to the...

Page 93: ...ode is Unlocked In the Unlocked mode the channel may be turned on and off from network display devices By setting the Switch Lock mode of the channel to Lock then channel will not change state until t...

Page 94: ...g Mode The operating mode of each channel may be set to either DCR DC Relay in which case the state of the channel is controlled by Circuit Breaker Switch controls in N2KView or Switch Breaker favorit...

Page 95: ...ice Selection A DSM410 unit can be used to configure a remote DSM200 to set which NMEA 2000 devices are selected for display on the remote DSM200 unit In this manner multiple devices of the same type...

Page 96: ...cted from the bus has lost power or for some other reason is not responding to queries Offline The Disp column indicates whether data from that particular device is accepted for display by the remote...

Page 97: ...150 DSM250 DSM410 Remote Configuration Screen 6 9 1 Remote Device Selection A DSM410 unit can be used to configure a remote DSM150 DSM250 DSM410 to set which NMEA 2000 devices are selected for display...

Page 98: ...transmitted by this device Off By scrolling to the device and pressing the Enter key you may then use the Scroll Up and Scroll Down keys to toggle the Display status for this particular device Once yo...

Page 99: ...py the device selection settings from a DSM410 unit to a remotely located DSM150 DSM250 DSM410 In this way it is possible to make all device selection changes on a single DSM150 DSM250 DSM410 unit and...

Page 100: ...lecting this menu item and pressing Enter all the favorite screen settings will be copied from the local DSM150 DSM250 DSM410 to the selected remote DSM150 DSM250 DSM410 unit After copying favorite sc...

Page 101: ...rations from local display 6 9 7 Copy all settings from local display This is the single operation that makes it easy to have multiple DSM150 DSM250 DSM410 displays on a boat Set one DSM150 DSM250 DSM...

Page 102: ...from local display 6 9 8 Label The Label of the DSM150 DSM250 DSM410 is used by the Alert System to identify the source of an alert Here the label can be changed using the method described in section...

Page 103: ...Revision 1 7 2 Page 87 Figure 75 DSM150 DSM250 DSM410 Remote Device Selection...

Page 104: ...00 Configuration Screen 6 10 1 Advanced Configuration Advanced Configuration changes some complex parameters within the device and should only be performed by an advanced user Typically advanced confi...

Page 105: ...ough water STW initial accuracy is significantly affected by the location or placement of the DST100 within the hull The DSM410 can correct for these inaccuracies using the speed calibration procedure...

Page 106: ...gative value equal to the distance between the DST100 and the bottom of the keel The display will then subtract the programmed offset from the measured depth of the water as seen by the DST100 showing...

Page 107: ...d will complete the operation Resetting the trip log zeroes the DST100 s trip log such that all displays receive a zeroed value i e you don t have to perform the operation from other display locations...

Page 108: ...1 Advanced Configuration Advanced Configuration changes some complex parameters within the device and should only be performed by an advanced user Typically advanced configuration is only done at ins...

Page 109: ...ed causes the DSM410 to display the following screen Figure 83 DST110 NMEA 2000 PGN Enable Disable Screen You can enable or disable the transmission of these messages or set the frequency of transmiss...

Page 110: ...e until it matches the known speed of the boat Press the Accept key to accept the value when you are satisfied If you do not wish to perform speed calibration at this time press the Abort key and the...

Page 111: ...depth of the DST110 The DSM410 will then add the measured depth of the water as seen by the DST110 to the programmed offset value to produce the total water depth If you are interested in the depth of...

Page 112: ...e corresponding offset information as the information is stored at a single place at the source 6 11 7 Trip Log The DSM410 is capable of clearing the trip log counter within a DST110 depth speed tempe...

Page 113: ...st Screen Figure 89 EMS100 Configuration Screen Second Screen 6 12 1 Engine Instance This entry allows you to program the NMEA 2000 device instance for the unit You usually will not need to modify the...

Page 114: ...enders vary from their specified values This setting allows you to apply an offset to the resistance value of the boost pressure sender in order to allow you to bring the digital value reported by the...

Page 115: ...option if there is no oil pressure gauge present YANMAR YANMAR W THRESHOLD YANMAR VDO YANMAR VDO W THRESHOLD Select the required option using the Scroll Up and Scroll Down keys followed by the Enter k...

Page 116: ...ons are Disabled select this option if there is no water temperature sender present YANMAR YANMAR VDO Select the required option using the Scroll Up and Scroll Down keys followed by the Enter key 6 12...

Page 117: ...lses per revolution in order to correctly calculate engine RPM Use this setting to program the EMS100 with the number of flywheel teeth or alternator pulses per revolution for the engine to which the...

Page 118: ...n advanced user Typically advanced configuration is only done at installation and should not need to be done while at sea Figure 91 FFM100 Advanced Configuration 6 13 1 1 Device Instance This entry al...

Page 119: ...t value of Yes for the FFM100 to output negative fuel flow values if the direction of fuel flow for the Channel 0 sensor is opposite the direction of the arrow on the fuel flow sensor label Set this e...

Page 120: ...ault state 6 13 2 Device Label A label may be assigned to the FFM100 as an aid to identifying the device over the network Typically this label will describe the location of the FFM100 6 13 3 Operating...

Page 121: ...low Figure 93 FFM100 Channel 0 First Configuration Screen Differential Mode Figure 94 FFM100 Channel 0 Second Configuration Screen Differential Mode 6 13 4 1 1 Channel Supply Return You may select whe...

Page 122: ...tance Program this parameter to match the desired instance number of the temperature reading for this channel You can program this parameter to any value between 0 and 252 The default value for this p...

Page 123: ...l Maretron display products will display this label text when you are selecting data to display 6 13 4 2 Channel 0 Configuration Menu Two Independent Sensors Mode This section describes the Channel 0...

Page 124: ...the flow sensor connected to this channel 6 13 4 2 5 Data Damping Period You can configure a damping parameter to smooth the flow rate readings or make them more responsive The data damping is configu...

Page 125: ...Instance Program this parameter to match the desired instance number of the volume reading for this channel You can program this parameter to any value between 0 and 252 The default value for this par...

Page 126: ...efault value for this parameter is 0 033 C which corresponds to Diesel fuel This parameter is not available when the Operating Mode is set to Two Individual Flow Sensors 6 13 5 1 4 Temperature Instanc...

Page 127: ...nnel 1 First Configuration Screen Two Independent Sensors Mode Figure 99 FFM100 Channel 1 Second Configuration Screen Two Independent Sensors Mode 6 13 5 2 1 Sensor You may select whether this channel...

Page 128: ...y to reset the total volume recorded to zero 6 13 5 2 7 Temperature Instance Program this parameter to match the desired instance number of the temperature reading for this channel You can program thi...

Page 129: ...me Label Program this parameter with a text string which identifies the particular volume parameter being monitored by this channel Maretron display products will display this label text when you are...

Page 130: ...iption text strings You can enter any information you like here such as the date the unit was installed or the location in which it was installed for later reference Tools such as Maretron N2KAnalyzer...

Page 131: ...Enter key 6 14 1 4 Restore Factory Defaults This option restores all settings on the device to their factory default state 6 14 2 Channel 0 5 This submenu contains configuration parameters for each o...

Page 132: ...y examining the specification of the pressure transducer being used 6 14 2 1 4 Pressure at 20mA Program this parameter to match the pressure reading of the pressure transducer when it is sourcing a cu...

Page 133: ...nce of the sender with the fluid levels Custom calibration is necessary for non rectangular tanks and for non standard values of resistances for tank level senders To perform custom calibration of the...

Page 134: ...first calibration step Enter the first calibration point with an empty tank 0 0 Gallons liters by pressing the Accept key The Current Point highlight will advance to the next point Figure 107 Empty L...

Page 135: ...will also adjust the tank capacity to the currently indicated level Figure 109 below shows the calibration screen at the last point with the full tank level and thus the tank capacity set to 101 gall...

Page 136: ...Depth enter the depth of the fluid when the tank is full this is the distance from the surface of the fluid to the bottom of the tank Fluid Density enter the density of the fluid whose depth is being...

Page 137: ...channel s Function has been set to Pressure Vacuum mode The Channel 0 5 Pressure Vacuum Mode menu is shown below Figure 112 FPM100 Channel Pressure Vacuum Mode Configuration 6 14 2 2 1 Function You c...

Page 138: ...data damping period is 16 0 seconds If the channel s Function is set to Pressure Vacuum the default data damping period is 3 0 seconds 6 15Maretron GPS100 Configuration This describes the configurati...

Page 139: ...e 114 GPS100 Advanced Configuration Screen 6 15 1 1 Device Instance The Device Instance will be used to identify the GPS100 device on the network Unless there are multiple GPSs on the network this sho...

Page 140: ...m selected which causes the screen shown in Figure 116 to be displayed Figure 116 Configuring Satellite Elevation Mask on a GPS100 The allowable values for Elevation Mask are between 90 and 90 This nu...

Page 141: ...ained Disabling the PDOP Mask by setting the value to will cause the GPS100 to report any position fixes obtained regardless of the accuracy of the fix 6 15 1 5 SNR Mask The DSM410 is capable of setti...

Page 142: ...DSM410 display Pressing the Enter key with NMEA2000 PGN Enable Disable menu item selected causes the DSM410 to display the screen shown in Figure 119 Figure 119 GPS100 NMEA 2000 PGN Enable Disable Sc...

Page 143: ...elected which causes the screen shown in Figure 121 to be displayed This will cause the GPS100 to discard all position and satellite data and compute a position fix Figure 121 Performing a Cold Start...

Page 144: ...ault which allows the GPS to report any available data regardless of the quality of the fix 6 15 4 Device Label A label may be assigned to the GPS100 as an aid to identifying the device over the netwo...

Page 145: ...23 Configuring SBAS on a GPS100 The allowable option for SBAS configuration are either Disable which causes the GPS100 not to use SBAS satellites or Enable which causes the GPS100 to use SBAS satellit...

Page 146: ...tore Factory Defaults configuration which allows you to return the GPS200 to the factory settings Figure 124 GPS200 Configuration Screen 6 16 1 Advanced Configuration Advanced Configuration changes so...

Page 147: ...lected causes the DSM410 to display the screen shown in Figure 119 Figure 126 GPS200 NMEA 2000 PGN Enable Disable Screen You can enable or disable specific transmissions by scrolling or through the di...

Page 148: ...compute a position fix Figure 128 Performing a Cold Start of the GPS200 6 16 3 Device Label A label may be assigned to the GPS200 as an aid to identifying the device over the network Typically this w...

Page 149: ...29 Configuring SBAS on a GPS200 The allowable option for SBAS configuration are either Disable which causes the GPS200 not to use SBAS satellites or Enable which causes the GPS200 to use SBAS satellit...

Page 150: ...130 IPG100 Configuration Screen 1 1 2 Advanced Configuration Advanced Configuration changes some complex parameters within the device and should only be performed by an advanced user Typically advanc...

Page 151: ...2KServer running on the IPG100 The following sections describe the entries in this menu Figure 132 IPG100 N2KServer Information Screen 6 17 1 3 1 Client List For each N2KView client connected to the I...

Page 152: ...nses This entry shows the number of platinum licenses in use followed by a slash followed by the total number of platinum licenses 6 17 1 3 5 Basic Licenses This entry shows the number of basic licens...

Page 153: ...KView client whether it is a Windows PC or an iOS or Android smartphone or tablet If you have an active Maretron Cloud Services account you must change this setting to Enable so that the IPG100 will c...

Page 154: ...s in the subnet mask the values define the network and must be the same The most common value is 255 255 255 0 If the DHCP parameter is set to Yes you do not need to configure this parameter If the DH...

Page 155: ...1 1 Data Damping In order to smooth the results viewed on a display you may individually change the data damping period that the J2K100 uses when sending fuel rate and tachometer engine RPM informati...

Page 156: ...tic messages use the Scroll Up or Scroll Down keys to move the highlighted cursor to the J1939 Diagnostic Messages menu item Then press the Enter key to move the highlight to the value field which dis...

Page 157: ...he DSM410 to display the following screen Figure 139 J2K100 NMEA 2000 PGN Enable Disable Screen You can enable or disable specific transmissions by scrolling or through the different transmitted messa...

Page 158: ...Address see section 6 18 4 identifies the engine on the J1939 network the Engine Instance identifies the engine to the NMEA2000 network Figure 140 J2K100 Engine Instance Configuration Use the Scroll...

Page 159: ...nce identifier to allow display devices to distinguish it from other air conditioners or icemakers on the network The AC Icemaker menu item allows you to configure the air conditioner or instance iden...

Page 160: ...a single J1939 engine genset or a single transmission and the NMEA 2000 network This setting identifies the J1939 source address of the engine genset and a transmission for which the J2K100 will serve...

Page 161: ...een To update the list after adding a device highlight this entry and press the Enter button 6 19Maretron NBE100 Configuration The DSM410 is capable of configuring the Maretron NBE100 Network Bus Exte...

Page 162: ...text strings You can enter any information you like here such as the date the unit was installed or the location in which it was installed for later reference Tools such as Maretron N2KAnalyzer allow...

Page 163: ...stance This entry allows you to program the NMEA 2000 device instance for the unit You usually will not need to modify the default value of 0 unless you have multiple units on the network 6 20 1 2 Ins...

Page 164: ...mission of the Rudder message by pressing the Enter key on the message to be configured Options are Disable The status message will not be transmitted Default The status message will be transmitted at...

Page 165: ...tion Options There are three methods of calibrating the rudder angle sender 6 20 3 1 Custom Calibration The Custom Calibration setting will provide the most accurate rudder angle readings under any ci...

Page 166: ...Custom Rudder Calibration menu item highlighted Figure 151 RAA100 Custom Rudder Angle Calibration The first step in the custom rudder angle sender calibration process is to turn the wheel hard over to...

Page 167: ...e wheel hard over to port and to measure the angle or the rudder angle from center with a protractor or other instrument Use the Increase and Decrease keys until the highlighted rudder angle value is...

Page 168: ...udder number must be configured For a vessel with a single rudder the number should be set to 0 For a vessel with two rudders the port rudder should be set to 0 and the starboard rudder should be set...

Page 169: ...formed correctly in order for the RAA100 to produce correct angle measurements A screenshot showing configuration of the operating mode appears in Figure 157 below To configure the operating mode use...

Page 170: ...d finally press the Enter key to confirm your selection and store the value within the RAA100 Figure 158 RAA100 Setting the to Sender Gauge Resistance 6 20 7 Gauge Resistance to Sender If the desired...

Page 171: ...Revision 1 7 2 Page 155 Figure 159 RAA100 Setting the to Sender Gauge Resistance...

Page 172: ...igure 160 RIM100 Configuration Screen 6 21 1 Advanced Configuration Advanced Configuration changes some complex parameters within the device and should only be performed by an advanced user Typically...

Page 173: ...able Disable Screen You can enable or disable the transmission of the Binary Switch Status message or set the frequency of transmission of the message by pressing the Enter key on the message to be co...

Page 174: ...alid Modes are Disable the channel is not being used Enable the channel is being used Select the required option using the Scroll Up and Scroll Down keys followed by the Enter key 6 21 4 2 Label A lab...

Page 175: ...SIM100 Configuration Screen 6 22 1 Advanced Configuration Advanced Configuration changes some complex parameters within the device and should only be performed by an advanced user Typically advanced...

Page 176: ...2000 PGN Enable Disable Screen You can enable or disable the transmission of the Binary Switch Status message or set the frequency of transmission of the message by pressing the Enter key on the mess...

Page 177: ...ault condition See the manual for details Valid Modes are Disable the channel is not being used End Of Line Resistor an open circuit is a fault condition No End Of Line Resistor an open circuit is not...

Page 178: ...e displayed Figure 168 SMS100 Configuration Screen 6 23 1 Advanced Configuration Advanced Configuration changes some complex parameters within the device and should only be performed by an advanced us...

Page 179: ...gure 170 SMS100 NMEA 2000 PGN Enable Disable Screen You can enable or disable the transmission of the various messages or set the frequency of transmission of the messages by pressing the Enter key on...

Page 180: ...ength is shown on a scale of one to five bars Bit Error Rate This entry shows the bit error rate of the cellular network connection This figure may be requested by Maretron technical support personnel...

Page 181: ...gure 172 below Figure 172 SSC200 SSC300 Configuration Screen 6 24 1 Advanced Configuration Advanced Configuration changes some complex parameters within the device and should only be performed by an a...

Page 182: ...0 baud This value may be changed by selecting the Baud Rate option in the menu and pressing Enter The use the Scroll Up and Scroll Down buttons to select the desired baud rate and press Enter to save...

Page 183: ...nd variation The SSC200 SSC300 always has magnetic heading available when variation is not available timeout or invalid the variation field is set to N A The default value of 5 0 seconds should be ade...

Page 184: ...isabled Off using the Scroll Up or Scroll Down keys followed by the Enter key 6 24 1 5 Restore Factory Defaults This option restores all settings on the device to their factory default state 6 24 2 In...

Page 185: ...ly the SSC200 SSC300 is mounted so that the label on the compass is facing up and the NMEA 2000 and NMEA 0183 connectors are facing towards the bow of the vessel A recent version of SSC200 SSC300 firm...

Page 186: ...180 SSC200 SSC300 Magnetic Deviation Calibration Start Screen Once you have begun the turn press Begin to start the calibration procedure If you do not wish to perform magnetic deviation calibration a...

Page 187: ...en will appear indicating this and you should repeat the calibration procedure 6 24 6 Magnetic Deviation Status Pressing the Enter key with the Magnetic Variation Status menu item selected causes the...

Page 188: ...by pressing the Enter key with the Rate of Turn Zero Offset Calibration menu item selected which causes the DSM410 to display the screen shown in Figure 184 The Rate of Turn Offset Calibration should...

Page 189: ...183 or NMEA 2000 factory default You should need to alter this setting only if There are variation sources available on both the NMEA 2000 and NMEA 0183 interfaces or There is no magnetic variation so...

Page 190: ...n Source menu item selected This highlights the next field where you select Manual Entry by scrolling or through the options until you reach Manual Entry Pressing the Enter key with the Manual Entry m...

Page 191: ...e only in magnetic heading format WARNING Magnetic variation changes as your location on the earth changes therefore magnetic variation should be adjusted with changes in position Neither the DSM410 n...

Page 192: ...guration Screen 6 25 1 Advanced Configuration Advanced Configuration changes some complex parameters within the device and should only be performed by an advanced user Typically advanced configuration...

Page 193: ...n Figure 191 Figure 191 TLA100 NMEA 2000 PGN Enable Disable Screen You can enable or disable the transmission of the Fluid Level message or set the frequency of transmission of the message by pressing...

Page 194: ...city After you have pressed the Enter key a confirmation screen will appear that warns you that the fluid remaining measurement will change as a result of this change Press the Accept key to accept th...

Page 195: ...ender with the fluid levels Figure 194 below shows a screenshot of the DSM410 with the Custom Calibration option highlighted Custom calibration is necessary for non rectangular tanks and for non stand...

Page 196: ...first calibration step Enter the first calibration point with an empty tank 0 0 Gallons liters by pressing the Accept key The Current Point highlight will advance to the next point Figure 196 Empty L...

Page 197: ...will also adjust the tank capacity to the currently indicated level Figure 198 below shows the calibration screen at the last point with the full tank level and thus the tank capacity set to 101 gall...

Page 198: ...his menu item and then press the Enter key to write the calibration values within the TLA100 and complete the calibration process Figure 200 American Standard Sender Calibration 6 25 4 3 European Stan...

Page 199: ...he highlighted cursor to Tank Number then press the Enter key to move the cursor over to the tank number value Use the Scroll Up or Scroll Down keys to select the desired tank number Finally press the...

Page 200: ...erating modes depending on the installation NMEA 2000 the only thing that is connected to the resistive sender is the TLA100 NMEA 2000 Analog Gauge in addition to the TLA100 the resistive sender is al...

Page 201: ...rsor over the Gauge Resistance to Sender menu item Then press the Enter key to move the highlight over the numerical resistance value Use the Increase and Decrease keys to change the value to the meas...

Page 202: ...the Gauge Resistance to Sender menu item Then press the Enter key to move the highlight over the numerical resistance value Use the Increase and Decrease keys to change the value to the measured resis...

Page 203: ...Configuration Screen 6 26 1 Advanced Configuration Advanced Configuration changes some complex parameters within the device and should only be performed by an advanced user Typically advanced configu...

Page 204: ...ary Switch Status message by pressing the Enter key on the message to be configured Options are Off The fluid level message will not be transmitted On The fluid level message will be transmitted at it...

Page 205: ...r that warns you that the fluid remaining measurement will change as a result of this change Press the Accept key to accept the change and store the new tank capacity value within the TLM100 or Press...

Page 206: ...ighted Custom calibration is necessary for non rectangular tanks To perform custom calibration of the tank level sender use the Scroll Up or Scroll Down keys to move the highlighted cursor over the Cu...

Page 207: ...ibration step Enter the first calibration point with an empty tank 0 0 Gallons liters by pressing the Accept key The Current Point highlight will advance to the next point Figure 214 Empty Level Calib...

Page 208: ...process and will also adjust the tank capacity to the currently indicated level Figure 216 below shows the calibration screen at the last point with the full tank level and thus the tank capacity set...

Page 209: ...d you know the capacity of the tank you can easily calibrate the sender by using the Rectangular Tank menu item Figure 218 below shows this option highlighted Use the Scroll Up or Scroll Down keys to...

Page 210: ...stance used in the data message This can be set from 0 to 15 6 26 6 Tank Type This is set to the type of fluid in the tank Values are Fuel Fresh Water Waste Water Live Well Oil Black Water Reserved 1...

Page 211: ...29 1 Advanced Configuration Advanced Configuration changes some complex parameters within the device and should only be performed by an advanced user Typically advanced configuration is only done at...

Page 212: ...r key with NMEA2000 PGN Enable Disable menu item selected causes the DSM410 to display the following screen Figure 222 Figure 222 TMP100 NMEA 2000 PGN Enable Disable Screen You can enable or disable t...

Page 213: ...ature Inside Temperature Live Well Temperature Main Cabin Temperature Outside Temperature Refrigeration Temperature Sea Temperature User Defined Temperature 129 144 Use this when none of the above opt...

Page 214: ...e Selection Figure 224 USB100 Configuration Screen 6 30 1 Advanced Configuration Advanced Configuration changes some complex parameters within the device and should only be performed by an advanced us...

Page 215: ...G Do not select multiple devices of the same type for display This will result in multiple and possibly conflicting readings Figure 226 USB100 Device Selection Screen The NA column of the menu display...

Page 216: ...SM410 is capable of performing configuration of the VDR100 Vessel Data Recorder This describes the configuration of the Maretron VDR100 firmware version 2 0 0 4 Figure 227 below shows a screenshot of...

Page 217: ...0 obtains its LAN connection settings from a DHCP server on the local area network When set to Yes the default value the VDR100 will obtain all necessary connection settings IP Address Subnet Mask Def...

Page 218: ...s parameter 6 31 8 Default DNS This is the IP address of a computer on the Internet that can identify and locate computer systems and resources on the internet In most cases this should not be require...

Page 219: ...sure sensors on the network 6 32 1 4 Instance Temperature This entry allows you to program the NMEA 2000 device instance for the temperature transmitted in PGN 130312 You usually will not need to modi...

Page 220: ...d Select the required option using the Scroll Up and Scroll Down keys followed by the Enter key Notice that by default the old Environmental Parameters message PGN 130310 is disabled while the new Env...

Page 221: ...actory preset can be easily compensated for using the Installation Offset calibration menu item To perform installation offset calibration use the Scroll Up or Scroll Down keys to move the highlighted...

Page 222: ...Wind Speed If the wind speed is sufficient then a confirmation screen shown in Figure 235 below will appear indicating that a successful installation offset calibration has completed Figure 235 Instal...

Page 223: ...press the Enter key to move the highlight to the numerical value on the right This is shown in Figure 237 below Use the Increase and Decrease keys to adjust the damping period to the desired value and...

Page 224: ...nt However the current humidity level may be entered in this screen to re calibrate the WSO100 should this be required Figure 239 Setting the Outside Humidity Use the Increase and Decrease buttons to...

Page 225: ...Revision 1 7 2 Page 209 Figure 240 Setting the Outside Temperature Use the Increase and Decrease buttons to select the correct temperature and the press the Enter button to store it...

Page 226: ...n order to set the Anchor Drop position using the display create a screen with an Anchor Watch display In normal operating mode use the Scroll Up and Scroll Down keys to change to the screen containin...

Page 227: ...42 below Figure 242 Bar Graph Display Example 7 3 Compass Rose Display The compass rose display shows a heading bearing or course parameter on a compass rose display There are two types of compass ros...

Page 228: ...DSM410 User s Manual Page 212 Revision 1 7 2 Figure 244 Compass Rose North Up Display...

Page 229: ...Display Example 7 5 Date Time The Date Time display shows a date and time on a single display The format of the date shown can be set using the Units menu please refer to 5 2 7 13 for details on how t...

Page 230: ...og gauge There is a general gauge format for most types of display and a specialized rudder gauge display A full screen example of a tachometer display can be seen in Figure 247 below Figure 247 Gauge...

Page 231: ...ected GPS receiver GPS operating mode 2D 3D DGPS Satellite signal strength up to 12 satellites Satellite azimuth and elevation up to 12 satellites Position HDOP Time Date Accuracy of position An examp...

Page 232: ...the network with an indicator light display that emulates a status light on a control panel The display may be set up in several different configurations Single Indicator Light this creates a single i...

Page 233: ...ows or 2 rows 2 column indicator light configurations In order to configure the individual indicator lights press the Enter key with the selected type highlighted to display a menu with entries for ea...

Page 234: ...onnection The default color is red Instance the instance number of the switch bank containing the indicator to be monitored Channel the channel number of the indicator to be monitored Title Sets the t...

Page 235: ...gure 254 Numeric Display Example The upper left hand corner indicates the parameter being displayed and the center of the screen shows the numeric value for the indicated parameter The bottom right ha...

Page 236: ...indicated parameter The bottom right hand corner shows the units 7 12Rolling Road The DSM410 supports a Rolling Road or navigation highway display This display repeats transmitted navigation data fro...

Page 237: ...d are COG SOG ETA and TTG On the navigation highway itself the waypoint name if available is displayed on the upper left and the waypoint number if available is displayed on the upper right The dashed...

Page 238: ...day The line graph display can show the selected data over a time period of 1 2 3 4 5 6 or 7 days Line graph displays are supported only for barometric pressure Figure 258 Line Graph Display 7 14SMS...

Page 239: ...ws a time value in an hours and minutes format Figure 260 below shows an example of this type of display Figure 260 Time hh mm Display 7 16Time hh mm ss The Time hm mm ss display shows a time value in...

Page 240: ...VDR is Recording Please refer to the VDR100 User s Manual for other status that could be displayed on the VDR Status display Figure 262 below shows an example of this type of display Figure 262 VDR St...

Page 241: ...ather display shows the following information Wind Direction Ground Referenced Wind Speed Ground Referenced Heat Index Wind Chill Outside Temperature Outside Humidity Barometric Pressure Inside Temper...

Page 242: ...ose appears in Figure 264 below Figure 264 Wind Rose Display 7 20Moon Phase Display The DSM410 supports a moon phase display which shows the current phase of the moon at the current location An exampl...

Page 243: ...bar graph A screenshot of the trim tab display appears in Figure 267 below Figure 267 Trim Tab Display 7 23Swing Meter Display The DSM410 supports a swing meter display similar to those found on dedic...

Page 244: ...og gauge with 180 of travel A screenshot of a tank gauge display showing a fuel tank s level appears in Figure 269 below Figure 269 Tank Gauge Display 7 25Watermaker Status The DSM410 supports a water...

Page 245: ...may be set up in several different configurations Single Indicator Light this creates a single switch breaker 2 rows this creates four rows of single switches breakers 3 rows this creates three rows...

Page 246: ...in Figure 272 below Figure 272 Selection of an Individual Switch Breaker Figure 273 below shows the configuration menu for each individual switch breaker Figure 273 Configuration of an Individual Swi...

Page 247: ...breaker which has been configured to refer to the switch bank instance and indicator number of the switch breaker you want to control In normal operating mode use the Scroll Up and Scroll Down keys t...

Page 248: ...DSM410 User s Manual Page 232 Revision 1 7 2 Figure 274 Favorite Screen Showing Highlighted Switch Breaker...

Page 249: ...ge is sent back to the Alert Source 8 1 Displaying Active Alerts Active Alerts are overlaid on all the favorite screens Figure 275 Alert Display The number of Alerts with pending operator actions is s...

Page 250: ...with the highest priority that requires accepting or cancelling is shown at the bottom left of the screen see Figure 275 This Alert may easily be accepted or cancelled without changing screens by pres...

Page 251: ...t or Cancel the Alert 8 3 Adding an Alert Alerts are created by selecting the parameter to be monitored e g Depth and then selecting the type of Alert e g High Alert Start by going to the Add New Aler...

Page 252: ...Scroll Down buttons 8 3 2 Alert Type This allows the selection of the type of Alert see paragraph 4 3 1 The options here are Alarm Warning The desired option is selected using the Scroll Up and Scroll...

Page 253: ...5 Description This is a textual field that will be displayed on the DSM410 and transmitted to Alert Slave devices It is intended to describe the alert e g Fire 8 3 6 Location This is a textual field t...

Page 254: ...minate any temporary transitions of the input signal above the High Alert Set Point lasting less than 5 seconds from triggering an alert Once the alert is triggered it becomes an active alert An alert...

Page 255: ...n order for an alert to become active This can be used to prevent false alerts caused by parameter values that briefly have a value that would cause an alert but quickly return to the normal value ran...

Page 256: ...the Set Delay to 5 seconds will eliminate any temporary transitions of the input signal above the Low Alert Set Point lasting less than 5 seconds from triggering an alert Once the alert is triggered...

Page 257: ...eing monitored must rise above the Low Alert Clear Point value for longer than the time in this field in order for the alert to become inactive The value is entered as minutes seconds If only one numb...

Page 258: ...with a valid value for longer than the time in this field in order for the alert to become inactive 8 3 7 4 Trigger Type is On Alert As opposed to high and low alerts that are associated with analog...

Page 259: ...the alert will be triggered Alert Clear Delay The condition for the parameter being monitored must be not in its error condition for at least the clear delay time before the alert will become cleared...

Page 260: ...value of 0 00 is entered then the alert will never re trigger Alert Set Delay If the switch being monitored is in the Off state for the amount of time specified in this field the alert will become ac...

Page 261: ...te other than Tripped for the amount of time specified in this field the alert will become inactive 8 3 7 7 Trigger Type is Outside Radius Alert The Outside Radius Alert is used to signal an alert whe...

Page 262: ...unciators will begin sounding again for that alert If a value of 0 00 is entered then the alert will never re trigger Alert Set Point If the distance between the current GPS position and the reference...

Page 263: ...vessel comes within a certain distance or radius of a reference point expressed as a longitude and latitude Figure 291 shows an Inside Radius Alert and associated parameters 8 3 7 8 1 Trigger Configu...

Page 264: ...ert is useful when the vessel is anchored or moored and the vessel should not drift outside a perimeter and if it does an alert is activated The point of reference can be selected from the current pos...

Page 265: ...onger than the time specified in the Alert Set Delay field the alert will become active Alert Clear Point The Alert will be cleared when the quality of the GPS fix as reported by the GPS becomes bette...

Page 266: ...will stop sounding If the condition which caused the alert remains true after the amount of time in this field the alert will return to the Active state and annunciators will begin sounding again for...

Page 267: ...dically making them useful for signaling watch changes for example every four hours or as a personnel alarm making sure a crew member is at the helm every 15 minutes When a Time Alert with a Repeat In...

Page 268: ...ne tenth second on one tenth second off beeps followed by one and a half seconds of silence The sequence is repeated This corresponds to the requirements for Temporal 4 alarms T4 CO Fire This is a ser...

Page 269: ...ose to send a message when the alert is triggered when the alert is cleared or both when the alert is triggered and when the alert is cleared After you select this entry and press Enter the screen cha...

Page 270: ...sing the Scroll Up and Scroll Down buttons and then pressing the Enter button again 8 3 13 Operating Mode Underway See Section 4 3 4 for a description of Operating Modes For this Alert to be triggered...

Page 271: ...ns and then pressing the Enter button again 8 4 Deleting an Alert From the Alert Setup Menu select the menu item Delete Alert Figure 299 Deleting an Alert This brings up the list of Alerts managed by...

Page 272: ...yed Figure 301 Deleting an Alert Confirmation Press the Accept button to delete the Alert or the Cancel button to return to the previous screen without deleting the Alert 8 5 Editing an Alert From the...

Page 273: ...parameters of the chosen Alert See Section 8 1 for details of these parameters 8 6 Setting the Vessel Operating Mode The Vessel Operating Mode must be set on each DSM410 This is a potentially risky op...

Page 274: ...Mode selected 8 7 SMS Text Phone Book The display is able to transmit SMS text messages via a Maretron SMS100 SMS Text Module in the event of an alert This menu allows you to program up to eight diff...

Page 275: ...splay the SMS Text Phone Book as shown in the figure below Figure 306 SMS Text Phone Book Screen To edit a number in the phone book press Scroll Up and Scroll Down until the desired entry is highlight...

Page 276: ...the phone number and saved it by pressing Enter a second time after the last digit is entered you will then be given the chance to edit the name for the phone number as shown in Figure 308 below The p...

Page 277: ...screen Once you have created all of the phone book entries you need press the Back key to exit the SMS Text Phone Book screen 8 8 Advanced Configuration The Advanced Parameters of the Alert System may...

Page 278: ...ptions here are Enable Disable 8 8 2 Flashing Screen As an extra means to gain the operator s attention to an Active Alert the DSM410 may be set up to flash the entire screen between Red for Alarms or...

Page 279: ...cal cleaners as they may remove paint or markings or may corrode the DSM410 enclosure or seals Do not use any cleaners containing acetone as they will deteriorate the plastic enclosure Ensure that the...

Page 280: ...to the network is in transmitting a valid data value Data fluctuates between two different values Two devices on the network are transmitting the same data Check the Instance Numbers on all devices tr...

Page 281: ...age Phase A Frequency Phase A L N Voltage Phase AB L L Voltage Phase B Frequency Phase B L N Voltage Phase BC L L Voltage Phase C Frequency Phase C L N Voltage Phase CA L L Voltage Anchor Watch DC Cur...

Page 282: ...ndicator Speed Through Water Over Ground Total Log Trip Log Tanks Capacity Level Remaining Temperature Bait Well Battery Engine Coolant Engine Oil Engine Room Exhaust Gas Freezer Heat Index Heating Sy...

Page 283: ...A 65020 Gen Phase C AC Power N A 65021 Gen Phase C AC Basic Quantities N A 65022 Gen Phase B AC Reactive Power N A 65023 Gen Phase B AC Power N A 65024 Gen Phase B AC Basic Quantities N A 65025 Gen Ph...

Page 284: ...In View N A 130306 Wind Data N A 130310 Environmental Parameters N A 130311 Environmental Parameters N A 130312 Temperature N A 130313 Humidity N A 130314 Actual Pressure N A 130316 Temperature Exten...

Page 285: ...nt Environmental Parameter Value IEC 60945 Classification Exposed Degree of Protection IP67 Operating Temperature 20 C to 70 C Storage Temperature 30 C to 80 C Relative Humidity 93 RH 40 C per IEC6094...

Page 286: ...technical support for Maretron products you can reach us in any of the following ways Telephone 1 866 550 9100 Fax 1 602 861 1777 E mail support maretron com World Wide Web http www maretron com Mail...

Page 287: ...ng the following diagram as a template for drilling the mounting holes because the printing process may have distorted the template Figure 312 Flush Mounting Template 93mm 3 66 114mm 4 49 114mm 4 49 1...

Page 288: ...NG WARRANTIES ARE EXPRESSLY IN LIEU OF AND EXCLUDES ALL OTHER EXPRESS OR IMPLIED WARRANTIES INCLUDING BUT NOT LIMITED TO THE IMPLIED WARRANTIES OF MERCHANTABILITY AND OF FITNESS FOR A PARTICULAR PURPO...

Page 289: ...ll shipping and insurance charges Maretron will return the replaced or repaired product with all shipping and handling prepaid except for requests requiring expedited shipping i e overnight shipments...

Reviews: