3 - 26
1
4
2
3
5
2
1
REPLACE Coolant
These operations are to be carried out as necessary or every 2 years at the beginning of
winter. Place the lift truck on level ground with the engine stopped and cold.
t
IMPORTANT
t
The engine does not contain any anti-corrosion elements and must be filled throughout the year with a mixture
containing 25% ethylene glycol-based antifreeze.
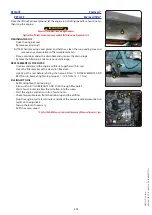
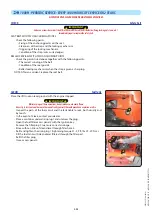
DRAINING THE LIQUID
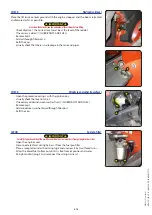
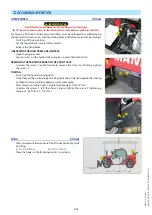
-Open the engine cover.
-Remove access panel 5.
-Place a container under the radiator drain plug 1 and unscrew the plug.
-Remove filler plug 2 from the expansion tank and fully open the heating control
to ensure correct drainage.
-Let the cooling circuit drain entirely while ensuring that the ports do not get clogged.
-Check the condition of the hoses as well as the fastening devices and change the
hoses if necessary.
-Rinse the circuit with clean water and use a cleaning agent if necessary.
FILLING WITH COOLANT
-Refit and tighten the radiator drain plug 1 (tightening torque 15 ft-lbs ±1.5 ft-lbs
20 N.m ±2 N.m).
-Slowly fill the circuit with coolant (
e
LUBRICANTS AND FUEL) up to the middle of
the expansion tank 3 by the filler hole 4.
-Refit the filler plug 2.
-Run the engine at idle for a few minutes.
-Check for any possible leaks.
-Check the level and refill if necessary.
REPLACE
Dry air filter cartridge
In case of use in a heavily dust laden atmosphere, there are pre-filtration cartridges,
(
e
FILTER ELEMENTS AND BELTS). Also, the checking and cleaning periodicity of the
cartridge must be reduced (up to 250 hours in a very dusty atmosphere and with
pre-filtration).
t
IMPORTANT
t
Change the cartridge in a clean location, with the engine stopped. Never operate the lift truck with the air filter
removed or damaged.
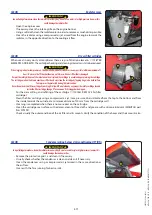
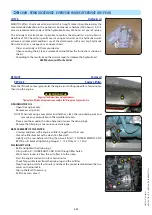
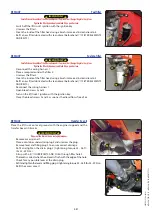
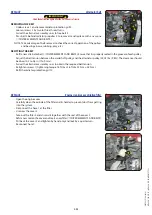
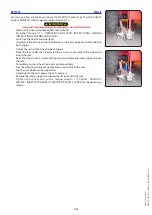
-Open the engine cover.
-Loosen the locks and remove cover 1.
-Gently remove the cartridge 2 to reduce dust falling as far as possible.
-Leave the safety cartridge in place.
-Carefully clean the following parts with a damp, clean lint-free cloth.
• The inside of the filter and cover.
• The inside of the filter inlet hose.
• The gasket surfaces in the filter and in the cover.
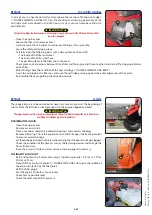
-Check pipes and connections between the air filter and the engine and the connection and state of the clogging indicator
on the filter.
-Before fitting check the condition of the new cartridge (
e
FILTER ELEMENTS AND BELTS).
-Insert the cartridge in the filter axis and push the cartridge pressing against the outer edge and not the centre.
-Reassemble the cover, guiding the valve downwards.
647732
(31/10/2019)
MT
625
H
75K
ST5
S1
/ MT
625
H
75K
COMFORT
ST5
S1
Summary of Contents for MT 625 H 75K COMFORT ST5 S1
Page 6: ...1 2 647732 31 10 2019 MT 625 H 75K ST5 S1 MT 625 H 75K COMFORT ST5 S1...
Page 7: ...1 3 647732 31 10 2019 MT 625 H 75K ST5 S1 MT 625 H 75K COMFORT ST5 S1...
Page 13: ...1 9 647732 31 10 2019 MT 625 H 75K ST5 S1 MT 625 H 75K COMFORT ST5 S1...
Page 21: ...1 17 647732 31 10 2019 MT 625 H 75K ST5 S1 MT 625 H 75K COMFORT ST5 S1...
Page 33: ...1 29 647732 31 10 2019 MT 625 H 75K ST5 S1 MT 625 H 75K COMFORT ST5 S1...
Page 39: ...2 1 2 DESCRIPTION 647732 31 10 2019 MT 625 H 75K ST5 S1 MT 625 H 75K COMFORT ST5 S1...
Page 40: ...2 2 647732 31 10 2019 MT 625 H 75K ST5 S1 MT 625 H 75K COMFORT ST5 S1...
Page 51: ...2 13 647732 31 10 2019 MT 625 H 75K ST5 S1 MT 625 H 75K COMFORT ST5 S1...
Page 55: ...2 17 647732 31 10 2019 MT 625 H 75K ST5 S1 MT 625 H 75K COMFORT ST5 S1...
Page 86: ...2 48 647732 31 10 2019 MT 625 H 75K ST5 S1 MT 625 H 75K COMFORT ST5 S1...
Page 87: ...3 1 3 MAINTENANCE 647732 31 10 2019 MT 625 H 75K ST5 S1 MT 625 H 75K COMFORT ST5 S1...
Page 123: ...3 37 647732 31 10 2019 MT 625 H 75K ST5 S1 MT 625 H 75K COMFORT ST5 S1...
Page 126: ...3 40 647732 31 10 2019 MT 625 H 75K ST5 S1 MT 625 H 75K COMFORT ST5 S1...
Page 128: ...4 2 647732 31 10 2019 MT 625 H 75K ST5 S1 MT 625 H 75K COMFORT ST5 S1...


