background image

231 

[2] REPLACEMENT OF MAIN FUEL FILTER


•  Various parts are at elevated temperatures immediately after stopping the engine operation. 

Always drain the coolant after the engine has cooled down. 

•  Keep away from flame. 


•  Have a filter wrench available. 

•  Have a waste cloth prepared. 


1.  Open the engine bonnet. 

2.  Place the waste cloth below the filter cartridge. 

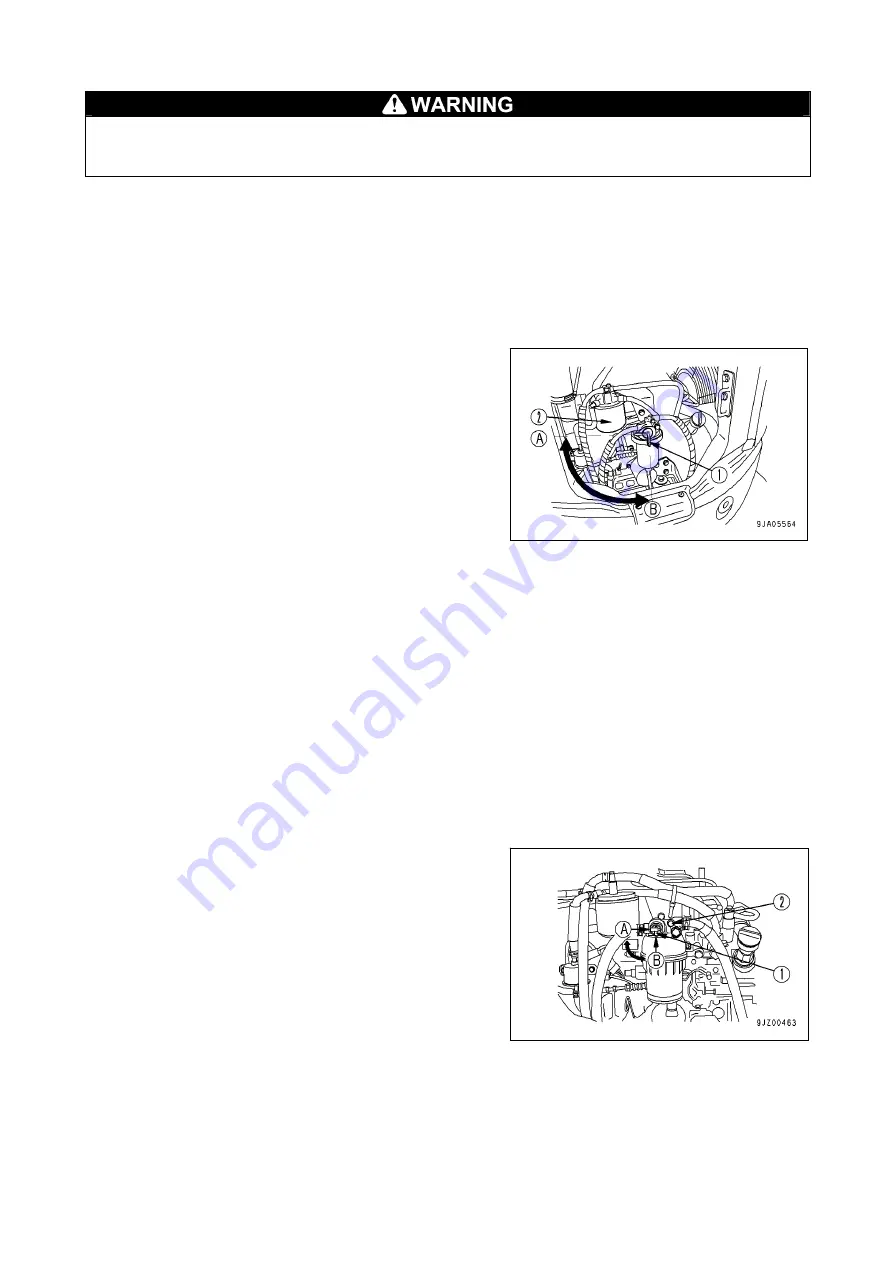
3.  Turn the handle (1) of the water separator to the closed 

position (A). 

4.  Using a filter wrench, turn the filter cartridge (2) to the 

left to remove it. If fuel is spilt, wipe cleanly with the 

waste cloth. 

5.  Clean the filter, fill the new filter cartridge with clean fuel, 

lightly apply fuel on the packing, and mount the 

cartridge on the filter base. 

6.  When installing, tighten about one rotation with a filter 

wrench after turning it to the right and the packing 

surface touches the sealing surface of the filter base. 

Tightening torque: 19.6 – 23.5 N·m (2.0 – 2.4 kg·m) 

7.  Turn the handle (1) of the water separator to the open 

position (B). 

8.  After replacing the filter cartridge, vent the air. 

Refer to the “Procedure for Air Bleeding” section and 

vent the air. 


PROCEDURE FOR AIR BLEEDING 

1.  Fill up the fuel tank with fuel until full. 

2.  Turn the handle (1) of the water separator to the open 

position (B). 

3.  Loosen the air venting bolts (2) of the water separator 

by turning 2 to 3 times. 

4.  Tighten the air bleed bolt (2) when bubble-free fuel 

comes out from the air bleed bolt (2). 

Summary of Contents for CC423S-1

Page 1: ...st read this manual before operating this machine This manual should be kept near the machine for reference and periodically reviewed by all personnel who will come into contact with it NOTICE MAEDA h...

Page 2: ......

Page 3: ...G 12 SAFETY 15 1 BASIC PRECAUTIONS 16 1 1 PRECAUTIONS BEFORE STARTING WORK 16 1 2 PREPARING FOR SAFE OPERATION 17 1 3 PRECAUTIONS FOR FIRE PREVENTION 19 1 4 CAUTIONS IN GETTING ON AND OFF THE MACHINE...

Page 4: ...2 9 FUSIBLE LINK 94 2 10 HOLDER FOR OPERATION MANUAL 94 2 11 GREASE GUN HOLDER 94 3 OPERATION 95 3 1 INSPECTING AND ADJUSTING BEFORE STARTING ENGINE 95 3 1 1 VISIBLE CHECKS 95 3 1 2 PRE OPERATION INSP...

Page 5: ...ST OPERATION POSTURE 145 3 20 BLADE OPERATION 146 3 20 1 PRECAUTIONS WHEN USING THE BLADE 146 3 20 2 BLADE OPERATION 147 3 20 3 WORK THAT CAN BE DONE WITH THE BLADE 147 3 21 PARKING THE MACHINE 148 3...

Page 6: ...CTION 194 4 PERIODIC REPLACEMENT OF IMPORTANT COMPONENTS 195 5 CONSUMABLES 196 6 OTHER REPLACEMENT PARTS 197 7 USE OF FUEL AND LUBRICATING OIL 198 7 1 USE OF FUEL AND LUBRICATING OIL ACCORDING TO TEMP...

Page 7: ...OF SEARCHER HOOK PARTS 253 3 MONITOR INDICATION 254 4 MOMENT LIMITER OPERATION AND CANCELLING RECOVERY 256 5 OPERATION 258 6 INSPECTION AND MAINTENANCE 261 6 1 CONSUMABLES 261 6 2 INSPECTION AND MAIN...

Page 8: ...vi This Page Intentionally Left Blank...

Page 9: ...1 INTRODUCTION 1 INTRODUCTION 2 2 FOR SAFE USE OF THE MACHINE 3 3 MACHINE OVERVIEW 4 4 QUALIFICATIONS FOR OPERATION 6 5 TERMINOLOGY 7 6 NECESSARY INFORMATION FOR SERVICING 12...

Page 10: ...operating this machine before understanding this manual thoroughly Keep this manual at hand so that you can read it when necessary If you lose or damage this manual contact Maeda or our sales service...

Page 11: ...lowing indications to provide other precautions for handling the machine and helpful information This denotes that failure to properly handle the machine may damage it or shorten its life This denotes...

Page 12: ...and craning an object weighing up to the rated total load 3 2 MACHINE STRUCTURE 1 Carrier 2 Upper slewing body 3 Safety device In this manual the front rear left and right directions are defined with...

Page 13: ...or display tri colour revolving working status lamp travelling crane stop travelling automatic stop working radius limiter function irregular winding prevention roller crane operation recording functi...

Page 14: ...defined in this manual shall be observed for safety assurance during operation of the machine 4 1 QUALIFICATION FOR CRANE OPERATION Only personnel that have obtained the required license or training...

Page 15: ...ght of hoisting accessories hooks and slinging ropes from the rated total load and can be hoisted WORKING RADIUS A horizontal distance between the axis of slewing and the hook centre BOOM LENGTH A dis...

Page 16: ...t point A denotes a boom angle and point B denotes a lifting height above ground The same working radius applies to point A and point B 2 The diagram of working radius and lifting height shows the rel...

Page 17: ...rking Radius column in the chart by any extent work should be performed within the rated total load in the next column of Working Radius The rated total load chart indicates the load including the mas...

Page 18: ...figures 1 3 18 m boom 1 All the booms are retracted 2 5 03 m boom 2 Booms 3 and 4 are retracted with boom 2 fully extended If boom 2 is extended even to a small extent work should be performed in acco...

Page 19: ...11 4 8 71 m boom 4 All the booms are fully extended If more than half of the mark of boom 3 is exposed from boom 2 work should be performed in accordance with the values of this column...

Page 20: ...he machine or when ordering parts please contact the Company or our sales service agency with the following information Machine ID plate This is located on the lower right part of the canopy Engine No...

Page 21: ...ID plate and location This is located on the upper surface of the engine EPA Environmental Protection Agency US Environmental Protection Agency Hour meter location This is displayed on the machine mo...

Page 22: ...14 This Page Intentionally Left Blank...

Page 23: ...ANSPORT PRECAUTIONS 38 4 TOWING PRECAUTIONS 39 5 MAINTENANCE PRECAUTIONS 40 6 SAFETY LABEL LOCATIONS 47 All the safety precautions defined in this manual should always be read and observed Failure to...

Page 24: ...mobile cranes all the time Also when performing a slinging operation always carry the completion certificate of skill training course for slinging operation The operators are requested to receive educ...

Page 25: ...he hoisted load to the ground stop the engine and pull out the starter switch key TEMPORARY STORAGE WHEN ABNORMALITY IS FOUND WITHIN MACHINE In case the machine is found with an abnormality and is the...

Page 26: ...ns If the machine malfunctions it may behave unexpectedly resulting in serious injury CLEAN AND TIDY UP THE OPERATOR S CABIN Before getting in the cabin wipe off shoe soles to remove dirt oil and grea...

Page 27: ...to a safe place Fire due to deposition or adherence of combustibles If any of such combustibles as dead leaves chips paper litters and charcoal dust is deposited on or sticking to the peripheral area...

Page 28: ...ot slippery Repair any damage and re tighten any loosened bolts Do not grasp operating levers and locking levers when getting on and off the machine Never step on the engine bonnet and cover that are...

Page 29: ...or optional units may give rise to safety and legal issues and thus the customer is kindly requested to consult with us or our sales service agency beforehand Depending on the combination of attachmen...

Page 30: ...lapsed by the mass and or vibration of the machine which may trip or fall Be especially careful after rain use of dynamite or earthquakes as the ground will be unstable The ground of an area near an e...

Page 31: ...rocedure 1 Report Immediately report to the electricity company or related management company and receive instructions for the power transmission stop emergency procedures and related matters 2 Evacua...

Page 32: ...h as the hook or wire exists BEWARE OF ASBESTOS DUST Inhalation of asbestos dust may result in lung cancer This machine does not contain asbestos but asbestos may be found in the wall ceiling or other...

Page 33: ...rator s seat to the operator s posture for easy work Also check seat belts and their mounting fixtures for any damage or abrasion Refer to the descriptions under Operation 3 1 2 Pre operation Inspecti...

Page 34: ...ondensation and or similar substance freeze the machine may operate improperly upon the next use and cause unexpected accidents CAUTIONS WHEN STARTING UP USING BOOSTER CABLE Wrong booster cable connec...

Page 35: ...nt of the machine causes the direction of actual running to be in reverse of the running lever and thus the machine may move toward undesired direction resulting in serious bodily accidents Make sure...

Page 36: ...oming into contact of those objects and operate the machine slowly BE CAREFUL WHEN TRAVELLING OVER SLOPE ALWAYS observe the following to prevent serious injuries and death accidents when travelling ov...

Page 37: ...ounter the risk of tumbling or collision because of an invisible road shoulder or snow covered installations Be very careful Refrain from directly touching metal surface with your hands or fingers in...

Page 38: ...tally If crane work is performed without the machine being placed horizontally no forecast or warning is issued even when the rated total load is approached Never fail to check the inclination of the...

Page 39: ...OLD WEATHER Defrost and remove snow from the slewing gear boom and winch Check their movements before starting work Check the winch brake to ensure that it works properly Operating the machine without...

Page 40: ...r the boom is derricked the higher the probability of tumbling backward is raised by wind blowing from ahead Thus adequate attention is required in the operation When an earthquake occurs abort the op...

Page 41: ...st bracket to hit and damage the other hoisted load or the loads move and lose balance causing serious accidents such as tripping Do not hoist more than 1 load at a time even if the total combined wei...

Page 42: ...chart Be careful to prevent the wire rope and or hoisted load from contacting an obstacle such as a tree or steel when hoisting a load If caught by an obstacle do not forcibly wind up the hoist load b...

Page 43: ...the hook block and load to fall and may lead to serious accidents Take care not to over hoist the hook block Be careful to prevent the wire rope and or hoisted load from contacting an obstacle such as...

Page 44: ...when the load is hoisted which may cause the load to waggle and cause the machine to lose balance and thus may damage the crane or trip the machine Attempts to pull the load towards the machine or let...

Page 45: ...ture prescribed in the instruction manual Refer to the descriptions under Operation 3 19 2 Operation Posture During Travelling Hoist As to the hoisted load limit its weight within an allowance and ass...

Page 46: ...e safe loading unloading Reinforce with blocks or other substances if the ramps deflect much Remove the mud and other substances from the footing to prevent the machine from skidding over the ramps Re...

Page 47: ...owing rod have sufficient strength for the weight of the machine being towed Wear leather gloves when handling the wire rope Never enter between the towing machine and the object being towed during th...

Page 48: ...away slippery substances such as grease and oil to assure safe operations An untidy workplace may cause safety hazards and result in injuries to personnel Organic glass polycarbonate is used for roof...

Page 49: ...eason One person should sit at the operator s seat Keep checking each other while ensuring that the engine can be stopped at any time When working near such rotating parts as fan belt and winch drum k...

Page 50: ...support the machine securely may cause falling of the machine resulting in a serious bodily accident Do not use concrete blocks for supporting the machine A concrete block may readily be broken even...

Page 51: ...e recharging it dismount if from the machine and conduct the recharging in a well ventilated place During the recharging process remove the battery cap Securely tighten the battery cap afterwards WARN...

Page 52: ...d plug have been cooled down so that they can be touched by bare hand in order to prevent a burn injury because of the spewing hot oil or coming in contact with parts heated at high temperatures When...

Page 53: ...ally swollen Indication of twist or collapse on a movable part of hose Foreign object buried in coating BEWARE OF HIGH VOLTAGE During or at immediately after stopping an engine operation the inside of...

Page 54: ...w waste liquid to flow on the ground into river drainage sea or lake Observe the applicable legal regulations and rules when disposing of this machine as well as harmful substances such as oil fuel so...

Page 55: ...TIONS Keep safety labels clean and visible at all times If lost replace immediately or apply for a new one There are other labels than safety labels shown below and treat them in the same manner SAFET...

Page 56: ...48 SAFETY LABEL LOCATIONS 2 2...

Page 57: ...njection Port Warning 542 4782600 6 Trapping Risk No Entry When Slewing CL000180012 7 Belt Entanglement Caution CL000080010 8 Do Not Step On 584 4581700 2 places 9 Plug Ejection Caution CL000190010 2...

Page 58: ...50 12 Burn Injury Caution CL000170005 15 Hook Block Winding Caution 553 4267400 2 places 16 Winch Winding Caution 553 4267500 23 Caution for lifting machine 541 3472400 21 Warning 541 4614900...

Page 59: ...51 24 Machine Mass 542 4773100 28 Working Radius Rated Total Load Chart 542 3582200...

Page 60: ...52 30 Safe Operation 557 3494500 31 Operating the Moment Limiter 542 2250000...

Page 61: ...53 32 Lever Operating Patterns 556 3368100 34 Cautions on override switch 585 4739200 35 Number of Falls Switching Warning 585 3555500 36 Warnings on Operation Inspection and Maintenance 584 3469700...

Page 62: ...ag 585 4738300 47 Trapping Risk 553 4267600 48 Boom Operation Caution 542 4774400 2 places 49 High Pressure Washing Around Operator s Seat Prohibited 542 4774900 50 High Pressure Washing Within Cover...

Page 63: ...1 NAME OF EACH SECTION 56 2 EXPLANATION OF EACH EQUIPMENT 58 3 OPERATION 95 4 HANDLING WIRE ROPE 153 5 TRANSPORTATION 159 6 HANDLING MACHINE IN COLD ENVIRONMENT 169 7 LONG TERM STORAGE 172 8 TROUBLES...

Page 64: ...N 1 1 MACHINE UNITS 1 Hook 2 Hook block 3 Wire rope 4 Boom 5 Derricking cylinder 6 Winch 7 Crawler 8 Sprocket 9 Track frame 10 Idler 11 Tri colour revolving working status lamp 12 Override switch 13 W...

Page 65: ...quipment operation lever 5 Travel lever 6 Accelerator pedal 7 Horn switch 8 Right work equipment operation lever 9 Machine monitor 10 Levelling instrument 11 Starter switch 12 Speed up pedal 13 Buzzer...

Page 66: ...ctivated then after the startup screen is displayed the operation lock password screen will display Next a standby screen appears before switching to the home screen NOTES When the engine is started t...

Page 67: ...towage switch 3 Travel mode selector switch 4 Fuel gauge 5 Hour meter display 6 Time display 7 Working mode display 8 Travel 1st speed 2nd speed display Refer to Operation 2 3 4 Moment Limiter Functio...

Page 68: ...nt 1 6 Time setting 1 7 Language setting 1 8 Error history display 1 9 Switch operation sound ON OFF change 1 10 Home switch 1 11 Display page change 1 1 HOOK SLING NUMBER CHANGE When the switch 1 1 i...

Page 69: ...hold the replacement switch 1 4B to update the replacement time When updating the number of exchanges is incremented once and the remaining time is reset NOTES When replacing engine oil or the engine...

Page 70: ...s with or of adjustment switch 1 5B The screen returns to the previous user mode screen with the home switch 1 5A 1 6 TIME SETTING When switch 1 6 is pressed time setting 24 12 hour display and summer...

Page 71: ...urring at the present time are displayed in red characters For details about the contents of the display refer to Operation 2 1 2 Warning Display 1 9 Switch operation sound ON OFF change When switch 1...

Page 72: ...perating state NOTES While this switch is pressed the red lamp of the tri colour revolving working status lamp illuminates When the winch is hoisted while this switch is pressed the hoisting speed bec...

Page 73: ...gh the indicator may not point to the correct position for a while after the starter switch is turned ON this is normal 5 HOUR METER DISPLAY Displays the hour meter 6 TIME DISPLAY Displays the set tim...

Page 74: ...occurs items for which immediate action must be taken are displayed When an abnormality occurs the monitor of the abnormal part illuminates in red and the buzzer sounds 1 Consumables display 2 Charge...

Page 75: ...67 2 2 SWITCHES 1 Starter switch 2 Horn switch 3 Light switch 4 Buzzer canceling switch 5 Maintenance switch 6 Emergency stop switch 7 Override switch...

Page 76: ...and when the engine has started immediately release your hand from the key The key automatically returns to the ON position The engine of this machine has the automatic remaining heat function If the...

Page 77: ...one when a fault code is displayed Other warning sounds are not cancelled 5 MAINTENANCE SWITCH This switch is not used for crane operations It is a maintenance switch for servicing 6 EMERGENCY STOP SW...

Page 78: ...due to cutting of the winch wire rope After the moment limiter detects that the rated total load is exceeded during crane operation and automatically stops the operation do not perform hoisting operat...

Page 79: ...detector side of boom tip 5 Tri colour revolving working status lamp A Red revolving working status lamp warning lamp when load factor is 100 or more B Yellow revolving working status lamp alarm lamp...

Page 80: ...m may fail to stop at the predetermined position causing the machine to overturn The override switch has the function of disabling the moment limiter function While this switch is at the ON cancel pos...

Page 81: ...If the calculation result is Rated total load Actual load 100 or more the moment limiter issues an alarm and at the same time automatically stops the boom operation The overload stop accuracy satisfi...

Page 82: ...engine speed to low speed Performing crane operations at a high engine speed could cause critical danger in this case the hoisted load will waggle resulting in overload which could lead to tipping of...

Page 83: ...recover from the overload condition perform one of the following so as to operate the crane in reverse order when it is automatically stopped 1 Unwind the wire rope to lower the hook and place the sus...

Page 84: ...automatic stop has occurred through entry into the overload region while lowering or extending the boom Do not use under normal conditions or when lifting clear from the ground If you use this switch...

Page 85: ...g radius display 5 Boom length display 6 Lifting height display 7 Number of wire falls display 8 Boom angle lower limit display 9 Boom angle upper limit display 10 Working radius upper limit display 1...

Page 86: ...e rated total load i e total weight of hook hoisting attachment and hoisted load which the crane can currently hoist is displayed It is calculated according to the conditions including the number of w...

Page 87: ...ops hook hoisting and boom extension actions During hook storage operation the mark flashes in red in a hook stored state However this is not an abnormality 9 Over lowering display If the hook falls i...

Page 88: ...y recover from the overload For recovery operations refer to Operations 2 3 3 2 Recovery Operation from Automatic Stop 4 WORKING RANGE LIMIT DEVICE When the boom is approaching the predetermined worki...

Page 89: ...d hold the switch The monitor display changes to the orange color and the lifting height is set as the upper limit value NOTES Before performing a practical operation be sure to check if the boom auto...

Page 90: ...gain by repeating the procedure mentioned above An alarm sounds intermittently when the boom which is in the upper limit is in the prediction zone or upper limit stop state and only if the raising ope...

Page 91: ...peration is performed The set value is memorized when the starter switch is turned to the OFF position When the boom is in the prediction zone or upper limit stop state in a condition in which the wor...

Page 92: ...action is automatically stopped When an automatic stop occurs immediately recover from the stop For recovery operation perform hook hoisting operation 7 NUMBER OF WIRES FALLS CHANGE DISPLAY Before ch...

Page 93: ...lling with hoisted load Unless these precautions in travelling with a lifted load are observed serious physical injury may be caused When travelling with a lifted load use this to change from the stat...

Page 94: ...the boom 4 automatically stops hook block 1 hoisting and boom 4 extension actions and prevents any further action if the hook block 1 nears the boom 4 tip and pushes up the weight 3 At the same time o...

Page 95: ...ls serious physical injury may result When pulling up or pushing down the lock lever be careful not to contact the operation lever of the work equipment This lever 1 locks crane operation and travelli...

Page 96: ...direction b Left slewing Push the lever in the left direction Expansion and contraction operation of boom c Contraction of boom Pull the lever rearward d Expansion of boom Push the lever forward N Ne...

Page 97: ...pedal b Full rotation Depress the pedal fully CAUTION When E mode is selected full rotation does not occur even if the pedal is depressed to position b 5 TRAVEL LEVER When the track frame is facing b...

Page 98: ...equipment 9 displays the inclination status of the machine The inclination and direction of the machine can be determined from the position of the air bubbles Use this to check whether the machine bo...

Page 99: ...is necessary to raise the boom open engine bonnet B only When closing the engine bonnet A take care not to trap your hands with the counterweight CAUTION Be sure to keep the bonnet locked except when...

Page 100: ...bonnet 3 completely The stopper 4 functions and the bonnet 3 is fixed 3 To close the bonnet 3 pull the bonnet support stopper 4 to the free position F gently lower the bonnet and push the bonnet to th...

Page 101: ...under the operator s seat Fuse capacity and circuit name No Fuse capacity Connection table 1 10A Emergency operation power supply 2 5A Operation switch 3 20A Controller I O power supply 4 5A Controlle...

Page 102: ...ent flows As with a normal fuse this protects electrical equipment and wiring from burning due to abnormal current 2 10 HOLDER FOR OPERATION MANUAL There is a box for storing the instruction manual on...

Page 103: ...bonnet to its upper extent and be sure to fix the bonnet with the stopper Immediately remove deposits of inflammable materials from around the engine s high temperature parts such as engine mufflers a...

Page 104: ...ck the working lamp for breakage remarkable deformation and contamination Repair if any abnormality is found Clean as necessary Check for slack wiring lose connections and any trace of burning Repair...

Page 105: ...NSPECTION AROUND OPERATOR S SEAT Inspect if windows come off or broken and if window glasses are cracked or broken Repair if any abnormality is found If the window comes off or breaks during work stop...

Page 106: ...adiator Opening the cap in this state may cause burns Turn the cap slowly to release pressure after the temperature lowers and carefully remove it 1 Open the sand cover and check that the cooling wate...

Page 107: ...mption and this tends to increase the oil temperature deteriorating the oil faster The oil level being too low may burn out the engine Be careful not to let any foreign substance go into the filler op...

Page 108: ...angerous Keep away from fire 1 Insert the key into the starter switch 1 and turn the key to the ON position to light the machine monitor 2 Confirm the remaining fuel amount with the fuel gauge of the...

Page 109: ...are a container for at least 1 litre Allen key to remove a plug 8 mm Oil replacement quantity in slewing reduction gear case 0 75 litres 1 Place the machine on a level surface 2 Fully retract and lowe...

Page 110: ...anges with temperature so consider the following as guides when checking Before operation near the L level oil temperature 10 to 30 C In normal operation near the H level oil temperature 50 to 80 C 4...

Page 111: ...position 7 INSPECTION OF WATER SEPARATOR If the red ring 1 of the water separator is sunk to the bottom of the case 2 no water has entered When the red ring 1 is floating water is present up to the bo...

Page 112: ...es of the specified capacity are used if there are traces of breaks or short circuits in the electric wiring or if terminals are loose If they are loose re tighten them In particular inspect the wirin...

Page 113: ...seat belt and fixing brackets for damage or defects A seat belt that is damaged or worn out must be replaced with new one The seat belt must be replaced once every three years even if its appearance...

Page 114: ...the insertion bracket 2 into the buckle 1 and confirm it is properly secured by pulling on the belt 3 When removing the belt raise the lever tip of the buckle 1 and the belt will come off Draw the bel...

Page 115: ...ust the mirrors before operation If the mirrors are poorly adjusted the visibility cannot be secured resulting in disorder or serious physical injury Adjust the mirror mounting so that a person on the...

Page 116: ...ngine start the machine may make unexpected movements causing serious physical injury 1 Check that the lock lever 1 is in the lock position L 2 Check the positions of all levers 3 Insert the key into...

Page 117: ...to request inspection in good time 2 INSPECTION OF LOW SPEED AND ACCELERATION STATE OF ENGINE Check if variations in engine rotation occur or the engine suddenly stops when the machine stops in norma...

Page 118: ...lever is operated to RETRACT side pulled backward At this time check if abnormal noise is generated from the parts of the boom or boom telescoping cylinder Repair if any abnormality is found 3 Verify...

Page 119: ...all colours of the revolving lights illuminate then the green revolving lights illuminate 3 Start the engine and operate the crane as follows Then check if the monitor display of the moment limiter is...

Page 120: ...starting the engine in a narrow enclosed place pay due attention to ventilation CAUTION If it is difficult to start the engine because the temperature is low perform the cold climate engine starting o...

Page 121: ...tion to pre warm Check that the glow lamp is illuminated When preheating is completed the glow lamp goes out 3 When the glow lamp goes out turn the starter switch key to the START position to start 4...

Page 122: ...engine warm up It also extends the life of the machine Do not accelerate the engine suddenly until the warm up operations are done Do not perform low idling or high idling under no load for more than...

Page 123: ...ds lower boom Pull inwards raise boom 4 Check if there are any abnormalities with the exhaust gas colour noise or vibration If there are abnormalities contact us or our sales service agency 5 After wa...

Page 124: ...e performed except in emergency When the engine overheats do not immediately stop it but rotate it at intermediate speed to gradually cool down before stopping it 1 Perform around 5 minutes of low idl...

Page 125: ...functions and shorten the life of the engine and crane Perform break in for a period of the first approximately 100 hours time displayed on the service meter Pay attention particularly to the followin...

Page 126: ...wn on the figure on the right when moving to the work site or going to and from the transportation place Make sure the boom is fully retracted Make sure the boom is fully lowered Stow the hook block i...

Page 127: ...in the front the direction of the travelling lever operation is reversed For safety check the vicinity of the machine and honk the horn before starting to move Do not allow anyone around the machine...

Page 128: ...ing Posture 2 Operate the right and left travelling levers 5 as follows When the sprocket is rearward of the machine body Push the left and right travelling levers 5 slowly forward to start moving Whe...

Page 129: ...g Posture 2 Operate the right and left travelling levers 3 as follows When the sprocket is rearward of the machine body Pull the left and right travelling levers 3 slowly towards you to start moving W...

Page 130: ...122 STOP Avoid sudden stops and try to stop with a safety margin whenever possible 1 Place the right and left travelling levers 5 at the neutral position N The brakes function and the machine stops...

Page 131: ...hanges as far as possible In particular stop the machine once before making a pivot turn spin turn Operate the right and left travelling levers 5 as follows CHANGING MACHINE DIRECTION WHEN STOPPED Whe...

Page 132: ...ovement B Left turn in backward movement NOTES When turning to the right operate the right travelling lever in the same way MAKING PIVOT TURN SPIN TURN ON THE SPOT To make a pivot turn to the left pul...

Page 133: ...isual inspection before slewing Check the safety in the vicinity of the machine and honk the horn before starting to slew the machine 1 Operate the left work equipment operation lever 2 to slew A Left...

Page 134: ...the boom may be damaged leading to serious physical injury Example of erroneous settings Number of wire rope falls in actual work Two falls Number of wire rope falls in set switch Four falls If the s...

Page 135: ...zzer sounds release your hand immediately from the left work equipment operation lever and place it at the neutral position to stop the boom extension operation After that operate the left work equipm...

Page 136: ...so results in irregular winding of the winch drum When the hook block is loosened from the normal stowage position the hook block may sway interfering with and damaging the peripheral equipment Pay th...

Page 137: ...the hook block 4 is detached from the stowage rope 5 without the boom being raised near the stowage position the hook block 4 sways considerably which may not only damage the peripheral equipment but...

Page 138: ...pull toward you to hoist the hook block At this time do not over hoist the hook block If over hoisted the hook block is in a state of being over hoisted 2 Operate the right work equipment operation l...

Page 139: ...CAUTION Be careful not to lower the hook block excessively so that the hook block does not fall sideways on the ground Doing so results in irregular winding of the winch drum When stopping the winch o...

Page 140: ...as follows Cancel While continuing to press the switch operate the right work equipment operation lever to the Hoisting side pull toward you The hook block is hoisted and is stored in the storage sect...

Page 141: ...erating the machine by derricking the boom exercise caution so that the mass weight of the suspended load is not overloaded when the boom reaches the lowest position Operate the right work equipment o...

Page 142: ...ended retracted the hook block is in a raised or lowered state Always perform the winch operation simultaneously to adjust the hook block height When the boom is extended for a long time the boom slig...

Page 143: ...hook hoisting operation to lift a load Operate the left work equipment operation lever 2 as follows Left slewing Push the lever outside left side Neutral Release your hand from the lever The lever ret...

Page 144: ...r part of the hook block Do not perform hook stowage operation with the maintenance switch in the ON position Unless hook stowage mode is set the upper part of the hook block the boom and wire rope et...

Page 145: ...peration lever 2 to the Left slewing side push outside or to the Right slewing side pull inside and slew so that the boom is positioned in the centre of the machine body NOTES The boom stowage is comp...

Page 146: ...colour revolving working status lamp turns on NOTES The right figure shows a state in which the hook block 4 is stored in the lower part of the boom tip NOTES The right figure shows the state in which...

Page 147: ...stop the hook block from swaying Be careful not to lower the hook block excessively so that the hook block does not fall sideways on the ground Doing so results in irregular winding of the winch drum...

Page 148: ...to Lower side push outside to lower the boom to the end NOTES At this time hoist the hook block 4 occasionally to reduce slack in the wire rope At this time be careful not to allow the hook block 4 a...

Page 149: ...y in addition to the prohibitions in this section DON T OPERATE WITH SLEWING FORCE Drawing in or lifting the load with slewing operation is prohibited DON T OPERATE WITH DERRICKING FORCE Drawing in or...

Page 150: ...ind the wire Untangle and then wind the wire DON T OPERATE DURING TRAVELLING HOIST The operation during travelling hoist may result in the swing of load and tipping over This is in principle prohibite...

Page 151: ...IN WORKING RANGE When performing travelling hoist be sure to observe strictly the gross rated load shown in the table below Item Remarks Boom length 5 0 m two stage boom or less Rated total load See t...

Page 152: ...fer to Operation 3 13 Hoisting and Lowering and lower the hoisted load to as close to the ground as possible 3 Press and hold the travelling mode selector switch on the monitor The mode is set to the...

Page 153: ...structure 1 Refer to Operation 3 7 Starting Forward and Backward Stopping the Machine and Operation 3 8 Changing Direction of the Machine before travelling with the machine 2 Refer to Operation 3 13 H...

Page 154: ...nd cause serious accidents Removing extraneous material with the machine in a posture different from the basic posture can cause the machine to overturn or the wires to be damaged and cause serious ac...

Page 155: ...e blade control lever on the right side of the operator s seat back and forth CAUTION Raise the blade off the ground when operating the machine for work other than removing extraneous material Otherwi...

Page 156: ...l not move Careless contact with the travelling lever s may result in sudden movement of the machine leading to serious physical injury Be sure to place the lock lever securely at the lock position be...

Page 157: ...ndercarriage If you find any leakage or abnormality fix the problem 2 Fill up the fuel tank to full 3 Remove paper and dead leaves in the engine compartment and around the battery because they cause a...

Page 158: ...ture for the travelling posture of the Machine PRECAUTIONS IN TRAVELLING AT HIGH SPEED When travelling on a bumpy roadbed or a bumpy road with many boulders and stones set the travelling speed to low...

Page 159: ...travel so that the front of the machine faces the valley side Climbing the slope in the forward direction and going downhill in the reverse direction cause the Machine to be unstable giving rise to t...

Page 160: ...S When the engine stops during uphill travelling place the travelling lever at the neutral position and stop the machine Then start the engine PRECAUTIONS ON SLOPE On a slope when the slewing operatio...

Page 161: ...ling in boom IWRC 6 Fi 29 0 0 6 CRITERIA FOR WIRE ROPE REPLACEMENT A wire rope undergoes wear and tear over time Prompt replacement is required if any of the following appears in the wire rope 1 Again...

Page 162: ...ameter d 3 When a wire rope is flattened by local crushing and the minimum diameter is 2 3 of the maximum diameter or less 4 A rope of which core wires or rope core is exposed 5 A rope extremely bent...

Page 163: ...e of a hook block number of falls of a wire rope and the maximum gross rated load at that time Hook type Hook used for both 2 falls and 4 falls Hook used for both 2 falls and 4 falls Hook exclusive fo...

Page 164: ...ion and how many times the wire rope has been twisted 2 Operate the left work equipment operation lever to the Retract side pull toward you to retract the boom fully 3 Operate the right work equipment...

Page 165: ...n step 1 the opposite direction to which it will return naturally when the hand is released from the wedge socket a total number of times equal to the hook block twist number multiplied by n the numbe...

Page 166: ...he raising and lowering of the hook block several times 11 Spool the wire rope tight and close together on the winch drum with tensioned wraps 12 Repeat the above steps to minimize the twists in the w...

Page 167: ...icable local laws and regulations observe these laws and regulations for safe transportation If not contact us or our sales service agency TRANSPORTATION MEASURE Take road width height and weight into...

Page 168: ...engine speed for loading and unloading the machine Be sure to load the machine on to the truck by driving in reverse Loading by driving forward may cause the machine to overturn Be sure to unload the...

Page 169: ...5 degrees or less Securely hang the hooks of the ramp boards on the hooks of the trailer If the ramp boards are bent by the machine weight place a block such as lumber under the ramp boards to prevent...

Page 170: ...e machine becomes unstable when it gets over rear wheels of the trailer Therefore travel slowly and carefully The direction change is strictly prohibited 11 The machine inclines backward when it has g...

Page 171: ...caps with lock CAUTION Do not use the fixing hole behind the track frame for towing and hoisting the machine 4 Insert square timbers in the front and the back of each crawler belt to prevent accidenta...

Page 172: ...hang the hooks of the ramp boards on the hooks of the trailer If the ramp boards are bent by the machine weight place a block such as lumber under the ramp boards to prevent bending 4 Remove the chai...

Page 173: ...AUTION When lifting the machine use four wire ropes for slinging of the same standard and four shackles When lifting the machine be careful not to allow the wire ropes for slinging to contact the main...

Page 174: ...NOTES Place padding at points where the wire slinging ropes and machine body make contact before hoisting 7 Set the slinging angle of the wire rope for slinging to 30 40 degrees and slowly lift the m...

Page 175: ...e sling installation position right and left bracket hole position of the boom at two locations If lifting the machine in a manner other than mentioned above cannot be avoided consult us or our sales...

Page 176: ...ts where the wire slinging ropes and machine body make contact before hoisting 7 Lift the machine slowly NOTES Immediately after lifting dynamic lift off stop once to check the sling state and sling p...

Page 177: ...r skin wash the affected area with plenty of water and consult a physician immediately The disposal of cooling water which has had antifreeze added and which is discharged when replacing the cooling w...

Page 178: ...y fluid is toxic do not drain it into a ditch or spray it on the ground Battery fluid dissolves paints If it contacts the machine rinse immediately with water The battery capacity drops when the tempe...

Page 179: ...pen the drain valve of the fuel tank to drain the water in the fuel system to prevent the water from freezing Fill up the fuel tank to full Doing so prevents water drops from being formed in space ins...

Page 180: ...mixing amount of antifreeze solution 7 2 DURING STORAGE If you have to perform anti rust operation indoors open the window and entrance for better ventilation to prevent gas poisoning Be sure to oper...

Page 181: ...e from the air bleed bolt 2 5 Turn the key of the starter switch to the ON position and return to the OFF position after 10 to 15 seconds 8 2 PHENOMENON WHICH IS NOT A FAULT The following phenomena ar...

Page 182: ...battery fluid come into contact with your clothes or skin wash the affected area immediately with plenty of water Should it get into your eye wash your eye immediately with clean water and consult a p...

Page 183: ...d position securely In this step take care that the mounting bracket does not contact the terminals When replacing the battery fix the battery body securely with the battery mounting bracket 1 Tighten...

Page 184: ...nite resulting in an explosion Securely fix the charge clip of the charger to the terminal of the battery then securely fix the charge clip to terminal of the battery Set the charge current to no more...

Page 185: ...each other or come into contact with the machine CAUTION Use a booster cable and clips of appropriate size for the battery size The battery in the working machine and the failed machine should be of t...

Page 186: ...he engine does not start wait for 2 minutes or more before re starting DISCONNECTING BOOSTER CABLE After the engine has started disconnect the booster cables in reverse order relative to the connectin...

Page 187: ...y struggling Insufficient battery charge Charge the battery Starter key turning slow Insufficient battery charge Starter fault Charge the battery Replacement Starter disengaged before the engine start...

Page 188: ...and replenish repair cooling water supply Adjust fan belt tension referring to the regular 250 hour maintenance Refer to Irregular Maintenance to clean inside the cooling system Change coolant referr...

Page 189: ...sometimes breathes Defective nozzle Replacement of nozzle Abnormal noise is generated combustion or mechanical Use of low grade fuel Overheat Damaged internal muffler parts Valve clearance excessive...

Page 190: ...valve Inspection repair or replacement of wiring between controller and solenoid valve Defective solenoid valve coil or spool Disassembly repair or replacement of solenoid valve 8 4 5 OVER HOISTING P...

Page 191: ...r hoist detector weight Inspection and replacement of over hoist detecting weight Defective wiring between controller and over hoist detector Inspection repair or replacement of wiring between control...

Page 192: ...normality P1402 4 Engine abnormality A P1403 3 Engine abnormality A P1412 4 Engine abnormality A P1413 3 Engine abnormality A P1422 4 Engine abnormality A P1423 3 Engine abnormality A P1432 4 Engine a...

Page 193: ...ault ES05H Angle meter sensor voltage fault high voltage fault ES06L Sensor fault ES06H Sensor fault ES07L Sensor fault ES07H Sensor fault ES08L Sensor fault ES08H Sensor fault ES09L Sensor fault ES09...

Page 194: ...186 This Page Intentionally Left Blank...

Page 195: ...INTENANCE 191 3 LEGAL INSPECTION 194 4 PERIODIC REPLACEMENT OF IMPORTANT COMPONENTS 195 5 CONSUMABLES 196 6 OTHER REPLACEMENT PARTS 197 7 USE OF FUEL AND LUBRICATING OIL 198 8 STANDARD TIGHTENING TORQ...

Page 196: ...ys use genuine Maeda grease The viscosity of grease must conform to specifications according to ambient temperature USE CLEAN OIL AND GREASE Always use clean oil or grease and keep in a secure contain...

Page 197: ...using diesel fuel KEEP ATTACHMENT SURFACE CLEAN Be sure to clean the attachment surface after removing a part to which the O ring and gasket sealing are attached Replace the part with a new one with t...

Page 198: ...cleaner for clogging Clean the radiator core at an early stage to prevent it from being clogged Clean and replace the fuel filter in a timely manner Be sure to clean the electrical parts especially th...

Page 199: ...e instruction may cause the filters to become clogged A small amount of oil remaining in piping and cylinders does not cause problems even when mixed with other oil FUEL HANDLING CAUTION Always use di...

Page 200: ...e is required to wipe a part that the adhesion of sands and dust accelerates the wearing away of the rotating part FILTER HANDLING A filter is an extremely important part that keeps major equipment fr...

Page 201: ...d immediately after operation Hydraulic equipment operates under high pressure The following precautions should be observed when performing inspection and maintenance of hydraulic equipment Place the...

Page 202: ...the winch wire rope end and wire clip for damage 4 Replace the wire rope promptly if it is damaged 5 Check the hydraulic hose for oil leaks and friction flaws on the surface Replace the hose if a sur...

Page 203: ...ow and re tighten or replace if any abnormality is found When replacing the hose replace the O ring and the gasket at the same time Contact us or our sales service agent to replace important component...

Page 204: ...T OF CONSUMABLES Item Replacement cycle Hydraulic oil filter Every 250 hours Engine oil filter Every 500 hours 1st time at 50 hours Main fuel filter Every 500 hours Cylinder packing Every 3 years Boom...

Page 205: ...PLACEMENT PARTS Check with us or our sales agency for the part number by referring to the machine number 2 No Part name No Part name 1 Clear plate 4 Fusible link 45 A 2 Working lights assembly LED 5 F...

Page 206: ...oil quantity is defined as a quantity of oil to be replaced at inspection and maintenance When starting the engine at temperatures 0 C or lower always use the recommended multi grade oil even if dayti...

Page 207: ...ur genuine super coolant AF NAC is not recommended in principle Otherwise a serious failure may occur in the cooling system including the engine 2 For the mixing proportion of super coolant and diluti...

Page 208: ...27 0 34 0 2 8 3 5 10 17 66 0 6 70 59 0 74 0 6 0 7 5 12 19 113 11 5 98 0 123 10 0 12 5 14 22 172 17 5 153 190 15 5 19 5 16 24 260 26 5 235 285 23 5 29 5 18 27 360 37 0 320 400 33 0 41 0 20 30 510 52 3...

Page 209: ...FILLING OF ENGINE COOLANT 98 2 INSPECTION OF OIL LEVEL AND REFILLING OIL IN ENGINE OIL PAN 99 3 INSPECTION OF FUEL LEVEL 100 4 INSPECTION OF OIL LEVEL AND REFILLING OIL IN WINCH REDUCTION GEAR CASE 10...

Page 210: ...CTION ADJUSTMENT OF FAN BELT TENSION 228 4 INSPECTION CLEANING OF RADIATOR FINS 229 5 INSPECTION CLEANING OF AIR CLEANER 229 10 7 MAINTENANCE EVERY 500 HOURS 230 1 REPLACEMENT OF ENGINE OIL AND ENGINE...

Page 211: ...hod of maintenance 10 1 2 INITIAL 500 HOURS MAINTENANCE The following maintenance should be performed after 500 hours of operation limited to the first maintenance of a new machine 1 OIL REPLACEMENT I...

Page 212: ...of dust indicator 1 shows a red piston clean the air cleaner element CAUTION Until the transparent window of dust indicator 1 shows a red piston do not clean the air cleaner element If the element is...

Page 213: ...he element CAUTION Do not tap or bump the element while cleaning it Avoid the use of an element if the groove gasket or sealing is damaged Pack the unused elements and store them in a dry place 7 Set...

Page 214: ...oportion of 30 at a minimum is required Even in areas where anti freezing is not needed use the super coolant at a minimum proportion of 30 to prevent corrosion of cooling system The mixing proportion...

Page 215: ...ning it until it comes into contact with the stopper 4 Open the cover 2 on the lower right side of the vehicle 5 Place a container underneath the drain valve 3 and the engine cylinder block drain plug...

Page 216: ...s at high idling Keep the coolant cap off at this time 13 Drain the coolant from the sub tank 5 clean the interior of the sub tank and fill with coolant up to the middle point of FULL LOW 14 Stop the...

Page 217: ...sure to perform a battery electrolyte level check at least once a month according to the following standard WHEN INSPECTING ELECTROLYTE LEVEL FROM BATTERY SIDE Check in the following method if the ele...

Page 218: ...evel reaches the bottom of the sleeve it swells due to surface tension and the plate looks contorted B Small amount As the electrolyte level does not reach the bottom of the sleeve the plate does not...

Page 219: ...ment cup 5 and then remove the element 6 Take care not to lose the red ring 3 inside the cup 5 Clean the interior of the cup 5 and the element 6 with diesel fuel or cleaning oil 6 Install the element...

Page 220: ...2 Prepare a container to receive the drained fuel 3 Open the cover 1 on the right side of the vehicle 4 Open the drain valve 2 on the lower part of the tank to drain deposits and water accumulated at...

Page 221: ...oller 2 on the crawler belt 3 Measure the maximum slack between the upper side of the rubber track and the lower side of the lumber Reference value for amount of slack Slack amount a is normal if it i...

Page 222: ...d or replaced Ask us or our sales service agency for repair LOOSENING TENSION It is highly dangerous if you discharge the grease not following the procedure below If the crawler belt does not loosen a...

Page 223: ...il in Hydraulic Oil Tank to check the oil level in the hydraulic oil tank CAUTION Revving the engine at the outset and allowing the cylinder to move the stroke end may damage piston packing or other p...

Page 224: ...level and firm surface 2 Shift the right work equipment operation lever 3 into Raise pull to the left to raise the boom slightly 3 Shift the right control lever into Down push it forward to lower the...

Page 225: ...by following the procedure provided below 1 Bring a 4 to 6 mm round bar 6 into contact with the rope wedge 9 2 Remove the rope wedge 9 by lightly tapping the round bar 6 with a hammer in the direction...

Page 226: ...e and draw the wire rope 5 through the load sheave at the tip of boom 10 wire guide 11 of boom No 2 and 3 and snap sheave 12 2 Draw the wire rope 5 through the rope attachment hole of the winch drum 8...

Page 227: ...he wire rope 5 7 Secure the wedge socket 3 to the boom with the wedge socket pin 1 and tighten the wedge socket pin fixing bolt 2 8 Shift the right machine operation lever into Raise pull to the left...

Page 228: ...se The tension of the boom extending wire 8 is normal if the No 4 boom is extended when the adjusting bolt 9 is turned If the No 4 boom is not extended refer to the section Inspection and Maintenance...

Page 229: ...g adjustment procedure 1 With the booms fully retracted in a horizontal position extend the telescoping booms for approx 2 m 2 Retract the booms slowly and completely Measure clearance a in this condi...

Page 230: ...nt of No 4 boom extending wire rope 8 1 With the lock nut 6 loose tighten the right and left adjusting nuts 9 evenly in a direction where the No 4 boom extending wire rope 8 becomes tight clockwise un...

Page 231: ...ce 4 Greasing the guide sheave 1 place 5 Greasing the wire retaining roller pin 2 places 6 Greasing hook block 1 places 7 Greasing of the boom slide plate 6 places Neo grease grease for boom 8 Greasin...

Page 232: ...224...

Page 233: ...sing a new machine is required once every 10 hours until the machine attains the first 100 hours of operation that initial fit emerges If you hear any noise at the greasing point grease immediately re...

Page 234: ...e 3 Loosen the 3 bolts and remove the cover 2 At this time the cover may jump off because of spring 3 keep pressing the cover down while removing the bolts 4 Take out the element 5 after removing the...

Page 235: ...a container for at least 1 litre Allen key to remove a plug 8 mm Oil replacement quantity in slewing reduction gear case 0 75 litres 1 Place the machine on a level surface 2 As shown on the right full...

Page 236: ...cially check if the belt is touching the bottom of the V groove and if it is replace the belt Standard slack of belt in use mm A B C 10 14 7 10 9 13 NOTES Belt in use refers to the belt attached to th...

Page 237: ...use of the compressed air keep the pressure of the compressed air to 0 19 MPa 1 9 kg cm and apply it away from the fins Damage on the fins will cause water leakage or overheating At a dusty worksite...

Page 238: ...e amount of metal particles or foreign matter contact us or our sales service agency 4 Install the drain plug P 5 Using a filter wrench turn the filter cartridge 1 to the left to remove it 6 Clean the...

Page 239: ...h clean fuel lightly apply fuel on the packing and mount the cartridge on the filter base 6 When installing tighten about one rotation with a filter wrench after turning it to the right and the packin...

Page 240: ...the plug F is facing up and that the plug F and the plug P are positioned perpendicular to the ground 2 Place a container to collect the drained oil underneath the plug P 3 Remove the plug G using an...

Page 241: ...g slowly Oil replacement quantity 0 6 litres each for left and right Have an Allen key ready 1 Make sure the plug F is facing up and that the plug F and the plug P are positioned perpendicular to the...

Page 242: ...lug P is pointed directly towards the ground 4 Place a container to collect the drained oil underneath the plug P 5 Loosen the plug P slowly using an Allen key and remove it while releasing the intern...

Page 243: ...Check and clean the fuel injection valve and fuel injection pump Special tools are required for inspection and maintenance Contact us or our sales service agent 2 INSPECTION OF CRANKCASE BREATHER Cra...

Page 244: ...rns Begin work after the temperature has dropped When removing the cap of oil inlet there is a risk of oil spurting out Take care to turn it slowly while removing internal pressure Replaced oil 28 5 l...

Page 245: ...lug P after draining Tightening torque of the drain plug is 44 1 to 53 9 N m 4 5 to 5 5 kg m When opening the drain valve P be careful not to get exposed to splashes of oil 6 Loosen the hose clamp 3 a...

Page 246: ...internal pressure from the radiator 3 With no pressure in the radiator give further turning of the radiator cap 1 until it reaches the stopper while holding it down Remove the radiator cap 1 4 Place...

Page 247: ...y tap water soft water to the radiator through the radiator supply port up to the supply port and close the radiator cap 1 11 Drain the cooling water in the sub tank and then wash the inside 12 Supply...

Page 248: ...240 This Page Intentionally Left Blank...

Page 249: ...241 SPECIFICATIONS 1 PRINCIPAL SPECIFICATIONS LIST 242 2 SPECIFICATION DIMENSIONAL DRAWING 243 3 RATED TOTAL LOAD CHART 244 4 WORKING RADIUS LIFTING HEIGHT 247...

Page 250: ...ype Double acting hydraulic cylinder direct thrusting system Derricking angle Time 0 to 80 deg 12 sec Slewing system Type Fixed capacity piston type brake valve with pivot axis brakes Slewing angle Sp...

Page 251: ...243 2 SPECIFICATION DIMENSIONAL DRAWING...

Page 252: ...980 3 00 900 450 900 900 3 50 720 360 720 720 4 00 600 300 600 600 4 50 500 250 500 500 4 70 460 230 460 460 5 00 430 430 5 50 370 370 6 00 330 330 6 54 290 290 7 00 260 7 50 235 8 00 215 8 38 200 Boo...

Page 253: ...50 900 900 3 50 720 360 720 720 4 00 600 300 600 600 4 50 500 250 500 500 4 70 460 230 460 460 5 00 430 430 5 50 370 370 6 00 330 330 6 54 290 290 7 00 260 7 50 235 8 00 215 8 38 200 Boom length 3 18...

Page 254: ...750 750 3 50 720 360 720 720 4 00 600 300 600 600 4 50 500 250 500 500 4 70 460 230 460 460 5 00 430 430 5 50 370 370 6 00 330 330 6 54 290 290 7 00 260 7 50 235 8 00 215 8 38 200 Boom length 3 18 m b...

Page 255: ...247 4 WORKING RADIUS LIFTING HEIGHT 4 Fall Wire Rope...

Page 256: ...248 This Page Intentionally Left Blank...

Page 257: ...TY PRECAUTIONS 250 2 NAMES OF SEARCHER HOOK PARTS 253 3 MONITOR INDICATION 254 4 MOMENT LIMITER OPERATION AND CANCELLING RECOVERY 256 5 OPERATION 258 6 INSPECTION AND MAINTENANCE 261 7 WORKING RADIUS...

Page 258: ...hrough the machine becoming damaged or overturning There may be no display for the searcher hook selector switch due to retrofit etc of the searcher hook In this case as work will be necessary to set...

Page 259: ...51 1 2 SAFETY LABEL LOCATIONS In this section only safety labels specifically relating to the searcher hook are described For other safety labels on the main machine see Safety 6 Safety Label Location...

Page 260: ...1 Pin Hole Warning 102 4608500 2 places 2 Searcher Hook Maximum Gross Rated Total Load 102 4621200 3 Searcher Hook Danger 103 4635500 4 Stowage Warning 103 4635800 5 Searcher Hook Performance 542 3586...

Page 261: ...253 2 NAMES OF SEARCHER HOOK PARTS 1 E boom 2 Bracket 3 Plate L 4 Plate R 5 Pin 6 Positioning pin 7 Linchpin 8 Hook 9 Shackle 10 Bolt A 11 Bolt B 12 Bolt C 13 Nut 14 High tension washer...

Page 262: ...254 3 MONITOR INDICATION 1 Searcher hook selector switch 2 Searcher hook position display...

Page 263: ...see Searcher Hook 1 1 Moment Limiter Settings When the searcher hook selector switch is pressed and held the position of the searcher hook changes and the moment limiter display switches to match the...

Page 264: ...This is a recovery condition only when the searcher hook is being used For searcher hook operation with a load capacity ratio of 90 or more be sure to slow down the engine speed and perform operation...

Page 265: ...he E boom and hook will interfere with each other NOTES When the boom angle reaches 40 degrees the boom hoisting operation stops automatically When the boom angle is 40 degrees or more the SH1 and Boo...

Page 266: ...for travelling operation and switch the searcher hook position of the moment limiter to no display stowage For operational methods for the crane see Operation 3 Machine Operation and Control 1 As sho...

Page 267: ...x the position pin 5 with linchpin 6 If the position pin 5 detaches during operation there is a risk of serious accident 7 Remove the linchpin 11 from the tip of the position pin 10 and remove the pos...

Page 268: ...ion For details concerning positions see Searcher Hook 1 1 Moment Limiter Settings 11 Firmly secure the load to hook 12 and begin work When lifting a load with a searcher hook lift it clear from the g...

Page 269: ...trength 10 9 4 pieces Every 6 months or when damage cracks or deformation is found Hexagonal bolt with washer M12 30L strength 10 9 4 pieces Every 6 months or when damage cracks or deformation is foun...

Page 270: ...d Maintenance Item Page 6 3 PRE OPERATION INSPECTION 263 6 3 1 INSPECTION BEFORE STARTING ENGINE 263 1 Inspection of boom and bracket 263 2 Inspection of searcher hook mounting bolts 263 3 Inspection...

Page 271: ...en if it is before its normal replacement time 3 Inspection of hook Check that the wire rope latch is working properly Replace or repair if any abnormality is found Rotate the hook and check that it r...

Page 272: ...th is minimum 3 2 m Displayed value of boom length when the boom length is maximum 8 7 m Displayed value of working radius with boom length set to 3 2 m boom stage 1 boom angle set to 50 0 degrees sea...

Page 273: ...correctly set the searcher hook position for the actual machine and the searcher hook position on the monitor Do not use the searcher hook and the hook block of the crane main body at the same time W...

Page 274: ...5 240 7 50 220 215 7 52 220 215 8 00 195 8 50 175 9 00 160 9 36 150 Boom length 3 18 m boom Boom fully retracted 5 03 m boom Boom length 3 19 m to 5 03 m 6 87 m boom Boom length 5 04 m to 6 87 m 8 71...

Page 275: ...NE CC423S 1 Document Number 542E OM1803 00 First Edition March 1st 2018 Issued by MAEDA SEISAKUSHO CO LTD 1095 Onbegawa Shinonoi Nagano City Nagano Prefecture 388 8522 Japan Any reproduction or reprin...

Page 276: ......

Page 277: ......

Page 278: ......

Reviews: