background image

Chapter 3

18 

Printing on customized paper 
sizes

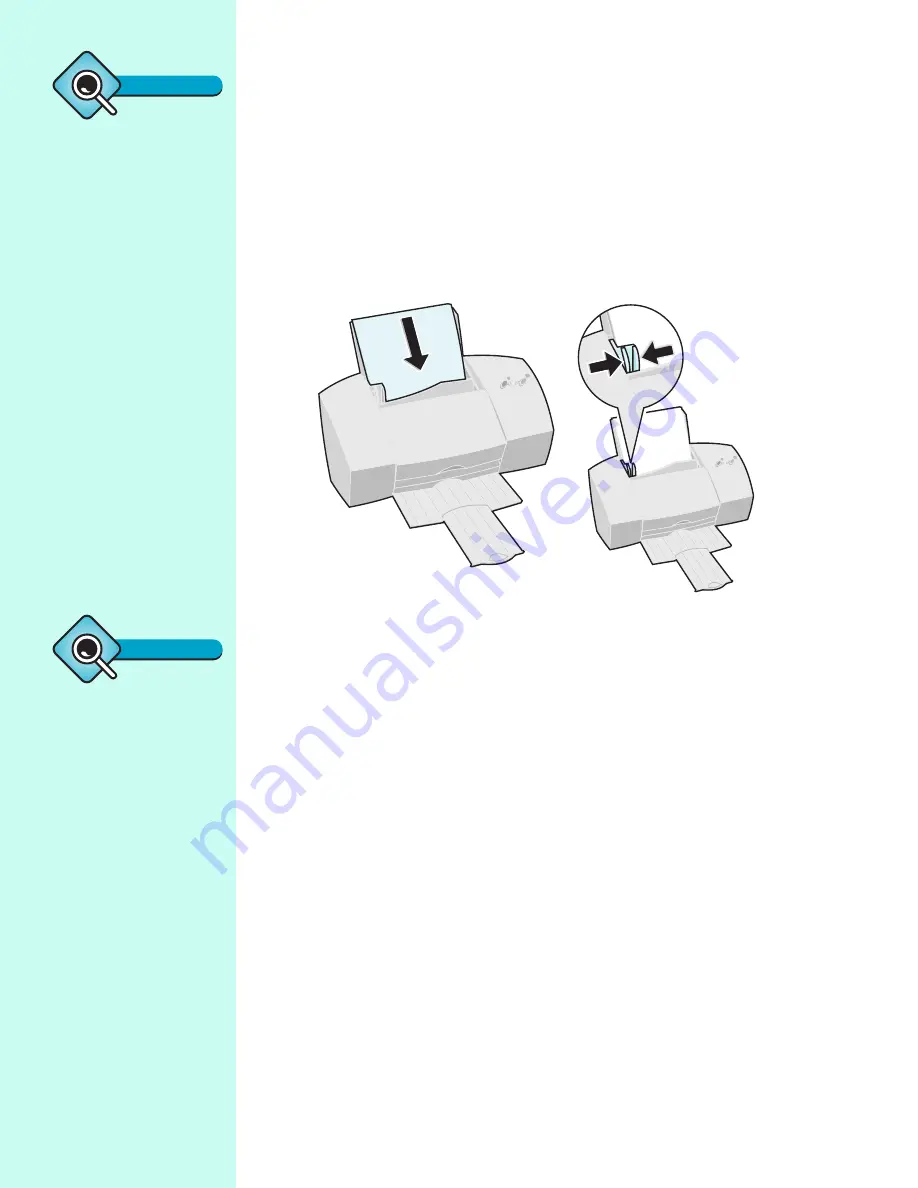
1

Load up to 25 sheets of specialty media or up to 100 sheets of plain 
paper against the right side of the automatic feeder. 

Squeeze the release tab and the 
paper guide together, and slide the 
paper guide to the edge of the paper.

Load the specialty media or plain 
paper with the print side facing 
you.

Tip

Printing near paper 
edges 

For the best print quality 
near paper edges, use these 
minimum margin settings in 
your application:

Set the left and right 
margin settings to at least 
6.35mm (0.25 in.) each for 
all paper sizes except A4.

For A4 paper sizes, set the 
left and right margin 
settings to at least 3.37mm 
(0.133 in.) each.

Set the top margin to at 
least 1.7mm (0.067 in.).

Set the bottom margin 
for all paper sizes to 
12.7mm (0.5 in.) for black 
printing and 19.5mm 
(0.75 in.) for color 
printing. 

Tip

Paper dimensions

You can use any paper size 
that fits within these 
dimensions:

Width

76.2 mm - 215.9 mm

3.0 inches - 8.5 inches

Height

127.0 mm - 431.8 mm

5.0 inches - 17.0 inches

Summary of Contents for Z31 Color Jetprinter

Page 1: ...User s Guide ...

Page 2: ...other countries Color Jetprinter is a trademark of Lexmark International Inc Windows is a registered trademark of Microsoft in the U S and other countries PCL is a registered trademark of the Hewlett Packard Company PCL 3 is Hewlett Packard Company s designation of a set of printer commands language and functions included in its printer products This printer is intended by Lexmark International In...

Page 3: ...ties 8 Using the Control Program 11 3 Printing on paper and other media 13 Printing on plain paper 13 Printing on specialty media 15 Printing transparencies 16 Printing envelopes or card stock 17 Printing on customized paper sizes 18 Printing greeting cards 20 Printing iron on transfers 21 Printing banners 22 Printing photos 24 Printing specialty media from the manual feeder 28 ...

Page 4: ...Appendix 41 Installing the printer software 41 Printing from Windows 3 1 or 3 11 41 Printing from Windows NT 4 0 42 Printing from DOS 43 Statement of Limited Warranty 44 Federal Communications Commission FCC Compliance Information Statement 45 Notices 46 Power Supply Information 46 Safety information 46 Index 49 ...

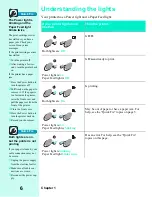
Page 5: ...inkjet printer that provides high quality text and graphics For information about See page Using the parts of the printer 2 Using the buttons 5 Understanding the lights 6 Glossary Inkjet A non impact printing technology that creates characters and graphics with programmed patterns of ink Chapter 1 ...

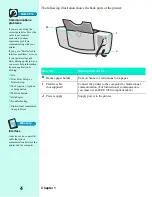
Page 6: ...per and specialty media straight in the automatic feeder C Automatic feeder Automatically load paper and specialty media The automatic feeder holds up to 100 sheets of paper 10 transparencies 25 sheets of photo paper or glossy film 25 iron on transfers 25 sheets of labels 10 envelopes greeting cards postcards or index cards A B C Quick Fix Quick Fix Printer has missing or damaged parts Contact you...

Page 7: ...may have plain paper loaded in the automatic feeder but you need to print an envelope or transparency Paper feeds incorrectly from the automatic feeder E Buttons and lights Check the printer status Turn the printer on or off Eject paper from the printer For more information see Using the buttons on page 5 and Understanding the lights on page 6 F Front cover Install or change print cartridges Clear...

Page 8: ...ons problems If you are not using the correct parallel cable or the cable is not securely connected you may experience problems communicating with your printer If you get a Parallel cable interface problems error or if your printer stops and starts during a print job you can access help information from an application by clicking 1File 2Print Print Setup or Printer Setup 3The Properties Options or...

Page 9: ...ress the Paper Feed but ton If the printer has a paper jam 1Press the Power button to turn the printer off 2Pull firmly on the paper to remove it If you cannot reach the paper because it is too far inside the printer raise the front cover and pull the paper out from the front of the printer 3Close the front cover 4Press the Power button to turn the printer back on 5Resend your document If the prob...

Page 10: ...t cartridge carrier has stalled or you have a paper jam Check your screen for any error messages If the print cartridge carrier has stalled 1Turn the printer off 2After waiting a few sec onds turn the printer back on If the printer has a paper jam 1Press the Power button to turn the printer off 2Pull firmly on the paper to remove it If the paper is too far inside the printer raise the front cover ...

Page 11: ...r printer several software applications were installed on your computer These applications allow you to perform printing tasks with the best printing results For information about using this application On this operating system See page Printer Properties Windows 95 98 8 Control Program Windows 95 98 11 Glossary Software application Any program loaded on your computer used to perform a specific ta...

Page 12: ... setting options click here Tip Tip To open the Printer Properties from a Windows application click 1File 2Print Print Setup or Printer Setup 3The Properties Options or Setup button Glossary Page orientation Indicates the direction of print placement and is identified as Portrait The longer side of the paper is vertical Landscape The longer side of the paper is horizontal Glossary Reverse page ord...

Page 13: ...ust your print quality and print speed here You can also reset your software to factory defaults Click here if you need any additional help Click Print Setup Note Overrides Some software applications may override the Paper Source Paper Size and Orientation settings in your printer software Glossary Printer driver A program that converts the data in a software applica tion to a format used by the p...

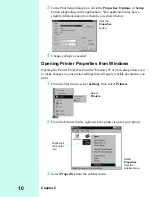
Page 14: ...from Windows Opening the Printer Properties from the Windows 95 or 98 desktop allows you to make changes to your printer settings that will apply to ALL documents you print 1 From the Start menu select Settings then select Printers 2 From the Printers folder right click the printer icon for your printer 3 Select Properties from the sidebar menu Click the Properties button Select Printers Right cli...

Page 15: ...rtridges Change settings for DOS printing View information about the software Cancel a print job Note Windows 3 1 and 3 11 In Windows 3 1 or 3 11 the Control Program has a sixth tab for Windows printing You can use this tab to open Printer Properties or Spool Manager Glossary Run minimized An option that allows the Control Program to run in the background rather than appearing on your screen each ...

Page 16: ...Chapter 2 12 ...
Page 17: ... multiple sheets at one time Make sure the paper is aligned against the right side of the automatic feeder Make sure the media guide is against the left edge of the paper Quick Fix Paper fails to feed 1Align the paper against the right side of the automatic feeder 2Make sure no more than 100 sheets of plain paper are loaded in the auto matic feeder 3Slide the paper guide against the left edge of t...

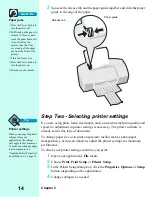
Page 18: ...n s File menu 2 Choose Print Print Setup or Printer Setup 3 In the Printer Setup dialog box click the Properties Options or Setup button depending on the application 4 Change setting s as needed Release tab Paper guide Quick Fix Paper jams 1Press the Power button to turn the printer off 2Pull firmly on the paper to remove it If you cannot reach the paper because it is too far inside the printer ra...

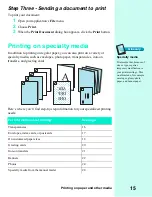
Page 19: ...er transparencies iron on transfers and greeting cards Here s where you ll find step by step information for your specialized printing needs For information about printing See page Transparencies 16 Envelopes index cards or postcards 17 On customized paper sizes 18 Greeting cards 20 Iron on transfers 21 Banners 22 Photos 24 Specialty media from the manual feeder 28 Glossary Specialty media Print m...

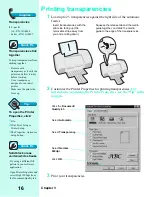
Page 20: ...ent Quality tab Select Automatic Select Normal 600dpi Click OK Select Transparency Supplies Transparencies 50 pack A4 P N 12A0808 Letter P N 12A0807 Quick Fix Transparencies stick together To keep transparencies from sticking together Remove each transparency as it exits the printer and allow it to dry before stacking Use a transparency designed for an inkjet printer Make sure the print side faces...

Page 21: ... envelopes index cards or postcards Click the Paper tab Click OK Use the scroll bar to select correct envelope or card size Select Landscape when printing envelopes Note DOS Printing When printing envelopes from a DOS application the recommended envelope orientation is reversed In DOS the envelope should be positioned so that the stamp is in the lower right corner Tip Envelope settings For best pr...

Page 22: ...ty near paper edges use these minimum margin settings in your application Set the left and right margin settings to at least 6 35mm 0 25 in each for all paper sizes except A4 For A4 paper sizes set the left and right margin settings to at least 3 37mm 0 133 in each Set the top margin to at least 1 7mm 0 067 in Set the bottom margin for all paper sizes to 12 7mm 0 5 in for black printing and 19 5mm...

Page 23: ...elect Custom paper size Enter the dimensions for the paper size you are using and click OK Click OK Click the Paper tab Tip To open Printer Properties click 1File 2Print Print Setup or Printer Setup 3The Properties Options or Setup button Glossary Letter A4 Letter size refers to a sheet of paper measuring 216mm x 279 4mm 8 5 in x 11 in A4 is a standard paper size and refers to a sheet of paper mea...

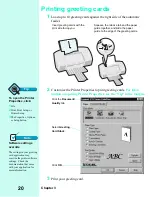
Page 24: ...uide together and slide the paper guide to the edge of the greeting cards Insert greeting cards with the print side facing you Select Greeting Card Stock Click OK Click the Document Quality tab Tip To open the Printer Properties click 1File 2Print Print Setup or Printer Setup 3The Properties Options or Setup button Note Software settings override The settings in your greeting card application may ...

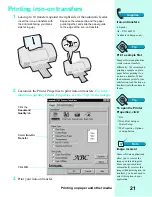
Page 25: ... Document Quality tab Supplies Iron on transfers 10 pack A4 P N 1402519 Available in Europe only Tip Print a sample first Many software applications create iron on transfers differently We recommend printing a sample on plain paper before printing it on an iron on transfer When the document prints to your satisfaction load the iron on transfer s into the automatic feeder Tip To open the Printer Pr...

Page 26: ...er holder on the back of the printer b Pull the banner paper support up c Insert banner paper into the banner paper holder Tip Inkjet banner paper Use banner paper recom mended for inkjets We do not recommend using the type of continuous form paper intended for dot matrix printers This kind of continuous form paper is designed for use with a different kind of ink ...

Page 27: ... edge of the banner d Insert the unattached edge of the first page into the automatic feeder Click OK Click the Paper tab Use the scroll bar to select Banner or Banner A4 paper size Tip To open the Printer Properties click 1File 2Print Print Setup or Printer Setup 3The Properties Options or Setup button Tip Removing extra banner paper If you loaded more paper than you needed 1Tear off your banner ...

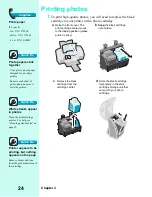
Page 28: ...rarily in the print cartridge storage unit that came with your photo cartridge Supplies Photo paper 20 pack A4 P N 1372208 Letter P N 1372481 4 x 6 P N 12A0099 Quick Fix Photo papers stick together Use a glossy photo paper designed for an inkjet printer Remove each sheet of glossy photo paper as it exits the printer Quick Fix White streaks appear in photos Clean the print cartridge nozzles For hel...

Page 29: ... Remove the sticker and tape covering the gold contact area of the photo print cartridge f Insert the photo cartridge g Snap the photo cartridge into place Click the Cartridges tab Click Install Change Cartridge Warning Cartridge handling Do NOT touch the gold contact area on the print cartridge Microscopic particles may clog the print nozzles Supplies Photo cartridge P N 12A1990 Tip To open the C...

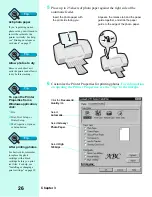
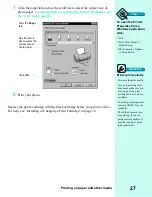
Page 30: ...hoto Paper Select High 1200dpi Tip 4x6 photo paper If you re printing on 4x6 photo cards you will need to insert the cards into the printer vertically For help see Printing envelopes or card stock on page 17 Tip Allow photos to dry Remove each sheet as it exits the printer and allow it to dry before stacking Tip To open the Printer Properties from a Windows application click 1File 2Print Print Set...

Page 31: ...the Paper tab Use the scroll bar to select the correct size of photo paper Click OK Tip To open the Printer Properties from a Windows application click 1File 2Print Print Setup or Printer Setup 3The Properties Options or Setup button Quick Fix Printer prints slowly Decrease the print quality If you are printing a text document make sure you are using a black print cartridge and not a photo cartrid...

Page 32: ...e sheet at a time making sure your paper rests against the right side of the manual feeder When printing envelopes or card stock make sure your envelope or card is inserted vertically as shown and rests against the right side of the manual feeder Glossary Specialty media Print media that because of size or type requires temporary modification to your printer settings This would include for example...

Page 33: ...cartridges 30 Removing a print cartridge from the printer 30 Installing or changing a print cartridge 30 Completing the cartridge installation 31 Improving print quality 32 Aligning print cartridges 32 Cleaning print nozzles 35 Wiping print nozzles and contacts 37 Cleaning print cartridge carrier contacts 39 Preserving print cartridges 40 Glossary Print cartridge The ink reservoir and printhead un...

Page 34: ... printer and update the printer software to reflect the changes you made Raise the front cover The print cartridge carrier moves to the loading position unless the printer is busy Pull the handle of the print cartridge you are replacing toward you until you hear a snap Remove the print cartridge by lifting it up and out of the printer a b c Supplies Black cartridge Standard yield P N 12A1970 High ...

Page 35: ...Program If you are installing a new cartridge remove the sticker and tape covering the gold contact area of the print cartridge Insert the replacement print cartridge into the print cartridge carrier Push back firmly on the cartridge until it snaps securely into place a b c Warning Cartridge Handling Do NOT touch the gold contact area on the print cartridge Microscopic particles may clog the print...

Page 36: ...ing to your satisfaction you may need to clean the print nozzles Aligning print cartridges Normally you only align the print cartridges after you have installed a new print cartridge However if the black portions of a graphic or text do not align properly with the color portions you need to realign the print cartridges Click the Cartridges tab Click Install Change Cartridge Tip To open the Control...

Page 37: ...Tip in the margin Aligned Misaligned Click the Cartridges tab Select the Align Cartridges button Tip Cartridge alignment Align the print cartridges when Characters are not aligned correctly at left margin The black portions of a graphic or text do not align properly with the color portions Vertical lines appear wavy Tip To open the Control Program click 1Start 2Programs 3Lexmark Z31 Series 4Lexmar...

Page 38: ...nted test page of the appropriate alignment settings 4 After you have entered a number for all of the patterns click OK Sample group A pattern 4 For example select 4 from A Horizontal Note Alignment page The alignment page that you print may look different from the example shown here Tip Print quality suggestions Make sure you are using a paper designed especially for inkjet printing If you are us...

Page 39: ...uccessful Clean the print nozzles when you suspect the nozzles are clogged or when characters are not printing completely 1 Make sure plain paper is loaded in the printer 2 Use the Control Program to run the nozzle test For information on opening the Control Program see the Tip in the margin Click the Cartridges tab Click the Clean Print Nozzles button Tip To open the Control Program click 1Start ...

Page 40: ...s If the print quality of both lines is not satisfactory after running the test three times go to step 5 5 Remove and reinstall the print cartridge 6 Repeat the nozzle test 7 If the lines are still broken wipe the print cartridge nozzles For help see Wiping print nozzles and contacts on page 37 Broken lines indicate clogged nozzles Unbroken lines indicate clean nozzles Note Clean the print nozzles...

Page 41: ...ve dried ink hold the damp cloth against the nozzles for about three seconds Gently blot and wipe dry 2 Allow the gold colored area to dry Nozzles Quick Fix Printer prints unexpected or missing characters Make sure your Lexmark Color Jetprinter s printer driver is set as the default printer Your printer may have bi directional communication problems For help see Bidirectional communi cations probl...

Page 42: ...cts for about three seconds Gently blot and wipe dry 4 Allow the gold colored area to dry 5 Reinstall the print cartridge and repeat the nozzle test For help see Cleaning print nozzles on page 35 6 If the nozzle test line is still broken clean the print cartridge carrier contacts For help see Cleaning print cartridge carrier contacts on page 39 Contacts Warning Cartridge handling Do NOT wipe the n...

Page 43: ...he front cover 6 Plug the printer power supply into an electrical outlet If the print quality has not improved after this cleaning process replace your print cartridge If print quality still does not improve your printer may require service Carrier contacts Note Cartridge carrier positioning Unplugging the power supply forces the cartridge carrier to remain in the loading position Quick Fix Ink sm...

Page 44: ...he print cartridge will not print correctly if removed from the printer and left exposed for an extended period of time If a print cartridge runs out of ink leave the empty cartridge in the printer until you are ready to replace it Printing with one of the print cartridge carriers empty may cause printer problems Do not refill print cartridges Refilling empty print cartridges may invalidate your w...

Page 45: ...r computer is on and Windows is running IMPORTANT If Windows displays a message indicating your printer has been found select Cancel If the Update Device Driver Wizard appears select Cancel 2 Insert Setup Disk 1 into your disk drive 3 From the Start menu choose Run 4 In the command line text box type the letter of your disk drive followed by setup for example a setup and then click OK 5 When promp...

Page 46: ...pen the Spool Manager from the Control Program 1 From the Lexmark Z31 program group double click the Control Program icon 2 Click the Windows Printing tab 3 Click the Spool Manager button Printing from Windows NT 4 0 Using the Control Program The Control Program appears each time you send a job to print Use the Control Program when you want to Cancel a print job Enable Control Program options Moni...

Page 47: ...in your DOS application to change printer settings Use the following steps only if you want to change a printer setting that does not exist in your DOS application Settings in your DOS application override settings in the driver 1 From the Control Program click the DOS Printing tab For help opening the Control Program see Using the Printer Properties on page 8 2 Change settings as needed Note When...

Page 48: ... information that came with your printer Lexmark Z31 Color Jetprinter This Statement of Limited Warranty applies to this product if it was originally purchased for your use and not for resale from Lexmark or a Lexmark remarketer referred to in this statement as Remarketer Warranty Lexmark warrants that this product Is manufactured from new parts or new and serviceable used parts which perform like...

Page 49: ...consequential damages This is true even if you advise Lexmark or a Remarketer of the possibility of such damages Lexmark is not liable for any claim by you based on a third party claim This limitation of remedies also applies to any developer of materials supplied to Lexmark Lexmark s and the developer s limitations of remedies are not cumulative Such developer is an intended beneficiary of this l...

Page 50: ...his program As an Energy Star Partner Lexmark International Inc has determined that this product meets the Energy Star guidelines for energy efficiency Power Supply Information If your power supply fails replace it with the Lexmark replacement part or other UL LISTED Direct Plug In Power Unit marked Class 2 and rated 30 Vdc at 830 mA Safety information If your product is NOT marked with this symbo...

Page 51: ...sjon som ikke er direkte beskrevet i bruksanvisningen Dette produktet er utviklet testet og god kjent i overensstemmelse med strenge verdensomspennende sikkerhetsstan darder for bestemte Lexmark deler Delenes sikkerhetsfunksjoner kan være skjulte Lexmark er ikke ansvarlig for bruk av uoriginale reservedeler Säkerhetsanvisningar Om produkten INTE är märkt med denna symbol MÅSTE den anslutas till et...

Page 52: ...ais de segurança para uso de compo nentes específicos da Lexmark Os recursos de segurança de alguns compo nentes podem não ser sempre óbvios A Lexmark não é responsável pelo uso de outros componentes de substituição ...

Page 53: ...printing 20 selecting in Printer Properties 20 software overrides 20 index 17 printing 17 selecting in Printer Properties 17 software overrides 17 carrier contacts cleaning 39 cartridge carrier print contact cleaning 39 loading position 39 cartridge print aligning 33 caring for 29 definition 29 disposal 30 handling 25 31 37 38 ink levels 32 installing 30 ordering 30 preserving 40 removing 30 repla...

Page 54: ... software application 7 specialty media 15 28 greeting cards printing 20 selecting in Printer Properties 20 software overrides 20 H handling print cartridges 37 38 I improving print quality 32 index cards printing 17 Industry Canada Compliance Statement 46 ink levels checking 32 Ink Low message 31 inkjet definition 1 installing a print cartridge 30 interface definition 4 iron on transfers ordering...

Page 55: ...us form 22 error lights 5 jams 14 loading 13 printing 13 recommended banner 22 photo 25 paper exit tray locating 3 using 3 paper feed problems multiple sheets 13 paper fails to feed 13 paper jam 6 14 Paper Feed button 5 locating 5 using 5 Paper Feed light 6 error 5 6 understanding 6 paper feeder automatic 2 paper feeder manual 3 paper guide locating 2 using 1 2 paper support locating 2 using 2 Pap...

Page 56: ... Windows 95 98 10 from in Windows 3 1 or 3 11 9 Document Quality tab 9 opening from from application 9 Paper tab 8 using 9 printer settings changing 14 checking 14 printer software Control Program 8 11 downloading printer driver 41 installing using diskettes 41 using the CD ROM 41 Printer Properties 8 9 updating 31 using 7 8 printing banners 22 card stock 17 continuous forms 22 customized paper si...

Page 57: ...Manager using 42 storage unit print cartridge using 30 supplies ordering iron on transfers 21 photo cartridge 25 photo paper 24 power supply 47 print cartridge 30 transparencies 16 T text printing 32 transfers iron on ordering 21 printing 21 selecting in Printer Properties 21 transparencies printing 16 problems contain white streaks 16 solid black areas 16 stick together 16 troubleshooting dark pr...

Page 58: ...tain white streaks 16 solid black areas 16 stick together 16 unexpected or missing characters 37 white dashes 36 white lines 36 U United Kingdom Telecommunications Act 1984 47 W Warranty 45 Windows 3 1 or 3 11 42 Windows NT 4 0 42 Windows NT documentation 1 ...

Reviews: