


2-60
Service Manual
4060-
xxx
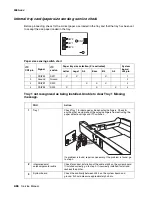
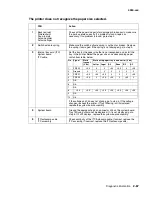
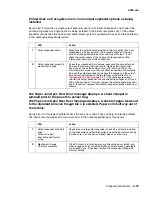
Paper size switch not selecting paper size that is selected.
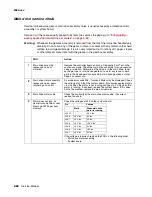
24
x
Paper Jam Check Tray
x
displays when tray
x
is empty. Tray
x
does not
display.
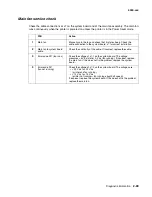
Tray
x
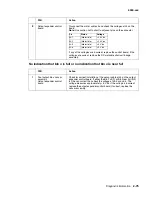
Empty displays. Tray does not respond to loading paper. No response
from the front door switch.
FRU
Action
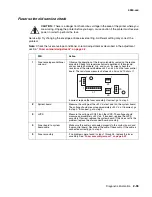
1
Paper size switch
High-capacity feeder option
control board
Check for continuity between the common pin (J5-1) and the pin of
the paper size selected.
If any position does not measure continuity when selected, replace
the paper size switch assembly. If the switch assembly is operating
correctly, replace the high-capacity feeder option control board.
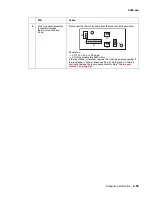
FRU
Action
1
High-capacity feeder option
control board
Check the voltages on the board at J4-1(red) and J4-3 (blue). The
voltages measure approxi5 V dc. If incorrect, disconnect J4
from the board and measure the voltages again. If incorrect, replace
the high-capacity feeder option control board.
2
Elevator top optical sensor
cable
Elevator top optical sensor
Check the continuity of the sensor cable. If incorrect, replace the
cable. If correct, replace the top optical sensor assembly.
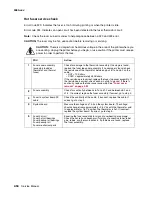
FRU
Action
1
High-capacity feeder option
control board
Check the voltage on the board at J4-2 (green). The voltage
measures approxi5 V dc. If incorrect, disconnect the cable at
J4 and check the voltage again. If incorrect, replace the high-capacity
feeder option control board.
2
Elevator top optical sensor
cable
Elevator top optical sensor
Check the continuity of the sensor cable. If incorrect, replace the
cable. If correct, replace the top optical sensor assembly.
Pin
Color
Paper size
J5-1
Black
Common lead
J5-2
Blue
B5
J5-3
Green
Executive
J5-4
Yellow
A4
J5-5
Orange
Letter
J5-6
Red
Legal
J5-7
Brown
A5
Summary of Contents for T63 Series
Page 13: ...Laser notices xiii 4060 xxx Japanese Laser Notice ...
Page 14: ...xiv Service Manual 4060 xxx Korean Laser Notice ...
Page 34: ...1 16 Service Manual 4060 xxx ...
Page 218: ...4 64 Service Manual 4060 xxx ...
Page 236: ...6 2 Service Manual 4060 xxx ...
Page 238: ...7 2 Service Manual 4060 xxx Assembly 1 Covers ...
Page 240: ...7 4 Service Manual 4060 xxx Assembly 2 Frame 1 5 2 1 3 4 3 4 8 6 7 ...
Page 252: ...7 16 Service Manual 4060 xxx Assembly 9 Paper feed alignment 3 2 1 4 ...
Page 258: ...7 22 Service Manual 4060 xxx Assembly 12 Drives Main drive and developer drive 3 2 4 1 7 6 5 ...
Page 260: ...7 24 Service Manual 4060 xxx Assembly 13 Hot roll fuser 3 7 5 2 6 4 1 5 8 7 9 ...
Page 262: ...7 26 Service Manual 4060 xxx Assembly 14 Transfer charging 3 2 4 1 5 6 7 9 10 8 ...
Page 264: ...7 28 Service Manual 4060 xxx Assembly 15 Electronics power supplies 3 7 5 2 6 4 1 ...
Page 266: ...7 30 Service Manual 4060 xxx Assembly 16 Electronics card assemblies 3 1 4 5 6 9 2 4 7 8 10 ...
Page 268: ...7 32 Service Manual 4060 xxx Assembly 17 Electronics shields ...
Page 270: ...7 34 Service Manual 4060 xxx Assembly 18 Cabling diagrams 1 3 1 2 4 5 6 7 8 7 4 ...
Page 272: ...7 36 Service Manual 4060 xxx Assembly 19 Cabling diagrams 2 HVPS LVPS 3 5 4 1 2 6 ...
Page 276: ...7 40 Service Manual 4060 xxx Assembly 21 250 sheet paper tray ...
Page 284: ...7 48 Service Manual 4060 xxx Assembly 23 Duplex option 1 ...
Page 286: ...7 50 Service Manual 4060 xxx Assembly 24 Envelope feeder 3 11 7 13 5 9 2 10 6 4 12 8 14 1 ...
Page 288: ...7 52 Service Manual 4060 xxx Assembly 25 Output expander ...
Page 290: ...7 54 Service Manual 4060 xxx Assembly 25 cont Output expander ...
Page 292: ...7 56 Service Manual 4060 xxx Assembly 26 High capacity output expander ...
Page 296: ...7 60 Service Manual 4060 xxx Assembly 27 5 bin mailbox ...
Page 298: ...7 62 Service Manual 4060 xxx Assembly 27 cont 5 bin mailbox ...
Page 300: ...7 64 Service Manual 4060 xxx Assembly 28 High capacity feeder 1 ...
Page 320: ...7 84 Service Manual 4060 xxx Assembly 38 StapleSmart finisher 4 1 ...
Page 344: ...I 20 Service Manual 4060 xxx ...
Page 345: ......


