2-46
Service Manual
4060-
xxx
5
LVPS
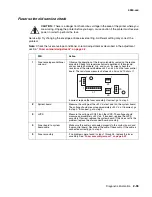
Unplug the AC line cord from the LVPS and disconnect the
interconnect card cable on the LVPS. Reconnect the AC line cord
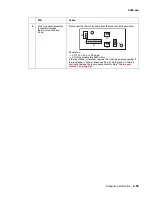
and measure the voltage on CN2-1 on the LVPS. The voltage should
measure approxi5 V dc.
If the voltage is correct, go to step 6. If the voltage is incorrect, go to
step 10.
6
Interconnect board
Unplug the AC line cord from the LVPS and reconnect the
interconnect board cable to CN2 on the LVPS. Reconnect the AC
line cord, turn the machine on and measure the voltage at the +5 V
test point on the interconnect board. The voltage should read
approxi5 V dc.
If correct, replace the following FRUs in the order shown:
• System board
• Interconnect board
If the voltage is incorrect, go to step 7.
7
Interconnect board
Unplug the AC line cord from the LVPS, remove the inner shield and
system board assembly from the interconnect board.
Note:
The inner shield with system board attached can be moved far
enough away from the printer to access the interconnect board
voltage test points.
Measure the voltage at the +5 V test point on the interconnect board.
The voltage should m5 V dc. If correct, go to step 11. If
incorrect, go to step 8.
8
Communications card
Turn the printer off and remove the communications card. Check the
voltage at the 5 V test point on the interconnect board.
If the voltage is correct, replace the communication card assembly. If
the voltage is incorrect, go to step 9.
9
Features or option installed
on the interconnect board
assembly
Warning:
Observe all the ESD precautions and turn the printer off
before any feature or option cards are removed or replaced.
Remove one option/feature at a time to help isolate the failing part.
Replace the faulty part.
10
LVPS fuse F1 (primary
power)
Unplug the AC line cord, remove the LVPS from the printer, and
check the continuity of fuse F1. See
“Low voltage power supply
removal” on page 4-42
.
If continuity is correct, replace the LVPS assembly.
If continuity is incorrect, replace fuse F1 and measure the voltage at
CN2-1. If the voltage is correct, reconnect the interconnect board
cable, reinstall the system board, and recheck the printer for a dead
machine condition. If the printer is still inoperative, go to step 11.
If the voltage is incorrect, replace the LVPS assembly.
FRU
Action
CN2
1
9
10
18
J4
J5
F2
F1
+24V
+5V
Test
Points
Summary of Contents for T63 Series
Page 13: ...Laser notices xiii 4060 xxx Japanese Laser Notice ...
Page 14: ...xiv Service Manual 4060 xxx Korean Laser Notice ...
Page 34: ...1 16 Service Manual 4060 xxx ...
Page 218: ...4 64 Service Manual 4060 xxx ...
Page 236: ...6 2 Service Manual 4060 xxx ...
Page 238: ...7 2 Service Manual 4060 xxx Assembly 1 Covers ...
Page 240: ...7 4 Service Manual 4060 xxx Assembly 2 Frame 1 5 2 1 3 4 3 4 8 6 7 ...
Page 252: ...7 16 Service Manual 4060 xxx Assembly 9 Paper feed alignment 3 2 1 4 ...
Page 258: ...7 22 Service Manual 4060 xxx Assembly 12 Drives Main drive and developer drive 3 2 4 1 7 6 5 ...
Page 260: ...7 24 Service Manual 4060 xxx Assembly 13 Hot roll fuser 3 7 5 2 6 4 1 5 8 7 9 ...
Page 262: ...7 26 Service Manual 4060 xxx Assembly 14 Transfer charging 3 2 4 1 5 6 7 9 10 8 ...
Page 264: ...7 28 Service Manual 4060 xxx Assembly 15 Electronics power supplies 3 7 5 2 6 4 1 ...
Page 266: ...7 30 Service Manual 4060 xxx Assembly 16 Electronics card assemblies 3 1 4 5 6 9 2 4 7 8 10 ...
Page 268: ...7 32 Service Manual 4060 xxx Assembly 17 Electronics shields ...
Page 270: ...7 34 Service Manual 4060 xxx Assembly 18 Cabling diagrams 1 3 1 2 4 5 6 7 8 7 4 ...
Page 272: ...7 36 Service Manual 4060 xxx Assembly 19 Cabling diagrams 2 HVPS LVPS 3 5 4 1 2 6 ...
Page 276: ...7 40 Service Manual 4060 xxx Assembly 21 250 sheet paper tray ...
Page 284: ...7 48 Service Manual 4060 xxx Assembly 23 Duplex option 1 ...
Page 286: ...7 50 Service Manual 4060 xxx Assembly 24 Envelope feeder 3 11 7 13 5 9 2 10 6 4 12 8 14 1 ...
Page 288: ...7 52 Service Manual 4060 xxx Assembly 25 Output expander ...
Page 290: ...7 54 Service Manual 4060 xxx Assembly 25 cont Output expander ...
Page 292: ...7 56 Service Manual 4060 xxx Assembly 26 High capacity output expander ...
Page 296: ...7 60 Service Manual 4060 xxx Assembly 27 5 bin mailbox ...
Page 298: ...7 62 Service Manual 4060 xxx Assembly 27 cont 5 bin mailbox ...
Page 300: ...7 64 Service Manual 4060 xxx Assembly 28 High capacity feeder 1 ...
Page 320: ...7 84 Service Manual 4060 xxx Assembly 38 StapleSmart finisher 4 1 ...
Page 344: ...I 20 Service Manual 4060 xxx ...
Page 345: ......


